open【部署、使用教程】
目录
【1】创建证书
【2】安装openVPN-Server端并配置
【3】将证书移动到相对路径
【4】开启内核转发功能,否则会无法启动openVPN
【5】启动服务,加入开机自启
【6】启动后服务端会生成一个tun0的虚拟网卡,用于不同网段之间相互通信
【7】安装openVPN-client(windows)
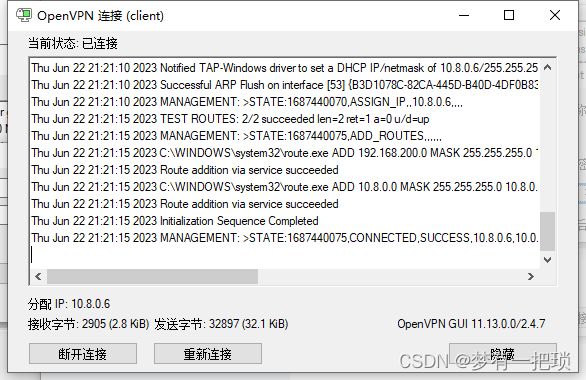
【9】打开客户端软件,点击连接,后会生成一个虚拟ip地址与服务端互相通信
【10】客户端尝试ping服务端虚拟VPN地址
【11】客户端访问后端内部节点
【12】后端节点抓包,查看数据传输过程
【13】 如果向上面一样配置后端路由规则,如果节点过多怎么办
【14】双重认证(密钥+用户名+密码认证的登录方式)
【15】实现方式
【16】客户端再次测试使用VPN连接
【17】客户端通过VPN服务访问jumpserver
- VPN就是虚拟专用通道(假的网络),就是将两个不同的网络通过建立一条虚拟隧道的方式连接起来,提供安全的数据传输隧道
- 是linux下开源的软件,提供了良好的性能和友好的用户GUI
| 主机 | 公网 | 私网 |
| openVPN server | 10.0.0.10 | 192.168.200.10 |
| opevVPN client | windows |
【1】创建证书
[root@open-server ~]# yum -y install easy-rsa

# 生成密钥证书,需要准备vars【变量】文件,充当CA权威机构
[root@open-server ~]# mkdir /opt/easy-rsa
[root@open-server ~]# cd /opt/easy-rsa/
[root@open-server easy-rsa]# /usr/bin/cp -a /usr/share/easy-rsa/3.0.8/* ./
[root@open-server easy-rsa]# /usr/bin/cp -a /usr/share/doc/easy-rsa-3.0.8/vars.example ./vars
[root@open-server easy-rsa]# >vars
[root@open-server easy-rsa]# vim vars
if [ -z "$EASYRSA_CALLER" ]; then
        echo "You appear to be sourcing an Easy-RSA 'vars' file." >&2
        echo "This is no longer necessary and is disallowed. See the section called" >&2
        echo "'How to use this file' near the top comments for more details." >&2
        return 1
fi
set_var EASYRSA_DN "cn_only"
set_var EASYRSA_REQ_COUNTRY "CN"
set_var EASYRSA_REQ_PROVINCE "Beijing"
set_var EASYRSA_REQ_CITY "shanghai"
set_var EASYRSA_REQ_ORG "test"
set_var EASYRSA_REQ_EMALL "**48925*[email protected]"
set_var EASYRSA_NS_SUPPORT "yes"- 初始化生成证书
# 1、初始化、创建PKI目录,用于存放证书
[root@open-server easy-rsa]# ./easyrsa init-pki

Note: using Easy-RSA configuration from: /opt/easy-rsa/vars

init-pki complete; you may now create a CA or requests.
Your newly created PKI dir is: /opt/easy-rsa/pki

[root@open-server easy-rsa]#

# 2、创建根证书,会提示设置密码,用于CA对之后生成的server和client证书签名时使用,其余默认
[root@open-server easy-rsa]# ./easyrsa build-ca

Note: using Easy-RSA configuration from: /opt/easy-rsa/vars
Using SSL: openssl OpenSSL 1.0.1e-fips 11 Feb 2013

Enter New CA Key Passphrase: 1234
Re-Enter New CA Key Passphrase: 1234
Generating RSA private key, 2048 bit long modulus
.....+++
......+++
e is 65537 (0x10001)
You are about to be asked to enter information that will be incorporated
into your certificate request.
What you are about to enter is what is called a Distinguished Name or a DN.
There are quite a few fields but you can leave some blank
For some fields there will be a default value,
If you enter '.', the field will be left blank.
-----
Common Name (eg: your user, host, or server name) [Easy-RSA CA]: 回车

CA creation complete and you may now import and sign cert requests.
Your new CA certificate file for publishing is at:
/opt/easy-rsa/pki/ca.crt

[root@open-server easy-rsa]#

# 3、创建server端证书和私钥文件,nopass表示不加密私钥文件,其余默认
[root@open-server easy-rsa]# ./easyrsa gen-req server nopass

Note: using Easy-RSA configuration from: /opt/easy-rsa/vars
Using SSL: openssl OpenSSL 1.0.1e-fips 11 Feb 2013
Generating a 2048 bit RSA private key
...............................................................................................................................................................+++
..............+++
writing new private key to '/opt/easy-rsa/pki/easy-rsa-2332.7jdnuc/tmp.35IQjh'
-----
You are about to be asked to enter information that will be incorporated
into your certificate request.
What you are about to enter is what is called a Distinguished Name or a DN.
There are quite a few fields but you can leave some blank
For some fields there will be a default value,
If you enter '.', the field will be left blank.
-----
Common Name (eg: your user, host, or server name) [server]: 回车

Keypair and certificate request completed. Your files are:
req: /opt/easy-rsa/pki/reqs/server.req
key: /opt/easy-rsa/pki/private/server.key

[root@open-server easy-rsa]#

# 4、给srver端证书签名,首先是对一些信息的确认,可以输入yes,然后创建ca根证书时设置的密码
[root@open-server easy-rsa]# ./easyrsa sign server server

Note: using Easy-RSA configuration from: /opt/easy-rsa/vars
Using SSL: openssl OpenSSL 1.0.1e-fips 11 Feb 2013


You are about to sign the following certificate.
Please check over the details shown below for accuracy. Note that this request
has not been cryptographically verified. Please be sure it came from a trusted
source or that you have verified the request checksum with the sender.

Request subject, to be signed as a server certificate for 825 days:

subject=
    commonName                = server


Type the word 'yes' to continue, or any other input to abort.
  Confirm request details: yes
Using configuration from /opt/easy-rsa/pki/easy-rsa-2359.ZPaCfY/tmp.pzKHq7
Enter pass phrase for /opt/easy-rsa/pki/private/ca.key: 1234证书的密码
Check that the request matches the signature
Signature ok
The Subject's Distinguished Name is as follows
commonName            :PRINTABLE:'server'
Certificate is to be certified until Sep 24 12:20:30 2025 GMT (825 days)

Write out database with 1 new entries
Data Base Updated

Certificate created at: /opt/easy-rsa/pki/issued/server.crt

[root@open-server easy-rsa]#

# 5、创建Diffie-Hellman文件,密钥交换时的Diffie-Hellman算法
[root@open-server easy-rsa]# ./easyrsa gen-dh
...................................
...................................
................................................+....................+.++*++*

DH parameters of size 2048 created at /opt/easy-rsa/pki/dh.pem

# 6、创建client端证书和私钥文件,nopass表示不加密私钥文件,其余默认
[root@open-server easy-rsa]# ./easyrsa gen-req client nopass

Note: using Easy-RSA configuration from: /opt/easy-rsa/vars
Using SSL: openssl OpenSSL 1.0.2k-fips  26 Jan 2017
Generating a 2048 bit RSA private key
..........+++
...................................+++
writing new private key to '/opt/easy-rsa/pki/easy-rsa-3284.fskfny/tmp.M4Zywm'
-----
You are about to be asked to enter information that will be incorporated
into your certificate request.
What you are about to enter is what is called a Distinguished Name or a DN.
There are quite a few fields but you can leave some blank
For some fields there will be a default value,
If you enter '.', the field will be left blank.
-----
Common Name (eg: your user, host, or server name) [client]:

Keypair and certificate request completed. Your files are:
req: /opt/easy-rsa/pki/reqs/client.req
key: /opt/easy-rsa/pki/private/client.key

# 7、给client端证书签名,首先是对一些信息的确认,可以输入yes,然后创建ca根证书时设置的密码
[root@open-server easy-rsa]# ./easyrsa sign client client

Note: using Easy-RSA configuration from: /opt/easy-rsa/vars
Using SSL: openssl OpenSSL 1.0.2k-fips  26 Jan 2017


You are about to sign the following certificate.
Please check over the details shown below for accuracy. Note that this request
has not been cryptographically verified. Please be sure it came from a trusted
source or that you have verified the request checksum with the sender.

Request subject, to be signed as a client certificate for 825 days:

subject=
    commonName                = client


Type the word 'yes' to continue, or any other input to abort.
  Confirm request details: yes
Using configuration from /opt/easy-rsa/pki/easy-rsa-3314.DRMnW8/tmp.pwtwdK
Enter pass phrase for /opt/easy-rsa/pki/private/ca.key:
Check that the request matches the signature
Signature ok
The Subject's Distinguished Name is as follows
commonName            :ASN.1 12:'client'
Certificate is to be certified until Sep 24 12:51:05 2025 GMT (825 days)

Write out database with 1 new entries
Data Base Updated

Certificate created at: /opt/easy-rsa/pki/issued/client.crt
【2】安装openVPN-Server端并配置
[root@open-server easy-rsa]# yum -y install open

# 修改配置文件
[root@open-server easy-rsa]# cd /etc/open/
[root@open-server open]# >server.conf
[root@open-server open]# vim server.conf
port 1194
proto udp
dev tun
ca ca.crt
cert server.crt
key server.key
dh dh.pem
server 10.8.0.0 255.255.255.0
ifconfig-pool-persist ipp.txt
push "route 192.168.200.0 255.255.255.0"
keepalive 10 120
max-clients 100
status open-status.log
verb 3
client-to-client
log /var/log/open.log
persist-key
persist-tun
duplicate-cn
【3】将证书移动到相对路径
[root@open-server open]# cp /opt/easy-rsa/pki/ca.crt ./
[root@open-server open]# cp /opt/easy-rsa/pki/issued/server.crt ./
[root@open-server open]# cp /opt/easy-rsa/pki/private/server.key ./
[root@open-server open]# cp /opt/easy-rsa/pki/dh.pem ./
【4】开启内核转发功能,否则会无法启动openVPN
[root@open-server open]# echo "net.ipv4.ip_forward = 1" >> /etc/sysctl.conf
[root@open-server open]# systemctl restart network
【5】启动服务,加入开机自启
[root@open-server open]# systemctl -f enable [email protected]
[root@open-server open]# systemctl start [email protected]

# 查看端口【 配置中是 udp协议 】
[root@open-server open]# netstat -lntpu | grep open
udp        0      0 0.0.0.0:1194            0.0.0.0:*                           3174/open
【6】启动后服务端会生成一个tun0的虚拟网卡,用于不同网段之间相互通信
[root@open-server open]# ifconfig tun
tun0: flags=4305  mtu 1500
        inet 10.8.0.1  netmask 255.255.255.255  destination 10.8.0.2
        unspec 00-00-00-00-00-00-00-00-00-00-00-00-00-00-00-00  txqueuelen 100  (UNSPEC)
        RX packets 0  bytes 0 (0.0 B)
        RX errors 0  dropped 0  overruns 0  frame 0
        TX packets 0  bytes 0 (0.0 B)
        TX errors 0  dropped 0 overruns 0  carrier 0  collisions 0
【7】安装openVPN-client(windows)
- 下载open软件包,安装(需要软件包的可以留言)
- 将服务端的证书保存到windows的open目录下
[root@open-server open]# cd /opt/easy-rsa/pki/
[root@open-server pki]# sz ca.crt

[root@open-server pki]# cd issued/
[root@open-server issued]# sz client.crt

[root@open-server issued]# cd ..
[root@open-server pki]# cd private/
[root@open-server private]# sz client.key
【8】创建client.o配置文件

client
dev tun
proto udp
remote 10.0.0.10 1194
resolv-retry infinite
nobind
ca ca.crt
cert client.crt
key client.key
verb 3
persist-key
persist-tun
【9】打开客户端软件,点击连接,后会生成一个虚拟ip地址与服务端互相通信

【10】客户端尝试ping服务端虚拟VPN地址

【11】客户端访问后端内部节点
- 当我们通过客户端访问后端时,因为后端没配置路由地址,返回不到数据

- 后端主机配置路由【需要配置10.8.0.0/24网段的路由】


- 客户端再次尝试 ping 后端主机访问测试

【12】后端节点抓包,查看数据传输过程

【13】 如果向上面一样配置后端路由规则,如果节点过多怎么办
- 解决办法:就需要在open的服务端做以下方式配置,不需要再后端配置了
[root@open-server ~]# systemctl start firewalld.service

[root@open-server ~]# firewall-cmd --add-service=open
success
[root@open-server ~]# firewall-cmd --add-service=open --permanent
success
[root@open-server ~]# firewall-cmd --add-masquerade
success
[root@open-server ~]# firewall-cmd --add-masquerade --permanent- 测试客户端是否能访问到后端节点

【14】双重认证(密钥+用户名+密码认证的登录方式)
- 首先第一点安全很重要,其次管理这些密钥和证书比较麻烦。
- 如果用户量多,不可能为每一个用户创建一套密钥,太麻烦
- 可以实现多个用户只是用一套证书,使用不同的用户+密码
- 新用户加入时,就只需要添加一个用户名和密码就行了
【15】实现方式
- 首先确保使用密钥可以链接VPN服务端。然后在配置密钥+用户名+密码的登录方式
[root@open-server ~]# cd /etc/open/
[root@open-server open]# vim server.conf
.........
.........
## 添加以下几行
script-security 3
auth-user-pass-verify /etc/open/check.sh via-env
username-as-common-name- 创建脚本文件
[root@open-server open]# vim check.sh
#!/bin/bash
PASSFILE="/etc/open/openfile"
LOG_FILE="/var/log/open-password.log"
TIME_STAMP=`date "+%Y-%m-%d %T"`
  if [ ! -r  "${PASSFILE}" ];then
    echo "${TIME_STAMP}: Could not open password file \"${PASSFILE}\" for reading." >> ${LOG_FILE}
    exit 1
  fi
  CORRECT_PASSWORD=`awk '!/^;/&&!/^#/&&$1=="'${username}'"{print $2;exit}' ${PASSFILE}`
  if [ "${CORRECT_PASSWORD}" = "" ];then
    echo "${TIME_STAMP}: User does not exist: username=\"${username}\", password=\"${password}\"." >> ${LOG_FILE}
    exit 1
  fi
  if [ "${password}" = "${CORRECT_PASSWORD}" ];then
    echo "${TIME_STAMP}: Successful authentication: username=\"${username}\"." >> ${LOG_FILE}
    exit 0
  fi
  echo "${TIME_STAMP}: Incorrect password: username=\"${username}\", password=\"${password}\"." >>${LOG_FILE}
exit 1- 脚本授权
[root@open-server open]# chmod +x check.sh - 创建用户名+密码的文件
[root@open-server open]# echo "admin admin123" >> /etc/open/openfile
[root@open-server open]# cat /etc/open/openfile
admin admin123- 重启open服务端
[root@open-server open]# systemctl restart [email protected]- 客户端配置修改

【16】客户端再次测试使用VPN连接
- 如果有新的成员加入需要使用客户端VPN连接内网主机,可以将客户端目录的证书+配置文件打包发给他
【17】客户端通过VPN服务访问jumpserver
- jumpserver【私网地址:192.168.200.160】
![]()
