Shiro教程(一):入门概述与基本使用
Shiro
第一章:入门概述
1.1 Shiro是什么
Apache.Shiro是一个功能强大且易于使用的Java安全(权限)框架。Shiro可以完成:认证、授权、加密、会话管理、与Web集成、缓存等。借助Shiro可以快速轻松地保护任何应用程序——从最小的移动应用程序到最大的Web和企业应用程序。
https://shiro.apache.org/

1.2 为什么使用Shiro
自2003年以来,框架格局发生了相当大的变化,因此今天仍然有很多系统在使用Shiro。这与Shiro的特性密不可分。
易于使用:使用Shiro构建系统安全框架非常简单。就算第一次接触也能快速掌握。
全面:Shiro包含系统完全框架需要的功能,满足安全需求的一站式服务。
灵活:Shiro可以在任何应用程序环境中工作。虽然它可以在Web、EJB和IoC环境中工作,但不需要依赖它们。Shiro也没有强制要求任何规范,甚至没有很多依赖项。
强力支持Web:Shiro具有出色的Web应用程序支持,可以基于应用程序URL和Web协议(例如REST)创建灵活的安全策略,同时还提供一组JSP库来控制页面输出。
兼容性强:Shiro的设计模式使其易于与其他框架和应用程序集成。Shiro与Spring、Grails、Wicket、Tapestry、Mule、Apache Camel、Vaadin等框架无缝集成。
社区支持:Shiro是Apache软件基金会的一个开源项目,有完备的社区支持,文档支持。如果需要,像Katasoft这样的商业公司也会提供专业的支持和服务。
1.3 Shiro与SpringSecurity的对比
- SpringSecurity基于Spring开发,项目若使用Spring作为基础,配合SpringSecurity做权限更加方便,而Shiro需要和Spring进行整合开发;
- SpringSecurity功能比Shiro更加丰富,例如安全维护方面;
- SpringSecurity社区资源相对比Shiro更加丰富;
- Shiro的配置和使用比较简单,SpringSecurity上手复杂些;
- Shiro依赖性低,不需要任何框架和容器,可以独立运行。SpringSecurity依赖Spring容器;
- Shiro不仅仅可以使用Web中,它可以工作在任何应用环境中。在集群会话时Shiro最重要的一个好处或许就是它的会话独立于容器的。
1.4 基本功能
认证登录授权、权限验证会话管理加密功能···
第二章:基本使用
2.1 环境准备
1、Shiro不依赖容器,直接创建
maven工程即可。
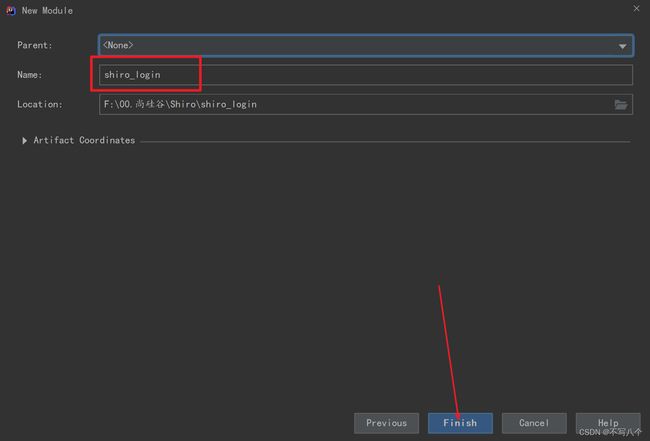
创建maven工程
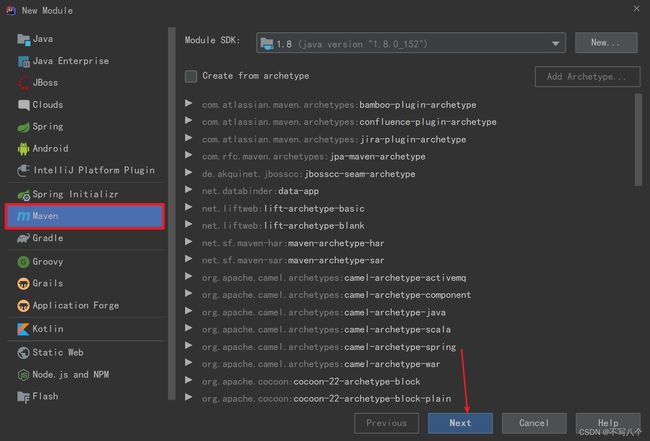
添加module
2、添加依赖
    <dependencies>
        <dependency>
            <groupId>org.apache.shirogroupId>
            <artifactId>shiro-coreartifactId>
            <version>1.9.0version>
        dependency>

        <dependency>
            <groupId>commons-logginggroupId>
            <artifactId>commons-loggingartifactId>
            <version>1.2version>
        dependency>
    dependencies>
2.2 INI文件
Shiro获取权限相关信息可以通过数据库获取,也可以通过ini配置文件获取。
1、创建
ini文件
在src/main/resources/下创建shiro.ini文件
[users]
zhangsan=z3
lisi=l4
2.3 登录认证
1、登录认证概念
- 身份验证:一般需要提供如身份ID等一些标识信息来表明登陆者的身份,如提供email,用户名,密码等。
- 在shiro中,用户需要提供principals(身份)和credentials(证明)给shiro,从而应用能验证用户身份。
- principals:身份,即主体的标识属性,可以是任何属性,如用户名、密码、邮箱,唯一即可。一个主体可以有多个principals,但只有一个Primary principals。一般是用户名、邮箱、手机号。
- credentials:证明,即只有主体知道的安全值,如密码、数字证书等。
- 最常见的principals和credentials组合就是用户名和密码。
2、登录认证基本流程
- 收集用户身份/凭证,即用户名/密码。
- 调用
Subject.login进行登录,如果失败将得到相应的AuthenticationException异常,根据异常提示用户错误信息;否则登录成功。 - 创建自定义的Realm类,继承
org.apache.shiro.realm.AuthenticatingRealm类,实现doGetAuthenticationInfo()方法。
3、登录认证实例
创建包com/wang/shirotest,然后包下新建ShiroRun测试类
package com.wang.shirotest;
import org.apache.shiro.SecurityUtils;
import org.apache.shiro.authc.*;
import org.apache.shiro.config.IniSecurityManagerFactory;
import org.apache.shiro.mgt.SecurityManager;
import org.apache.shiro.subject.Subject;
public class ShiroRun {
public static void main(String[] args) {
// 1 初始化获取SecurityManager
IniSecurityManagerFactory factory = new IniSecurityManagerFactory("classpath:shiro.ini");
SecurityManager securityManager = factory.getInstance();
SecurityUtils.setSecurityManager(securityManager);
// 2 获取Subject对象
Subject subject = SecurityUtils.getSubject();
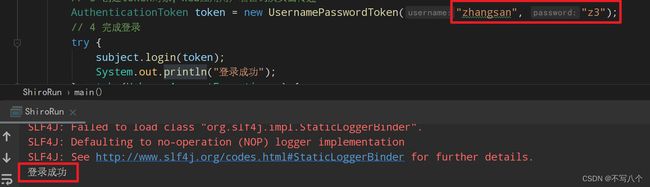
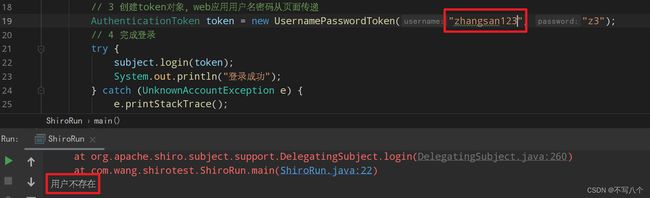
// 3 创建token对象,web应用用户名密码从页面传递
AuthenticationToken token = new UsernamePasswordToken("zhangsan", "z3");
// 4 完成登录
try {
subject.login(token);
System.out.println("登录成功");
} catch (UnknownAccountException e) {
e.printStackTrace();
System.out.println("用户不存在");
} catch (IncorrectCredentialsException e) {
e.printStackTrace();
System.out.println("密码错误");
} catch (AuthenticationException e) {
e.printStackTrace();
}
}
}
①登录成功
②用户不存在
③密码错误

2.4 角色、授权
1、授权概念
- 授权:也叫访问控制,即在应用中控制谁访问哪些资源。在授权中需要了解几个关键对象:主体(Subject)、资源(Resource)、权限(Permission)、角色(Role)。
- 主体(Subject):访问应用的用户,在Shiro中使用Subject代表该用户,用户只有授权,才能访问相应的资源。
- 资源(Resource):在应用中用户可以访问的URL,比如查看/编辑某些数据。用户只有授权后才能访问。
- 权限(Permission):安全策略中的原子授权单位,通过权限我们可以表示在应用中用户有没有操作某个资源的权力。即权限表示在应用中用户能不能访问某个资源。
- Shiro支持粗粒度权限(如用户模块的所有权限)和细粒度权限(操作某个用户的权限,即实例级别的)
- 角色(Role):权限的集合,一般情况下会赋予用户角色而不是权限,即这样用户可以拥有一组权限,赋予权限时比较方便。典型的如:项目经理、技术总监、开发工程师。
2、授权方式
-
编程式:通过写if/else授权代码完成
-
if(subject.hasRole('admin')){
    // 有权限
} else {
    // 无权限
}
-
-
注解式:通过执行的Java方法上放置相应的注解完成,没有权限时将抛出相应的异常。
-
@RequiresRoles("admin")
public void hello(){
    // 有权限
}
-
-
JSP/GSP标签:在JSP/GSP页面通过相应的标签完成。
-
<shiro:hasRole name="admin">

shiro:hasRole>
-
3、授权流程
- 首先调用
Subject.isPermitted*/hasRole*接口,其会委托给SecurityManager,而SecurityManager接着会委托给Authorizer; - Authorizer是真正的授权者,如果调用如
isPermitted(“user:view”),其首先会通 过PermissionResolver把字符串转换成相应的Permission实例; - 在进行授权之前,其会调用相应的
Realm获取Subject相应的角色/权限用于匹配传入 的角色/权限; Authorizer会判断Realm的角色/权限是否和传入的匹配,如果有多个Realm,会委托给ModularRealmAuthorizer进行循环判断,如果匹配如isPermitted*/hasRole*会返回true,否则返回false表示授权失败
4、授权实例
(1)角色判断
修改.ini文件,给用户添加角色
[users]
zhangsan=z3, role1, role2
lisi=l4
添加代码,判断用户是否有此角色
try {
            subject.login(token);
            System.out.println("登录成功");
            // 5 判断角色
            boolean hasRole = subject.hasRole("role1");
            System.out.println("是否拥有此角色:" + hasRole);
        }
运行代码

(2)判断权限信息
给.ini文件添加角色权限信息
[roles]
role1=user:insert,user:select
try中添加以下代码
 // 6 判断权限
            boolean hasPermit = subject.isPermitted("user:insert");
            System.out.println("是否拥有此权限:" + hasPermit);
运行代码

也可以使用checkPermission()方法检查用户是否拥有某个权限
// 也可以用checkPermission方法,但没有返回值,没有权限直接抛异常
subject.checkPermission("user:insert111");

5、完整代码
package com.wang.shirotest;

import org.apache.shiro.SecurityUtils;
import org.apache.shiro.authc.*;
import org.apache.shiro.config.IniSecurityManagerFactory;
import org.apache.shiro.mgt.SecurityManager;
import org.apache.shiro.subject.Subject;


public class ShiroRun {
    public static void main(String[] args) {
        // 1 初始化获取SecurityManager
        IniSecurityManagerFactory factory = new IniSecurityManagerFactory("classpath:shiro.ini");
        SecurityManager securityManager = factory.getInstance();
        SecurityUtils.setSecurityManager(securityManager);
        // 2 获取Subject对象
        Subject subject = SecurityUtils.getSubject();
        // 3 创建token对象,web应用用户名密码从页面传递
        AuthenticationToken token = new UsernamePasswordToken("zhangsan", "z3");
        // 4 完成登录
        try {
            subject.login(token);
            System.out.println("登录成功");
            // 5 判断角色
            boolean hasRole = subject.hasRole("role1");
            System.out.println("是否拥有此角色:" + hasRole);
            // 6 判断权限
            boolean hasPermit = subject.isPermitted("user:insert");
            System.out.println("是否拥有此权限:" + hasPermit);
            // 也可以用checkPermission方法,但没有返回值,没有权限直接抛异常
            subject.checkPermission("user:insert111");
        } catch (UnknownAccountException e) {
            e.printStackTrace();
            System.out.println("用户不存在");
        } catch (IncorrectCredentialsException e) {
            e.printStackTrace();
            System.out.println("密码错误");
        } catch (AuthenticationException e) {
            e.printStackTrace();
        }
    }
}
2.5 Shiro加密
实际系统开发中,一些敏感信息需要进行加密,比如用户的密码。Shiro内嵌很多常用的加密算法,比如MD5加密。Shiro可以很简单的使用信息加密。
1、使用Shiro进行密码加密
可以使用普通加密和带盐加密
package com.wang.shirotest;
import org.apache.shiro.crypto.hash.Md5Hash;
public class ShiroMD5 {
public static void main(String[] args) {
// 密码明文
String password = "z3";
// 使用MD5加密
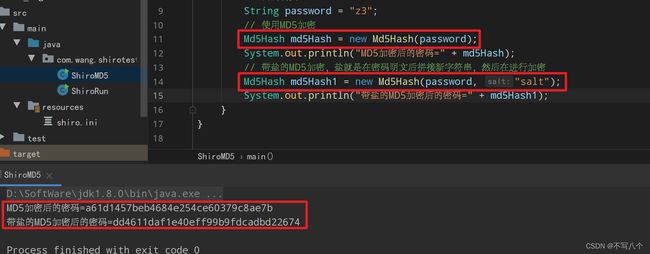
Md5Hash md5Hash = new Md5Hash(password);
System.out.println("MD5加密后的密码=" + md5Hash);
// 带盐的MD5加密,盐就是在密码明文后拼接新字符串,然后在进行加密
Md5Hash md5Hash1 = new Md5Hash(password, "salt");
System.out.println("带盐的MD5加密后的密码=" + md5Hash1);
}
}
打印加密后的密码
2、多次加密
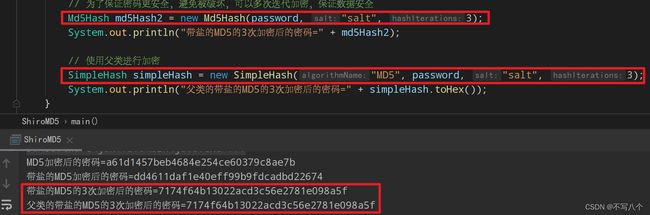
Md5Hash md5Hash2 = new Md5Hash(password, "salt", 3);
System.out.println("带盐的MD5的3次加密后的密码=" + md5Hash2);
加密后的密码更难被破解
带盐的MD5的3次加密后的密码=7174f64b13022acd3c56e2781e098a5f
使用父类进行加密
 // 使用父类进行加密
        SimpleHash simpleHash = new SimpleHash("MD5", password, "salt", 3);
        System.out.println("父类的带盐的MD5的3次加密后的密码=" + simpleHash.toHex());
打印结果可以看到,盐相同时两次加密3次之后的密码是相同的
2.6 Shiro自定义登录认证
Shiro默认的登录认证是不带加密的,如果想要实现加密认证需要自定义登录认证,自定义Realm。
1、认证实现
package com.wang.shirotest;

import org.apache.shiro.authc.AuthenticationException;
import org.apache.shiro.authc.AuthenticationInfo;
import org.apache.shiro.authc.AuthenticationToken;
import org.apache.shiro.authc.SimpleAuthenticationInfo;
import org.apache.shiro.realm.AuthenticatingRealm;
import org.apache.shiro.util.ByteSource;


/**
 * @author Administrator
 */
public class MyRealm extends AuthenticatingRealm {

    // 自定义登录认证方法,Shiro的login方法底层会调用该类的认证方法进行认证
    // 需要配置自定义的Realm生效,在ini文件中可以配置
    // 该方法只是获取进行对比的信息,认证逻辑还是按照Shiro底层认证逻辑完成

    @Override
    protected AuthenticationInfo doGetAuthenticationInfo(AuthenticationToken authenticationToken) throws AuthenticationException {

        // 1、获取身份信息
        String principal = authenticationToken.getPrincipal().toString();
        System.out.println("认证用户信息 = " + principal);
        // 2、获取凭证信息
        String password = new String((char[])authenticationToken.getCredentials());
        System.out.println("密码 = " + password);
        // 3、访问数据库获取用户信息
        if(principal.equals("zhangsan")){
            // 3.1、数据库中存的是加盐迭代3次之后的密码
            String passwordInfo = "7174f64b13022acd3c56e2781e098a5f";
            // 4、创建封装校验逻辑的对象,封装数据返回
            AuthenticationInfo info = new SimpleAuthenticationInfo(
                    authenticationToken.getPrincipal(),
                    passwordInfo,
                    ByteSource.Util.bytes("salt"),
                    authenticationToken.getPrincipal().toString()
            );
            return info;
        }

        return null;
    }
}
2、在Shiro.ini中添加配置信息
[main]
md5CredentialsMatcher=org.apache.shiro.authc.credential.Md5CredentialsMatcher
md5CredentialsMatcher.hashIterations=3

myrealm=com.wang.shirotest.MyRealm
myrealm.credentialsMatcher=$md5CredentialsMatcher
securityManager.realms=$myrealm