Shiro教程(二):Springboot整合Shiro全网最全教程
Shiro教程(二):Springboot整合Shiro全网最全教程
1、SpringBoot整合Shiro环境搭建
新建
Module
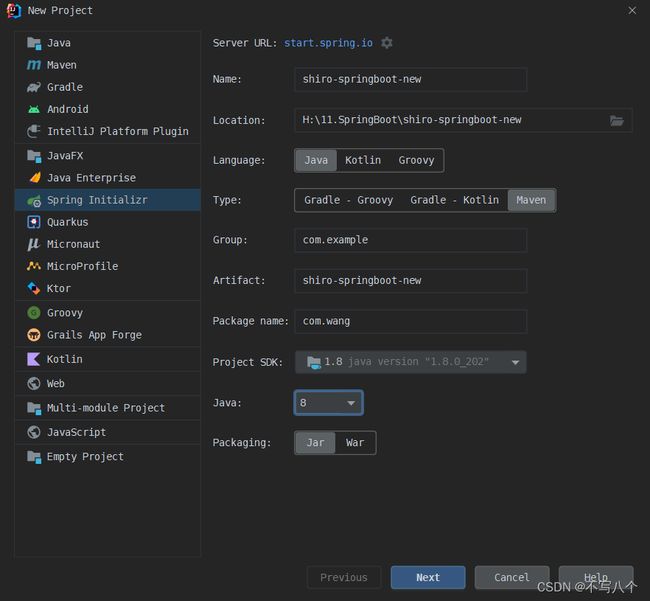
新建springboot项目
选择一个依赖就行,因为这里idea版本的问题,SpringBoot的版本最低就是2.7.13。可以等项目创建成功之后,到
pom.xml中修改版本为2.5.6
添加
thymeleaf模版依赖
<dependencies>
        <dependency>
            <groupId>org.thymeleafgroupId>
            <artifactId>thymeleaf-spring5artifactId>
        dependency>
        <dependency>
            <groupId>org.thymeleaf.extrasgroupId>
            <artifactId>thymeleaf-extras-java8timeartifactId>
        dependency>
    dependencies>
编写
index.html
在templates文件下创建index.html文件
DOCTYPE html>
<html lang="en" xmlns:th="http://www.thymeleaf.org"
      xmlns:shiro="http://www.thymeleaf.org/thymeleaf-extras-shiro">
<head>
    <meta charset="UTF-8">
    <title>Titletitle>
head>
<body>
<h1>首页h1>
<p th:text="${msg}">p>
body>
html>
创建
com.wang.controller.MyController
package com.wang.controller;

import org.springframework.stereotype.Controller;
import org.springframework.ui.Model;
import org.springframework.web.bind.annotation.RequestMapping;

@Controller
public class MyController {

    @RequestMapping({"/", "/index"})
    public String toIndex(Model model){
        model.addAttribute("msg", "hello shiro");
        return "index";
    }
}
启动程序,检查环境是否搭建成功
插曲:这里我设置启动程序的端口号为:1122
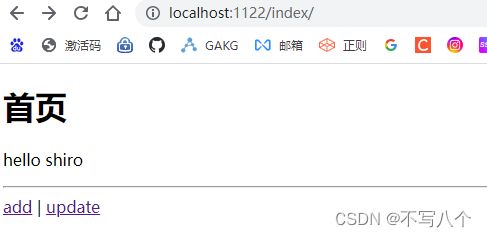
浏览器访问localhost:1122/index即可:
环境搭建成功。
接着整合shiro
1、导入依赖
<dependency>
            <groupId>org.apache.shirogroupId>
            <artifactId>shiro-springartifactId>
            <version>1.10.0version>
        dependency>
        <dependency>
            <groupId>org.apache.shirogroupId>
            <artifactId>shiro-spring-boot-web-starterartifactId>
        dependency>
2、初步配置
UserRealm类
package com.wang.config;

import org.apache.shiro.authc.AuthenticationException;
import org.apache.shiro.authc.AuthenticationInfo;
import org.apache.shiro.authc.AuthenticationToken;
import org.apache.shiro.authz.AuthorizationInfo;
import org.apache.shiro.realm.AuthorizingRealm;
import org.apache.shiro.subject.PrincipalCollection;

public class UserRealm extends AuthorizingRealm{
    // 授权
    @Override
    protected AuthorizationInfo doGetAuthorizationInfo(PrincipalCollection principalCollection) {
        System.out.println("执行了=>授权doGetAuthorizationInfo");
        return null;
    }

    // 认证
    @Override
    protected AuthenticationInfo doGetAuthenticationInfo(AuthenticationToken authenticationToken) throws AuthenticationException {
        System.out.println("执行了=>认证doGetAuthenticationInfo");
        return null;
    }
}
3、编写配置类
ShiroConfig
package com.wang.config;

import org.apache.shiro.spring.web.ShiroFilterFactoryBean;
import org.apache.shiro.web.mgt.DefaultWebSecurityManager;
import org.springframework.beans.factory.annotation.Qualifier;
import org.springframework.context.annotation.Bean;
import org.springframework.context.annotation.Configuration;

@Configuration
public class ShiroConfig {
    // 3、ShiroFilterFactoryBean
    @Bean("shiroFilterFactoryBean")
    public ShiroFilterFactoryBean getShiroFilterFactoryBean(@Qualifier("securityManager") DefaultWebSecurityManager defaultWebSecurityManager){
        ShiroFilterFactoryBean shiroFilterFactoryBean = new ShiroFilterFactoryBean();
        // 设置安全管理器
        shiroFilterFactoryBean.setSecurityManager(defaultWebSecurityManager);
        return shiroFilterFactoryBean;
    }

    // 2、DefaultWebSecurityManager
    @Bean(name = "securityManager")
    public DefaultWebSecurityManager getDefaultWebSecurityManager(@Qualifier("userRealm")UserRealm userRealm){
        DefaultWebSecurityManager securityManager = new DefaultWebSecurityManager();
        // 关联UserRealm
        securityManager.setRealm(userRealm);
        return securityManager;
    }

    // 1、创建 realm对象 需要自定义
    @Bean(name = "userRealm")
    public UserRealm userRealm(){
        return new UserRealm();
    }

}
2、实现登录拦截
创建2个页面
add.html update.html
add.html
DOCTYPE html>
<html lang="en">
<head>
    <meta charset="UTF-8">
    <title>Titletitle>
head>
<body>
<h1>addh1>
body>
html>
update.html
DOCTYPE html>
<html lang="en">
<head>
    <meta charset="UTF-8">
    <title>Titletitle>
head>
<body>
<h1>updateh1>
body>
html>
有了页面,就去
controller添加跳转方法
package com.wang.controller;

import org.springframework.stereotype.Controller;
import org.springframework.ui.Model;
import org.springframework.web.bind.annotation.RequestMapping;

@Controller
public class MyController {

    @RequestMapping({"/", "/index"})
    public String toIndex(Model model){
        model.addAttribute("msg", "hello shiro");
        return "index";
    }

    @RequestMapping("/user/add")
    public String add(){
        return "user/add";
    }

    @RequestMapping("/user/update")
    public String update(){
        return "user/update";
    }
}
给
index.html添加跳转连接
DOCTYPE html>
<html lang="en" xmlns:th="http://www.thymeleaf.org"
      xmlns:shiro="http://www.thymeleaf.org/thymeleaf-extras-shiro">
<head>
    <meta charset="UTF-8">
    <title>Titletitle>
head>
<body>
<h1>首页h1>
<p th:text="${msg}">p>
<hr>
<a th:href="@{/user/add}">adda> |

<a th:href="@{/user/update}">updatea>
body>
html>
测试:重新启动程序
添加授权
@Bean("shiroFilterFactoryBean")
    public ShiroFilterFactoryBean getShiroFilterFactoryBean(@Qualifier("securityManager") DefaultWebSecurityManager defaultWebSecurityManager){
        ShiroFilterFactoryBean shiroFilterFactoryBean = new ShiroFilterFactoryBean();
        // 设置安全管理器
        shiroFilterFactoryBean.setSecurityManager(defaultWebSecurityManager);
        // 添加shiro的内置过滤器
        /*
            anon:无需认证就可以访问
            authc:必须认证才可以访问
            user:必须有“记住我”功能才能使用
            perms:拥有对某个资源的权限才能访问
            role:拥有某个角色权限才能访问
         */
        Map<String, String> filterChainDefinitionMap = new LinkedHashMap<>();
        filterChainDefinitionMap.put("/user/add", "authc");
        filterChainDefinitionMap.put("/user/update", "authc");
        shiroFilterFactoryBean.setFilterChainDefinitionMap(filterChainDefinitionMap);
        return shiroFilterFactoryBean;
    }
再次启动程序访问,点击
add/update发现已经被拦截了
按道理应该跳转到登录页面,所以我们添加一个登陆页面:
DOCTYPE html>
<html lang="en">
<head>
    <meta charset="UTF-8">
    <title>Titletitle>
head>
<body>
<h1>登录h1>
<form action="">
    <p>用户名:<input type="text" name="username">p>
    <p>密码:<input type="text" name="password">p>
    <p><input type="submit">登录p>
form>
body>
html>
接着在
controller添加登录页面的跳转
@RequestMapping("/toLogin")
    public String toLogin(){
        return "login";
    }
然后在
ShiroConfig中添加登录的请求
@Bean("shiroFilterFactoryBean")
    public ShiroFilterFactoryBean getShiroFilterFactoryBean(@Qualifier("securityManager") DefaultWebSecurityManager defaultWebSecurityManager){
        ShiroFilterFactoryBean shiroFilterFactoryBean = new ShiroFilterFactoryBean();
        // 设置安全管理器
        shiroFilterFactoryBean.setSecurityManager(defaultWebSecurityManager);
        // 添加shiro的内置过滤器
        /*
            anon:无需认证就可以访问
            authc:必须认证才可以访问
            user:必须有“记住我”功能才能使用
            perms:拥有对某个资源的权限才能访问
            role:拥有某个角色权限才能访问
         */
        Map<String, String> filterChainDefinitionMap = new LinkedHashMap<>();
        filterChainDefinitionMap.put("/user/add", "authc");
        filterChainDefinitionMap.put("/user/update", "authc");
        shiroFilterFactoryBean.setFilterChainDefinitionMap(filterChainDefinitionMap);

        // 设置登录的请求
        shiroFilterFactoryBean.setLoginUrl("/toLogin");
        return shiroFilterFactoryBean;
    }
再次重启程序点击
add/update,跳转到登录页面
3、实现用户认证
controller编写
@RequestMapping("/login")
    public String login(String username, String password, Model model){
        // 获取当前的用户
        Subject subject = SecurityUtils.getSubject();
        // 封装用户的登录数据
        UsernamePasswordToken usernamePasswordToken = new UsernamePasswordToken(username, password);
        // 执行登录的方法,如果没有异常就说明ok
        try{
            subject.login(usernamePasswordToken);
            return "index";
        }catch (UnknownAccountException e){
            model.addAttribute("msg", "用户名错误");
            return "login";
        }catch (IncorrectCredentialsException e){
            model.addAttribute("msg","密码错误");
            return "login";
        }
    }
给login.html一个登录提示:
<p th:text="${msg}">p>
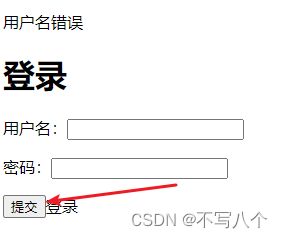
接着测试程序:点击提交之后弹出:
执行了=>认证doGetAuthenticationInfo
修改
UserRealm.java文件
// 认证
    @Override
    protected AuthenticationInfo doGetAuthenticationInfo(AuthenticationToken authenticationToken) throws AuthenticationException {
        System.out.println("执行了=>认证doGetAuthenticationInfo");

        // 用户名 密码 数据库中取 这个userToken.getUsername()是表单输入的用户名
        String name = "admin";
        String password = "123";
        UsernamePasswordToken userToken = (UsernamePasswordToken)authenticationToken;
        if(!userToken.getUsername().equals(name)){
            return null;
        }

        // 密码认证:shiro做,密码加密了
        // MD5加密  MD5盐值加密
        return new SimpleAuthenticationInfo("",password,"");
    }
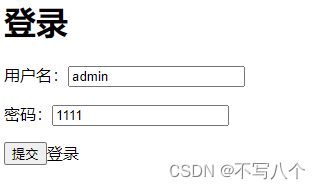
正确的用户名密码是
admin 123
当输入错的密码的时候点击提交:
4、整合mybatis
导入相关依赖
        <dependency>
            <groupId>mysqlgroupId>
            <artifactId>mysql-connector-javaartifactId>
        dependency>
		<dependency>
            <groupId>log4jgroupId>
            <artifactId>log4jartifactId>
            <version>1.2.17version>
        dependency>
        <dependency>
            <groupId>com.alibabagroupId>
            <artifactId>druidartifactId>
            <version>1.2.16version>
        dependency>
        <dependency>
            <groupId>org.mybatis.spring.bootgroupId>
            <artifactId>mybatis-spring-boot-starterartifactId>
            <version>2.2.2version>
        dependency>
        <dependency>
            <groupId>org.projectlombokgroupId>
            <artifactId>lombokartifactId>
            <version>1.18.26version>
        dependency>
添加连接数据库配置文件
spring:
  datasource:
    password: 12345
    username: root
    url: jdbc:mysql://localhost:3306/shiro_db?useSSL=true&useUnicode=true&characterEncoding=UTF-8&serverTimezone=UTC
    driver-class-name: com.mysql.cj.jdbc.Driver
    type: com.alibaba.druid.pool.DruidDataSource
    dbcp2:
      initial-size: 5
      min-idle: 5
      max-wait-millis: 60000
      time-between-eviction-runs-millis: 60000
      min-evictable-idle-time-millis: 30000
      validation-query: SELECT 1 FROM DUAL
      test-while-idle: true
      test-on-borrow: false
      test-on-return: false
      pool-prepared-statements: true
创建
pojo
package com.wang.pojo;

import lombok.AllArgsConstructor;
import lombok.Data;
import lombok.NoArgsConstructor;

/**
 * @author Wang
 * @date 2021/11/19 0019 20:43
 * description
 */
@Data
@AllArgsConstructor
@NoArgsConstructor
public class User {
    private int id;
    private String name;
    private String pwd;
    private String perms;
}
创建
mapper
package com.wang.mapper;

import com.wang.pojo.User;
import org.apache.ibatis.annotations.Mapper;
import org.springframework.stereotype.Repository;

/**
 * @author Wang
 * @date 2021/11/19 0019 20:44
 * description
 */
@Repository
@Mapper
public interface UserMapper {
    User queryUserByName(String name);
}
创建
service和ServiceImpl
package com.wang.service;

import com.wang.pojo.User;

/**
 * @author Wang
 * @date 2021/11/19 0019 20:50
 * description
 */
public interface UserService {
    User queryUserByName(String name);
}
package com.wang.service;

import com.wang.mapper.UserMapper;
import com.wang.pojo.User;
import org.springframework.beans.factory.annotation.Autowired;
import org.springframework.stereotype.Service;

/**
 * @author Wang
 * @date 2021/11/19 0019 20:50
 * description
 */
@Service
public class UserServiceImpl implements UserService {
    @Autowired
    UserMapper userMapper;
    @Override
    public User queryUserByName(String name) {
        return userMapper.queryUserByName(name);
    }
}
创建
mapper.xml
DOCTYPE mapper
        PUBLIC "-//mybatis.org//DTD Mapper 3.0//EN"
        "http://mybatis.org/dtd/mybatis-3-mapper.dtd">
<mapper namespace="com.wang.mapper.UserMapper">
    <select id="queryUserByName" parameterType="String" resultType="com.wang.pojo.User">
        SELECT * FROM mybatis.user where name = #{name}
    select>
mapper>
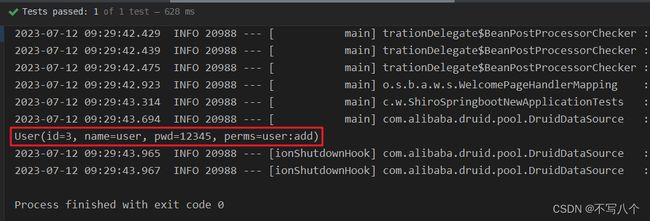
写到这里别着急继续写,先测试一下刚刚写的业务是否正确,我们在ShiroSpringbootNewApplicationTests中添加测试代码:
package com.wang;

import com.wang.pojo.User;
import com.wang.service.UserService;
import org.junit.jupiter.api.Test;
import org.springframework.beans.factory.annotation.Autowired;
import org.springframework.boot.test.context.SpringBootTest;

@SpringBootTest
class ShiroSpringbootNewApplicationTests {

    @Autowired
    UserService userService;

    @Test
    void contextLoads() {
        User user = userService.queryUserByName("user");
        System.out.println(user);
    }

}
运行查看结果:代码没有问题
接着去改造
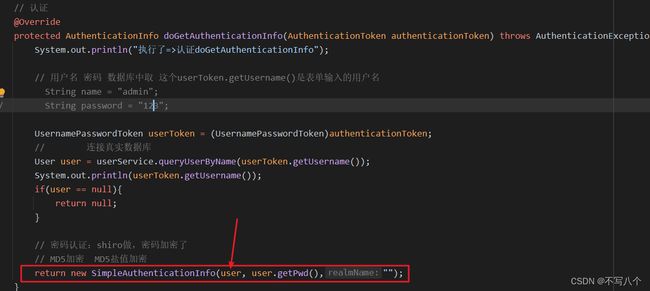
UserRealm,去连接真实数据库:
// 认证
    @Override
    protected AuthenticationInfo doGetAuthenticationInfo(AuthenticationToken authenticationToken) throws AuthenticationException {
        System.out.println("执行了=>认证doGetAuthenticationInfo");

        // 用户名 密码 数据库中取 这个userToken.getUsername()是表单输入的用户名
//        String name = "admin";
//        String password = "123";

        UsernamePasswordToken userToken = (UsernamePasswordToken)authenticationToken;
        //        连接真实数据库
        User user = userService.queryUserByName(userToken.getUsername());
        System.out.println(userToken.getUsername());
        if(user == null){
            return null;
        }

        // 密码认证:shiro做,密码加密了
        // MD5加密  MD5盐值加密
        return new SimpleAuthenticationInfo("",user.getPwd(),"");
    }
5、Shiro请求授权实现
先给数据库的user对象增加一个权限perms列
给pojo中的User对象也要加入perms属性
@Data
@AllArgsConstructor
@NoArgsConstructor
public class User {
    private int id;
    private String name;
    private String pwd;
    private String perms;
}
添加权限:用户需要有[user:add]才能访问user/add
filterChainDefinitionMap.put("/user/add", "perms[user:add]");
重启试一下:访问 /user/add,报错,说明授权成功
我们设置未授权跳转到为授权页面:
MyController中添加跳转
    @RequestMapping("/noauth")
    @ResponseBody
    public String unauthorized(){
        return "未经授权无法访问此页面";
    }
在ShiroConfig中配置未授权页面跳转:
// 未授权页面
        shiroFilterFactoryBean.setUnauthorizedUrl("/noauth");
再次访问/user/add效果如下:
我们可以在UserRealm中给来的用户添加权限:
SimpleAuthorizationInfo simpleAuthorizationInfo = new SimpleAuthorizationInfo();

simpleAuthorizationInfo.addStringPermission("user:add");
这样用户就能访问需要授权的接口/user/add了:
但是,这样有一个问题,不管是什么用户,都会进行授权,那接口的拦截就无意义了。
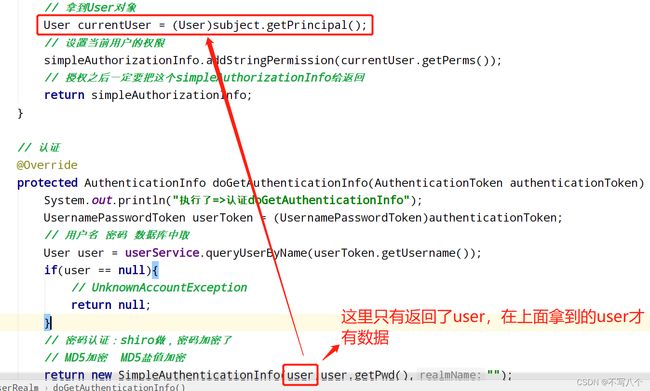
所以应该拿到当前的用户,并设置当前用户的权限,在UserRealm中添加代码
// 授权
    @Override
    protected AuthorizationInfo doGetAuthorizationInfo(PrincipalCollection principalCollection) {
        System.out.println("执行了=>授权doGetAuthorizationInfo");
        SimpleAuthorizationInfo simpleAuthorizationInfo = new SimpleAuthorizationInfo();
        // 拿到当前登录的这个对象
        Subject subject = SecurityUtils.getSubject();
        // 拿到User对象
        User currentUser = (User)subject.getPrincipal();
        // 设置当前用户的权限
//        simpleAuthorizationInfo.addStringPermission("user:add");
        simpleAuthorizationInfo.addStringPermission(currentUser.getPerms());
        return simpleAuthorizationInfo;
    }
这里我们要修改认证的代码返回值,把user返回
return new SimpleAuthenticationInfo(user,user.getPwd(),"");
我们进行不同用户的测试:
使用user登录即可访问/user/add
6、整合Thymeleaf
先导入依赖包
        <dependency>
            <groupId>com.github.theborakompanionigroupId>
            <artifactId>thymeleaf-extras-shiroartifactId>
            <version>2.0.0version>
        dependency>
写一个方法整合shiro-thymeleaf,在
ShiroConfig中添加以下代码
//整合ShiroDialect:用来整合shiro-thymeleaf
    @Bean
    public ShiroDialect getShiroDialect(){
        return new ShiroDialect();
    }
然后在首页判断用户是否有此权限
<div shiro:hasPermission="user:add">
    <a th:href="@{/user/add}">adda>
div>

<div shiro:hasPermission="user:update">
    <a th:href="@{/user/update}">updatea>
div>
我们继续使用user用户登录,该用户只有user:add权限:可以看到用户user登录只能看到add的功能:
使用root用户登录,该用户只有user:update权限:
我们登录之后,登录按钮不应该再显示了,我们在UserRealm中把用户信息加入session:
// 认证
    @Override
    protected AuthenticationInfo doGetAuthenticationInfo(AuthenticationToken authenticationToken) throws AuthenticationException {
        System.out.println("执行了=>认证doGetAuthenticationInfo");

        // 用户名 密码 数据库中取 这个userToken.getUsername()是表单输入的用户名
//        String name = "admin";
//        String password = "123";

        UsernamePasswordToken userToken = (UsernamePasswordToken)authenticationToken;
        //        连接真实数据库
        User user = userService.queryUserByName(userToken.getUsername());
        System.out.println(userToken.getUsername());
        if(user == null){
            return null;
        }
        Subject currentSubject = SecurityUtils.getSubject();
        Session session = currentSubject.getSession();
        session.setAttribute("loginUser",user);
        // 密码认证:shiro做,密码加密了
        // MD5加密  MD5盐值加密
        return new SimpleAuthenticationInfo(user, user.getPwd(),"");
    }
然后在前端判断,是否有user:
<div th:if="${session.loginUser==null}">
    <a th:href="@{/toLogin}">登录a>
div>
再次登录,登录按钮不显示
7、完整代码下载地址
SpringBoot整合Shiro完整代码下载地址


![[外链图片转存失败,源站可能有防盗链机制,建议将图片保存下来直接上传(img-5qAJ0kFA-1689132653268)(C:\Users\Administrator\AppData\Roaming\Typora\typora-user-images\image-20230711214429297.png)]](http://img.e-com-net.com/image/info8/bdb0986832a14b4391ad029308858f85.jpg)
