STM32智能送药小车(三):0.96寸7针OLED的配置与编程
目录
一.OLED的简单说明
二.Cubemx的配置
三.根据时序图写驱动程序及自定义显示程序
驱动程序:
用户自定义:
一.OLED的简单说明
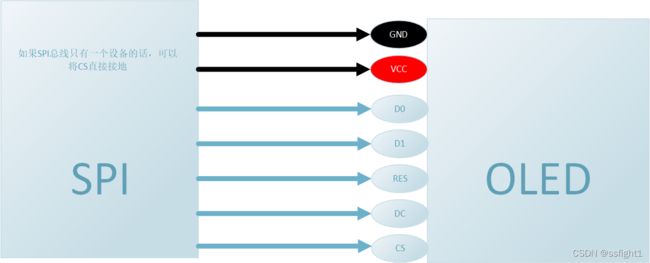
0.96寸七针OLED:
- CS:OLED片选信号;
- RST(RES):硬复位OLED;
- DC(RS):命令/数据标志(0,读写命令;1,读写数据)。
接线如下:D0,D1分别接SPI_CLK,SPI_MOSI
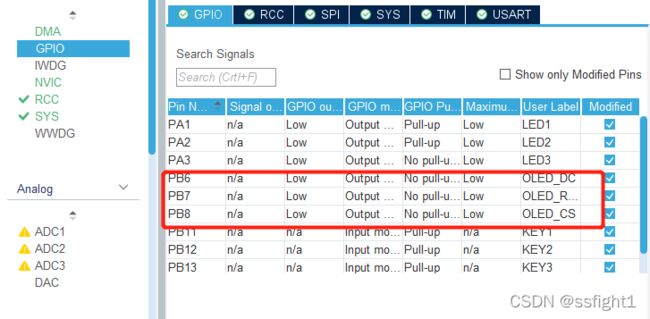
二.Cubemx的配置
三.根据时序图写驱动程序及自定义显示程序
驱动程序:
void OLED_WR_Byte(uint8_t dat,uint8_t cmd)
{
	if(cmd)
	{
		OLED_DC_Set();//命令/数据标志位置为1,则表示传送的是命令字节
	}

	else
	  OLED_DC_Clr();//命令/数据标志位置为0,则表示传送的是数据字节
	  OLED_CS_Clr();//片选信号为低,表示选中OLED
	  HAL_SPI_Transmit_DMA(&hspi2,&dat,1);//oled.c文件唯一修改的地方,这里是利用了hal库提供的SPI传送函数
	  OLED_CS_Set();
	  OLED_DC_Set();
}

void OLED_Set_Pos(unsigned char x, unsigned char y)
{
	OLED_WR_Byte(0xb0+y,OLED_CMD);
	OLED_WR_Byte((((x+2)&0xf0)>>4)|0x10,OLED_CMD);
	OLED_WR_Byte(((x+2)&0x0f),OLED_CMD);
}
//开启OLED显示
void OLED_Display_On(void)
{
	OLED_WR_Byte(0X8D,OLED_CMD);  //设置电荷泵命令字
	OLED_WR_Byte(0X14,OLED_CMD);  //开启电荷泵
	OLED_WR_Byte(0XAF,OLED_CMD);  //DISPLAY ON
}
//关闭OLED显示
void OLED_Display_Off(void)
{
	OLED_WR_Byte(0X8D,OLED_CMD);  //设置电荷泵命令字
	OLED_WR_Byte(0X10,OLED_CMD);  //关闭电荷泵
	OLED_WR_Byte(0XAE,OLED_CMD);  //DISPLAY OFF
}
//清屏函数,清完后整个屏幕都是黑色的,没有一点光亮
void OLED_Clear(void)
{
	uint8_t i,n;
	for(i=0;i<8;i++)
	{
		OLED_WR_Byte (0xb0+i,OLED_CMD);    //设置页地址
		OLED_WR_Byte (0x02,OLED_CMD);      //设置起始列低地址
		OLED_WR_Byte (0x10,OLED_CMD);      //设置起始列高地址
		for(n=0;n<128;n++)OLED_WR_Byte(0,OLED_DATA);
	} //更新显示
}
用户自定义:
//在指定位置显示一个字符,包括部分字符
//x:0~127
//y:0~6
//mode:0,反白显示;1,正常显示
//size:选择字体大小 16/12
void OLED_ShowChar(uint8_t x,uint8_t y,uint8_t chr)
{
	unsigned char c=0,i=0;
		c=chr-' ';//得到偏移后的值
		if(x>Max_Column-1){x=0;y=y+2;}
		if(SIZE ==16)
			{
			OLED_Set_Pos(x,y);
			for(i=0;i<8;i++)
			OLED_WR_Byte(F8X16[c*16+i],OLED_DATA);
			OLED_Set_Pos(x,y+1);
			for(i=0;i<8;i++)
			OLED_WR_Byte(F8X16[c*16+i+8],OLED_DATA);
			}
			else {
				OLED_Set_Pos(x,y+1);
				for(i=0;i<6;i++)
				OLED_WR_Byte(F6x8[c][i],OLED_DATA);

			}
}
//m^n函数
uint32_t oled_pow(uint8_t m,uint8_t n)
{
	uint32_t result=1;
	while(n--)result*=m;
	return result;
}
//显示两个数字
//x,y :起点坐标
//len :数字的位数
//size:字体大小
//mode:0:填充模式;1:叠加模式
//num:数值(0~4294967295);
void OLED_ShowNum(uint8_t x,uint8_t y,uint32_t num,uint8_t len,uint8_t size)
{
	uint8_t t,temp;
	uint8_t enshow=0;
	for(t=0;t120){x=0;y+=2;}
			j++;
	}
}
//显示汉字
void OLED_ShowCHinese(uint8_t x,uint8_t y,uint8_t no)
{
	uint8_t t,adder=0;
	OLED_Set_Pos(x,y);
    for(t=0;t<16;t++)
		{
				OLED_WR_Byte(Hzk[2*no][t],OLED_DATA);
				adder+=1;
     }
		OLED_Set_Pos(x,y+1);
    for(t=0;t<16;t++)
			{
				OLED_WR_Byte(Hzk[2*no+1][t],OLED_DATA);
				adder+=1;
      }
}
/*显示BMP图片。x的范围为0~127,y的页得的范围0~7*/
void OLED_DrawBMP(unsigned char x0, unsigned char y0,unsigned char x1, unsigned char y1,unsigned char BMP[])
{
 unsigned int j=0;
 unsigned char x,y;

  if(y1%8==0) y=y1/8;
  else y=y1/8+1;
	for(y=y0;y126){x=0;y++;}
	  	OLED_Set_Pos(x,y);
	  	for(i=0;i<6;i++)	OLED_WR_Byte(oled_6x8[c][i],OLED_DATA);
	  	x+=6;
	  	j++;
	}
}
//-------------------------------------------------------------------------------------------------------------------
//  @brief      OLED显示有符号数(6*8字体)
//  @param      x			x轴坐标设置0-127
//  @param      y           y轴坐标设置0-7
//  @param      num         有符号数
//  @return     void
//  @since      v1.0
//  Sample usage:
//-------------------------------------------------------------------------------------------------------------------
void oled_int16(uint8_t x, uint8_t y, int16_t num)
{
	int8_t ch[7];
	if(num<0)   {num = -num;oled_p6x8str(x, y, "-");}
	else         oled_p6x8str(x, y, " ");
	x+=6;

	oled_hexascii(num,ch);
    oled_p6x8str(x, y, &ch[1]);	    //显示数字  6*8字体
}
float fabs(float num)
{
	if (num >= 0)
	{
		num = num;
	}
	else
	{
		num = -num;
	}
	return num;
}
//显示9位字符,最高位正负,三位整数,第五位小数点,后四位小数部分
//x,y :起点坐标
//len :数字的位数
//size:字体大小
void OLED_Showdecimal(uint8_t x,uint8_t y,float num,uint8_t len,uint8_t size2)
{
	uint8_t t,temp,len1,temp1;
	float temp2;
	uint8_t enshow=0;
    if(num < 0)
	{
		OLED_ShowChar(x,y,'0'-3);
        // OLED_ShowChar(x,y,'0'- 3,size2);
		num =fabs(num);
	}
    else
	OLED_ShowChar(x,y,' ');//第一位显示符号
	temp1 = (int)temp;
	temp2 = num - temp1;
	len1 = len - 6;//len1为整数部分位数,若显示数位需要扩展,修改该行
	OLED_ShowChar(x + size2/2*4,y,'0'- 2);//浮点数的第5位显示小数点
	x = x + size2/2;
	for(t=0;t
参考资料:
https://yngzmiao.blog.csdn.net/article/details/80033873
STM32Cubemx——硬件SPI驱动七针0.96寸OLED_平陆成江,的博客-CSDN博客_7针oled与stm32连接


