Linux随笔15-Ubuntu20.04允许root用户图形界面登录、chrony局域网时间同步服务、ipxe实现系统自动化安装
Contents
- 1. Ubuntu20.04-LTS允许root在图形界面登录
-
- 1.1. Ubuntu Server 20.04安装GNome图形环境
- 1.2. 允许root用户在图形界面登录
- 1.3. 总结
- 2. chrony局域网时间同步
-
- 2.1. 设置NTP服务器
- 2.2. 设置NTP客户端
- 3. kvm-qemu环境通过ipxe实现CentOS7系统自动化安装
-
- 3.1. iPXE介绍
- 3.2. iPXE环境准备
- 3.3. 通过iPXE安装系统
- 4. References
1. Ubuntu20.04-LTS允许root在图形界面登录
Ubuntu默认是不允许root用户在图形界面直接登录的,至于原因,在 /var/log/auth.log 文件中有详细的记载。由于我的虚拟机是采用的Ubuntu-20.04.2-live-server-amd64.iso安装的,所以默认并没有图形界面。为此需要先准备图形界面环境。
1.1. Ubuntu Server 20.04安装GNome图形环境
采用系统默认的软件镜像源,安装GNome图形环境有两种方式:通过apt命令以及通过tasksel命令。
- 通过apt命令安装GNome环境
通过apt install gnome gnome-session gdm3安装即可,这种方式安装的图形界面环境由于只安装图形环境相关的软件包,所以消耗的资源更少一些,对于一些软件,也是没有直接被安装上的。安装过程大致如下:
等待上述命令执行完成即可。root@ubuntu20u04:~# apt install gnome gnome-session gdm3 ... aspell-autobuildhash: processing: en [en_GB-ize-wo_accents-only]. aspell-autobuildhash: processing: en [en_GB-variant_0]. aspell-autobuildhash: processing: en [en_GB-variant_1]. aspell-autobuildhash: processing: en [en_US-w_accents-only]. aspell-autobuildhash: processing: en [en_US-wo_accents-only]. Processing triggers for rygel (0.38.3-1ubuntu1) ... Processing triggers for libgdk-pixbuf2.0-0:amd64 (2.40.0+dfsg-3ubuntu0.2) ... Processing triggers for libc-bin (2.31-0ubuntu9.2) ... Processing triggers for dbus (1.12.16-2ubuntu2.1) ... Processing triggers for systemd (245.4-4ubuntu3.4) ... Processing triggers for sgml-base (1.29.1) ... root@ubuntu20u04:~# - 通过tasksel命令安装GNome环境
使用tasksel命令可以安装完整的GNome图形环境。先确认下系统是否已经安装了该命令,如果没有安装该命令,需要执行apt install tasksel安装这个命令。具体如下所示:
这个命令的使用帮助信息,如下所示:root@ubuntu20u04:~# dpkg -l | egrep tasksel ii tasksel 3.34ubuntu16 all tool for selecting tasks for installation on Debian systems ii tasksel-data 3.34ubuntu16 all official tasks used for installation of Debian systems root@ubuntu20u04:~#
然后使用这个命令安装完整的GNome图形桌面环境,具体如下所示:root@ubuntu20u04:~# tasksel --help Unknown option: help Usage: tasksel install <task>... tasksel remove <task>... tasksel [options] -t, --test test mode; don't really do anything --new-install automatically install some tasks --list-tasks list tasks that would be displayed and exit --task-packages list available packages in a task --task-desc returns the description of a task root@ubuntu20u04:~#
上述列出了可以安装的GNome图形环境,其中 ubuntu-desktop 这个是我们需要安装的,执行如下命令进行安装:root@ubuntu20u04:~# tasksel --list-tasks | egrep desktop u kubuntu-desktop Kubuntu desktop u lubuntu-desktop Lubuntu Desktop u ubuntu-budgie-desktop Ubuntu Budgie desktop u ubuntu-desktop Ubuntu desktop u ubuntu-desktop-default-languages Ubuntu desktop default languages u ubuntu-desktop-minimal Ubuntu minimal desktop u ubuntu-desktop-minimal-default-languages Ubuntu minimal desktop default languages u ubuntu-mate-desktop Ubuntu MATE desktop u ubuntustudio-desktop Ubuntu Studio desktop u ubuntustudio-desktop-core Ubuntu Studio minimal DE installation u xubuntu-desktop Xubuntu desktop root@ubuntu20u04:~#
执行完上述命令之后,如下图所示:root@ubuntu20u04:~# tasksel install ubuntu-desktop xserver-xorg install root@ubuntu20u04:~#
 执行完成,即可安装完整的图形界面,包含所需要的一些软件也会被自动安装上。
执行完上述操作之后,才是重启系统仍然会进入图形界面。要自动进入图形界面,需要修改运行级别。通过systemctl get-default命令可以查看系统的当前运行级别。通过systemctl set-default graphical.target命令可以设置系统的默认运行级别。通过systemctl list-units --type target命令可以列出系统已经装载并且处于活动状态的target对象(运行级别)都有哪些,具体如下所示:
root@ubuntu20u04:~# systemctl list-units --type target
  UNIT                   LOAD   ACTIVE SUB    DESCRIPTION
  basic.target           loaded active active Basic System
  cryptsetup.target      loaded active active Local Encrypted Volumes
  getty.target           loaded active active Login Prompts
  graphical.target       loaded active active Graphical Interface
  local-fs-pre.target    loaded active active Local File Systems (Pre)
  local-fs.target        loaded active active Local File Systems
  multi-user.target      loaded active active Multi-User System
  network-online.target  loaded active active Network is Online
  network-pre.target     loaded active active Network (Pre)
  network.target         loaded active active Network
  nss-lookup.target      loaded active active Host and Network Name Lookups
  nss-user-lookup.target loaded active active User and Group Name Lookups
  paths.target           loaded active active Paths
  remote-fs-pre.target   loaded active active Remote File Systems (Pre)
  remote-fs.target       loaded active active Remote File Systems
  rpcbind.target         loaded active active RPC Port Mapper
  slices.target          loaded active active Slices
  sockets.target         loaded active active Sockets
  sound.target           loaded active active Sound Card
  swap.target            loaded active active Swap
  sysinit.target         loaded active active System Initialization
  time-set.target        loaded active active System Time Set
  time-sync.target       loaded active active System Time Synchronized
  timers.target          loaded active active Timers

LOAD   = Reflects whether the unit definition was properly loaded.
ACTIVE = The high-level unit activation state, i.e. generalization of SUB.
SUB    = The low-level unit activation state, values depend on unit type.

24 loaded units listed. Pass --all to see loaded but inactive units, too.
To show all installed unit files use 'systemctl list-unit-files'.
root@ubuntu20u04:~#
root@ubuntu20u04:~# systemctl get-default
multi-user.target
root@ubuntu20u04:~# systemctl set-default graphical.target
Created symlink /etc/systemd/system/default.target → /lib/systemd/system/graphical.target.
root@ubuntu20u04:~# ls /etc/systemd/system/default.target -lh
lrwxrwxrwx 1 root root 36 Jun 26 10:36 /etc/systemd/system/default.target -> /lib/systemd/system/graphical.target
root@ubuntu20u04:~# systemctl reboot
从上述输出中可以看出,将graphical.target设置为默认的运行级别的结果就是再 /etc/systemd/system/ 这个目录中创建一个符号链接文件,该符号链接文件指向 /lib/systemd/system/graphical.target 这个文件。
设置完成之后,重启系统即可进入图形界面环境。
1.2. 允许root用户在图形界面登录
在virtual-manager中打开对应的ubuntu虚拟机,然后从图形界面中输入root用户名进行登录,具体如下:
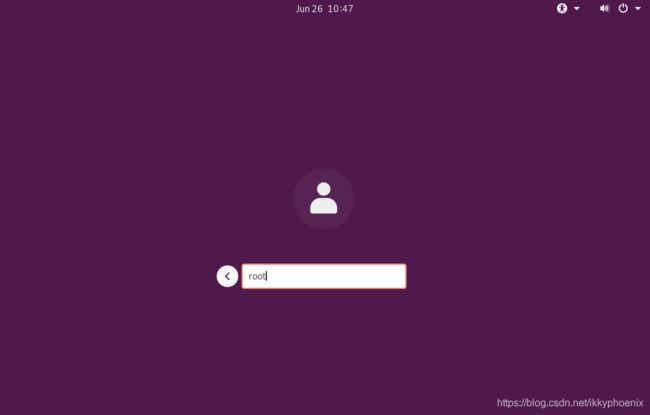 按下回车键之后,输入密码,此时提示如下所示:
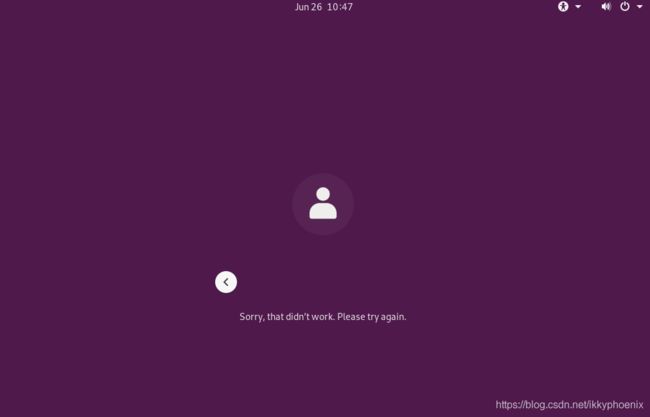 此时, /var/log/auth.log 中记录的日志信息内容如下所示:
root@ubuntu20u04:~# tail -n 10 /var/log/auth.log
Jun 26 10:47:54 ubuntu20u04 gdm-password]: pam_succeed_if(gdm-password:auth): requirement "user != root" not met by user "root"
Jun 26 10:47:54 ubuntu20u04 gdm-password]: pam_unix(gdm-password:auth): Couldn't open /etc/securetty: No such file or directory
Jun 26 10:48:16 ubuntu20u04 gdm-password]: pam_unix(gdm-password:auth): conversation failed
Jun 26 10:48:16 ubuntu20u04 gdm-password]: pam_unix(gdm-password:auth): auth could not identify password for [root]
Jun 26 10:48:21 ubuntu20u04 gdm-password]: pam_succeed_if(gdm-password:auth): requirement "user != root" not met by user "root"
Jun 26 10:48:21 ubuntu20u04 gdm-password]: pam_unix(gdm-password:auth): Couldn't open /etc/securetty: No such file or directory
Jun 26 10:48:39 ubuntu20u04 sshd[6134]: Accepted publickey for root from 192.168.122.1 port 45498 ssh2: RSA SHA256:DfCJivRw5mAGd/V87lotYjyC+ULpoCLHbxrRPG2Hlgg
Jun 26 10:48:39 ubuntu20u04 sshd[6134]: pam_unix(sshd:session): session opened for user root by (uid=0)
Jun 26 10:48:39 ubuntu20u04 systemd-logind[896]: New session 2 of user root.
Jun 26 10:48:39 ubuntu20u04 systemd: pam_unix(systemd-user:session): session opened for user root by (uid=0)
root@ubuntu20u04:~#
上述日志输出中提示: pam_succeed_if(gdm-password:auth): requirement “user != root” not met by user "root" ,即pam_succeed_if这个pam模块会对图形界面登录的用户进行检查,如果用户名是root,那么就禁止该用户登录系统。所以需要在系统的pam配置文件目录中找到记录了 pam_succeed_if 这个模块的配置文件。具体如下所示:
root@ubuntu20u04:~# egrep -l 'pam_succeed_if' /etc/pam.d/*
/etc/pam.d/gdm-autologin
/etc/pam.d/gdm-fingerprint
/etc/pam.d/gdm-password
root@ubuntu20u04:~#
上述输出显示3个文件中均包含这个模块,分别查看下3个模块中的具体相关参数,如下所示:
root@ubuntu20u04:~# egrep -o '.*pam_succeed_if.*' /etc/pam.d/gdm-autologin
auth	required	pam_succeed_if.so user != root quiet_success
root@ubuntu20u04:~# egrep -o '.*pam_succeed_if.*' /etc/pam.d/gdm-fingerprint
auth	required	pam_succeed_if.so user != root quiet_success
root@ubuntu20u04:~# egrep -o '.*pam_succeed_if.*' /etc/pam.d/gdm-password
auth	required	pam_succeed_if.so user != root quiet_success
root@ubuntu20u04:~#
将上述3个文件中的对应行注释掉,如下所示:
root@ubuntu20u04:~# sed -n -re '/pam_succeed_if/s/^/#/p' /etc/pam.d/gdm-password
#auth	required	pam_succeed_if.so user != root quiet_success
root@ubuntu20u04:~# sed -i.bak -re '/pam_succeed_if/s/^/#/' /etc/pam.d/gdm-password
root@ubuntu20u04:~# sed -i.bak -re '/pam_succeed_if/s/^/#/' /etc/pam.d/gdm-fingerprint
root@ubuntu20u04:~# sed -i.bak -re '/pam_succeed_if/s/^/#/' /etc/pam.d/gdm-autologin
root@ubuntu20u04:~# egrep -o '.*pam_succeed_if.*' /etc/pam.d/gdm-autologin
#auth	required	pam_succeed_if.so user != root quiet_success
root@ubuntu20u04:~# egrep -o '.*pam_succeed_if.*' /etc/pam.d/gdm-fingerprint
#auth	required	pam_succeed_if.so user != root quiet_success
root@ubuntu20u04:~# egrep -o '.*pam_succeed_if.*' /etc/pam.d/gdm-password
#auth	required	pam_succeed_if.so user != root quiet_success
root@ubuntu20u04:~#
此时再次尝试在图形界面登录,并观察 /var/log/auth.log 文件的内容变化:
root@ubuntu20u04:~# tail -f /var/log/auth.log
Jun 26 14:53:21 ubuntu20u04 gdm-password]: pam_unix(gdm-password:auth): Couldn't open /etc/securetty: No such file or directory
Jun 26 14:53:23 ubuntu20u04 gdm-password]: pam_unix(gdm-password:auth): Couldn't open /etc/securetty: No such file or directory
Jun 26 14:53:23 ubuntu20u04 gdm-password]: pam_unix(gdm-password:auth): authentication failure; logname= uid=0 euid=0 tty=/dev/tty1 ruser= rhost=  user=root
Jun 26 14:53:27 ubuntu20u04 gdm-password]: pam_unix(gdm-password:auth): Couldn't open /etc/securetty: No such file or directory
此时图形界面登录依然失败,但是已经不再是pam_succeed_if这个模块作祟了。提示没有/etc/securetty这个文件,所以不给登录。查看下哪个包提供了这个文件,然后安装这个包
root@ubuntu20u04:~# apt-file search /etc/securetty
rear: /usr/share/rear/skel/Linux-ia64/etc/securetty
root@ubuntu20u04:~# apt install rear
Reading package lists... Done
Building dependency tree
Reading state information... Done
The following additional packages will be installed:
  attr extlinux isolinux keyutils libisoburn1 libnfsidmap2 libtirpc-common libtirpc3 nfs-common rpcbind xorriso
Suggested packages:
  watchdog xorriso-tcltk jigit cdck
The following NEW packages will be installed:
  attr extlinux isolinux keyutils libisoburn1 libnfsidmap2 libtirpc-common libtirpc3 nfs-common rear rpcbind xorriso
0 upgraded, 12 newly installed, 0 to remove and 41 not upgraded.
Need to get 1,696 kB of archives.
After this operation, 6,702 kB of additional disk space will be used.
Do you want to continue? [Y/n] y
Get:1 http://cn.archive.ubuntu.com/ubuntu focal/main amd64 libtirpc-common all 1.2.5-1 [7,632 B]
...
root@ubuntu20u04:~# cat /usr/share/rear/skel/Linux-ia64/etc/securetty
console
vc/1
vc/2
vc/3
vc/4
vc/5
vc/6
vc/7
vc/8
vc/9
vc/10
vc/11
tty1
tty2
tty3
tty4
tty5
tty6
tty7
tty8
tty9
tty10
tty11
ttyS1
root@ubuntu20u04:~# cp /usr/share/rear/skel/Linux-ia64/etc/securetty /etc/securetty
从上述输出中可以看出,securetty 这个文件是由 rear 这个软件包提供的,执行命令apt install rear安装这个软件包。然后将软件包中提供的文件 /usr/share/rear/skel/Linux-ia64/etc/securetty 拷贝到 /etc/securetty 之后,再次尝试再图形界面以root身份登录,此时可以正常登录。具体如下所示:
root@ubuntu20u04:~# tail -f /var/log/auth.log
Jun 26 14:59:54 ubuntu20u04 gdm-password]: pam_unix(gdm-password:session): session opened for user root by (uid=0)
Jun 26 14:59:54 ubuntu20u04 systemd-logind[927]: New session 8 of user root.
Jun 26 14:59:54 ubuntu20u04 gdm-password]: gkr-pam: gnome-keyring-daemon started properly and unlocked keyring
Jun 26 14:59:56 ubuntu20u04 gnome-keyring-daemon[11782]: The Secret Service was already initialized
Jun 26 14:59:56 ubuntu20u04 gnome-keyring-daemon[11782]: The PKCS#11 component was already initialized
Jun 26 14:59:57 ubuntu20u04 polkitd(authority=local): Registered Authentication Agent for unix-session:8 (system bus name :1.156 [/usr/bin/gnome-shell], object path /org/freedesktop/PolicyKit1/AuthenticationAgent, locale en_US.UTF-8)
Jun 26 15:00:01 ubuntu20u04 CRON[12389]: pam_unix(cron:session): session opened for user root by (uid=0)
Jun 26 15:00:01 ubuntu20u04 CRON[12389]: pam_unix(cron:session): session closed for user root
Jun 26 15:00:03 ubuntu20u04 gdm-launch-environment]: pam_unix(gdm-launch-environment:session): session closed for user gdm
Jun 26 15:00:03 ubuntu20u04 systemd-logind[927]: Session c2 logged out. Waiting for processes to exit.
Jun 26 15:00:03 ubuntu20u04 systemd-logind[927]: Removed session c2.
Jun 26 15:00:03 ubuntu20u04 polkitd(authority=local): Unregistered Authentication Agent for unix-session:c2 (system bus name :1.132, object path /org/freedesktop/PolicyKit1/AuthenticationAgent, locale en_US.UTF-8) (disconnected from bus)
Jun 26 15:00:08 ubuntu20u04 dbus-daemon[905]: [system] Failed to activate service 'org.bluez': timed out (service_start_timeout=25000ms)
1.3. 总结
为了使root用户能在图形界面中登录,需要做如下操作:
- 将/etc/pam.d/目录下配置了
pam_succeed_if模块的文件中这一行注释 - 执行
apt install rear命令安装rear这个软件包 - 将rear软件包提供的/usr/share/rear/skel/Linux-ia64/etc/securetty文件拷贝为/etc/securetty
完成上述3步之后,由于pam模块的配置文件修改是即时生效的,所以无需重启系统即可实现root用户的图形界面登录。
2. chrony局域网时间同步
集群环境中的各个服务器之间要共同实现一些操作,最基本的需求就是要一致的时间。为此就需要在集群中设置时间同步服务器。RHEL/CentOS7.x开始,从默认的ntp服务切换为chronyd服务来实现时间同步。虽然服务名称不一样了,但是底层协议都是ntp协议,配置文件内容基本是一样的。
为了避免单点故障,集群环境中,通常将2台服务器作为NTP服务器,从互联网上同步时间,其他服务器从这两台服务器上同步时间。所以此处的实验以3台服务器来模拟时间同步服务的配置。三台服务器的角色描述如下表:
| Server | Role | Description |
|---|---|---|
| c7u6s1 | ntp服务器 | 从互联网同步时间 |
| c7u6s2 | ntp服务器 | 从互联网同步时间 |
| c7u6s3 | ntp客户端 | 从c7u6s1和c7u6s2同步时间 |
要实现该服务,需要确保各个节点上都已经安装了chrony这个软件包。其中提供了 chrony.conf 这个配置文件,以及服务后台命令chronyd以及用户交互命令chronyc。具体如下所示:
[root@c7u6s1 security]# rpm -qa | egrep chrony
chrony-3.2-2.el7.x86_64
[root@c7u6s1 security]# rpm -ql chrony
/etc/NetworkManager/dispatcher.d/20-chrony
/etc/chrony.conf
/etc/chrony.keys
/etc/dhcp/dhclient.d/chrony.sh
/etc/logrotate.d/chrony
/etc/sysconfig/chronyd
/usr/bin/chronyc
/usr/lib/systemd/ntp-units.d/50-chronyd.list
/usr/lib/systemd/system/[email protected]
/usr/lib/systemd/system/[email protected]
/usr/lib/systemd/system/chrony-wait.service
/usr/lib/systemd/system/chronyd.service
/usr/libexec/chrony-helper
/usr/sbin/chronyd
/usr/share/doc/chrony-3.2
/usr/share/doc/chrony-3.2/COPYING
/usr/share/doc/chrony-3.2/FAQ
/usr/share/doc/chrony-3.2/NEWS
/usr/share/doc/chrony-3.2/README
/usr/share/man/man1/chronyc.1.gz
/usr/share/man/man5/chrony.conf.5.gz
/usr/share/man/man8/chronyd.8.gz
/var/lib/chrony
/var/lib/chrony/drift
/var/lib/chrony/rtc
/var/log/chrony
[root@c7u6s1 security]#
接下来分别设置NTP的服务器和客户端。
2.1. 设置NTP服务器
修改配置文件 /etc/chrony.conf ,添加国内的互联网时间服务器。具体如下所示:
[root@c7u6s1 security]# vim /etc/chrony.conf
[root@c7u6s1 security]# cat /etc/chrony.conf | egrep '^[^#$].*'
pool cn.pool.ntp.org iburst maxsources 4
server ntp.aliyun.com iburst
server s1a.time.edu.cn iburst
driftfile /var/lib/chrony/drift
makestep 1.0 3
rtcsync
allow 192.168.122.0/24
local stratum 10
logdir /var/log/chrony
[root@c7u6s1 security]#
上述输出中过滤掉了注释和空行之后的有效配置内容,前3行增加了1个时间池和2个时间服务器(阿里云的时间服务器和北京邮电大学的时间服务器)。然后接下来在allow 192.168.122.0/24这一行指定了哪些主机可以连接到这个服务器同步时间,指定了192.168.122.0/24这个网段的主机可以连接到c7u6s1上进行时间同步。由于c7u6s1要当作内网的NTP服务器,建议开启local stratum 10这一行,表示即便c7u6s1与互联网时间服务器之间的时间同步操作失败,也允许客户端从该服务器进行时间同步。
修改完配置文件之后,重启服务,然后查看时间源信息,具体如下所示:
[root@c7u6s1 security]# systemctl restart chronyd
[root@c7u6s1 security]# ping ntp.aliyun.com
PING ntp.aliyun.com (203.107.6.88) 56(84) bytes of data.
64 bytes from 203.107.6.88 (203.107.6.88): icmp_seq=1 ttl=51 time=29.4 ms
64 bytes from 203.107.6.88 (203.107.6.88): icmp_seq=2 ttl=51 time=29.0 ms
^C
--- ntp.aliyun.com ping statistics ---
2 packets transmitted, 2 received, 0% packet loss, time 2583ms
rtt min/avg/max/mdev = 29.023/29.214/29.405/0.191 ms
[root@c7u6s1 security]# chronyc tracking
Reference ID    : CB6B0658 (203.107.6.88)
Stratum         : 3
Ref time (UTC)  : Sat Jun 26 09:44:54 2021
System time     : 0.000702305 seconds slow of NTP time
Last offset     : -0.001336256 seconds
RMS offset      : 0.001336256 seconds
Frequency       : 5.367 ppm slow
Residual freq   : -15.310 ppm
Skew            : 1.079 ppm
Root delay      : 0.042845245 seconds
Root dispersion : 0.002002266 seconds
Update interval : 64.4 seconds
Leap status     : Normal
[root@c7u6s1 security]# chronyc sources
210 Number of sources = 6
MS Name/IP address         Stratum Poll Reach LastRx Last sample
===============================================================================
^- time.cloudflare.com           3   6    37    50  -2662us[-2662us] +/-  103ms
^- undefined.hostname.local>     2   6    57    48  +5540us[+5540us] +/-  124ms
^- ntp1.flashdance.cx            2   6    37    51    -17ms[  -17ms] +/-  171ms
^- ntp7.flashdance.cx            2   6    35   114    -53ms[  -55ms] +/-  204ms
^* 203.107.6.88                  2   6    37    52    -74us[-1411us] +/-   23ms
^? 60.10.112.202.in-addr.ar>     0   7     0     -     +0ns[   +0ns] +/-    0ns
[root@c7u6s1 security]# chronyc sources -v
210 Number of sources = 6

  .-- Source mode  '^' = server, '=' = peer, '#' = local clock.
 / .- Source state '*' = current synced, '+' = combined , '-' = not combined,
| /   '?' = unreachable, 'x' = time may be in error, '~' = time too variable.
||                                                 .- xxxx [ yyyy ] +/- zzzz
||      Reachability register (octal) -.           |  xxxx = adjusted offset,
||      Log2(Polling interval) --.      |          |  yyyy = measured offset,
||                                \     |          |  zzzz = estimated error.
||                                 |    |           \
MS Name/IP address         Stratum Poll Reach LastRx Last sample
===============================================================================
^- time.cloudflare.com           3   6    37    59  -2662us[-2662us] +/-  103ms
^- undefined.hostname.local>     2   6    57    57  +5540us[+5540us] +/-  124ms
^- ntp1.flashdance.cx            2   6    37    60    -17ms[  -17ms] +/-  171ms
^- ntp7.flashdance.cx            2   6    35   123    -53ms[  -55ms] +/-  204ms
^* 203.107.6.88                  2   6    37    61    -74us[-1411us] +/-   23ms
^? 60.10.112.202.in-addr.ar>     0   7     0     -     +0ns[   +0ns] +/-    0ns
[root@c7u6s1 security]#
上述输出内容记录在图片中,如下图所示:
 ^*表示c7u6s1与这台时间服务器进行了时间同步,从上图中可以看出IP地址是203.107.6.88,对应的域名是ntp.aliyun.com。即c7u6s1与ntp.aliyun.com这台时间服务器进行了时间同步。
上图中各个域的符号含义解释如下:
第一列的 MS 的含义是时间源的模式(M)以及时间源的状态(S),其中M支持的符号有3种,分别如下所示:
- ^: 表示时间服务器
- =: 表示同级时间服务器(peer)
- #: 表示已经连接的局域网参考时间()
S支持的额符号有6种,分别如下所示: - *: 表示当前已经完成了与该时间源的时间同步
- +: 表示可接受的时间源,可以与已经选择的时间源进行组合的(combined)时间源
- -: 表示非组合的(not combined),即虽然是可接受的时间源,但是被组合算法排斥的时间源
- ?: 表示该时间源不可达,即该时间源的连接丢失,或者到该时间源发送的数据包没有通过全部测试,这种状态通常出现在刚启动的时候,直到从该时间源接受了至少3次尝试(samples)
- x: 表示该时间源的时间可能存在错误(即chronyd认为该时间源与其他主要的时间源之间存在时间不一致的情况)
- ~: 表示时间频繁变动(time too variable),即该时间源的时间不稳定
上述输出显示,c7u6s1已经与阿里云的时间源完成了时间同步。查看chronyd服务是否处于开机自动运行状态,如果没有处于enabled状态,那么需要执行命令systemctl enable chronyd将其设置为开机自动启动。具体如下所示:
[root@c7u6s1 security]# systemctl status chronyd
. chronyd.service - NTP client/server
   Loaded: loaded (/usr/lib/systemd/system/chronyd.service; enabled; vendor preset: enabled)
   Active: active (running) since Sat 2021-06-26 17:43:35 CST; 26min ago
     Docs: man:chronyd(8)
           man:chrony.conf(5)
  Process: 9358 ExecStartPost=/usr/libexec/chrony-helper update-daemon (code=exited, status=0/SUCCESS)
  Process: 9354 ExecStart=/usr/sbin/chronyd $OPTIONS (code=exited, status=0/SUCCESS)
 Main PID: 9356 (chronyd)
   CGroup: /system.slice/chronyd.service
           └─9356 /usr/sbin/chronyd

Jun 26 17:43:35 c7u6s1 systemd[1]: Stopped NTP client/server.
Jun 26 17:43:35 c7u6s1 systemd[1]: Starting NTP client/server...
Jun 26 17:43:35 c7u6s1 chronyd[9356]: chronyd version 3.2 starting (+CMDMON +NTP +REFCLOCK +RTC +PRIVDROP +SCFILTER +SECHASH +SIGND +A... +DEBUG)
Jun 26 17:43:35 c7u6s1 chronyd[9356]: Frequency -5.366 +/- 0.975 ppm read from /var/lib/chrony/drift
Jun 26 17:43:35 c7u6s1 systemd[1]: Started NTP client/server.
Jun 26 17:43:49 c7u6s1 chronyd[9356]: Selected source 162.159.200.1
Jun 26 17:43:50 c7u6s1 chronyd[9356]: Selected source 203.107.6.88
Jun 26 17:46:06 c7u6s1 chronyd[9356]: Source 193.182.111.142 replaced with 139.199.215.251
Hint: Some lines were ellipsized, use -l to show in full.
[root@c7u6s1 security]#
上述输出显示,其处于开机自动运行状态,所以无需执行systemctl enable chronyd命令。
接下来备份另一台NTP服务器的配置文件,并将 chrony.conf 这个配置文件拷贝过去,然后重启chronyd服务。具体如下:
在c7u6s2上备份配置文件
[root@c7u6s2 ~]# mv /etc/chrony.conf{,.bak}
[root@c7u6s2 ~]#
将c7u6s1上的配置文件拷贝到c7u6s2
[root@c7u6s1 security]# rsync -av --progress -e 'ssh -p 22 -l root' /etc/chrony.conf c7u6s2:/etc/
root@c7u6s2's password:
sending incremental file list
chrony.conf
          1,234 100%    0.00kB/s    0:00:00 (xfr#1, to-chk=0/1)

sent 1,331 bytes  received 35 bytes  248.36 bytes/sec
total size is 1,234  speedup is 0.90
[root@c7u6s1 security]#
在c7u6s2上重启chronyd这个服务
[root@c7u6s2 ~]# systemctl restart chronyd
[root@c7u6s2 ~]# systemctl status chronyd
. chronyd.service - NTP client/server
   Loaded: loaded (/usr/lib/systemd/system/chronyd.service; enabled; vendor preset: enabled)
   Active: active (running) since Sat 2021-06-26 18:13:24 CST; 3s ago
     Docs: man:chronyd(8)
           man:chrony.conf(5)
  Process: 8903 ExecStartPost=/usr/libexec/chrony-helper update-daemon (code=exited, status=0/SUCCESS)
  Process: 8899 ExecStart=/usr/sbin/chronyd $OPTIONS (code=exited, status=0/SUCCESS)
 Main PID: 8901 (chronyd)
   CGroup: /system.slice/chronyd.service
           └─8901 /usr/sbin/chronyd

Jun 26 18:13:24 c7u6s2 systemd[1]: Starting NTP client/server...
Jun 26 18:13:24 c7u6s2 chronyd[8901]: chronyd version 3.2 starting (+CMDMON +NTP +REFCLOCK +RTC +PRIVDROP +SCFILTER +SECHASH +SIGND +A... +DEBUG)
Jun 26 18:13:24 c7u6s2 chronyd[8901]: Frequency -5.396 +/- 0.039 ppm read from /var/lib/chrony/drift
Jun 26 18:13:24 c7u6s2 systemd[1]: Started NTP client/server.
Hint: Some lines were ellipsized, use -l to show in full.
[root@c7u6s2 ~]#
chronyd服务也是处于开机自动运行状态,所以无需执行systemctl enable chronyd命令。
查看c7u6s2的时间源以及时间同步情况,具体如下所示:
[root@c7u6s2 ~]# chronyc tracking
Reference ID    : CB6B0658 (203.107.6.88)
Stratum         : 3
Ref time (UTC)  : Sat Jun 26 10:13:38 2021
System time     : 0.000000175 seconds fast of NTP time
Last offset     : -0.000483101 seconds
RMS offset      : 0.000483101 seconds
Frequency       : 5.396 ppm slow
Residual freq   : -116.098 ppm
Skew            : 0.039 ppm
Root delay      : 0.040812578 seconds
Root dispersion : 0.006072729 seconds
Update interval : 0.0 seconds
Leap status     : Normal
[root@c7u6s2 ~]# chronyc sources
210 Number of sources = 6
MS Name/IP address         Stratum Poll Reach LastRx Last sample
===============================================================================
^- ntp1.flashdance.cx            2   6    17    47    -26ms[  -26ms] +/-  194ms
^- ntp.wdc1.us.leaseweb.net      2   6    17    47  +9726us[+9726us] +/-  237ms
^- time.cloudflare.com           3   6    17    48  -4287us[-4287us] +/-  104ms
^- 139.199.214.202               2   6    17    49  +6033us[+6033us] +/-   30ms
^* 203.107.6.88                  2   6    17    51   -414us[ -897us] +/-   22ms
^? 60.10.112.202.in-addr.ar>     0   7     0     -     +0ns[   +0ns] +/-    0ns
[root@c7u6s2 ~]# chronyc sources -v
210 Number of sources = 6

  .-- Source mode  '^' = server, '=' = peer, '#' = local clock.
 / .- Source state '*' = current synced, '+' = combined , '-' = not combined,
| /   '?' = unreachable, 'x' = time may be in error, '~' = time too variable.
||                                                 .- xxxx [ yyyy ] +/- zzzz
||      Reachability register (octal) -.           |  xxxx = adjusted offset,
||      Log2(Polling interval) --.      |          |  yyyy = measured offset,
||                                \     |          |  zzzz = estimated error.
||                                 |    |           \
MS Name/IP address         Stratum Poll Reach LastRx Last sample
===============================================================================
^- ntp1.flashdance.cx            2   6    17    59    -26ms[  -26ms] +/-  194ms
^- ntp.wdc1.us.leaseweb.net      2   6    17    59  +9726us[+9726us] +/-  237ms
^- time.cloudflare.com           3   6    17    60  -4287us[-4287us] +/-  104ms
^- 139.199.214.202               2   6    17    61  +6033us[+6033us] +/-   30ms
^* 203.107.6.88                  2   6    17    61   -414us[ -897us] +/-   22ms
^? 60.10.112.202.in-addr.ar>     0   7     0     -     +0ns[   +0ns] +/-    0ns
[root@c7u6s2 ~]#
c7u6s2同样与阿里云的时间源完成了时间同步。
至此,2台局域网环境的时间服务器设置完成。接下来将这两台服务器作为内网集群的时间源,同步其他客户端服务器的时间。
2.2. 设置NTP客户端
将需要时间同步的客户端的配置文件修改,注释掉原有的时间服务器,然后将服务器指定为上述两台服务器的IP地址。具体如下所示:
[root@c7u6s3 ~]# vim /etc/chrony.conf
[root@c7u6s3 ~]# cat /etc/chrony.conf
# Use public servers from the pool.ntp.org project.
# Please consider joining the pool (http://www.pool.ntp.org/join.html).
#server 0.centos.pool.ntp.org iburst
#server 1.centos.pool.ntp.org iburst
#server 2.centos.pool.ntp.org iburst
#server 3.centos.pool.ntp.org iburst
server 192.168.122.11 iburst
server 192.168.122.12 iburst


# Record the rate at which the system clock gains/losses time.
driftfile /var/lib/chrony/drift

# Allow the system clock to be stepped in the first three updates
# if its offset is larger than 1 second.
makestep 1.0 3

# Enable kernel synchronization of the real-time clock (RTC).
rtcsync

# Enable hardware timestamping on all interfaces that support it.
#hwtimestamp *

# Increase the minimum number of selectable sources required to adjust
# the system clock.
#minsources 2

# Allow NTP client access from local network.
#allow 192.168.0.0/16

# Serve time even if not synchronized to a time source.
#local stratum 10

# Specify file containing keys for NTP authentication.
#keyfile /etc/chrony.keys

# Specify directory for log files.
logdir /var/log/chrony

# Select which information is logged.
#log measurements statistics tracking
上述输出的第9、10行即为新添加的内网NTP服务器的IP地址。接下来在客户端上查看NTP服务器的时间源,具体如下所示:
[root@c7u6s3 ~]# chronyc sources -v
210 Number of sources = 4

  .-- Source mode  '^' = server, '=' = peer, '#' = local clock.
 / .- Source state '*' = current synced, '+' = combined , '-' = not combined,
| /   '?' = unreachable, 'x' = time may be in error, '~' = time too variable.
||                                                 .- xxxx [ yyyy ] +/- zzzz
||      Reachability register (octal) -.           |  xxxx = adjusted offset,
||      Log2(Polling interval) --.      |          |  yyyy = measured offset,
||                                \     |          |  zzzz = estimated error.
||                                 |    |           \
MS Name/IP address         Stratum Poll Reach LastRx Last sample
===============================================================================
^+ tick.ntp.infomaniak.ch        1  10   377   792  +2963us[+3739us] +/-   68ms
^- time.cloudflare.com           3  10   377   710  -6278us[-5499us] +/-  102ms
^- time.cloudflare.com           3  10   377   804  -6067us[-5292us] +/-  102ms
^* 119.28.206.193                2  10   377   606   +355us[+1136us] +/-   48ms
[root@c7u6s3 ~]# chronyc sources
210 Number of sources = 4
MS Name/IP address         Stratum Poll Reach LastRx Last sample
===============================================================================
^+ tick.ntp.infomaniak.ch        1  10   377   811  +2963us[+3739us] +/-   68ms
^- time.cloudflare.com           3  10   377   729  -6278us[-5499us] +/-  102ms
^- time.cloudflare.com           3  10   377   823  -6067us[-5292us] +/-  102ms
^* 119.28.206.193                2  10   377   625   +355us[+1136us] +/-   48ms
[root@c7u6s3 ~]# !vim
vim /etc/chrony.conf
[root@c7u6s3 ~]# systemctl reload chronyd
Failed to reload chronyd.service: Job type reload is not applicable for unit chronyd.service.
See system logs and 'systemctl status chronyd.service' for details.
[root@c7u6s3 ~]# systemctl restart chronyd
[root@c7u6s3 ~]# chronyc sources
210 Number of sources = 2
MS Name/IP address         Stratum Poll Reach LastRx Last sample
===============================================================================
^* c7u6s1.localhost              3   6     7     1   +289us[-4222us] +/-   20ms
^+ c7u6s2.localhost              3   6     7     1   -424us[-4935us] +/-   20ms
[root@c7u6s3 ~]#
[root@c7u6s3 ~]# chronyc sources -v
210 Number of sources = 2

  .-- Source mode  '^' = server, '=' = peer, '#' = local clock.
 / .- Source state '*' = current synced, '+' = combined , '-' = not combined,
| /   '?' = unreachable, 'x' = time may be in error, '~' = time too variable.
||                                                 .- xxxx [ yyyy ] +/- zzzz
||      Reachability register (octal) -.           |  xxxx = adjusted offset,
||      Log2(Polling interval) --.      |          |  yyyy = measured offset,
||                                \     |          |  zzzz = estimated error.
||                                 |    |           \
MS Name/IP address         Stratum Poll Reach LastRx Last sample
===============================================================================
^* c7u6s1.localhost              3   6   377    45   +994us[ +996us] +/-   20ms
^+ c7u6s2.localhost              3  10   377   491  -1214us[-1223us] +/-   21ms
[root@c7u6s3 ~]#
从上述输出种可以看出,在客户端上修改了配置文件之后,也需要重启chronyd,否则无法加载配置文件中更新的内容。从上述的时间源状态中可以看出,c7u6s3已经与c7u6s1这台时间源完成了时间同步。
至此,集群环境的2台时间源服务器和1台客户端配置操作就完成了。
3. kvm-qemu环境通过ipxe实现CentOS7系统自动化安装
3.1. iPXE介绍
iPXE是开源的网络启动固件,提供了增强版的PXE特性,比如:
- 可以从http协议的web服务器上启动系统
- 可以从iSCSI的SAN存储上启动
- 可以通过FCoE从Fibre Channel的SAN存储上启动
- 可以从AoE SAN存储上启动
- 可以从无线网络启动
- 可以从广域网启动
- 可以从Infiniband网络启动
- 使用脚本控制启动流程
可以将iPXE烧录到网卡的ROM芯片中替代原有的PXE;也可以通过chainload的形式在PXE的基础上启动系统,而无需将iPXE烧录到网卡的ROM芯片中。
下面将c7u6s1配置为iPXE服务器,通过c7u6s1安装CentOS7.6系统。
3.2. iPXE环境准备
要准备iPXE环境,c7u6s1上需要启动dhcpd、httpd以及tftp服务。其中dhcpd服务用于给新安装的虚拟机分配IP地址,httpd服务用于提供kickstart文件以及安装的软件源,tftp服务用于提供启动文件,比如此处的undionly.kpxe。
接下来准备这些服务:
- 安装并启动httpd服务
[root@c7u6s1 tftpboot]# yum install -y httpd Loaded plugins: fastestmirror, langpacks Loading mirror speeds from cached hostfile * base: mirrors.163.com * epel: mirrors.ustc.edu.cn * extras: mirrors.163.com * updates: mirrors.163.com Package httpd-2.4.6-97.el7.centos.x86_64 already installed and latest version Nothing to do [root@c7u6s1 tftpboot]# [root@c7u6s1 tftpboot]# systemctl enable --now httpd [root@c7u6s1 tftpboot]# systemctl status httpd . httpd.service - The Apache HTTP Server Loaded: loaded (/usr/lib/systemd/system/httpd.service; enabled; vendor preset: disabled) Active: active (running) since Wed 2021-06-30 17:14:22 CST; 4h 5min ago Docs: man:httpd(8) man:apachectl(8) Main PID: 13209 (httpd) Status: "Total requests: 983; Current requests/sec: 0; Current traffic: 0 B/sec" CGroup: /system.slice/httpd.service ├─13209 /usr/sbin/httpd -DFOREGROUND ├─13210 /usr/sbin/httpd -DFOREGROUND ├─13211 /usr/sbin/httpd -DFOREGROUND ├─13212 /usr/sbin/httpd -DFOREGROUND ├─13213 /usr/sbin/httpd -DFOREGROUND ├─13214 /usr/sbin/httpd -DFOREGROUND └─13220 /usr/sbin/httpd -DFOREGROUND Jun 30 17:14:22 c7u6s1 systemd[1]: Starting The Apache HTTP Server... Jun 30 17:14:22 c7u6s1 systemd[1]: Started The Apache HTTP Server. [root@c7u6s1 tftpboot]# - 安装并启动dhcp
dhcp服务需要做一些额外的配置,来配合iPXE启动,需要在指定分配的IP地址范围之外,将filename指定为 ***undionly.kpxe***这个文件,同时需要next-server指定tftp服务器的IP地址。具体如下所示:
上述就是完整的dhcp服务配置文件的内容。此处[root@c7u6s1 tftpboot]# yum install -y dhcp Loaded plugins: fastestmirror, langpacks Loading mirror speeds from cached hostfile * base: mirrors.163.com * epel: mirrors.bfsu.edu.cn * extras: mirrors.163.com * updates: mirrors.163.com Package 12:dhcp-4.2.5-83.el7.centos.1.x86_64 already installed and latest version Nothing to do [root@c7u6s1 tftpboot]# systemctl enable --now dhcpd Created symlink from /etc/systemd/system/multi-user.target.wants /dhcpd.service to /usr/lib/systemd/system/dhcpd.service. [root@c7u6s1 tftpboot]# systemctl status dhcpd . dhcpd.service - DHCPv4 Server Daemon Loaded: loaded (/usr/lib/systemd/system/dhcpd.service; enabled; vendor preset: disabled) Active: active (running) since Wed 2021-06-30 16:41:17 CST; 4h 40min ago Docs: man:dhcpd(8) man:dhcpd.conf(5) Main PID: 12935 (dhcpd) Status: "Dispatching packets..." CGroup: /system.slice/dhcpd.service └─12935 /usr/sbin/dhcpd -f -cf /etc/dhcp/dhcpd.conf -user dhcpd -group dhcpd --no-pid Jun 30 21:17:14 c7u6s1 dhcpd[12935]: DHCPREQUEST for 192.168.122.105 from 52:54:00:7b:5d:97 (c7u6sx) via eth0 Jun 30 21:17:17 c7u6s1 dhcpd[12935]: ns1.example.org: host unknown. Jun 30 21:17:19 c7u6s1 dhcpd[12935]: ns2.example.org: host unknown. Jun 30 21:17:19 c7u6s1 dhcpd[12935]: DHCPACK on 192.168.122.105 to 52:54:00:7b:5d:97 (c7u6sx) via eth0 Jun 30 21:17:19 c7u6s1 dhcpd[12935]: DHCPREQUEST for 192.168.122.105 from 52:54:00:7b:5d:97 (c7u6sx) via eth0 Jun 30 21:17:19 c7u6s1 dhcpd[12935]: DHCPACK on 192.168.122.105 to 52:54:00:7b:5d:97 (c7u6sx) via eth0 Jun 30 21:21:21 c7u6s1 dhcpd[12935]: DHCPREQUEST for 192.168.122.105 from 52:54:00:7b:5d:97 (c7u6sx) via eth0 Jun 30 21:21:24 c7u6s1 dhcpd[12935]: ns1.example.org: host unknown. Jun 30 21:21:27 c7u6s1 dhcpd[12935]: ns2.example.org: host unknown. Jun 30 21:21:27 c7u6s1 dhcpd[12935]: DHCPACK on 192.168.122.105 to 52:54:00:7b:5d:97 (c7u6sx) via eth0 [root@c7u6s1 tftpboot]# [root@c7u6s1 tftpboot]# cat /etc/dhcp/dhcpd.conf | egrep '^[^$|^#].*' option domain-name "example.org"; option domain-name-servers ns1.example.org, ns2.example.org; default-lease-time 600; max-lease-time 7200; log-facility local7; subnet 192.168.122.0 netmask 255.255.255.0 { range 192.168.122.100 192.168.122.150; option routers 192.168.122.1; filename "undionly.kpxe"; next-server 192.168.122.11; } [root@c7u6s1 tftpboot]# - 安装并启动tftp-server
[root@c7u6s1 tftpboot]# yum install -y tftp-server
Loaded plugins: fastestmirror, langpacks
Loading mirror speeds from cached hostfile
 * base: mirrors.163.com
 * epel: mirrors.ustc.edu.cn
 * extras: mirrors.163.com
 * updates: mirrors.163.com
Package tftp-server-5.2-22.el7.x86_64 already installed and latest version
Nothing to do
[root@c7u6s1 tftpboot]# vim /etc/xinetd.d/tftp
[root@c7u6s1 tftpboot]# egrep disable /etc/xinetd.d/tftp
        disable                 = no
[root@c7u6s1 tftpboot]# systemctl enable --now tftp
[root@c7u6s1 tftpboot]# systemctl status tftp
. tftp.service - Tftp Server
   Loaded: loaded (/usr/lib/systemd/system/tftp.service; indirect; vendor preset: disabled)
   Active: active (running) since Wed 2021-06-30 21:24:57 CST; 3s ago
     Docs: man:in.tftpd
 Main PID: 14149 (in.tftpd)
   CGroup: /system.slice/tftp.service
           └─14149 /usr/sbin/in.tftpd -s /var/lib/tftpboot

Jun 30 21:24:57 c7u6s1 systemd[1]: Started Tftp Server.
[root@c7u6s1 tftpboot]#
上面的服务准备好之后,就需要准备iPXE实现自动启动所需要的文件了。具体分为下面几部分:
- 网络引导文件 undionly.kpxe(UEFI环境下为ipxe.efi),放置在/var/lib/tftpboot/这个目录下面
- 网络引导文件关联的iPXE脚本文件 boot.ipxe,一般放置在/var/www/html/目录下面
- 光盘镜像文件,一般挂载在/var/www/html/下创建的与发行版相对应的目录下,比如此处挂载在/var/www/html/centos7/iso/这个目录下
- kickstart自动应答文件,此处使用 c7u6_virt_host.cfg
上述就是iPXE网络自动安装系统所需要准备的文件。其中第一个文件 undionly.kpxe 在系统软件包有提供。但是使用这个默认提供的文件,会导致网络引导阶段的死循环。要使用默认提供的文件,需要执行下面的操作,安装iPXE相关的软件包。在c7u6s1虚拟机上安装ipxe相关的软件包,具体如下所示:
[root@c7u6s1 tftpboot]# yum list | egrep '^ipxe.*' | gawk '{print $1}' | xargs -i yum install -y {}
Loaded plugins: fastestmirror, langpacks
Loading mirror speeds from cached hostfile
 * base: mirrors.163.com
 * epel: mirrors.bfsu.edu.cn
 * extras: mirrors.163.com
 * updates: mirrors.163.com
Package ipxe-bootimgs-20180825-3.git133f4c.el7.noarch already installed and latest version
Nothing to do
Loaded plugins: fastestmirror, langpacks
Loading mirror speeds from cached hostfile
 * base: mirrors.163.com
 * epel: mirrors.ustc.edu.cn
 * extras: mirrors.163.com
 * updates: mirrors.163.com
Package ipxe-roms-20180825-3.git133f4c.el7.noarch already installed and latest version
Nothing to do
Loaded plugins: fastestmirror, langpacks
Loading mirror speeds from cached hostfile
 * base: mirrors.163.com
 * epel: mirrors.ustc.edu.cn
 * extras: mirrors.163.com
 * updates: mirrors.163.com
Package ipxe-roms-qemu-20180825-3.git133f4c.el7.noarch already installed and latest version
Nothing to do
[root@c7u6s1 tftpboot]#
安装好之后,由于此处使用BIOS的形式,而非UEFI,所以可以将/usr/share/ipxe/undionly.kpxe这个文件拷贝到tftp服务器的家目录中。具体如下所示:
[root@c7u6s1 tftpboot]# cp /usr/share/ipxe/undionly.kpxe .
此时如果新建一个虚拟机并指定从网络引导,会出现如下图所示的情况:
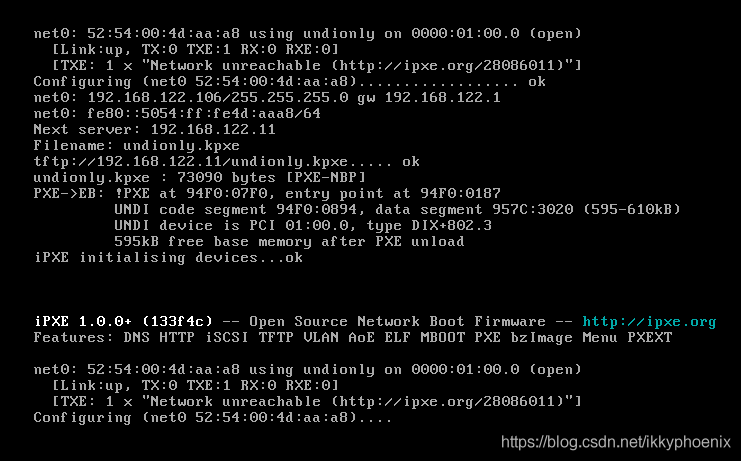 反复重复上述的过程。
官方文档提供了一种解决方案,就是自己编译。具体过程如下所示:
[root@c7u6s1 ~]# mkdir -p /root/softwares
[root@c7u6s1 softwares]# git clone git://git.ipxe.org/ipxe.gi
[root@c7u6s1 softwares]# cd src/config
[root@c7u6s1 config]# for f in `ls *.h`; do ln -s `pwd`/$f `pwd`/local/$f; done
上述第4条命令是在config目录下的所有.h头文件在config/local/目录下创建对应的链接文件,否则下面编译的时候会报错。
除此之外,还需要安装开发环境,以及xz-devel。具体如下所示:
[root@c7u6s1 config]# yum install @development xz-devel
上述软件包安装完成之后,就可以着手编译了。具体如下所示:
#准备一个ipxe脚本文件,告知undionly.kpxe去哪里找网络引导所需要的内核以及虚拟内存文件。
[root@c7u6s1 src]# pwd
/root/softwares/ipxe/src
[root@c7u6s1 src]# vim demo.ipxe
[root@c7u6s1 src]# cat demo.ipxe
#!ipxe

dhcp
chain http://192.168.122.11/boot.ipxe
[root@c7u6s1 src]#
[root@c7u6s1 src]# make bin/undionly.kpxe EMBED=demo.ipxe
上述的demo.ipxe文件中指定了引导脚本的路径为c7u6s1(192.168.122.11)服务器上的web服务器根目录下的boot.ipxe这个脚本文件。这个文件默认并不存在,需要后面创建。
等待上述过程完成,在src/bin/目录下就生成了对应的undionly.kpxe这个文件。然后将这个文件拷贝到/var/lib/tftpboot/目录下。具体如下所示:
[root@c7u6s1 src]# cp bin/undionly.kpxe /var/lib/tftpboot/
接下来准备boot.ipxe这个iPXE脚本文件,具体如下所示:
[root@c7u6s1 src]# pwd
/root/softwares/ipxe/src
[root@c7u6s1 src]# cd /var/www/html/
[root@c7u6s1 html]# vim boot.ipxe
[root@c7u6s1 html]# cat boot.ipxe
#!ipxe

:start
menu PXE Boot Options
item shell iPXE shell
item centos7-net CentOS 7 installation
item exit  Exit to BIOS

choose --default centos7-net --timeout 6000 option && goto ${option}

:shell
shell

:centos7-net
set server_root http://192.168.122.11/centos7
initrd ${server_root}/iso/images/pxeboot/initrd.img
#kernel ${server_root}/iso/images/pxeboot/vmlinuz inst.repo=${server_root}/ ip=dhcp ipv6.disable initrd=initrd.img inst.geoloc=0 devfs=nomount
kernel ${server_root}/iso/images/pxeboot/vmlinuz inst.ks=${server_root}/c7u6_virt_host.cfg ip=dhcp ipv6.disable initrd=initrd.img inst.geoloc=0 devfs=nomount
boot

:exit
exit
[root@c7u6s1 html]#
上述脚本中指定了1个菜单项,即CentOS7-net,并在其中指定了网络启动所需要的内核文件以及虚拟内存文件。同时在内核文件中通过参数inst.ks指定了kickstart文件的路径。这三个文件都是通过web服务器提供的。
接下来准备上述的光盘ISO镜像挂载,由于我系统上已经通过fstab自动挂载了iso文件到/media/iso这个目录下,所以此处只需要在/var/www/html/目录下创建对应的发行版目录centos7/iso/,然后将/media/iso绑定到/var/www/html/centos7/iso/目录上即可。具体如下所示:
[root@c7u6s1 html]# cat /etc/fstab | tail -n1
/dev/sr1        /media/iso      iso9660 defaults,loop   0 0
[root@c7u6s1 html]# mkdir -p centos7/iso
[root@c7u6s1 html]# mount --bind /media/iso /var/www/html/centos7/iso
[root@c7u6s1 iso]# pwd
/var/www/html/centos7/iso
[root@c7u6s1 iso]# ls images/
efiboot.img  pxeboot  TRANS.TBL
[root@c7u6s1 iso]# ls images/pxeboot/
initrd.img  TRANS.TBL  vmlinuz
[root@c7u6s1 iso]#
上述就完成了光盘镜像文件的准备操作,注意使用绝对路径。
最后准备kickstart文件,具体如下所示:
[root@c7u6s1 centos7]# pwd
/var/www/html/centos7
[root@c7u6s1 centos7]#
[root@c7u6s1 centos7]# vim c7u6_virt_host.cfg
[root@c7u6s1 centos7]# cat c7u6_virt_host.cfg
#version=DEVEL
# System authorization information
auth --enableshadow --passalgo=sha512
# Use CDROM installation media
#cdrom
# Use text mode install
install
text
reboot
url --url=http://192.168.122.11/centos7/iso
# Run the Setup Agent on first boot
firstboot --enable
ignoredisk --only-use=vda
# Keyboard layouts
keyboard --vckeymap=us --xlayouts=''
# System language
lang en_US.UTF-8

# Network informationnetwork  --bootproto=dhcp --device=eth0 --onboot=yes --ipv6=no --no-activate                                                                    #network  --bootproto=dhcp --device=eth1 --onboot=off --ipv6=autonetwork  --hostname=c7u6sx

# Root password
rootpw --iscrypted $6$wYQ4sQUHYVmetic4$ULf257dlixXfr3zfXj5bRZ6wzt0zZDGWDYg3zvsEFNggMWhob7zU0ZCNoM4dyxWNfcb7EkOMYW3..oePpZjqJ.
# System services
services --enabled="chronyd"
selinux --disabled
firewall --disabled
# Do not configure the X Window System
skipx
# System timezone
timezone Asia/Shanghai --isUtc
user --groups=wheel --name=albert --password=$6$TsBO3LGhk7nFEV.V$U4.Ke7W5M2Gjc.4wgA91Of7tUC1wRMBatHpM51Uj2xSGMTXr6H3EdY3LKvPdgWjZjVlZrJdsProzVnCuzeu2I/ --iscrypted --gecos="Albert Qee"
# System bootloader configuration
bootloader --location=mbr --boot-drive=vda
#autopart --type=lvm
# Partition clearing information
clearpart --all --initlabel --drives=vda
# Disk partitioning information
part /boot --fstype="ext4" --size=512
part swap --fstype="swap" --size=1024
part pv.01 --fstype="lvmpv" --size=1 --grow
volgroup vg0 --pesize=4096 pv.01
#logvol / --fstype='xfs' --size=39424 --name=root --vgname=vg0
logvol / --fstype="xfs" --size=1 --name=root --vgname=vg0 --grow

%packages
@base
@core
chrony
vim-enhanced
tree
%end

%addon com_redhat_kdump --disable --reserve-mb='auto'

%end

%anaconda
pwpolicy root --minlen=6 --minquality=1 --notstrict --nochanges --notempty
pwpolicy user --minlen=6 --minquality=1 --notstrict --nochanges --emptyok
pwpolicy luks --minlen=6 --minquality=1 --notstrict --nochanges --notempty
%end

%post
mkdir /root/.ssh -m 600
cat > /root/.ssh/authorized_keys << EOF
ssh-rsa AAAAB3NzaC1yc2EAAABDAQABAAABgQC8u+h0pbgbTZ+n54HyWVl8GoGEEjLDjA7O5Zrt55pZes0Dkwr4XqqlO+Wse/UJ3BqsAmLVoZEk7b8KbUxuGu5gauWEn0TAl4FzhP1h8YdUIfMWVKrzXH+7/IMXnrwHyaNFqoadp5KLTZeU4gKM6TVjvU2NZ6qIXU6L7OFMSZ+74g9Z2U8Ce7xp1AnodD1rGR4LoXcd8I/mCPZN0RP7rzH4UXdoe9cP431XYbWfiPPu4EjBpPylxXQ5Uq2drS0f+3ZRf1tIicXtWcGqb8M3T1efRy2MjgFhuC6YPU0+JDCCV8oNrBUyu5ifsRtbjaFpPrlkrmV7dm2Q2A1F3kYjCod9Ri5hDQ/oPIcBvAmCv7zDmK6HAX9Va9qNWL5uzVeUXGneTLtThBaHiQu//LNTSSTaPHYwZQbnMtBEG790hLCjCXAabpDWWr/jQFPNozMIqBDx5xjLqC2kwnomRuC2p8days/LVnVXsCur+vscmHu0oA6MX3aRj/xn3sqXjBVbG88= root@amdhost
EOF
chmod 600 /root/.ssh/authorized_keys
%end
#reboot
#halt
#poweroff
上述就是kickstart文件的全部内容,在上述kickstart文件的末尾通过脚本脚宿主机的root用户的公钥文件加入到新建虚拟机的root用户的/root/.ssh/authorized_keys这个文件中,并且设置对应目录和文件的权限为适当的权限。以便系统安装完成之后,就可以自动完成root身份的公钥验证登录。
至此,iPXE服务器就准备完成了。在开始安装之前,需要设置下Virt-Manager的网络,将virbr0的DHCP功能关闭。具体如下所示:
[root@LiuXianQiE networks]# virsh net-list
 Name      State    Autostart   Persistent
--------------------------------------------
 default   active   yes         yes
 vnet11    active   yes         yes
 vnet12    active   yes         yes
 vnet13    active   yes         yes
 vnet14    active   yes         yes

[root@LiuXianQiE networks]# virsh net-edit default
<network>
  <name>default</name>
  <uuid>7b03db65-aa5e-44ed-8961-d72ece83ce95</uuid>
  <forward mode='nat'/>
  <bridge name='virbr0' stp='on' delay='0'/>
  <mac address='52:54:00:45:1e:56'/>
  <ip address='192.168.122.1' netmask='255.255.255.0'>
      <!--
  	  <dhcp>
		  <range start="192.168.122.2" end="192.168.122.254" />
	  </dhcp>
      -->
  </ip>
</network>
上述命令将
[root@LiuXianQiE networks]# pwd
/etc/libvirt/qemu/networks
[root@LiuXianQiE networks]# ls
autostart  default.xml
[root@LiuXianQiE networks]# cat default.xml
<!--
WARNING: THIS IS AN AUTO-GENERATED FILE. CHANGES TO IT ARE LIKELY TO BE
OVERWRITTEN AND LOST. Changes to this xml configuration should be made using:
  virsh net-edit default
or other application using the libvirt API.
-->

<network>
  <name>default</name>
  <uuid>7b03db65-aa5e-44ed-8961-d72ece83ce95</uuid>
  <forward mode='nat'/>
  <bridge name='virbr0' stp='on' delay='0'/>
  <mac address='52:54:00:45:1e:56'/>
  <ip address='192.168.122.1' netmask='255.255.255.0'>
  </ip>
</network>
[root@LiuXianQiE networks]#
注释掉之后,退出virsh net-edit default之后,就自动将注释的内容删除了。所以从命令行直接查看该文件的时候,就发现该文件的dhcp部分已经消失了。
至此,新建的虚拟机就不会从virbr0自动获取IP地址了,而是从c7u6s1这个虚拟机上配置的DHCP服务器上获取IP地址。接下来就可以准备新的虚拟机,并通过iPXE自动安装系统了。
3.3. 通过iPXE安装系统
在Virtual Machine Manager的图形界面中创建新的虚拟机,具体如下所示:

点击上图的棕色方框创建新的虚拟机,弹出窗口如下:

选择第三项PXE,然后点击Forward进行下一步设置。具体如下所示:

在搜索框中输入要安装的发行版名称,然后在自动弹出的下拉框中选择对应的发行版,此处选择CentOS 7,因为我们这里将要安装CentOS 7.6。
接下来设置新虚拟机的内存,和CPU核心数,具体如下所示:

此处的内存容量不宜低于2G,如果低于2G,在安装的时候将会报错。
接下来设置存储,具体如下所示:
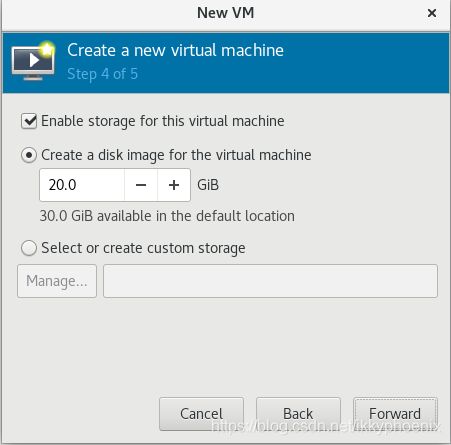
接下来指定虚拟机的名称,这里的名称是Virtual Machine Manager以及virsh命令管理的时候所看到的名称,而不是虚拟机的主机名。具体如下所示:
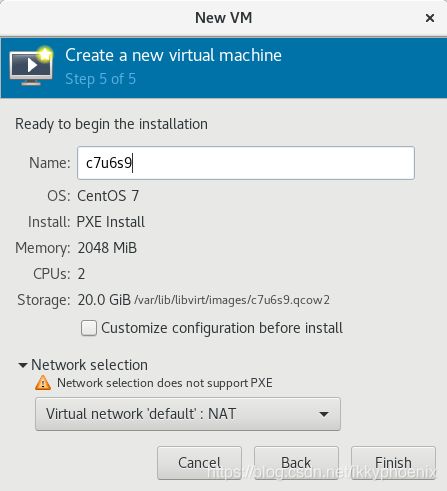
点击完成之后,由于Virtual Machine Manager中默认没有选中网络启动,所以还需要设置下网络启动。具体如下所示:
 将网络启动设置为第一启动项,在完成安装之后,需要再将本地硬盘作为第一启动项,即上图的第二个启动项。
此时点击启动虚拟机的按钮,即可开始自动系统安装,具体如下所示:
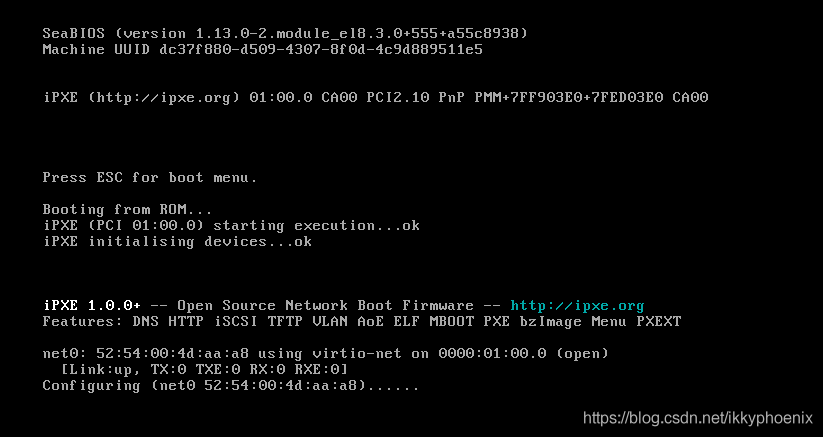 上述就是在给虚拟机从DHCP服务器请求IP地址,请求完成之后,就会进入到iPXE的启动引导菜单,具体如下所示:
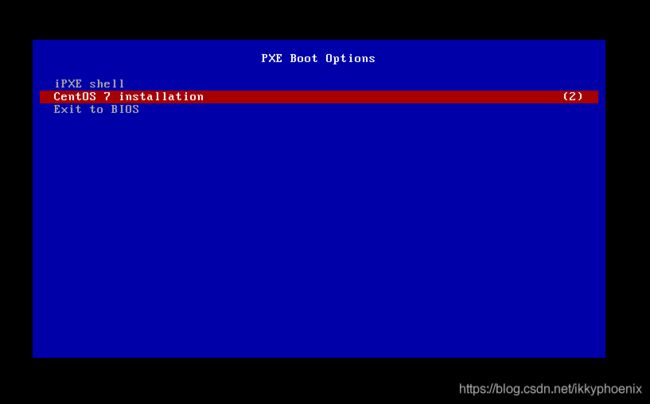 默认等待6秒,就开始从默认的CentOS 7开始进行安装。具体如下所示:
 上述完成了磁盘分区并且已经开始了软件包安装。等待安装过程完成即可。
安装完成之后,将启动项修改为本地磁盘启动即可。
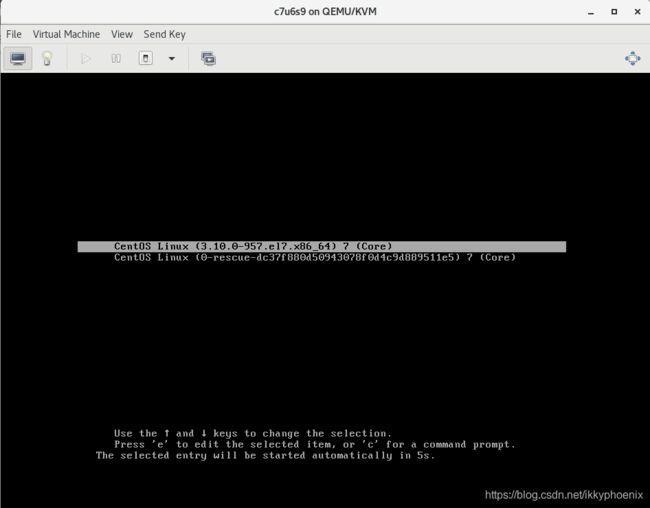 上述即为从本地硬盘启动之后的视图。
从宿主机上连接上述虚拟机,具体如下所示:
[root@LiuXianQiE networks]# virsh domifaddr c7u6s9 --source agent
 Name       MAC address          Protocol     Address
-------------------------------------------------------------------------------
 lo         00:00:00:00:00:00    ipv4         127.0.0.1/8
 -          -                    ipv6         ::1/128
 eth0       52:54:00:4d:aa:a8    ipv4         192.168.122.60/24
 -          -                    ipv6         fe80::5054:ff:fe4d:aaa8/64

[root@LiuXianQiE networks]#
[root@LiuXianQiE networks]# ssh -o StrictHostKeyChecking=no 192.168.122.60
Warning: Permanently added '192.168.122.60' (ECDSA) to the list of known hosts.
[root@c7u6sx ~]# ip addr show eth0
2: eth0: <BROADCAST,MULTICAST,UP,LOWER_UP> mtu 1500 qdisc pfifo_fast state UP group default qlen 1000
    link/ether 52:54:00:4d:aa:a8 brd ff:ff:ff:ff:ff:ff
    inet 192.168.122.60/24 brd 192.168.122.255 scope global noprefixroute dynamic eth0
       valid_lft 3322sec preferred_lft 3322sec
    inet6 fe80::5054:ff:fe4d:aaa8/64 scope link noprefixroute
       valid_lft forever preferred_lft forever
[root@c7u6sx ~]# hostnamectl set-hostname c7u6s9
[root@c7u6sx ~]# exit
logout
Connection to 192.168.122.60 closed.
[root@LiuXianQiE networks]# ssh 192.168.122.60
Last login: Wed Jun 30 23:26:14 2021 from 192.168.122.1
[root@c7u6s9 ~]#
上述执行virsh domifaddr c7u6s9命令查看新建虚拟机的IP地址,然后通过ssh -o StrictHostKeyChecking=no 192.168.122.60连接到新建的虚拟机,表示不询问直接将远程主机的公钥加入到本地主机的known_hosts这个文件中。第一次加入之后,第二次连接就不会再提示了,所以可以省略掉-o StrictHostKeyChecking=no这个选项。
说明我们在kickstart文件的%post...%end部分指定的后向安装脚本正常生效了。
另外,我们在dhcpd服务的配置文件中指定的自动分配的IP地址范围是100-150,但是这里虚拟机安装完系统之后获得IP地址是192.168.122.60,并不在这个范围。猜测应该是Virutal Machine Manager在启动虚拟机的时候,自动给其分配了IP地址,此时查看Virutal Machine Manager中的virbr0的配置文件,具体如下所示:
此时查看dhcpd服务的状态信息,发现在系统安装阶段,确实分配了100-150这个网段范围内的IP地址,具体如下所示:
[root@c7u6s1 tftpboot]# systemctl status dhcpd
● dhcpd.service - DHCPv4 Server Daemon
   Loaded: loaded (/usr/lib/systemd/system/dhcpd.service; enabled; vendor preset: disabled)
   Active: active (running) since Wed 2021-06-30 16:41:17 CST; 6h ago
     Docs: man:dhcpd(8)
           man:dhcpd.conf(5)
 Main PID: 12935 (dhcpd)
   Status: "Dispatching packets..."
   CGroup: /system.slice/dhcpd.service
           └─12935 /usr/sbin/dhcpd -f -cf /etc/dhcp/dhcpd.conf -user dhcpd -group dhcpd --no-pid

Jun 30 23:22:56 c7u6s1 dhcpd[12935]: ns2.example.org: host unknown.
Jun 30 23:22:56 c7u6s1 dhcpd[12935]: DHCPACK on 192.168.122.105 to 52:54:00:7b:5d:97 (c7u6sx) via eth0
Jun 30 23:27:27 c7u6s1 dhcpd[12935]: DHCPREQUEST for 192.168.122.105 from 52:54:00:7b:5d:97 (c7u6sx) via eth0
Jun 30 23:27:30 c7u6s1 dhcpd[12935]: ns1.example.org: host unknown.
Jun 30 23:27:33 c7u6s1 dhcpd[12935]: ns2.example.org: host unknown.
Jun 30 23:27:33 c7u6s1 dhcpd[12935]: DHCPACK on 192.168.122.105 to 52:54:00:7b:5d:97 (c7u6sx) via eth0
Jun 30 23:32:07 c7u6s1 dhcpd[12935]: DHCPREQUEST for 192.168.122.105 from 52:54:00:7b:5d:97 (c7u6sx) via eth0
Jun 30 23:32:10 c7u6s1 dhcpd[12935]: ns1.example.org: host unknown.
Jun 30 23:32:13 c7u6s1 dhcpd[12935]: ns2.example.org: host unknown.
Jun 30 23:32:13 c7u6s1 dhcpd[12935]: DHCPACK on 192.168.122.105 to 52:54:00:7b:5d:97 (c7u6sx) via eth0
[root@c7u6s1 tftpboot]#
从上述输出中可以看出,在系统安装过程中,给虚拟机分配了192.168.122.106这个IP地址。查看日志信息如下所示:
[root@c7u6s1 tftpboot]# less /var/log/messages
Jun 30 23:16:04 c7u6s1 in.tftpd[14467]: Client ::ffff:192.168.122.106 finished undionly.kpxe
Jun 30 23:16:05 c7u6s1 dhcpd: DHCPDISCOVER from 52:54:00:4d:aa:a8 via eth0
Jun 30 23:16:05 c7u6s1 dhcpd: DHCPOFFER on 192.168.122.106 to 52:54:00:4d:aa:a8 via eth0
Jun 30 23:16:06 c7u6s1 dhcpd: DHCPDISCOVER from 52:54:00:4d:aa:a8 via eth0
Jun 30 23:16:06 c7u6s1 dhcpd: DHCPOFFER on 192.168.122.106 to 52:54:00:4d:aa:a8 via eth0
Jun 30 23:16:08 c7u6s1 dhcpd: DHCPREQUEST for 192.168.122.106 (192.168.122.11) from 52:54:00:4d:aa:a8 via eth0
Jun 30 23:16:08 c7u6s1 dhcpd: DHCPACK on 192.168.122.106 to 52:54:00:4d:aa:a8 via eth0
Jun 30 23:16:09 c7u6s1 dhcpd: DHCPDISCOVER from 52:54:00:4d:aa:a8 via eth0
Jun 30 23:16:09 c7u6s1 dhcpd: DHCPOFFER on 192.168.122.106 to 52:54:00:4d:aa:a8 via eth0
Jun 30 23:16:10 c7u6s1 in.tftpd[14468]: Client ::ffff:192.168.122.11 timed out
Jun 30 23:16:10 c7u6s1 in.tftpd[14469]: Client ::ffff:192.168.122.11 timed out
Jun 30 23:16:10 c7u6s1 in.tftpd[14470]: Client ::ffff:192.168.122.11 timed out
Jun 30 23:16:11 c7u6s1 dhcpd: DHCPREQUEST for 192.168.122.106 (192.168.122.11) from 52:54:00:4d:aa:a8 via eth0
Jun 30 23:16:11 c7u6s1 dhcpd: DHCPACK on 192.168.122.106 to 52:54:00:4d:aa:a8 via eth0
Jun 30 23:16:12 c7u6s1 dhcpd: DHCPDISCOVER from 52:54:00:4d:aa:a8 via eth0
Jun 30 23:16:12 c7u6s1 dhcpd: DHCPOFFER on 192.168.122.106 to 52:54:00:4d:aa:a8 via eth0
Jun 30 23:16:14 c7u6s1 dhcpd: DHCPREQUEST for 192.168.122.106 (192.168.122.11) from 52:54:00:4d:aa:a8 via eth0
Jun 30 23:16:14 c7u6s1 dhcpd: DHCPACK on 192.168.122.106 to 52:54:00:4d:aa:a8 via eth0
Jun 30 23:16:15 c7u6s1 dhcpd: DHCPDISCOVER from 52:54:00:4d:aa:a8 via eth0
Jun 30 23:16:15 c7u6s1 dhcpd: DHCPOFFER on 192.168.122.106 to 52:54:00:4d:aa:a8 via eth0
Jun 30 23:16:17 c7u6s1 dhcpd: DHCPREQUEST for 192.168.122.106 (192.168.122.11) from 52:54:00:4d:aa:a8 via eth0
Jun 30 23:16:17 c7u6s1 dhcpd: DHCPACK on 192.168.122.106 to 52:54:00:4d:aa:a8 via eth0
Jun 30 23:16:18 c7u6s1 dhcpd: DHCPDISCOVER from 52:54:00:4d:aa:a8 via eth0
Jun 30 23:16:18 c7u6s1 dhcpd: DHCPOFFER on 192.168.122.106 to 52:54:00:4d:aa:a8 via eth0
Jun 30 23:16:20 c7u6s1 dhcpd: DHCPREQUEST for 192.168.122.106 (192.168.122.11) from 52:54:00:4d:aa:a8 via eth0
Jun 30 23:16:20 c7u6s1 dhcpd: DHCPACK on 192.168.122.106 to 52:54:00:4d:aa:a8 via eth0
Jun 30 23:16:34 c7u6s1 dhcpd: DHCPDISCOVER from 52:54:00:4d:aa:a8 via eth0
Jun 30 23:16:34 c7u6s1 dhcpd: DHCPREQUEST for 192.168.122.60 (192.168.122.1) from 52:54:00:4d:aa:a8 via eth0: unknown lease 192.168.122.60.
但是后面确实通过c7u6s1的dhcp服务为其分配了192.168.122.60这个IP地址。
至此,通过iPXE基于kickstart实现的自动化CentOS7.6系统安装操作就完成了。
4. References
[1]. How to install Gnome on Ubuntu 20.04 LTS Focal Fossa
[2]. Build your own PXE boot server
[3]. iPXE
[4]. Chainloading iPXE
[5]. Disable DHCP on a QEMU/libvirt/KVM Network
