Spring Boot配置文件详解
1.配置文件
Spring Boot提供了两种常用的配置文件,分别是properties文件和yml文件,配置文件名是固定的application,配置文件放在src/main/resources目录或者类路径/config下。他们的作用都是修改Spring Boot自动配置的默认值。相对于properties文件而言,yml文件更年轻,也有很多的坑,语法的要求也是特别的严格,yml通过空格来确定层级关系,使配置文件结构更清晰,但也会因为微不足道的空格而破坏了层级关系。
yml配置文件http://www.yaml.org/ 参考语法
2.YAML语法
1、YAML基本语法
– 使用缩进表示层级关系
– 缩进时不允许使用Tab键,只允许使用空格。
– 缩进的空格数目不重要,只要相同层级的元素左侧对齐即可
– 大小写敏感
在这里大家要注意一点在冒号后边记得要添加空格否则会报错
server:
   port: 8081
   path: /hel
2、值的写法
字面量:普通的值(数字,字符串,布尔)
k: v:字面直接来写;
"":双引号;不会转义字符串里面的特殊字符;特殊字符会作为本身想表示的意思
name: "zhangsan \n lisi":输出;zhangsan 换行 lisi
'':单引号;会转义特殊字符,特殊字符最终只是一个普通的字符串
name: ‘zhangsan \n lisi’:输出;zhangsan \n lisi
对象、Map(属性和值)(键值对)
k: v:在下一行来写对象的属性和值的关系;注意缩进
对象还是k: v的
  person:
     name: 张三
     age: 18
     boss: true
行内写法
person:{ name: 张三 ,age: 18,boss: true}数组(List、Set):
用- 值表示数组中的一个元素
    list:
       -李四
       -王五
行内写法
list: [张三,李四]复合结构:上面三种数据结构任意组合
 person:
     name: 张三
     age: 18
     boss: true
     birthday: 2017/12/12
     hashmap: {k1:1,k2:2}
     list:
        -李四
        -王五
     dog:
         dogname: 狗子
         dogage: 1
3、配置文件值注入
1.值注入
配置文件就用上边的那个复合结构的yml文件
javabean:
package com.example.demo.bean;


import org.springframework.boot.context.properties.ConfigurationProperties;
import org.springframework.context.annotation.PropertySource;
import org.springframework.stereotype.Component;


import java.util.Date;
import java.util.List;
import java.util.Map;

/**
 * 将配置文件中配置的每一个属性的值,映射到这个组件中
 * @ConfigurationProperties:告诉SpringBoot将本类中的所有属性和配置文件中相关的配置进行绑定;
 * prefix = "person":配置文件中哪个下面的所有属性进行一一映射
 *
 * 只有这个组件是容器中的组件,才能容器提供的@ConfigurationProperties功能;
 * @ConfigurationProperties(prefix = "person")默认从全局配置文件中获取值;
 *
 */
@Component
@ConfigurationProperties(prefix = "person")
public class Person {

    private String name;
    private Integer age;
    private Boolean boss;
    private Date  birthday;
    private Map hashmap;
    private List list;
    private Dog dog;

    @Override
    public String toString() {
        return "Person{" +
                "name='" + name + '\'' +
                ", age=" + age +
                ", boss=" + boss +
                ", birthday=" + birthday +
                ", hashmap=" + hashmap +
                ", list=" + list +
                ", dog=" + dog +
                '}';
    }

    public String getName() {
        return name;
    }

    public void setName(String name) {
        this.name = name;
    }

    public Integer getAge() {
        return age;
    }

    public void setAge(Integer age) {
        this.age = age;
    }

    public Boolean getBoss() {
        return boss;
    }

    public void setBoss(Boolean boss) {
        this.boss = boss;
    }

    public Date getBirthday() {
        return birthday;
    }

    public void setBirthday(Date birthday) {
        this.birthday = birthday;
    }

    public Map getHashmap() {
        return hashmap;
    }

    public void setHashmap(Map hashmap) {
        this.hashmap = hashmap;
    }

    public List getList() {
        return list;
    }

    public void setList(List list) {
        this.list = list;
    }

    public Dog getDog() {
        return dog;
    }

    public void setDog(Dog dog) {
        this.dog = dog;
    }
}
在使用@ConfigurationProperties注解的时候可能会报一个错,你只要在你的pom文件中添加上
            org.springframework.boot
            spring-boot-configuration-processor
            true
然后我们测试是否可以正常使用
测试类:
package com.example.demo;

import com.example.demo.bean.Person;
import org.junit.Test;
import org.junit.runner.RunWith;
import org.springframework.beans.factory.annotation.Autowired;
import org.springframework.boot.test.context.SpringBootTest;
import org.springframework.context.ApplicationContext;
import org.springframework.test.context.junit4.SpringRunner;

@RunWith(SpringRunner.class)
@SpringBootTest
public class DemoApplicationTests {
	@Autowired
      Person person;

	@Test
	public void contextLoads() {
		System.out.println(person);
	}

}
测试结果:
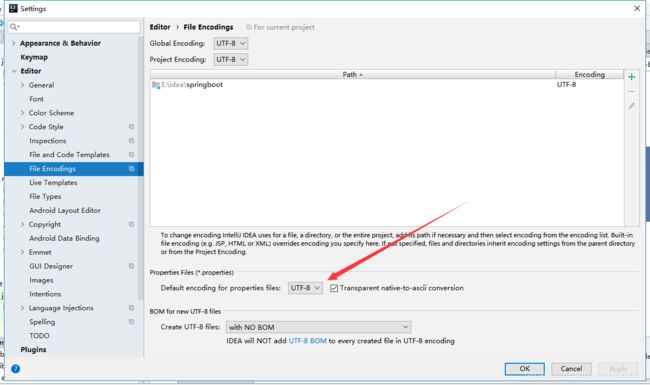
2.properties配置文件在idea中默认utf-8可能会乱码
至于properties文件我相信大家都比较熟悉了这里也就不废话了
只是properties配置文件在idea中默认utf-8可能会乱码所以我们要修改一个idea的设置即可
3.@value
配置文件的值注入还有一个注解也可以达到效果是@value
结果为:
4.@Value获取值和@ConfigurationProperties获取值比较
| @ConfigurationPropertie | @Value | |
| 功能 | 批量注入配置文件中的属性 | 一个一个的指定 |
| 松散绑定(松散语法) | 支持 | 不支持 |
| SpEL | 不支持 | 支持 |
| JSR303数据校 | 支持 | 不支持 |
| 复杂类型封 | 支持 | 不支持 |
所以我们得出结论:
如果说,我们只是在某个业务逻辑中需要获取一下配置文件中的某项值,使用@Value;
如果说,我们专门编写了一个javaBean来和配置文件进行映射,我们就直接使用@ConfigurationProperties;
5、@PropertySource&@ImportResource&@Bean
2.@ImportResource:导入Spring的配置文件,让配置文件里面的内容生效;Spring Boot里面没有Spring的配置文件,我们自己编写的配置文件,也不能自动识别;想让Spring的配置文件生效,加载进来;@ImportResource标注在一个配置类上
示例:
package com.example.demo;

import org.springframework.boot.SpringApplication;
import org.springframework.boot.autoconfigure.SpringBootApplication;
import org.springframework.context.annotation.ImportResource;

@ImportResource(value = {"classpath:bean.xml"})
@SpringBootApplication
public class DemoApplication {

	public static void main(String[] args) {
		SpringApplication.run(DemoApplication.class, args);
	}

}
测试类:
package com.example.demo;

import com.example.demo.bean.Person;
import org.junit.Test;
import org.junit.runner.RunWith;
import org.springframework.beans.factory.annotation.Autowired;
import org.springframework.boot.test.context.SpringBootTest;
import org.springframework.context.ApplicationContext;
import org.springframework.test.context.junit4.SpringRunner;

@RunWith(SpringRunner.class)
@SpringBootTest
public class DemoApplicationTests {

	@Autowired
	ApplicationContext applicationContext;

	@Test
	public void testapplicationContext(){
        boolean testService = applicationContext.containsBean("testService");
        System.out.println(testService);
    }


}
结果:
但是spring-boot不推荐你用这种方式加载bean的方式推荐的是全注解的方式
这里就需要使用到@Bean注解了
3.@Bean
@Configuration//指明当前类是一个配置类;就是来替代之前的Spring配置文件在配置文件中用4、配置文件占位符
1、随机数
${random.value}、${random.int}、${random.long}${random.int(10)}、${random.int[1024,65536]}
2、占位符获取之前配置的值,如果没有可以是用:指定默认值
person.last‐name=张三${random.uuid}
person.age=${random.int}
person.birth=2017/12/15
person.boss=false
person.maps.k1=v1
person.maps.k2=14
person.lists=a,b,c
person.dog.name=${person.hello:hello}_dog
person.dog.age=15
5、Profile
1、多Profile文件
我们在主配置文件编写的时候,文件名可以是 application-{profile}.properties/yml
默认使用properties配置
2、yml支持多文档块方式
使用---隔开每一部分是一个文档块
server:
port: 8081
spring:
profiles:
active: prod
‐‐‐
server:
port: 8083
spring:
profiles: dev
‐‐‐
server:
port: 8084
spring:
profiles: prod #指定属于哪个环境
3、激活指定profile
1、在配置文件中指定 spring.profiles.active=prod
如果使用的yaml的多文档块也是一样的指令添加在上方的文档块中即可
server.port=8081
spring.profiles.active=prod
我们在prod文件中定义的启动端口为8084
2、命令行:--spring.profiles.active=dev;可以直接在测试的时候,配置传入命令行
我们使用的idea可以直接添加上命令行参数
也可以打成jar包之后使用指令启动时加上命令行参数,所以这种配置的优先级是比第一种要高的
3、虚拟机参数;-Dspring.profiles.active=dev
这种配置的优先级也比第一种高
6、配置文件加载位置
springboot 启动会扫描以下位置的application.properties或者application.yml文件作为Spring boot的默认配置文
件
–file:./config/
–file:./
–classpath:/config/
–classpath:/
优先级由高到底,高优先级的配置会覆盖低优先级的配置;
SpringBoot会从这四个位置全部加载主配置文件;互补配置;
我们还可以通过spring.config.location来改变默认的配置文件位置
指令为:
--spring.config.location=配置文件物理地址7、外部配置加载顺序
SpringBoot也可以从以下位置加载配置; 优先级从高到低;高优先级的配置覆盖低优先级的配置,所有的配置会
形成互补配置
- .命令行参数所有的配置都可以在命令行上进行指定java -jar spring-boot-02-config-02-0.0.1-SNAPSHOT.jar --server.port=多个配置用空格分开; --配置项=值
- 来自java:comp/env的JNDI属性
- Java系统属性(System.getProperties())
- 操作系统环境变量
- RandomValuePropertySource配置的random.*属性值 由jar包外向jar包内进行寻找; 优先加载带profile
- .jar包外部的application-{profile}.properties或application.yml(带spring.profile)配置文件
- jar包内部的application-{profile}.properties或application.yml(带spring.profile)配置文件
再来加载不带profile - jar包外部的application.properties或application.yml(不带spring.profile)配置文件
- jar包内部的application.properties或application.yml(不带spring.profile)配置文件
- @Configuration注解类上的@PropertySource
- 通过SpringApplication.setDefaultProperties指定的默认属性
所有支持的配置加载来源;
参考官网


