SpringBoot源码分析(3)--Environment简介/prepareEnvironment准备环境(万字图文源码debug分析)
文章目录
- 一、前言
- 二、Environment
-
- 2.1、什么是 Environment?
- 2.2、Environment组成
-
- 2.2.1、profile数据结构
-
- 2.2.2.1、profile示例
- 2.2.2、properties数据结构
- 三、prepareEnvironment
-
- 3.1、获取或者创建环境getOrCreateEnvironment
-
- 3.1.1、AbstractEnvironment
- 3.1.2、StandardEnvironment
- 3.1.3、StandardServletEnvironment
- 3.2、配置环境configureEnvironment()
-
- 3.2.1、配置属性configurePropertySources
- 3.2.2、配置profile
- 3.3、ConfigurationPropertySources.attach(environment)
- 3.4、environmentPrepared
-
- 3.4.1、ConfigFileApplicationListener
- 3.4.2、AnsiOutputApplicationListener
- 3.4.3、LoggingApplicationListener
- 3.4.4、ClasspathLoggingApplicationListener
- 3.4.5、BackgroundPreinitializer
- 3.4.6、DelegatingApplicationListener 委托监听器
- 3.4.7、FileEncodingApplicationListener
- 3.5、bindToSpringApplication绑定环境
- 3.6、环境转换EnvironmentConverter
- 四、总结
- 五、问答
-
- 5.1、ConfigurationPropertySources.attach为什么调用两次?
- 5.2、为什么`environment.getActiveProfiles();`这个函数执行了两次?
一、前言
本文基于spring-boot-2.2.14.BUILD-SNAPSHOT源码分析prepareEnvironment这一步骤,prepareEnvironment主要是解析上下文中的所有配置文件,等待后续步骤将值绑定到spring上下文中。
二、Environment
运用 Environment 来获取环境变量值非常简单,只要注入Environment类调用其办法getProperty(key)即可,但知其然知其所以然,简略了解下它的原理,由于后续的几种获取配置的办法都和它休戚相关。
@Slf4j
@SpringBootTest
public class EnvironmentTest {
    @Resource
    private Environment env;
    @Test
    public void Test() {
        String port= env.getProperty("server.port");
        log.info("Environment 端口号 {}", port);
    }
}
之所以写这篇文章,是受jasypt组件的启发。很好奇这玩意儿究竟是如何实现对敏感属性加解密的;现在来看,要想实现这个功能,不仅需要熟悉 Bean 的生命周期、IoC 容器拓展点 (IoC Container Extension Points) 和 Spring Boot 的启动流程等知识,还需要掌握 Environment。这样以后我们就可以自己在配置文件中添加一种加解密方式了。
jasypt的使用只需在pom.xml文件中添加依赖即可
<!-- jasypt加密 如配置文件中ENC() -->
<dependency>
	<groupId>com.github.ulisesbocchio</groupId>
	<artifactId>jasypt-spring-boot-starter</artifactId>
	<version>2.1.0</version>
</dependency>
jasypt.encryptor.password=p@SSwd123

spring.datasource.url=jdbc:mysql://HOST:PORT/db_sql_boy?characterEncoding=UTF-8
spring.datasource.hikari.driver-class-name=com.mysql.cj.jdbc.Driver
spring.datasource.hikari.username=root
spring.datasource.hikari.password=ENC(2wa+DEsldkjdslkdj329xhmwNOHewWLIfquAXaUiqlsSkjierjl82sdlLKKEnml)
2.1、什么是 Environment?
Environment 是 springboot 核心的环境配置接口,它提供了简单的方法来访问应用程序属性,包括系统属性、操作系统环境变量、命令行参数、和应用程序配置文件中定义的属性等等。
Environment是Spring3.1才提供的一个接口。它是对当前运行的应用程序的环境的抽象,下面我们了解一下它的组成。
2.2、Environment组成
Environment接口内容如下所示:
public interface Environment extends PropertyResolver {
    String[] getActiveProfiles();
    String[] getDefaultProfiles();
    boolean acceptsProfiles(Profiles profiles);
}

public interface PropertyResolver {
    boolean containsProperty(String key);
    String getProperty(String key);
    String getProperty(String key, String defaultValue);
    <T> T getProperty(String key, Class<T> targetType);
    <T> T getProperty(String key, Class<T> targetType, T defaultValue);
    String resolvePlaceholders(String text);
}
Environment由两部分组成
1)profiles
profile中文直译是"概述"、“简介”、"轮廓"的意思,但在使用spring开发应用程序的时候,我们对profile的认识更亲切的是用在划分多环境的时候。
通常,我们会将profile划分成如:开发、测试、预生产、生产环境。每个环境会有有些bean不同、配置不同等。每个profile将有相应的bean和配置与之匹配,那么当我们切换profile的时候自然也就切换了相应的bean和配置文件,从而达到在不同环境中快速切换避免不断修改的问题。
这也就是spring的java doc里面描述的"logical group"的意思。
2)properties
properties的概念想必我们已经非常熟悉了,在java中properties代表着key-value的键值对象集合。Environment内部设计了key-value结构的对象来存储相应的键值。
综上所述,Environment中包含着用于切换环境的profile,还包含着存储键值对的properties。
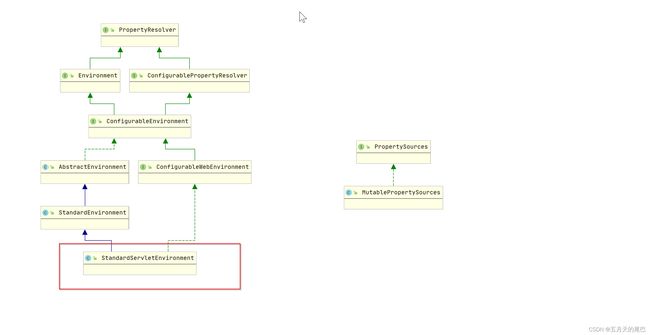
UML类关系图如下:


上面的内容中,我们了解了Environment的组成部分包括profile和properties。spring在对Environment进行设计的时候也把这两个部分进行了隔离。
如上图所示,PropertyResolver包含了properties相关的操作,如:getProperty(String key),Environment继承于PropertyResolver同时也就将properties的相关能力给组合了进来。
Environment的则包含了profile的相关操作,如:getActiveProfiles()。
如果查看PropertyResolver和Environment接口的方法,我们就会发现这两个接口都只是包含了如getter方法的获取操作,并没有setter样子的操作。这或许也意味着spring希望在程序的开发运行过程中,Environment尽量是维持稳定的,而不是不断地被修改、变化。
那么在程序启动过程中势必要对Environment进行配置,因此我们会看到多个继承自Environment和PropertyResolver接口地子接口,如:ConfigurableEnvironment和ConfigurablePropertyResolver。
再往下看,AbstractEnvironment显然包含了Environment设计地大部分实现,而从StandardEnvironment再往下走了两个分支,也就是针对reactive和Servlet的Environment实现。
到这里,我们基本了解了Environment主要的相关接口设计,设计路线也比较简单。
profile和properties的数据结构
前面的两个部分,我们了解了Environment包含profile和properties。也知道了Environment相关接口也主要是根据profile和properties来设计的。但是我们并不知道具体的实现里面profile和properties的数据结构是怎么样的。
2.2.1、profile数据结构
从uml类图中,我们清晰地看到Environment的具体实现是在AbstractEnvironment这个抽象类中。AbstractEnvironment类中包含着profile的成员变量
public abstract class AbstractEnvironment implements ConfigurableEnvironment {
    private final Set<String> activeProfiles = new LinkedHashSet<>();

	private final Set<String> defaultProfiles = new LinkedHashSet<>(getReservedDefaultProfiles());
}
profile的存储结构看起来相对简单,就是两个set集合,每个profile就是单纯的一个String类型的字符串表示而已。
activeProfiles表示的是当前应用中"激活"的profile集合,比如我当profile=dev的时候表示当前环境是开发环境。
而defaultProfiles则表示的是默认的profile集合,也就是说如果没有任何指定的profile,那么就会采用默认的。
2.2.2.1、profile示例
在项目开发的过程中,我们难免会遇到开发(dev)、测试(sit)、生产(prod)等环境的切换,而各个环境的配置肯定是不同的。所谓的profile就是用来切换环境的。

springboot提供了spring.profiles.active属性指定激活哪个文件。然后spring会加载application-{profile}.propertites/yml文件。 多个profile文件用逗号分隔,属性加载时后面的优先级更高,即读取属性时会先从后面的profile中读取属性。
2.2.2、properties数据结构
我们再看看AbstractEnvironment中properties的数据结构
private final MutablePropertySources propertySources = new MutablePropertySources();

private final ConfigurablePropertyResolver propertyResolver =
		new PropertySourcesPropertyResolver(this.propertySources);
前面我们一直提到,properties是一种key-value的键值对存储的集合。那么也就是说MutablePropertySources这个类实现了这个概念。
我们先看看MutablePropertySources的继承结构是怎么样的

Iterable接口表明MutablePropertySources像集合一样是可以迭代的,我们可以大胆猜测其内部就是组成了一个集合。Iterable往下,就是PropertySources,这个接口表示的是PropertySource类的集合,也就是说被迭代的元素就是PropertySource。MutablePropertySources则直接继承于PropertySources。
那么,我们基本可以想得到PropertySource这个类就是properties概念得设计,是我们主要得关注对象。
现在让我们打开MutablePropertySources看看PropertySource的具体结构
public class MutablePropertySources implements PropertySources {

    private final List<PropertySource<?>> propertySourceList = new CopyOnWriteArrayList<>();

    //......省略其他代码
}
跟我们想象得差不多,就是一个PropertySource类的集合作为成员组合在MutablePropertySources中。
我们继续跟进PropertySource这个类,看一下它的源码
public abstract class PropertySource<T> {

	protected final String name;// 属性源名称

	protected final T source;  // 属性源值(一个泛型,比如Map,Property)

    public boolean containsProperty(String name) {//是否包含某个属性
		return (getProperty(name) != null);
	}

    public abstract Object getProperty(String name);//获得属性对应的值

	//......
}
这里的name指的是配置文件的名称,source是一个Map集合或者Property等
如我们创建了一个application.properties文件,内容如
server.port= 8083
spring.profiles.active=prod

name=tom
那么当application.properties这个文件被加载到内存中,并作为一个PropertySource存在的时候,name=application.propertites。也就是说,加载application.properties这样的资源,泛型T将会是一个Map集合,而Map集合包含着application.properties文件中所有的键值对。
proertySourceList保存的数据如下图:(我们看到从上到下有系统配置,环境变量配置,application配置)。proertySourceList存储的对象是PropertySource。PropertySource中name即为文件名或某一特定的配置标识,source就是该文件对应的key/value
PropertySource是一个抽象类。spring将会针对资源的不同来源而使用不同的实现

- MapPropertySource : Map 键值对的对象转换为 PropertySource 对象的适配器;
- PropertiesPropertySource : Properties 对象中的所有配置属性转换为 Spring 环境中的属性值;
- ResourcePropertySource : 从文件系统或者 classpath 中加载配置属性,封装成 PropertySource对象;
- ServletConfigPropertySource : Servlet 配置中读取配置属性,封装成 PropertySource 对象;
- ServletContextPropertySource : Servlet 上下文中读取配置属性,封装成 PropertySource 对象;
- StubPropertySource : 是个空的实现类,它的作用仅仅是给 CompositePropertySource 类作为默认的父级属性源,以避免空指针异常;
- CompositePropertySource : 是个复合型的实现类,内部维护了 PropertySource集合队列,可以将多个 PropertySource 对象合并;
- SystemEnvironmentPropertySource : 操作系统环境变量中读取配置属性,封装成 PropertySource 对象;
三、prepareEnvironment
这一步的主要作用按顺序加载命令行参数, 系统参数和外部配置文件, 创建并配置Web环境, 获取profiles.active属性, 并发布ApplicationEnvironmentPreparedEvent事件, 之后获取属性时, 按顺序获取, 获取到就立即返回, 实现了属性之间的合理加载与替换
- 根据应用类型创建应用环境:如得到系统的参数、JVM 及 Servlet 等参数,等
- 将 defaultProperties、commandLine 及 active-prifiles 属性加载到环境中
- 将配置文件加载到环境中

private ConfigurableEnvironment prepareEnvironment(SpringApplicationRunListeners listeners,
													   ApplicationArguments applicationArguments) {
	// 获取或者创建环境   创建就会读取: java环境变量和系统环境变量
	ConfigurableEnvironment environment = getOrCreateEnvironment();
	//配置环境  将命令行参数读取环境变量中
	//将 defaultProperties、commandLine及active-prifiles 属性加载到环境中
    //commandLine 在 args 中配置
    //其它参数可在如下4个路径中配置:servletConfigInitParams、servletContextInitParams、systemProperties、systemEnvironment
	configureEnvironment(environment, applicationArguments.getSourceArgs());
	// 将@PropertieSource的配置信息 放在第一位,它的优先级是最低的
	ConfigurationPropertySources.attach(environment);
	//发布环境已准备事件,这是第二次发布事件,发布了ApplicationEnvironmentPreparedEvent 的监听器 读取了全局配置文件
	listeners.environmentPrepared(environment);
	// 将所有spring.main 开头的配置信息绑定到SpringApplication中
	bindToSpringApplication(environment);
	//如果不是web应用,就转成其他环境如StandardEnvironment
	if (!this.isCustomEnvironment) {
		environment = new EnvironmentConverter(getClassLoader()).convertEnvironmentIfNecessary(environment,
				deduceEnvironmentClass());
	}
	//绑定环境
	ConfigurationPropertySources.attach(environment);
	return environment;
}
以下问题将在本文中找到答案:
- ConfigurationPropertySources.attach为什么调用两次?
3.1、获取或者创建环境getOrCreateEnvironment
源码如下:
private ConfigurableEnvironment getOrCreateEnvironment() {
	//此处可以设置自定义environment,此处是一个拓展点
	if (this.environment != null) {
		return this.environment;
	}
	switch (this.webApplicationType) {
		case SERVLET:
			//spring boot应用创建的是StandardServletEnvironment
			return new StandardServletEnvironment();
		case REACTIVE:
			return new StandardReactiveWebEnvironment();
		default:
			return new StandardEnvironment();
	}
}
基于《SpringBoot源码分析(2)–SpringBoot启动源码(万字图文源码debug讲解springboot启动原理)》一文中的分析,我们的项目类型为SERVLET,所以此处会创建StandardServletEnvironment对象。
public class StandardServletEnvironment extends StandardEnvironment implements ConfigurableWebEnvironment {
	//......省略其他代码
}
我们可以看一下StandardServletEnvironment的继承依赖关系。实例化StandardServletEnvironment必定会实例化其所有父类, 所以我们首先分析抽象父类AbstractEnvironment的代码, 然后分析StandardEnvironment代码, 最后分析StandardServletEnvironment
3.1.1、AbstractEnvironment
AbstractEnvironment定义了子类需要实现的类, 并通过模板方法, 在构造函数中, 调用子类的customizePropertySources()方法, 将环境配置全部放入this.propertySources中,
AbstractEnvironment实现了getActiveProfiles和setActiveProfiles方法, 分别用来获取和设置spring.profiles.active属性的配置
//抽象环境类
public abstract class AbstractEnvironment implements ConfigurableEnvironment {

    //配置是否允许获取SystemEnvironment的配置
    public static final String IGNORE_GETENV_PROPERTY_NAME = "spring.getenv.ignore";

    //spring启动profile
    public static final String ACTIVE_PROFILES_PROPERTY_NAME = "spring.profiles.active";

    //spring默认profile
    public static final String DEFAULT_PROFILES_PROPERTY_NAME = "spring.profiles.default";

    //默认的profile名称
    protected static final String RESERVED_DEFAULT_PROFILE_NAME = "default";

    //用来维护属性列表
    private final MutablePropertySources propertySources = new MutablePropertySources();

    //构造函数
    //调用了customizePropertySources方法
    //customizePropertySources方法由子类实现
    public AbstractEnvironment() {
        customizePropertySources(this.propertySources);
    }

    //空方法,加载自定义配置文件,如果没有自定义,我们实例化的是StandardServletEnvironment。此处是一个拓展点
    //鼓励子类继承实现
    protected void customizePropertySources(MutablePropertySources propertySources) {}

    //获取系统属性
   public Map<String, Object> getSystemEnvironment() {
        if (suppressGetenvAccess()) {
            //如果spring.getenv.ignore配置为true,
            //那么返回空map
            return Collections.emptyMap();
        }
        try {
            //返回系统属性
            return (Map) System.getenv();
        }
        catch (AccessControlException ex) {
            //...
        }
    }

    /**
     * 获取activeProfiles
     */
    @Override
    public String[] getActiveProfiles() {
        return StringUtils.toStringArray(doGetActiveProfiles());
    }

    /**
     * 获取activeProfiles
     */
    protected Set<String> doGetActiveProfiles() {
        //上锁
        synchronized (this.activeProfiles) {
            if (this.activeProfiles.isEmpty()) {
                //如果activeProfiles为空
                //那么从propertySources中获取spring.profiles.active属性的值
                //并且用","分割为数组
                String profiles = getProperty(ACTIVE_PROFILES_PROPERTY_NAME);
                if (StringUtils.hasText(profiles)) {
                    //profile保存到activeProfiles成员变量中
                    setActiveProfiles(StringUtils.commaDelimitedListToStringArray(
                            StringUtils.trimAllWhitespace(profiles)));
                }
            }
            return this.activeProfiles;
        }
    }

    @Override
    public void setActiveProfiles(String... profiles) {
        Assert.notNull(profiles, "Profile array must not be null");
        if (logger.isDebugEnabled()) {
            logger.debug("Activating profiles " + Arrays.asList(profiles));
        }
        //上锁
        synchronized (this.activeProfiles) {
            //清空activeProfiles
            this.activeProfiles.clear();
            for (String profile : profiles) {
                validateProfile(profile);
                //重新添加到activeProfiles变量中
                this.activeProfiles.add(profile);
            }
        }
    }
}
3.1.2、StandardEnvironment
StandardEnvironment继承了AbstractEnvironment, customizePropertySources代码执行步骤有:
- 先添加数据systemProperties(系统属性)到父类的propertySource末尾
- 再添加systemEnvironment(系统环境变量)维护到父类的propertySource末尾
 //环境变量
public static final String SYSTEM_ENVIRONMENT_PROPERTY_SOURCE_NAME = "systemEnvironment";

//jvm 系统属性
public static final String SYSTEM_PROPERTIES_PROPERTY_SOURCE_NAME = "systemProperties";

 //重写父类customizePropertySources方法
 //在实例化对象的过程中调用
@Override
protected void customizePropertySources(MutablePropertySources propertySources) {
    //获取systemProperties(系统属性), 添加到propertySources的末尾
	propertySources.addLast(
			new PropertiesPropertySource(SYSTEM_PROPERTIES_PROPERTY_SOURCE_NAME, getSystemProperties()));
	//获取systemEnvironment(系统环境变量), 添加到propertySources的末尾
	propertySources.addLast(
			new SystemEnvironmentPropertySource(SYSTEM_ENVIRONMENT_PROPERTY_SOURCE_NAME, getSystemEnvironment()));
}
3.1.3、StandardServletEnvironment
我们获取的环境是一个StandardServletEnvironment实例, 实例化StandardServletEnvironment的步骤有3个步骤
1、调用抽象父类AbstractEnvironment的构造函数
2、调用当前类的customizePropertySources方法
- propertySources列表末尾添加一个名称为servletConfigInitParams的空配置
- propertySources列表末尾再添加一个名称为servletContextInitParams的空配置
- 如果jndi可用, propertySources列表末尾末尾在添加一个名称为jndiProperties的空配置, 由于我们没有使用jndi, 所以不会添加该配置
3、调用父类StandardEnvironment的customizePropertySources方法
- propertySources末尾添加systemProperties(系统属性)
- propertySources末尾获取systemEnvironment(系统环境变量)
所以当前StandardServletEnvironment对象的propertySources, 按顺序排列为servletConfigInitParams, servletContextInitParams, systemProperties, systemEnvironment
 //servlet容器初始化参数
public static final String SERVLET_CONTEXT_PROPERTY_SOURCE_NAME = "servletContextInitParams";

 //servlet配置初始化参数
public static final String SERVLET_CONFIG_PROPERTY_SOURCE_NAME = "servletConfigInitParams";

 //jndi属性
public static final String JNDI_PROPERTY_SOURCE_NAME = "jndiProperties";

protected void customizePropertySources(MutablePropertySources propertySources) {
    //末尾添加一个名称为servletContextInitParams的空配置
    propertySources.addLast(new StubPropertySource("servletConfigInitParams"));
     //末尾再添加一个名称为servletContextInitParams的空配置
    propertySources.addLast(new StubPropertySource("servletContextInitParams"));
    if (JndiLocatorDelegate.isDefaultJndiEnvironmentAvailable()) {
        //如果jndi配置可用
        //末尾在添加一个名称为jndiProperties的空配置
        propertySources.addLast(new JndiPropertySource("jndiProperties"));
    }

    //调用父类StandardEnvironment的customizePropertySources
    super.customizePropertySources(propertySources);
}
ConfigurableEnvironment environment = getOrCreateEnvironment();执行完之后,debug如下
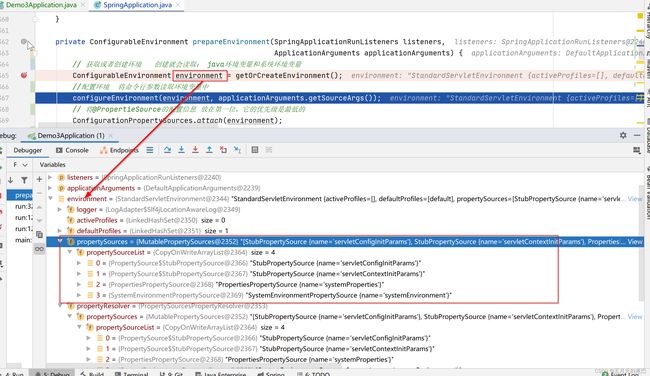
此时在 Environment 里 MutablePropertySources 类型的成员变量propertySources中已经有了四个 PropertySource 了,名称依次是:servletConfigInitParams、servletContextInitParams、systemProperties和systemEnvironment。
systemProperties配置如下:

systemEnvironment配置如下:

3.2、配置环境configureEnvironment()
configureEnvironment()方法中的逻辑也很简单。首先,为 Environment 中的 PropertySourcesPropertyResolver 设定 ConversionService;然后,向 Environment 中的 MutablePropertySources 追加一个名称为commandLineArgs的 PropertySource 实例,将defaultProperties和命令行参数分别添加到commandLineArgs的propertySources中,注意使用的是addFirst()方法,这意味着这个名称为commandLineArgs的 PropertySource 优先级是最高的。最后,设置profiles属性。主要逻辑如下:
protected void configureEnvironment(ConfigurableEnvironment environment,
            String[] args) {
    if (this.addConversionService) {
        //默认为true
        //environment中配置各个转换类
        ConversionService conversionService = ApplicationConversionService
                .getSharedInstance();
        environment.setConversionService(
                (ConfigurableConversionService) conversionService);
    }
    //2.2.1配置属性
    configurePropertySources(environment, args);
    //2.2.2配置profile
    configureProfiles(environment, args);
}
3.2.1、配置属性configurePropertySources
- 如果默认属性defaultProperties不为空,那么将会添加到environment的propertySources末尾
- 如果当前environment的propertySources包含commandLineArgs命令行参数, 那么替换为springApplicationCommandLineArgs
- 如果当前environment的propertySources不包含commandLineArgs, 那么添加一个commandLineArgs到propertySources的首部, SimpleCommandLinePropertySource的代码解析在封装命令行参数DefaultApplicationArguments已经分析过了
//传入参数为StandardServletEnvironment和命令行参数
protected void configurePropertySources(ConfigurableEnvironment environment,
            String[] args) {
    //调用AbstractEnvironment的getPropertySources()方法
    //获取之前配置的所有属性
    MutablePropertySources sources = environment.getPropertySources();
    if (this.defaultProperties != null && !this.defaultProperties.isEmpty()) {
        //如果this.defaultProperties不为null
        //那么添加defaultProperties到propertySources的末尾
        sources.addLast(
                new MapPropertySource("defaultProperties", this.defaultProperties));
    }
    if (this.addCommandLineProperties && args.length > 0) {
        //如果存在命令行参数
        String name = CommandLinePropertySource.COMMAND_LINE_PROPERTY_SOURCE_NAME;
        if (sources.contains(name)) {
            //如果sources中包含了"commandLineArgs",
            //那么将其替换为"springApplicationCommandLineArgs"
            PropertySource<?> source = sources.get(name);
            //先将"commandLineArgs"修改为null,
            CompositePropertySource composite = new CompositePropertySource(name);
            //然后新增一个PropertySource
            //name为"springApplicationCommandLineArgs",
            //source不变
            composite.addPropertySource(new SimpleCommandLinePropertySource(
                    "springApplicationCommandLineArgs", args));
            composite.addPropertySource(source);
            //替换
            sources.replace(name, composite);
        }
        else {
            //如果propertySources的中不包含"commandLineArgs"
            //将命令行参数放在propertySources的首位
            sources.addFirst(new SimpleCommandLinePropertySource(args));
        }
    }
}
上面有个核心关键类出现了,MutablePropertySources,mutable中文是可变的意思,该类封装了属性资源集合:
public class MutablePropertySources implements PropertySources {
	private final Log logger;
	private final List<PropertySource<?>> propertySourceList = new CopyOnWriteArrayList<>();
	//......
}
该类又是如何使用的呢?

这里的设计很巧妙,将MutablePropertySources传递到文件解析器propertyResolver中,同时AbstractEnvironment又实现了文件解析接口ConfigurablePropertyResolver,所以AbstractEnvironment就有了文件解析的功能。所以StandardServletEnvironment文件解析功能实际委托给了PropertySourcesPropertyResolver来实现。

3.2.2、配置profile
将this.additionalProfiles和environment.getActiveProfiles()组合到一起, 重新赋值给environment的activeProfiles
//传入参数为StandardServletEnvironment和命令行参数
protected void configureProfiles(ConfigurableEnvironment environment, String[] args) {
    //调用的是AbstractEnvironment的getActiveProfiles()方法,读取spring.profiles.active配置的值
    environment.getActiveProfiles();
    Set<String> profiles = new LinkedHashSet<>(this.additionalProfiles);
    //再次获取和配置profile
    profiles.addAll(Arrays.asList(environment.getActiveProfiles()));
    //设置environment的profile
    environment.setActiveProfiles(StringUtils.toStringArray(profiles));
}
为什么environment.getActiveProfiles();这个函数执行了两次?下面会有回答。
第一行获取当前环境中的spring.profiles.active属性,注意这里是到启动参数、系统配置、环境变量中找该属性,而不是加载我们项目的配置文件application.properties,此时配置文件还没开始加载
虽然有些项目也会在application.properties中指定该属性来开启不同配置,如application-dev.properties、application-sit.properties等,这个流程我们后续再介绍
 /**
 * 获取activeProfiles
 */
@Override
public String[] getActiveProfiles() {
    return StringUtils.toStringArray(doGetActiveProfiles());
}

/**
 * 获取activeProfiles
 */
protected Set<String> doGetActiveProfiles() {
    //上锁
    synchronized (this.activeProfiles) {
        if (this.activeProfiles.isEmpty()) {
            //如果activeProfiles为空
            //那么从propertySources中获取spring.profiles.active属性的值
            //并且用","分割为数组
            String profiles = getProperty("spring.profiles.active");
            if (StringUtils.hasText(profiles)) {
                //profile保存到activeProfiles成员变量中
                setActiveProfiles(StringUtils.commaDelimitedListToStringArray(
                        StringUtils.trimAllWhitespace(profiles)));
            }
        }
        return this.activeProfiles;
    }
}

找到的话设置到Environment的activeProfiles属性中,该属性默认为一个空的Set
public abstract class AbstractEnvironment implements ConfigurableEnvironment {
    //......省略其他代码
    private final Set<String> activeProfiles = new LinkedHashSet();
}
然后将SpringApplication的additionalProfiles也添加到Environment的avtiveProfiles列表中
这个additionalProfiles默认是空的
public class SpringApplication {
	//......省略其他代码
	private Set<String> additionalProfiles;
SpringApplication提供了一个接口来设置这个列表
public void setAdditionalProfiles(String... profiles) {
        this.additionalProfiles = new LinkedHashSet(Arrays.asList(profiles));
    }
所以我们可以通过在启动类中先new出SpringApplication,然后调用该方法来指定要激活的配置文件
@SpringBootApplication
public class Demo3Application {

    public static void main(String[] args) {
        SpringApplication springApplication = new SpringApplication(new Class[]{Demo3Application .class});
        springApplication.setAdditionalProfiles("dev");
        springApplication.run(args);
    }
}
或者在启动参数中指定spring.profiles.active属性
本文采用以下测试demo作为讲解,后续会讲解spring.profiles.active属性的作用。
@SpringBootApplication
public class Demo3Application {

    public static void main(String[] args) {
        List<String> argsList = new ArrayList<>();
        argsList.add("--spring.profiles.active=sit");
        if (args != null) {
            argsList.addAll(Arrays.asList(args));
        }
        SpringApplication.run(Demo3Application.class, StringUtils.toStringArray(argsList));
    }
}

或者在启动命令中添加spring.profiles.active参数
如启动命令【java -jar …/java/*.jar --spring.profiles.active=dev 】
3.3、ConfigurationPropertySources.attach(environment)
这个方法很简单,判断MutablePropertySources的成员变量propertySourceList中有没有name是configurationProperties的PropertySource对象,如果有就把它移除,然后将name是configurationProperties,类型是ConfigurationPropertySourcesPropertySource的对象添加进propertySourceList的头部
public static void attach(Environment environment) {
	Assert.isInstanceOf(ConfigurableEnvironment.class, environment);
	 //取得environment中的propertySources
	MutablePropertySources sources = ((ConfigurableEnvironment) environment).getPropertySources();
	PropertySource<?> attached = sources.get("configurationProperties");
	if (attached != null && attached.getSource() != sources) {
	    //如果存在的话,直接移除
		sources.remove("configurationProperties");
		attached = null;
	}
	if (attached == null) {
	    //将propertySources转换为SpringConfigurationPropertySources,放在首位
		sources.addFirst(new ConfigurationPropertySourcesPropertySource("configurationProperties",
				new SpringConfigurationPropertySources(sources)));
	}
}
将environment对象的propertySources属性封装成一个SpringConfigurationPropertySources对象,并以configurationProperties为key加入到propertySources属性列表的首位。
debug的时候发现一个很有意思的事情,就是configurationProperties中的ConfigurationPropertySourcesPropertySource 包含了外面所有的propertySource。原因就是在attach方法中进行了赋值。

3.4、environmentPrepared
发布ApplicationEnvironmentPreparedEvent事件
public void environmentPrepared(ConfigurableEnvironment environment) {
        //遍历所有的listener,发布事件。我们前面知道是SpringApplicationRunListeners实际实例化子类是EventPublishingRunListener
 	for (SpringApplicationRunListener listener : this.listeners) {
 		listener.environmentPrepared(environment);
 	}
 }
1、EventPublishingRunListener
public void environmentPrepared(ConfigurableEnvironment environment) {
 //发布ApplicationEnvironmentPreparedEvent事件(即加载配置文件)
 	this.initialMulticaster
 			.multicastEvent(new ApplicationEnvironmentPreparedEvent(this.application, this.args, environment));
 }

 //此处即观察者模式,一直跟进去到,最终调用的是listener.onApplicationEvent(event);此处为通知加载配置文件
 public void multicastEvent(final ApplicationEvent event, @Nullable ResolvableType eventType) {
 	ResolvableType type = (eventType != null ? eventType : resolveDefaultEventType(event));
 	Executor executor = getTaskExecutor();
 	for (ApplicationListener<?> listener : getApplicationListeners(event, type)) {
 		if (executor != null) {
 			executor.execute(() -> invokeListener(listener, event));
 		}
 		else {
 			invokeListener(listener, event);
 		}
 	}
 }

对该事件感兴趣的监听器有
- ConfigFileApplicationListener:配置文件监听器,解析配置文件如propertites,yml等文件
- AnsiOutputApplicationListener:字符输出监听器, 用于调整控制台显示的打印字符的各种颜色
- LoggingApplicationListener:日志监听器, 初始化日志配置
- ClasspathLoggingApplicationListener:打印debug日志, 记录当前classpath
- BackgroundPreinitializer:
- DelegatingApplicationListener:
- FileEncodingApplicationListener:判断编解码是否强制
虽然有很多listener,但是监听处理ApplicationEnvironmentPreparedEvent事件的只有ConfigFileApplicationListener。
关于配置文件的核心处理便在ConfigFileApplicationListener中完成。在该类中我们可以看到很多熟悉的常量:比如Spring Boot默认寻找的配置文件的名称、默认扫描的类路径等。
public class ConfigFileApplicationListener implements EnvironmentPostProcessor, SmartApplicationListener, Ordered {
    private static final String DEFAULT_PROPERTIES = "defaultProperties";
    private static final String DEFAULT_SEARCH_LOCATIONS = "classpath:/,classpath:/config/,file:./,file:./config/";
    private static final String DEFAULT_NAMES = "application";
    private static final Set<String> NO_SEARCH_NAMES = Collections.singleton((Object)null);
    private static final Bindable<String[]> STRING_ARRAY = Bindable.of(String[].class);
    public static final String ACTIVE_PROFILES_PROPERTY = "spring.profiles.active";
    public static final String INCLUDE_PROFILES_PROPERTY = "spring.profiles.include";
    public static final String CONFIG_NAME_PROPERTY = "spring.config.name";
    public static final String CONFIG_LOCATION_PROPERTY = "spring.config.location";
    public static final String CONFIG_ADDITIONAL_LOCATION_PROPERTY = "spring.config.additional-location";
    public static final int DEFAULT_ORDER = -2147483638;
    private final DeferredLog logger = new DeferredLog();
    private String searchLocations;
    private String names;
    private int order = -2147483638;

    public ConfigFileApplicationListener() {
    }
3.4.1、ConfigFileApplicationListener
调用SpringFactoriesLoader.loadFactories()方法, 获取EnvironmentPostProcessor的子类列表, 然后将自己加入到子类列表中, 然后按@Order注解排序, 然后调用各个EnvironmentPostProcessor的postProcessEnvironment方法, 获取到的EnvironmentPostProcessor子类有
- SystemEnvironmentPropertySourceEnvironmentPostProcessor
- CloudFoundryVcapEnvironmentPostProcessor
- SpringApplicationJsonEnvironmentPostProcessor
- DebugAgentEnvironmentPostProcessor
- ConfigFileApplicationListener
 @Override
 public void onApplicationEvent(ApplicationEvent event) {
       //监听的时间属于ApplicationEnvironmentPreparedEvent,则处理
 	if (event instanceof ApplicationEnvironmentPreparedEvent) {
 		onApplicationEnvironmentPreparedEvent((ApplicationEnvironmentPreparedEvent) event);
 	}
 	if (event instanceof ApplicationPreparedEvent) {
 		onApplicationPreparedEvent(event);
 	}
 }

 private void onApplicationEnvironmentPreparedEvent(ApplicationEnvironmentPreparedEvent event) {
       //此处从spring.factories中查找所有EnvironmentPostProcessor,(此处是一个拓展点,可以自定义自己的EnvironmentPostProcessor,加载自定义配置文件到environment中)
 	List<EnvironmentPostProcessor> postProcessors = loadPostProcessors();
 	 //将this添加到postProcessors中
 	postProcessors.add(this);
 	 //通过注解Order排序
 	AnnotationAwareOrderComparator.sort(postProcessors);
       //执行postProcessors的postProcessEnvironment,此处调试有多个,我们先关注ConfigFileApplicationListener这个(即本类,可以看到它实现了EnvironmentPostProcessor接口)
 	for (EnvironmentPostProcessor postProcessor : postProcessors) {
 		postProcessor.postProcessEnvironment(event.getEnvironment(), event.getSpringApplication());
 	}
 }

 List<EnvironmentPostProcessor> loadPostProcessors() {
 	return SpringFactoriesLoader.loadFactories(EnvironmentPostProcessor.class, getClass().getClassLoader());
 }
1、SystemEnvironmentPropertySourceEnvironmentPostProcessor
获取名称为systemEnvironment的属性, 替换为OriginAwareSystemEnvironmentPropertySource类型的PropertySource
public class SystemEnvironmentPropertySourceEnvironmentPostProcessor
        implements EnvironmentPostProcessor, Ordered {

    @Override
    public void postProcessEnvironment(ConfigurableEnvironment environment,
            SpringApplication application) {
        //名称为systemEnvironment的属性
        String sourceName = StandardEnvironment.SYSTEM_ENVIRONMENT_PROPERTY_SOURCE_NAME;
        PropertySource<?> propertySource = environment.getPropertySources()
                .get(sourceName);
        if (propertySource != null) {
            //替换属性
            replacePropertySource(environment, sourceName, propertySource);
        }
    }
    //替换属性
    private void replacePropertySource(ConfigurableEnvironment environment,
            String sourceName, PropertySource<?> propertySource) {
        Map<String, Object> originalSource = (Map<String, Object>) propertySource
                .getSource();
        //将systemEnvironment的属性转换为OriginAwareSystemEnvironmentPropertySource类型
        SystemEnvironmentPropertySource source = new OriginAwareSystemEnvironmentPropertySource(
                sourceName, originalSource);
        //然后替换原有的属性
        environment.getPropertySources().replace(sourceName, source);
    }
}
2、SpringApplicationJsonEnvironmentPostProcessor
获取AbstractEnvironment的成员变量PropertySources中名称为spring.application.json的属性, 将其转换为Map, 添加到jndiProperties或者systemProperties属性之前
public class SpringApplicationJsonEnvironmentPostProcessor
        implements EnvironmentPostProcessor, Ordered {

    @Override
    public void postProcessEnvironment(ConfigurableEnvironment environment,
            SpringApplication application) {
        MutablePropertySources propertySources = environment.getPropertySources();
        //将环境中spring.application.json配置转化为JsonPropertySource
        //然后添加到属性中
        propertySources.stream().map(JsonPropertyValue::get).filter(Objects::nonNull)
                .findFirst().ifPresent((v) -> processJson(environment, v));
    }

    private void processJson(ConfigurableEnvironment environment,
            JsonPropertyValue propertyValue) {
        //处理json
        JsonParser parser = JsonParserFactory.getJsonParser();
          // 获取spring.application.json 的值,转换成map
        Map<String, Object> map = parser.parseMap(propertyValue.getJson());
        if (!map.isEmpty()) {
            //默认放到jndiProperties 或者systemProperties之前
            addJsonPropertySource(environment,
                    new JsonPropertySource(propertyValue, flatten(map)));
        }
    }
}
3、CloudFoundryVcapEnvironmentPostProcessor
如果environment激活了 Cloud Founry, 那么在commandLineArgs属性之后, 添加一个vcap属性的配置
public class CloudFoundryVcapEnvironmentPostProcessor
        implements EnvironmentPostProcessor, Ordered {
    @Override
    public void postProcessEnvironment(ConfigurableEnvironment environment,
            SpringApplication application) {
        //如果environment激活了 Cloud Founry
        if (CloudPlatform.CLOUD_FOUNDRY.isActive(environment)) {
            //那么添加对Cloud Founry的支持
            Properties properties = new Properties();
            JsonParser jsonParser = JsonParserFactory.getJsonParser();
            addWithPrefix(properties,
                    getPropertiesFromApplication(environment, jsonParser),
                    "vcap.application.");
            addWithPrefix(properties, getPropertiesFromServices(environment, jsonParser),
                    "vcap.services.");
            //然后在environment添加一个vcap的配置
            MutablePropertySources propertySources = environment.getPropertySources();
            if (propertySources.contains(
                    CommandLinePropertySource.COMMAND_LINE_PROPERTY_SOURCE_NAME)) {
                propertySources.addAfter(
                        CommandLinePropertySource.COMMAND_LINE_PROPERTY_SOURCE_NAME,
                        new PropertiesPropertySource("vcap", properties));
            }
            else {
                propertySources
                        .addFirst(new PropertiesPropertySource("vcap", properties));
            }
        }
    }
}
4、ConfigFileApplicationListener
在systemEnvironment属性之后, 添加random属性
 @Override
 public void postProcessEnvironment(ConfigurableEnvironment environment, SpringApplication application) {
 	addPropertySources(environment, application.getResourceLoader());
 }

 protected void addPropertySources(ConfigurableEnvironment environment, ResourceLoader resourceLoader) {
   //在systemEnvironment属性之后,添加random属性
 	RandomValuePropertySource.addToEnvironment(environment);
    //读取配置文件
 	new Loader(environment, resourceLoader).load();
 }

4.1、ConfigFileApplicationListener$Loader
//内部类, 加载配置文件
private class Loader {
    //构造函数
    Loader(ConfigurableEnvironment environment, ResourceLoader resourceLoader) {
        this.environment = environment;
        // 创建一个占位符解析器,内部是 PropertyPlaceholderHelper,默认占位符 ${}
        this.placeholdersResolver = new PropertySourcesPlaceholdersResolver(
                this.environment);
        //resourceLoader实例化为DefaultResourceLoader
        this.resourceLoader = (resourceLoader != null) ? resourceLoader
                : new DefaultResourceLoader();
        //此处从spring.factories中获取PropertySourceLoader的实现类,我们可以看到只有两个,如下代码PropertiesPropertySourceLoader,YamlPropertySourceLoader
        //PropertiesPropertySourceLoader加载properties文件
        //YamlPropertySourceLoader加载yml文件
        this.propertySourceLoaders = SpringFactoriesLoader.loadFactories(
                PropertySourceLoader.class, getClass().getClassLoader());
    }

    void load() {
	FilteredPropertySource.apply(this.environment, DEFAULT_PROPERTIES, LOAD_FILTERED_PROPERTY,
			(defaultProperties) -> {
			    // LIFO队列 后进先出
				this.profiles = new LinkedList<>();
				this.processedProfiles = new LinkedList<>();
				// 已激活文件
				this.activatedProfiles = false;
				this.loaded = new LinkedHashMap<>();
				//初始化profiles环境信息,profiles。
				//首先添加一个null元素,如果没有设置环境,再添加一个default。目的是为了后续解析application.yml或application-default.yml
				initializeProfiles();
				while (!this.profiles.isEmpty()) {
				    //注意:这里的profile是启动参数、系统配置、环境变量中的spring.profiles.active变量,不是propertites或yml文件中的spring.profiles.active变量
				    //具体可参考本文2.2.2 configureProfiles部分
					Profile profile = this.profiles.poll();
					if (isDefaultProfile(profile)) {
						addProfileToEnvironment(profile.getName());
					}
					//遍历profile
                   // 获取默认配置文件路径,循环加载配置文件(不检查是否已经存在)
					load(profile, this::getPositiveProfileFilter,
							addToLoaded(MutablePropertySources::addLast, false));
					this.processedProfiles.add(profile);
				}
				// 对加载过的配置文件进行排序(排序就会检查是否存在)
				load(null, this::getNegativeProfileFilter, addToLoaded(MutablePropertySources::addFirst, true));
				//将this.loaded按顺序添加到environment的propertySources中
               //如果存在defaultProperties,放在defaultProperties之前
              //如果不存在defaultProperties,直接添加到最后
				addLoadedPropertySources();
				applyActiveProfiles(defaultProperties);
			});
    }
}
spring.factories中的PropertySourceLoader如下:
# PropertySource Loaders
org.springframework.boot.env.PropertySourceLoader=\
org.springframework.boot.env.PropertiesPropertySourceLoader,\
org.springframework.boot.env.YamlPropertySourceLoader
初始化initializeProfiles()
1.查找系统变量中的 spring.profiles.active 和 spring.profiles.include 属性对应的 Profile。如没有则创建一个默认的配置文件,形如application-default.yml、application-default.properties
2.添加一个null的profile,主要用来加载没有指定profile的配置文件,比如:application.properties
因为 profiles 采用了 LIFO 队列,后进先出。所以会先加载profile为null的配置文件,也就是匹配application.properties、application.yml。
private void initializeProfiles() {
	this.profiles.add(null);
	// 取得已激活配置文件,如spring.profiles.active指定的application.yaml文件
	Set<Profile> activatedViaProperty = getProfilesFromProperty(ACTIVE_PROFILES_PROPERTY);
	Set<Profile> includedViaProperty = getProfilesFromProperty(INCLUDE_PROFILES_PROPERTY);
	List<Profile> otherActiveProfiles = getOtherActiveProfiles(activatedViaProperty, includedViaProperty);
	this.profiles.addAll(otherActiveProfiles);
	this.profiles.addAll(includedViaProperty);
	addActiveProfiles(activatedViaProperty);
	// 如没有已激活配置文件,则新建一个默认的配置文件profiles.add("default")
	if (this.profiles.size() == 1) { // only has null profile
		for (String defaultProfileName : this.environment.getDefaultProfiles()) {
			Profile defaultProfile = new Profile(defaultProfileName, true);
			this.profiles.add(defaultProfile);
		}
	}
}
// 取得已经指定的配置文件,如spring.profiles.active指定的yaml文件
private Set<Profile> getProfilesActivatedViaProperty() {
	// 环境中没有spring.profiles.active和spring.profiles.include指定的文件,返回空
	if (!this.environment.containsProperty(ACTIVE_PROFILES_PROPERTY)
			&& !this.environment.containsProperty(INCLUDE_PROFILES_PROPERTY)) {
		return Collections.emptySet();
	}
	// 返回active已经激活的配置文件
	Binder binder = Binder.get(this.environment);
	Set<Profile> activeProfiles = new LinkedHashSet<>();
	activeProfiles.addAll(getProfiles(binder, INCLUDE_PROFILES_PROPERTY));
	activeProfiles.addAll(getProfiles(binder, ACTIVE_PROFILES_PROPERTY));
	return activeProfiles;
}

profile =null就是我们的默认application文件,profile=sit就是我们的application-sit文件
4.2、Loader类load方法(上述方法跟进去)
private void load(Profile profile, DocumentFilterFactory filterFactory, DocumentConsumer consumer) {
	//getSearchLocations()获取需要加载配置文件的目录
	//默认是四个目录"file:./config/,file:./,classpath:/config/,classpath:/"
	getSearchLocations().forEach((location) -> {
		boolean isFolder = location.endsWith("/");
		//getSearchNames()获取文件的名称,如果没有配置,默认application
		Set<String> names = isFolder ? getSearchNames() : NO_SEARCH_NAMES;
		names.forEach((name) -> load(location, name, profile, filterFactory, consumer));
	});
}
}
首先调用了getSearchLocations方法
//获取需要加载配置文件的目录
//默认是四个目录"classpath:/,classpath:/config/,file:./,file:./config/"
private Set<String> getSearchLocations() {
	Set<String> locations = getSearchLocations("spring.config.additional-location");
	if (this.environment.containsProperty("spring.config.location")) {
		locations.addAll(getSearchLocations("spring.config.location"));
	}
	else {
	    //asResolvedSet方法会对这四个目录进行反转
		locations.addAll(
				asResolvedSet(ConfigFileApplicationListener.this.searchLocations, "classpath:/,classpath:/config/,file:./,file:./config/"));
	}
	return locations;
}
1.getSearchLocations:获取配置文件路径
a)首先获取spring.config.additional-location配置的值
b) 若设置了spring.config.location属性则获取该配置的值,否则获取默认路径classpath:/,classpath:/config/,file:./,file:./config/四个路径下的值
再深入asResolvedSet方法内部分析一下
private Set<String> asResolvedSet(String value, String fallback) {
   List<String> list = Arrays.asList(StringUtils.trimArrayElements(StringUtils.commaDelimitedListToStringArray(
         (value != null) ? this.environment.resolvePlaceholders(value) : fallback)));
   //对classpath:/,classpath:/config/,file:./,file:./config/进行反转
   Collections.reverse(list);
   return new LinkedHashSet<>(list);
}
这里的value表示ConfigFileApplicationListener初始化时设置的搜索路径,而fallback就是DEFAULT_SEARCH_LOCATIONS默认搜索路径。StringUtils.trimArrayElements(StringUtils.commaDelimitedListToStringArray())方法就是以逗号作为分隔符对"classpath:/,classpath:/config/,file:./,file:./config/"进行切割,并返回一个字符数组。而这里的Collections.reverse(list);之后,就是体现优先级的时候了,先被扫描到的配置文件会优先生效。
这里我们拿到搜索路径之后,load方法里对每个搜索路径进行遍历,首先调用了getSearchNames()方法
//获取spring.config.name配置的名称,如果没有配置,默认application
private Set<String> getSearchNames() {
	if (this.environment.containsProperty("spring.config.name")) {
		String property = this.environment.getProperty("spring.config.name");
		return asResolvedSet(property, null);
	}
	return asResolvedSet(ConfigFileApplicationListener.this.names, "application");
2.getSearchNames:获取配置文件名称
a) 若设置了spring.config.name属性则获取该配置的值,否则默认为application

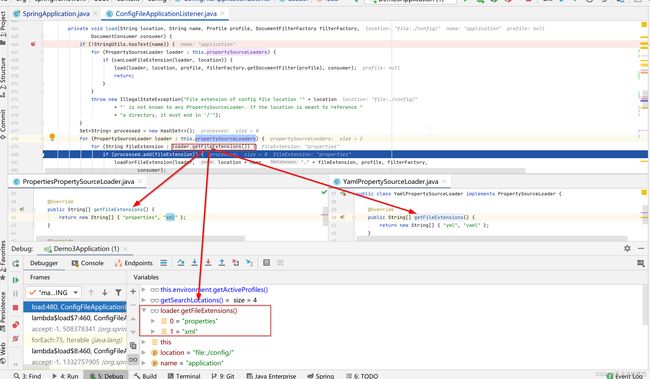
在load方法中会遍历this.propertySourceLoaders属性,也就是上面分析的PropertiesPropertySourceLoader,YamlPropertySourceLoader两个类,然后读取对应的文件。
PropertiesPropertySourceLoader会查找properties、xml后缀的文件;
YamlPropertySourceLoader会查找yml、yaml后缀的文件
4.3、上述load方法跟进去,调过了两个方法,来到最终的load方法
private void load(PropertySourceLoader loader, String location, Profile profile, DocumentFilter filter,
				DocumentConsumer consumer) {
	try {
		//加载location对应的文件(location为文件全路径。例:file:./config/application.properties)
		Resource resource = this.resourceLoader.getResource(location);
		if (resource == null || !resource.exists()) {
			if (this.logger.isTraceEnabled()) {
				StringBuilder description = getDescription("Skipped missing config ", location, resource,
						profile);
				this.logger.trace(description);
			}
			return;
		}
		if (!StringUtils.hasText(StringUtils.getFilenameExtension(resource.getFilename()))) {
			if (this.logger.isTraceEnabled()) {
				StringBuilder description = getDescription("Skipped empty config extension ", location,
						resource, profile);
				this.logger.trace(description);
			}
			return;
		}
		String name = "applicationConfig: [" + location + "]";
		//用对应的PropertiesPropertySourceLoader或YamlPropertySourceLoader加载对应配置文件的key,value
		List<Document> documents = loadDocuments(loader, name, resource);
		if (CollectionUtils.isEmpty(documents)) {
			if (this.logger.isTraceEnabled()) {
				StringBuilder description = getDescription("Skipped unloaded config ", location, resource,
						profile);
				this.logger.trace(description);
			}
			return;
		}
		List<Document> loaded = new ArrayList<>();
		for (Document document : documents) {
			if (filter.match(document)) {
			    //在documents里面已经解析出了propertites或yml配置文件中的key-value
			    //这里会读取spring.profiles.active属性的值并尝试重新设置Profile的值
			    //若之前initializeProfiles初始化Profile的时候没有从启动参数、系统配置、环境变量中找到spring.profiles.active属性,则这里会重新设置,否则此处不重新设置
				addActiveProfiles(document.getActiveProfiles());
				addIncludedProfiles(document.getIncludeProfiles());
				loaded.add(document);
			}
		}
		Collections.reverse(loaded);
		if (!loaded.isEmpty()) {
			//注意注意:此处我们会调用第一层load进来时传进来的函数式参数,即addToLoaded(MutablePropertySources::addLast, false)
			loaded.forEach((document) -> consumer.accept(profile, document));
			if (this.logger.isDebugEnabled()) {
				StringBuilder description = getDescription("Loaded config file ", location, resource, profile);
				this.logger.debug(description);
			}
		}
	}
	catch (Exception ex) {
		throw new IllegalStateException("Failed to load property source from location '" + location + "'", ex);
	}
}
在loadDocuments方法中解析出了propertites配置文件中的属性。

我们在启动参数中设置了spring.profiles.active=sit, 然后又在配置文件中设置了spring.profiles.active=prod, 那么这两者到底有什么区别?spring会加载application-{spring.profiles.active}.propertites最后谁生效呢?
答:若启动参数与application.propertites配置文件中同时有spring.profiles.active属性,spring默认会使用启动参数中的spring.profiles.active属性,也就是sit生效。即spring默认会加载application-sit.propertites/application-sit.yml文件。application.propertites文件中的spring.profiles.active=prod不生效。原理就在上面这段源码中
在上面【4.1、ConfigFileApplicationListener$Loader】部分我们有讲过profiles=null、sit,刚才一直加载的是profiles=null的情况,并且加载完application.propertites文件后读取到了spring.profiles.active=prod,我们再次回到主load方法,可以看到继续要加载的是启动参数中的spring.profiles.active=sit配置。

7、ConfigFileApplicationListener addToLoaded(MutablePropertySources::addLast, false)
//从调用点看,此处	addMethod也是一个函数MutablePropertySources::addLast(添加到最后面)
private DocumentConsumer addToLoaded(BiConsumer<MutablePropertySources, PropertySource<?>> addMethod,
		boolean checkForExisting) {
	return (profile, document) -> {
		if (checkForExisting) {
			for (MutablePropertySources merged : this.loaded.values()) {
				if (merged.contains(document.getPropertySource().getName())) {
					return;
				}
			}
		}
		//从当前loaded中获取profile为key的MutablePropertySources,如果没找到,则新建一个
		MutablePropertySources merged = this.loaded.computeIfAbsent(profile,
				(k) -> new MutablePropertySources());
		//把解析出来的配置,添加到MutablePropertySources中最后一个,最终配置会添加到loaded中
		addMethod.accept(merged, document.getPropertySource());
	};
}
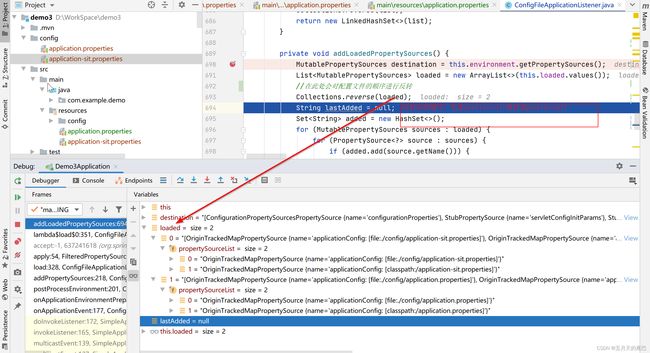
8、回到上文中addLoadedPropertySources(),此处会把load加载的配置文件生成的PropertySource添加到environment中(此处可以看到是按什么顺序添加)
private void addLoadedPropertySources() {
 	MutablePropertySources destination = this.environment.getPropertySources();
 	List<MutablePropertySources> loaded = new ArrayList<>(this.loaded.values());
 	//在此处会对配置文件的顺序进行反转
 	Collections.reverse(loaded);
 	String lastAdded = null;
 	Set<String> added = new HashSet<>();
 	for (MutablePropertySources sources : loaded) {
 		for (PropertySource<?> source : sources) {
 			if (added.add(source.getName())) {
 				addLoadedPropertySource(destination, lastAdded, source);
 				lastAdded = source.getName();
 			}
 		}
 	}
 }
此处对配置文件的顺序进行了反转,虽然加载的时候先加载了application.propertites文件再加载的application-{profile}.propertites文件,但是在此处进行了反转,最后获取属性时的顺序也就变成了先从application-{profile}.propertites文件中读取属性,若属性读取不到再去application.propertites文件中进行读取。

反转后的顺序:
然后进入addLoadedPropertySource(destination, lastAdded, source);
private void addLoadedPropertySource(MutablePropertySources destination, String lastAdded,
				PropertySource<?> source) {
	if (lastAdded == null) {
		if (destination.contains("defaultProperties")) {
			destination.addBefore("defaultProperties", source);
		}
		else {
			destination.addLast(source);
		}
	}
	else {
		destination.addAfter(lastAdded, source);
	}
}
可以看到source是被加载到了最后面。
然后environment的propertySources的propertySourceList集合就有新的数据了,我们可以看下效果

3.4.2、AnsiOutputApplicationListener
字符输出监听器, 用于调整控制台显示的打印字符的各种颜色
public class AnsiOutputApplicationListener
        implements ApplicationListener<ApplicationEnvironmentPreparedEvent>, Ordered {

    @Override
    public void onApplicationEvent(ApplicationEnvironmentPreparedEvent event) {
        ConfigurableEnvironment environment = event.getEnvironment();
        //控制台打印字符显示各种颜色
        //例如:设置spring.output.ansi.enabled=ALWAYS
        Binder.get(environment)
                .bind("spring.output.ansi.enabled", AnsiOutput.Enabled.class)
                .ifBound(AnsiOutput::setEnabled);
        AnsiOutput.setConsoleAvailable(environment
                .getProperty("spring.output.ansi.console-available", Boolean.class));
    }
}
3.4.3、LoggingApplicationListener
日志监听器, 初始化日志配置
public class LoggingApplicationListener implements GenericApplicationListener {
    //处理EnvironmentPrepared事件
    private void onApplicationEnvironmentPreparedEvent(
            ApplicationEnvironmentPreparedEvent event) {
        if (this.loggingSystem == null) {
            //在Starting事件中,我们已经初始化了loggingSystem
            //我们使用的是LogbackLoggingSystem
            this.loggingSystem = LoggingSystem
                    .get(event.getSpringApplication().getClassLoader());
        }
        initialize(event.getEnvironment(), event.getSpringApplication().getClassLoader());
    }
    //初始化日志
    protected void initialize(ConfigurableEnvironment environment,
        ClassLoader classLoader) {
        //应用环境属性
        new LoggingSystemProperties(environment).apply();
        LogFile logFile = LogFile.get(environment);
        if (logFile != null) {
            logFile.applyToSystemProperties();
        }
        //应用debug/trace参数
        initializeEarlyLoggingLevel(environment);
        //加载日志配置文件,应用环境属性
        initializeSystem(environment, this.loggingSystem, logFile);
        //根据环境属性设置日志输出级别
        initializeFinalLoggingLevels(environment, this.loggingSystem);
        //注册shutdown处理方式
        registerShutdownHookIfNecessary(environment, this.loggingSystem);
    }
}
3.4.4、ClasspathLoggingApplicationListener
打印debug日志, 记录当前classpath
public final class ClasspathLoggingApplicationListener
        implements GenericApplicationListener {

    private static final int ORDER = LoggingApplicationListener.DEFAULT_ORDER + 1;

    private static final Log logger = LogFactory
            .getLog(ClasspathLoggingApplicationListener.class);

    @Override
    public void onApplicationEvent(ApplicationEvent event) {
        if (logger.isDebugEnabled()) {
            if (event instanceof ApplicationEnvironmentPreparedEvent) {
                //处理EnvironmentPrepared事件
                //debug记录当前classpath
                logger.debug("Application started with classpath: " + getClasspath());
            }
            else if (event instanceof ApplicationFailedEvent) {
                logger.debug(
                        "Application failed to start with classpath: " + getClasspath());
            }
        }
    }

    private String getClasspath() {
        ClassLoader classLoader = Thread.currentThread().getContextClassLoader();
        if (classLoader instanceof URLClassLoader) {
            //获取classLoader加载类和资源的搜索路径
            return Arrays.toString(((URLClassLoader) classLoader).getURLs());
        }
        return "unknown";
    }
}
3.4.5、BackgroundPreinitializer
扩展点, 目前只关注Starting, Ready和Failed事件, EnvironmentPrepared事件不做处理
3.4.6、DelegatingApplicationListener 委托监听器
扩展点, 将当前的EnvironmentPrepared事件, 广播给其他关注该事件的Environment监听器, 目前没有做任何操作
public class DelegatingApplicationListener
        implements ApplicationListener<ApplicationEvent>, Ordered {
    @Override
    public void onApplicationEvent(ApplicationEvent event) {
        if (event instanceof ApplicationEnvironmentPreparedEvent) {
            List<ApplicationListener<ApplicationEvent>> delegates = getListeners(
                    ((ApplicationEnvironmentPreparedEvent) event).getEnvironment());
            if (delegates.isEmpty()) {
                //如果delegates为空,则立即返回
                return;
            }
            this.multicaster = new SimpleApplicationEventMulticaster();
            for (ApplicationListener<ApplicationEvent> listener : delegates) {
                this.multicaster.addApplicationListener(listener);
            }
        }
        if (this.multicaster != null) {
            this.multicaster.multicastEvent(event);
        }
    }
}
3.4.7、FileEncodingApplicationListener
如果指定了spring.mandatory-file-encoding属性, 如果系统属性file.encoding和spring.mandatory-file-encoding不一致的话, 抛出异常
public class FileEncodingApplicationListener
        implements ApplicationListener<ApplicationEnvironmentPreparedEvent>, Ordered {

    @Override
    public void onApplicationEvent(ApplicationEnvironmentPreparedEvent event) {
        ConfigurableEnvironment environment = event.getEnvironment();
        if (!environment.containsProperty("spring.mandatory-file-encoding")) {
            //如果环境不包含spring.mandatory-file-encoding属性
            //则立即返回
            return;
        }
        //获取系统指定编码
        String encoding = System.getProperty("file.encoding");
        String desired = environment.getProperty("spring.mandatory-file-encoding");
        if (encoding != null && !desired.equalsIgnoreCase(encoding)) {
            //系统编码和指定编码不一致,那么报错
            logger.error("System property 'file.encoding' is currently '" + encoding
                    + "'. It should be '" + desired
                    + "' (as defined in 'spring.mandatoryFileEncoding').");
            logger.error("Environment variable LANG is '" + System.getenv("LANG")
                    + "'. You could use a locale setting that matches encoding='"
                    + desired + "'.");
            logger.error("Environment variable LC_ALL is '" + System.getenv("LC_ALL")
                    + "'. You could use a locale setting that matches encoding='"
                    + desired + "'.");
            throw new IllegalStateException(
                    "The Java Virtual Machine has not been configured to use the "
                            + "desired default character encoding (" + desired + ").");
        }
    }
}
3.5、bindToSpringApplication绑定环境
//如果指定了main函数,那么会将当前环境绑定到指定的SpringApplication中
Binder.get(environment).bind("spring.main", Bindable.ofInstance(this));
3.6、环境转换EnvironmentConverter
如果没有调用了setEnvironment方法设置了环境, 那么将自定义environment转换为StandardEnvironment
//环境转换
if (!this.isCustomEnvironment) {
	environment = new EnvironmentConverter(getClassLoader()).convertEnvironmentIfNecessary(environment,
			deduceEnvironmentClass());
}
final class EnvironmentConverter {
    //环境转换
    StandardEnvironment convertEnvironmentIfNecessary(ConfigurableEnvironment environment,
            Class<? extends StandardEnvironment> type) {
        if (type.equals(environment.getClass())) {
            return (StandardEnvironment) environment;
        }
        //environment.getClass()不是StandardEnvironment的实例
        return convertEnvironment(environment, type);
    }

    //环境转换
    private StandardEnvironment convertEnvironment(ConfigurableEnvironment environment,
            Class<? extends StandardEnvironment> type) {
        //新建一个StandardEnvironment实例
        //然后赋值
        StandardEnvironment result = createEnvironment(type);
        result.setActiveProfiles(environment.getActiveProfiles());
        result.setConversionService(environment.getConversionService());
        copyPropertySources(environment, result);
        return result;
    }
}
四、总结
1、调用getOrCreateEnvironment()方法
- 创建了StandardServletEnvironment的实例
- 在AbstractEnvironment的propertySources中按顺序添加了名称为servletConfigInitParams, servletContextInitParams, jndiProperties, systemProperties, systemEnvironment的属性
2、调用configurePropertySources()方法
- 在AbstractEnvironment的propertySources末尾添加defaultProperties属性配置
- 添加commandLineArgs,到propertySources首部
- 获取spring.profiles.active属性
3、发布ApplicationEnvironmentPreparedEvent事件, 支持该事件的监听器有
- ConfigFileApplicationListener获取了五个EnvironmentPostProcessor, 分别执行他们的postProcessEnvironment方法
- SystemEnvironmentPropertySourceEnvironmentPostProcessor 将systemEnvironment属性的类型替换为SystemEnvironmentPropertySource
- SpringApplicationJsonEnvironmentPostProcessor, 添加spring.application.json属性到jndiProperties或者systemProperties之前
- CloudFoundryVcapEnvironmentPostProcessor 添加vcap属性到commandLineArgs之后
- ConfigFileApplicationListener, 首先添加random属性到systemEnvironment之后, 再读取配置文件, 加载到defaultProperties属性之前
-
- AnsiOutputApplicationListener 配置控制台打印字符串的颜色 LoggingApplicationListener 初始化日志配置
- ClasspathLoggingApplicationListener debug打印classpath日志 BackgroundPreinitializer 没有做任何操作
- DelegatingApplicationListener 没有做任何操作
- FileEncodingApplicationListener 判断file.encoding和spring.mandatory-file-encoding是否一致
4、将当前环境绑定到spring.main配置的main函数中
5、如果设置好了自定义environment, 那么将其转换为StandardEnvironment
6、如果配置了configurationProperties属性, 那么将其放在environment的propertySources的首部
7、environment的propertySources中属性列表顺序为configurationProperties, commandLineArgs, vcap, servletConfigInitParams, servletContextInitParams, spring.application.json, jndiProperties, systemProperties, systemEnvironment, random, 配置文件, defaultProperties
五、问答
5.1、ConfigurationPropertySources.attach为什么调用两次?
如下:在prepareEnvironment中调用了两次ConfigurationPropertySources.attach方法
private ConfigurableEnvironment prepareEnvironment(SpringApplicationRunListeners listeners,
													   ApplicationArguments applicationArguments) {
	// 获取或者创建环境   创建就会读取: java环境变量和系统环境变量
	ConfigurableEnvironment environment = getOrCreateEnvironment();
	//配置环境  将命令行参数读取环境变量中
	//将 defaultProperties、commandLine及active-prifiles 属性加载到环境中
    //commandLine 在 args 中配置
    //其它参数可在如下4个路径中配置:servletConfigInitParams、servletContextInitParams、systemProperties、systemEnvironment
	configureEnvironment(environment, applicationArguments.getSourceArgs());
	// 将@PropertieSource的配置信息 放在第一位,它的优先级是最低的
	ConfigurationPropertySources.attach(environment);
	//发布环境已准备事件,这是第二次发布事件,发布了ApplicationEnvironmentPreparedEvent 的监听器 读取了全局配置文件
	listeners.environmentPrepared(environment);
	// 将所有spring.main 开头的配置信息绑定到SpringApplication中
	bindToSpringApplication(environment);
	//如果不是web应用,就转成其他环境如StandardEnvironment
	if (!this.isCustomEnvironment) {
		environment = new EnvironmentConverter(getClassLoader()).convertEnvironmentIfNecessary(environment,
				deduceEnvironmentClass());
	}
	//绑定环境
	ConfigurationPropertySources.attach(environment);
	return environment;
}
第一次ConfigurationPropertySources.attach是为了将configurationProperties添加到MutablePropertySources首位, 然后发送listeners.environmentPrepared, 在后面的convertEnvironmentIfNecessary方法中可能会修改到configurationProperties属性,所以再次ConfigurationPropertySources.attach
5.2、为什么environment.getActiveProfiles();这个函数执行了两次?
//传入参数为StandardServletEnvironment和命令行参数
protected void configureProfiles(ConfigurableEnvironment environment, String[] args) {
    //调用的是AbstractEnvironment的getActiveProfiles()方法
    environment.getActiveProfiles();
    Set<String> profiles = new LinkedHashSet<>(this.additionalProfiles);
    //再次获取和配置profile
    profiles.addAll(Arrays.asList(environment.getActiveProfiles()));
    //设置environment的profile
    environment.setActiveProfiles(StringUtils.toStringArray(profiles));
}
可以看到environment.getActiveProfiles();这个函数执行了两次,且其内部实现并没有特殊之处
/**
* Return the set of active profiles as explicitly set through
 * {@link #setActiveProfiles} or if the current set of active profiles
 * is empty, check for the presence of the {@value #ACTIVE_PROFILES_PROPERTY_NAME}
 * property and assign its value to the set of active profiles.
 * @see #getActiveProfiles()
 * @see #ACTIVE_PROFILES_PROPERTY_NAME
 */
protected Set<String> doGetActiveProfiles() {
	synchronized (this.activeProfiles) {
		if (this.activeProfiles.isEmpty()) {
			String profiles = getProperty(ACTIVE_PROFILES_PROPERTY_NAME);
			if (StringUtils.hasText(profiles)) {
				setActiveProfiles(StringUtils.commaDelimitedListToStringArray(
						StringUtils.trimAllWhitespace(profiles)));
			}
		}
		return this.activeProfiles;
	}
}
按照我的理解调用两次是确保environment的activeProfiles属性确实从之前配置好的PropertySources中读取了spring.profiles.active属性,也就是说对PropertySourcesPropertyResolver类的getProperty函数的实现是悲观的。
后续问题
看完本篇文章后,我们还有其他的疑问。
1)prepareEnvironment这一步骤中会加载classpath:/,classpath:/config/,file:./,file:./config/四个目录下的配置文件,优先级是怎样的?
2)若不同的配置文件中有相同的变量名,以前面的为准还是以后面的为准?这些问题我们都将在下一篇文章中进行讲解。