【Qt QML入门】Text
Text组件在场景中添加格式化文本, 提供的是只读文本。文本项可以显示纯文本和富文本。

Text {
    id: txt
    text: "Hello World!"
    font.family: "Helvetica"
    font.pointSize: 24
    color: "red"
}
也可以支持部分Html格式标签

Text {
    id: txt1
    font.pointSize: 24
    text: "Hello World!"
}
implicitWidth/implicitHeight: 在没有指定width和height的时候,系统会默认使用
implicitWidth/implicitHeight,大多数Item的默认隐式大小为0x0,但Image和Text不可重写这个值
隐式宽高定义了控件中真实内容的大小,一个控件的width/height在控件初始化的时候已指定,而
implicitWidth/implicitHeight是跟随着控件包含的内容变化而变化的
contentWidth/contentHeight: 内容的宽、高
elide: 控制单行普通文本与宽度的匹配关系:
Text.ElideLeft: 超出宽度省略左边部分
Text.ElideRight: 超出宽度省略右边部分
Text.ElideMiddle: 超出宽度省略中间部分
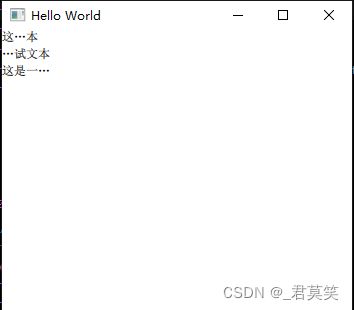
        Text {
            id: txt2
            text: "这是一段测试文本"
            width: 50         //控件的宽度
            elide: Text.ElideMiddle
            Component.onCompleted: {
                console.log("txt2.width=", txt2.width)
                console.log("txt2.implicitWidth=", txt2.implicitWidth)
                console.log("txt2.contentWidth=", txt2.contentWidth)                //只读属性:文本内容的宽度
                console.log("txt2.height=", txt2.height)
                console.log("txt2.implicitHeight=", txt2.implicitHeight)
                console.log("txt2.contentHeight=", txt2.contentHeight)              //只读属性:文本内容的高度
            }
        }

        Text {
            id: txt3
            text: "这是一段测试文本"
            width: 50         //控件的宽度
            elide: Text.ElideLeft
            Component.onCompleted: {
                console.log("txt3.width=", txt3.width)
                console.log("txt3.implicitWidth=", txt3.implicitWidth)
                console.log("txt3.contentWidth=", txt3.contentWidth)                //只读属性:文本内容的宽度
                console.log("txt3.height=", txt3.height)
                console.log("txt3.implicitHeight=", txt3.implicitHeight)
                console.log("txt3.contentHeight=", txt3.contentHeight)              //只读属性:文本内容的高度
            }
        }

        Text {
            id: txt4
            text: "这是一段测试文本"
            width: 50         //控件的宽度
            elide: Text.ElideRight
            Component.onCompleted: {
                console.log("txt4.width=", txt4.width)
                console.log("txt4.implicitWidth=", txt4.implicitWidth)
                console.log("txt4.contentWidth=", txt4.contentWidth)                //只读属性:文本内容的宽度
                console.log("txt4.height=", txt4.height)
                console.log("txt4.implicitHeight=", txt4.implicitHeight)
                console.log("txt4.contentHeight=", txt4.contentHeight)              //只读属性:文本内容的高度
            }
        }
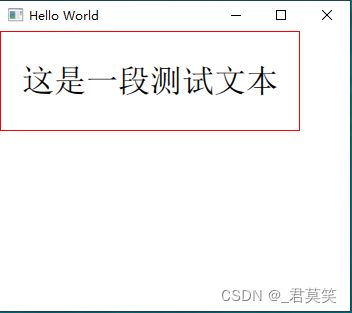
leftPadding/rightPadding/bottomPadding/topPadding:contentWidth和contentHeight 之外的
填充空间
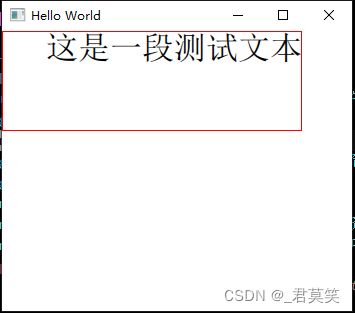
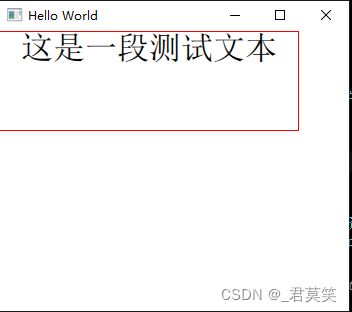
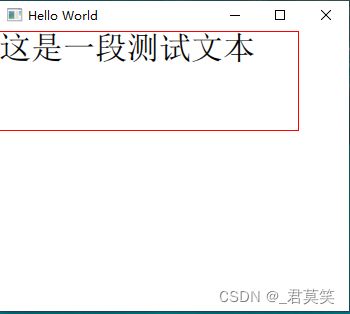
为了方便演示,我们给文本加一个边框:
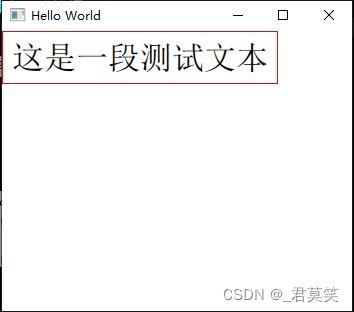
        Text {
            id: txt5
            text: "这是一段测试文本"
            font.pointSize: 24
            leftPadding: 10
            rightPadding: 10
            bottomPadding: 10
            topPadding: 10
            Rectangle {
                anchors.fill: parent
                color: "transparent"
                border.width: 1
                border.color: "red"
            }
        }
effectiveHorizontalAlignment: 查询文本的对齐方式
horizontalAlignment:
Text.AlignLeft:
Text.AlignRight:
Text.AlignHCenter:
Text.AlignJustify:
verticalAlignment:
Text.AlignTop:
Text.AlignBottom:
Text.AlignVCenter:
对于单行文本,文本的大小是文本的面积。在这种常见情况下,所有对齐都是等效的。如果您想让
文本居中,那么您需要修改Item::anchor,
或者将horizontalAlignment设置为Text.AlignHCenter并将宽度绑定到父元素的宽度
 文本居中
文本居中
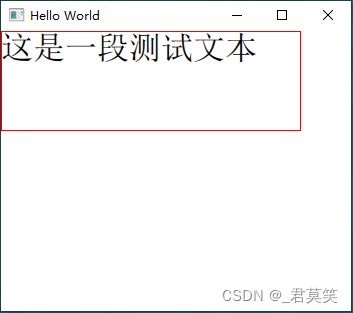 文本左对齐
文本左对齐
 文本右对齐
文本右对齐
 文本水平居中
 文本顶部对齐
 文本底部对齐
 文本垂直居中
        Rectangle {
            width: 300
            height: 100
            color: "transparent"
            border.width: 1
            border.color: "red"

            Text {
                id: txt6
                text: "这是一段测试文本"
                font.pointSize: 24
                width: parent.width
                height: parent.height
//                anchors.centerIn: parent                   //基于父控件居中
                horizontalAlignment: Text.AlignLeft      //左对齐
//                horizontalAlignment: Text.AlignHCenter   //水平居中对齐
                //horizontalAlignment: Text.AlignJustify     //自适应
//                verticalAlignment: Text.AlignTop           //顶部对齐
//                verticalAlignment: Text.AlignBottom          //底部对齐
//                verticalAlignment: Text.AlignVCenter         //垂直居中
                Component.onCompleted: {
                    console.log("effectiveHorizontalAlignment=", effectiveHorizontalAlignment)
                }
            }
        }