后端——》shiro系统权限认证完整demo及讲解
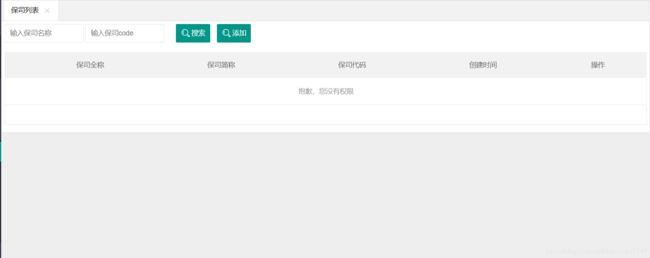
shiro是一款很强大的安全管理、权限认证框架。可以做登录权限管理,接口权限管理。如下,可以通过页面权限按钮控制用户是否拥有查询、新增、编辑的权限,完成后功能如下:在管理登录后给普通用户设置权限,可以是菜单权限,也可以是菜单列表查询权限和列表按钮权限。其中菜单的权限可以只通过代码逻辑控制,而列表查询和按钮接口的权限就可以交给shiro来管理。
直接上实现步骤吧。
大的步骤一:前期需要准备的表和功能(如果系统已有类似的表或功能,或者不需要菜单管理 只做权限管理的就跳过这一步)
1,sys_menu(菜单表)
2,sys_role_menu(角色菜单关联表<多对多>)
3,sys_authorities (权限表)
4,sys_role_authorities(角色权限关联表<多对多>)
5,sys_role(角色表)、sys_user(用户表)、sys_user_role(用户角色关联表<多对多>)。这三张表一般的系统都会有。
-------------以上是需要准备的表,表关系、字段说明、建表sql已经上传至我的资源,欢迎下载,链接如下-------------
https://download.csdn.net/download/nienianzhi1744/12015139
其中理解起来可能稍微难的一点是sys_authorities这张表,这张表有两个疑问点,
问一:表中的authority字段,是什么,这个字段的值是从哪来的,作用是什么。
答一:这个字段的值是swagger自动扫描的接口路径,如post:/v1/user/query。获取到接口路径后再把这个字符串存到表中。作用是在用户前端调用接口的时候,将路径加入shiro的权限管理器中比对,校验用户是否有权限。
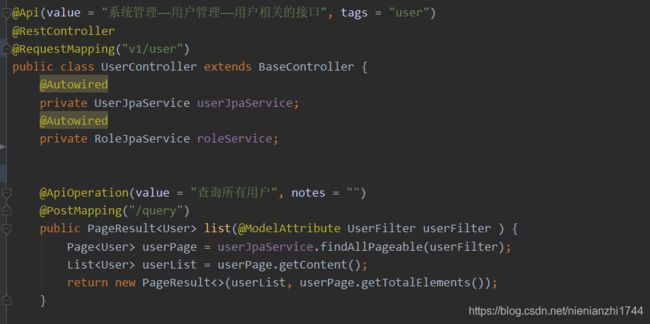
例一:如下面这个UserController的list接口方法,由于在方法上指定了post类型及路径"/query",所以这个list的接口路径是post:/v1/user/query(而不是post:/v1/user/list),那么swagger扫描出来的路径也是post:/v1/user/query。那么怎么扫描呢,只需要ajax通过get方式访问 /v2/api-docs 这个接口即可。至于swagger是什么,或者怎么配置,传送门:https://blog.csdn.net/nienianzhi1744/article/details/102622722 ( 只需要看文档中的swagger部分的内容即可)
问二: 表中的parent_menu_id、auth_type字段是什么,怎么来,作用是什么。
答二:parent_menu_id是接口所属父级菜单id,auth_type是接口类型(增删改查导出发送等等),方便授权时查看。怎么来的,当然是有个权限管理的列表,有个编辑按钮,手动选择当前权限时属于哪个菜单下的(因为swagger扫描完系统的接口后不会识别接口是属于哪个菜单或者哪个列表的,需要我们手动做功能选择),同时选择接口类型。作用是方便我们在授权管理时将接口权限与菜单关联,做到批量授权,同时也方便理解。如果只做权限管理不做菜单管理的话可以视情况加。
大的步骤二:
1,pom文件,添加3个jar包
      net.sf.ehcache
      ehcache-core
      2.5.0


      org.apache.shiro
      shiro-ehcache
      1.2.6


      org.apache.shiro
      shiro-all
      1.3.1
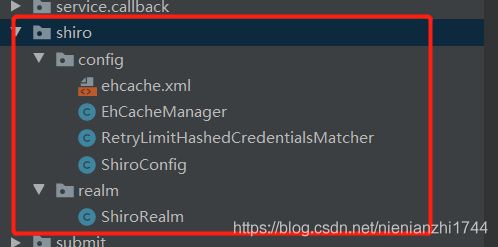
2,目录结构。在com.xxx后面建一个shiro目录,shiro目录下建一个config目录,一个realm目录。
两个目录加起来5个文件,这五个文件的作用是:
ehcache.xml:缓存配置。由于加了接口权限的功能,每次调用接口,shiro都会进行权限比较,但权限数据是存在我们数据库的sys_authorities表和sys_role_authorities表。难道每次访问一个接口都要去数据库中查一遍权限?当然不是的,由于我们上面添加了ehcache的jar包,所以我们登录系统后第一次查权限从数据库中查,然后把查到的权限存到缓存中即ehcache中,在后面就可以从缓存中查询权限。至于将这个把权限存到数据库中再拿出来比较的过程,交给shiro就好了,不需要手动写。(这不重要)
EhCacheManager:缓存配置。内容比较简单,赋值粘贴吧(这不重要)
RetryLimitHashedCredentialsMatcher:并发处理。内容比较简单,赋值粘贴吧(这不重要)
ShiroConfig:shiro配置类。在项目启动的时候会扫描到这个类,与springmvc的been配置文件类似。只要配置处理拦截资源文件过滤器,ehcache缓存管理器,自动登录管理器,realm认证及授权管理器这几个管理器。(这是最重要的文件一)
ShiroRealm:shiro登录认证及权限认证管理器。(这是最重要的文件二)
下面依次将这五个文件贴出来。
ehcache.xml:
EhCacheManager:
import net.sf.ehcache.Ehcache;
import org.apache.commons.io.IOUtils;
import org.apache.shiro.cache.Cache;
import org.apache.shiro.cache.CacheException;
import org.apache.shiro.cache.CacheManager;
import org.apache.shiro.cache.ehcache.EhCache;
import org.apache.shiro.config.ConfigurationException;
import org.apache.shiro.io.ResourceUtils;
import org.apache.shiro.util.Destroyable;
import org.apache.shiro.util.Initializable;
import org.slf4j.Logger;
import org.slf4j.LoggerFactory;

import java.io.ByteArrayInputStream;
import java.io.File;
import java.io.IOException;
import java.io.InputStream;

public class EhCacheManager implements CacheManager, Initializable, Destroyable {
    private static final Logger log = LoggerFactory.getLogger(EhCacheManager.class);
    protected net.sf.ehcache.CacheManager manager;
    private boolean cacheManagerImplicitlyCreated = false;
    /*这里有必要解释一下,这里是为了获取到ehcache的路径,你可能会说不就是在同一个文件夹吗,获取个文件这么费力?,
     *其实这里这么麻烦是考虑到了项目在windows和linux两种不同的系统的路径差异,同时也适用于打jar和war包两种部署方式
    * System.getProperty("user.dir")是获取到当前项目所在的前置路径
    * File.separator是获取当前操作系统下的文件夹分隔符*/
      private String cacheManagerConfigFile = System.getProperty("user.dir")+ File.separator+"src"+File.separator+"main"+File.separator+"java"+
    File.separator+"com"+File.separator+"xxx"+File.separator+"shiro"+File.separator+"config"+File.separator+"ehcache.xml";

    public EhCacheManager() {
    }

    public net.sf.ehcache.CacheManager getCacheManager() {
        return this.manager;
    }

    public void setCacheManager(net.sf.ehcache.CacheManager manager) {
        this.manager = manager;
    }

    public String getCacheManagerConfigFile() {
        return this.cacheManagerConfigFile;
    }

    public void setCacheManagerConfigFile(String classpathLocation) {
        this.cacheManagerConfigFile = classpathLocation;
    }

    protected InputStream getCacheManagerConfigFileInputStream() {
        String configFile = getCacheManagerConfigFile();
        if(cacheManagerConfigFile.contains("/target")){
            cacheManagerConfigFile=cacheManagerConfigFile.replace("/target","");
        }else if(cacheManagerConfigFile.contains("\\target")){
            cacheManagerConfigFile=cacheManagerConfigFile.replace("\\target","");
        }

        InputStream inputStream = null;
        try {
            inputStream = ResourceUtils.getInputStreamForPath(configFile); //原始的输入流
            byte[] b = IOUtils.toByteArray(inputStream);//使用字节数组保存流,实现将流保存到内存中.
            InputStream in = new ByteArrayInputStream(b);//从数组重建输入流
            return in;
        } catch (IOException e) {
            throw new ConfigurationException("Unable to obtain input stream for cacheManagerConfigFile [" + configFile + "]", e);
        } finally {
            IOUtils.closeQuietly(inputStream);//关闭打开文件的原始输入流.
        }
    }

    public final  Cache getCache(String name) throws CacheException {
        if(log.isTraceEnabled()) {
            log.trace("Acquiring EhCache instance named [" + name + "]");
        }

        try {
            Object e = this.ensureCacheManager().getEhcache(name);
            if(e == null) {
                if(log.isInfoEnabled()) {
                    log.info("Cache with name \'{}\' does not yet exist.  Creating now.", name);
                }

                this.manager.addCache(name);
                e = this.manager.getCache(name);
                if(log.isInfoEnabled()) {
                    log.info("Added EhCache named [" + name + "]");
                }
            } else if(log.isInfoEnabled()) {
                log.info("Using existing EHCache named [" + ((Ehcache)e).getName() + "]");
            }

            return new EhCache((Ehcache)e);
        } catch (net.sf.ehcache.CacheException var3) {
            throw new CacheException(var3);
        }
    }

    public final void init() throws CacheException {
        this.ensureCacheManager();
    }

    private net.sf.ehcache.CacheManager ensureCacheManager() {
        try {
            if(this.manager == null) {
                if(log.isDebugEnabled()) {
                    log.debug("cacheManager property not set.  Constructing CacheManager instance... ");
                }

                this.manager = new net.sf.ehcache.CacheManager(this.getCacheManagerConfigFileInputStream());
                if(log.isTraceEnabled()) {
                    log.trace("instantiated Ehcache CacheManager instance.");
                }

                this.cacheManagerImplicitlyCreated = true;
                if(log.isDebugEnabled()) {
                    log.debug("implicit cacheManager created successfully.");
                }
            }

            return this.manager;
        } catch (Exception var2) {
            throw new CacheException(var2);
        }
    }

    public void destroy() {
        if(this.cacheManagerImplicitlyCreated) {
            try {
                net.sf.ehcache.CacheManager e = this.getCacheManager();
                e.shutdown();
            } catch (Exception var2) {
                if(log.isWarnEnabled()) {
                    log.warn("Unable to cleanly shutdown implicitly created CacheManager instance.  Ignoring (shutting down)...");
                }
            }

            this.cacheManagerImplicitlyCreated = false;
        }

    }
}
RetryLimitHashedCredentialsMatcher:
import org.apache.shiro.authc.AuthenticationInfo;
import org.apache.shiro.authc.AuthenticationToken;
import org.apache.shiro.authc.ExcessiveAttemptsException;
import org.apache.shiro.authc.credential.HashedCredentialsMatcher;
import org.apache.shiro.cache.Cache;
import org.apache.shiro.cache.CacheManager;

import java.util.concurrent.atomic.AtomicInteger;

/**
 * Created by dearx on 2019/10/16.
 */
public class RetryLimitHashedCredentialsMatcher extends HashedCredentialsMatcher {
    //集群中可能会导致出现验证多过5次的现象,因为AtomicInteger只能保证单节点并发
    //解决方案,利用ehcache、redis(记录错误次数)和mysql数据库(锁定)的方式处理:密码输错次数限制; 或两者结合使用
    private Cache passwordRetryCache;

    public RetryLimitHashedCredentialsMatcher(CacheManager cacheManager) {
        //读取ehcache中配置的登录限制锁定时间
        passwordRetryCache = cacheManager.getCache("passwordRetryCache");
    }

    /**
     * 在回调方法doCredentialsMatch(AuthenticationToken token,AuthenticationInfo info)中进行身份认证的密码匹配,
     * 这里我们引入了Ehcahe用于保存用户登录次数,如果登录失败retryCount变量则会一直累加,如果登录成功,那么这个count就会从缓存中移除,
     * 从而实现了如果登录次数超出指定的值就锁定。
     * @param token
     * @param info
     * @return
     */
    @Override
    public boolean doCredentialsMatch(AuthenticationToken token,AuthenticationInfo info) {
        //获取登录用户名
        String username = (String) token.getPrincipal();
        //从ehcache中获取密码输错次数
        // retryCount
        AtomicInteger retryCount = passwordRetryCache.get(username);
        if (retryCount == null) {
            //第一次
            retryCount = new AtomicInteger(0);
            passwordRetryCache.put(username, retryCount);
        }
        //retryCount.incrementAndGet()自增:count + 1
        if (retryCount.incrementAndGet() > 5) {
            // if retry count > 5 throw  超过5次 锁定
            throw new ExcessiveAttemptsException("账户:"+username+"的密码连续5次输入错误将被锁定");
        }
        //否则走判断密码逻辑
        boolean matches = super.doCredentialsMatch(token, info);
        if (matches) {
            // clear retry count  清楚ehcache中的count次数缓存
            passwordRetryCache.remove(username);
        }
        return matches;
    }
}
ShiroConfig:
import com.xxx.shiro.realm.ShiroRealm;
import org.apache.shiro.authc.credential.HashedCredentialsMatcher;
import org.apache.shiro.mgt.SecurityManager;
import org.apache.shiro.spring.LifecycleBeanPostProcessor;
import org.apache.shiro.spring.security.interceptor.AuthorizationAttributeSourceAdvisor;
import org.apache.shiro.spring.web.ShiroFilterFactoryBean;
import org.apache.shiro.web.mgt.CookieRememberMeManager;
import org.apache.shiro.web.mgt.DefaultWebSecurityManager;
import org.apache.shiro.web.servlet.SimpleCookie;
import org.slf4j.Logger;
import org.slf4j.LoggerFactory;
import org.springframework.aop.framework.autoproxy.DefaultAdvisorAutoProxyCreator;
import org.springframework.context.annotation.Bean;
import org.springframework.context.annotation.Configuration;
import org.springframework.context.annotation.DependsOn;

import java.io.File;
import java.util.LinkedHashMap;
import java.util.Map;

/**
 * Created by dearx on 2019/10/15.
 */

@Configuration
public class ShiroConfig {
    private static final Logger logger = LoggerFactory
            .getLogger(ShiroConfig.class);

    /**
     * ShiroFilterFactoryBean 处理拦截资源文件过滤器
     *  1,配置shiro安全管理器接口securityManage;
     *  2,shiro 连接约束配置filterChainDefinitions;
     */
    @Bean
    public ShiroFilterFactoryBean shiroFilterFactoryBean(SecurityManager securityManager) {
        System.out.println("进入拦截器方法ShiroConfig.shiroFilterFactoryBean()");
        //shiroFilterFactoryBean对象
        ShiroFilterFactoryBean shiroFilterFactoryBean = new ShiroFilterFactoryBean();

        // 配置shiro安全管理器 SecurityManager
        shiroFilterFactoryBean.setSecurityManager(securityManager);

        // 指定要求登录时的链接
        shiroFilterFactoryBean.setLoginUrl("/login");
        // 登录成功后要跳转的链接
        shiroFilterFactoryBean.setSuccessUrl("/index");
        // 未授权时跳转的界面;
        shiroFilterFactoryBean.setUnauthorizedUrl("/login.html");

        // filterChainDefinitions拦截器
        Map filterChainDefinitionMap = new LinkedHashMap();
        // 配置不会被拦截的链接 从上向下顺序判断
        filterChainDefinitionMap.put("/static/**", "anon");
        filterChainDefinitionMap.put("/templates/**", "anon");

        // 配置退出过滤器,具体的退出代码Shiro已经替我们实现了
        filterChainDefinitionMap.put("/logout", "logout");
        //add操作,该用户必须有【addOperation】权限
        filterChainDefinitionMap.put("/add", "perms[addOperation]");

        //
        filterChainDefinitionMap.put("/user/**", "authc");

        shiroFilterFactoryBean
                .setFilterChainDefinitionMap(filterChainDefinitionMap);
        logger.debug("Shiro拦截器工厂类注入成功");
        return shiroFilterFactoryBean;
    }

    /**
     * shiro安全管理器设置realm认证
     * @return
     */
    @Bean public org.apache.shiro.mgt.SecurityManager securityManager() {
        DefaultWebSecurityManager securityManager = new DefaultWebSecurityManager();
        // 设置realm.
        securityManager.setRealm(shiroRealm());
        // //注入ehcache缓存管理器;
        securityManager.setCacheManager(ehCacheManager());
        //注入Cookie记住我管理器
        securityManager.setRememberMeManager(rememberMeManager());
        return securityManager;
    }

    /**
     * 身份认证realm; (账号密码校验;权限等)
     *
     * @return
     */
    @Bean public ShiroRealm shiroRealm() {
        ShiroRealm shiroRealm = new ShiroRealm();
        shiroRealm.setCredentialsMatcher(hashedCredentialsMatcher());
        return shiroRealm;
    }

    /**
     * ehcache缓存管理器;shiro整合ehcache:
     * 通过安全管理器:securityManager
     * @return EhCacheManager
     */
    @Bean public EhCacheManager ehCacheManager() {
        logger.debug(
                "=====shiro整合ehcache缓存:ShiroConfiguration.getEhCacheManager()");
        EhCacheManager cacheManager = new EhCacheManager();

        String path= System.getProperty("user.dir")+ File.separator+"src"+File.separator+"main"+File.separator+"java"+
                File.separator+"com"+File.separator+"xxx"+File.separator+"shiro"+File.separator+"config"+File.separator+"ehcache.xml";
        if(path.contains("/target")){
            path=path.replace("/target","");
        }else if(path.contains("\\target")){
            path=path.replace("\\target","");
        }
        System.out.println("ehcache缓存管理器path:"+path);
        cacheManager.setCacheManagerConfigFile(path);
        return cacheManager;
    }


    /**
     * 设置记住我cookie过期时间
     * @return
     */
    @Bean
    public SimpleCookie remeberMeCookie(){
        logger.debug("记住我,设置cookie过期时间!");
        //cookie名称;对应前端的checkbox的name = rememberMe
        SimpleCookie scookie=new SimpleCookie("rememberMe");
        //设置自动登录时间为1天
        scookie.setMaxAge(86400);
        return scookie;
    }
    // 配置cookie记住我管理器
    @Bean
    public CookieRememberMeManager rememberMeManager(){
        logger.debug("配置cookie记住我管理器!");
        CookieRememberMeManager cookieRememberMeManager=new CookieRememberMeManager();
        cookieRememberMeManager.setCookie(remeberMeCookie());
        return cookieRememberMeManager;
    }

    /**
     * 凭证匹配器 (由于我们的密码校验交给Shiro的SimpleAuthenticationInfo进行处理了
     * 所以我们需要修改下doGetAuthenticationInfo中的代码,更改密码生成规则和校验的逻辑一致即可; )
     *
     * @return
     */
    @Bean
    public HashedCredentialsMatcher hashedCredentialsMatcher() {
        HashedCredentialsMatcher hashedCredentialsMatcher = new RetryLimitHashedCredentialsMatcher(ehCacheManager());
        //new HashedCredentialsMatcher();
        hashedCredentialsMatcher.setHashAlgorithmName("md5");// 散列算法:这里使用MD5算法;
        hashedCredentialsMatcher.setHashIterations(1);// 散列的次数,比如散列两次,相当于 // md5(md5(""));
        return hashedCredentialsMatcher;
    }

    @Bean
    public LifecycleBeanPostProcessor lifecycleBeanPostProcessor() {
        return new LifecycleBeanPostProcessor();
    }

    /**
     * *
     * 开启Shiro的注解(如@RequiresRoles,@RequiresPermissions),需借助SpringAOP扫描使用Shiro注解的类,并在必要时进行安全逻辑验证
     * *
     * 配置以下两个bean(DefaultAdvisorAutoProxyCreator(可选)和AuthorizationAttributeSourceAdvisor)即可实现此功能
     * * @return
     */
    @Bean
    @DependsOn({"lifecycleBeanPostProcessor"})
    public DefaultAdvisorAutoProxyCreator advisorAutoProxyCreator() {
        DefaultAdvisorAutoProxyCreator advisorAutoProxyCreator = new DefaultAdvisorAutoProxyCreator();
        advisorAutoProxyCreator.setProxyTargetClass(true);
        return advisorAutoProxyCreator;
    }

    @Bean
    public AuthorizationAttributeSourceAdvisor authorizationAttributeSourceAdvisor() {
        AuthorizationAttributeSourceAdvisor authorizationAttributeSourceAdvisor = new AuthorizationAttributeSourceAdvisor();
        authorizationAttributeSourceAdvisor.setSecurityManager(securityManager());
        return authorizationAttributeSourceAdvisor;
    }

}
ShiroRealm:
import com.xxx.system.entity.Authorities;
import com.xxx.system.entity.RoleAuthorities;
import com.xxx.system.entity.User;
import com.xxx.system.entity.UserRole;
import com.xxx.system.service.AuthoritiesJpaService;
import com.xxx.system.service.RoleAuthoritiesJpaService;
import com.xxx.system.service.UserJpaService;
import com.xxx.system.service.UserRoleJpaService;
import com.wangfan.endecrypt.utils.EndecryptUtils;
import org.apache.shiro.SecurityUtils;
import org.apache.shiro.authc.*;
import org.apache.shiro.authz.AuthorizationInfo;
import org.apache.shiro.authz.SimpleAuthorizationInfo;
import org.apache.shiro.cache.Cache;
import org.apache.shiro.realm.AuthorizingRealm;
import org.apache.shiro.subject.PrincipalCollection;
import org.springframework.beans.factory.annotation.Autowired;
import java.util.HashSet;
import java.util.List;
import java.util.Set;
import java.util.stream.Collectors;
/**
* Created by dearx on 2019/10/15.
*/
public class ShiroRealm extends AuthorizingRealm {
@Autowired
private UserJpaService userJpaService;
@Autowired
private RoleAuthoritiesJpaService roleAuthoritiesJpaService;
@Autowired
private AuthoritiesJpaService authoritiesService;
@Autowired
private UserRoleJpaService userRoleJpaService;
/*权限认证*/
@Override
protected AuthorizationInfo doGetAuthorizationInfo(PrincipalCollection principalCollection) {
Set stringSet = new HashSet<>();
String username = (String) SecurityUtils.getSubject().getPrincipal();
User user = userJpaService.getByUsername(username);
if (user != null) {
if ("admin".equals(username)) {
/*管理员永远有全部权限*/
List authoritiesList = authoritiesService.selectList();
for (Authorities authorities : authoritiesList) {
stringSet.add(authorities.getAuthority());
}
} else {
/*根据用户获取用户所属角色*/
List userRoleList = userRoleJpaService.findByUserId(user.getUserId());
/*获取角色id集合*/
List roleIdList = userRoleList.stream().map(UserRole::getRoleId).collect(Collectors.toList());
/*根据角色id获取权限集合*/
List roleAuthoritiesList = roleAuthoritiesJpaService.findRoleAuthoritiesByRoleIdIn(roleIdList);
for (RoleAuthorities authorities : roleAuthoritiesList) {
stringSet.add(authorities.getAuthority());
}
}
}
SimpleAuthorizationInfo info = new SimpleAuthorizationInfo();
info.setStringPermissions(stringSet);
return info;
}
/*身份认证*/
@Override
protected AuthenticationInfo doGetAuthenticationInfo(AuthenticationToken authenticationToken) throws AuthenticationException {
String userName = (String) authenticationToken.getPrincipal();
String userPwd = new String((char[]) authenticationToken.getCredentials());
User user = userJpaService.getByUsername(userName);
String password = "";
if (user == null) {
throw new UnknownAccountException("账户不存在");
} else {
//根据用户名从数据库获取密码
password = user.getPassword();
if (!EndecryptUtils.encrytMd5(userPwd).equals(password)) {
throw new IncorrectCredentialsException("账户或密码不正确");
}
}
return new SimpleAuthenticationInfo(userName, password, getName());
}
@Override
protected void clearCachedAuthorizationInfo(PrincipalCollection principals) {
Cache cache = this.getAuthorizationCache();
Set 以上是主要文件了。每个文件是干嘛的都注释的很清楚了,不赘述了。当然,这只是完成了有关shiro的配置方面。那具体怎么应用呢,有几个重要的点:
重点一:登录的时候调用ShiroRealm 中的身份认证的方法,此时不涉及到权限认证,具体如下
/*这是需要的jar包
import org.apache.shiro.SecurityUtils;
import org.apache.shiro.authc.*;
import org.apache.shiro.session.Session;
import org.apache.shiro.subject.Subject;*/

/*登录的时候调用*/
public JsonResult login(String username, String password) {
        User user = userJpaService.getByUsername(username);
        Subject subject = SecurityUtils.getSubject();
        /*true代表记住密码,自动登录*/
        UsernamePasswordToken newtoken = new UsernamePasswordToken(username, password,true);
        // 执行认证登陆
        try {
            subject.login(newtoken);
        } catch (UnknownAccountException uae) {
            return  JsonResult.error(uae.getMessage());
        } catch (IncorrectCredentialsException ice) {
            return  JsonResult.error(ice.getMessage());
        } catch (LockedAccountException lae) {
            return JsonResult.error(lae.getMessage());
        } catch (ExcessiveAttemptsException eae) {
            return JsonResult.error(eae.getMessage());
        } catch (AuthenticationException ae) {
            return JsonResult.error(ae.getMessage());
        }
        if (subject.isAuthenticated()) {
            Session session = subject.getSession();
            session.setAttribute("currentUser",user);
            return JsonResult.ok("登录成功");
        } else {
            newtoken.clear();
            return JsonResult.error("登录失败");
        }
     }

/*登出的时候调用*/
public void logout(){
        Subject currentUser = SecurityUtils.getSubject();
        currentUser.logout();
    }
重点二:这是个力气活,在查询、编辑、新增等接口上增加权限认证,如下,在接口上 RequiresPermissions注解,注解的内的值是当前接口的路径。在前几步已经提到了,此注解的路径必须要与sys_authorities中swagger扫描出来的路径一致 ,如果sys_authorities中的权限路径不是swagger扫描出来的而是手写的(在下佩服),则也必须与手写的一致。加上这个注解后则表示这个接口被加入了shiro权限管理中。如下截图中getResult()方法是被加入了权限管理的,只有有权限的人才能访问,list方法是没有权限认证的,谁都可以调用。
重点三:每次走登录的方法的时候,都会重新将该用户的权限放到ehcache缓存中。缓存中的权限会根据ehcache.xml配置文件中配置的时间而失效。失效后会提示重新登录。
重点四:关于没有没有权限和重新登录的处理。
1,如果调用的接口没有权限会报这个错:
2,如果没有登录认证会报这个错:
我们要是直接把报错显示到页面上,那也太暴力了,当用户打开一个没有权限的页面,我么希望他看到的当然不是这一串红红火火。而是温柔的文字提示。所以我们用到了全局异常捕获处理。如下。此时如果用户没有进行登录认证或是没有权限的话,就可以转换成温馨的提示了。
import org.apache.shiro.authz.UnauthenticatedException;
import org.apache.shiro.authz.UnauthorizedException;
import org.slf4j.Logger;
import org.slf4j.LoggerFactory;
import org.springframework.web.bind.annotation.ControllerAdvice;
import org.springframework.web.bind.annotation.ExceptionHandler;
import org.springframework.web.bind.annotation.ResponseBody;
import org.wf.jwtp.exception.TokenException;

import java.util.HashMap;
import java.util.Map;


@ControllerAdvice
public class MyExceptionHandler {
    private Logger logger = LoggerFactory.getLogger("MyExceptionHandler");

    @ResponseBody
    @ExceptionHandler(Exception.class)
    public Map errorHandler(Exception ex) {
        Map map = new HashMap<>();
        // 根据不同错误获取错误信息
        if (ex instanceof IException) {
            map.put("code", ((IException) ex).getCode());
            map.put("msg", ex.getMessage());
        } else if (ex instanceof TokenException) {
            map.put("code", ((TokenException) ex).getCode());
            map.put("msg", ex.getMessage());
        } else if (ex instanceof UnauthenticatedException) {
            ex.printStackTrace();
            map.put("code", "401");
            map.put("msg", "请重新登录");
        }else if(ex instanceof UnauthorizedException){
            ex.printStackTrace();
            map.put("code", "403");
            map.put("msg", "抱歉,您没有权限");
        }
        else {
            String message = ex.getMessage();
            map.put("code", 500);
            map.put("msg", message == null || message.trim().isEmpty() ? "未知错误" : message);
            logger.error(message, ex);
            ex.printStackTrace();
        }
        return map;
    }

}
到此为止,有关shiro后端的配置已经完成。
与前端相关的html页面或是JavaScript代码与js,与角色授权的后端逻辑中会在近期更新出来。
欢迎提意见,长期在线,编辑不易,转载留名。


