k8s下安装redis
一、使用helm安装redis
执行以下命令添加redis的repo
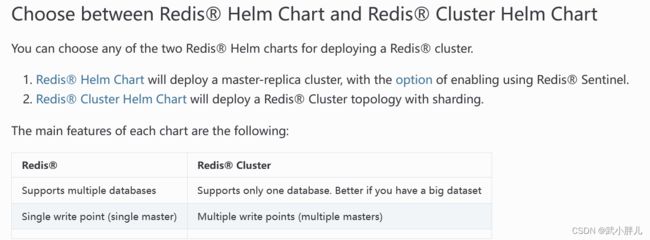
helm repo add bitnami https://charts.bitnami.com/bitnamiredis有两种部署方式:redis &redis cluster, 详细内容参见 redis 17.11.6 · bitnami/bitnami
1.1 安装Redis
创建的master和replica pod的默认size是8Gi,如果k8s的node没有足够的空间,会抛出如下错误:default-scheduler 0/3 nodes are available: pod has unbound immediate PersistentVolumeClaims. preemption: 0/3 nodes are available: 3 No preemption victims found for incoming pod 为此,我们可以扩大node的size,或在安装时重新设置pod的size,设置方法如下:
helm install --set replica.persistence.size=2Gi --set master.persistence.size=2Gi my-redis bitnami/redis1.2 安装Redis Cluster
helm install my-redis oci://registry-1.docker.io/bitnamicharts/redis-cluster --set persistence.size=512m二、创建并部署storageclass
kind: StorageClass
apiVersion: storage.k8s.io/v1
metadata:
  name: manual
provisioner: kubernetes.io/no-provisioner
volumeBindingMode: WaitForFirstConsumer
三、创建并部署PV (persistent volumes)
apiVersion: v1
kind: PersistentVolume
metadata:
  name: $pv_name
spec:
  storageClassName: manual
  capacity:
    storage: 2Gi
  accessModes:
  - ReadWriteOnce
  hostPath:
path: $data_pathpv的storageClassName指向先前创建的storageclass (manual)。此外,还需要指定data的存放路径 hostPath,这要求在k8s的各node上创建该路径,并修改路径权限;
chmod 777 $data_path否则pod会抛出如下错误: Can't open or create append-only dir appendonlydir: Permission denied
四、修改pvc
修改redis下master & replica pod使用的pvc,使其指向步骤3中创建的pv
metadata:
  annotations:
    pv.kubernetes.io/bind-completed: "yes"
    pv.kubernetes.io/bound-by-controller: "yes"
  creationTimestamp: "2023-06-29T11:18:24Z"
  finalizers:
  - kubernetes.io/pvc-protection
  labels:
    app.kubernetes.io/component: master
    app.kubernetes.io/instance: my-redis
    app.kubernetes.io/name: redis
  name: redis-data-my-redis-master-0
  namespace: default
  resourceVersion: "2608115"
  uid: 4f1b0e39-8078-4fdc-8aff-388437ab9922
spec:
  accessModes:
  - ReadWriteOnce
  resources:
    requests:
      storage: 2Gi
  storageClassName: $storage_name #指定storage name
  volumeMode: Filesystem
  volumeName: $pv_name #指定pv
status:
  accessModes:
  - ReadWriteOnce
  capacity:
    storage: 2Gi
  phase: Bound
~
五、重要参考文献
1. storage、pv、pvc的关联关系及配置方法
kubernetes - Error "no persistent volumes available for this claim and no storage class is set" - Stack Overflow
2. 详细的安装过程
iDeploying Redis Cluster on Kubernetes | AirplaneiyIn this guide, learn how to run Redis on Kubernetes and explore tips for improving performance, security, and more.https://www.airplane.dev/blog/deploy-redis-cluster-on-kubernetes
六、相关知识点
通过层层的关联关系实现了host上的path与container上path的绑定(mount),进而实现在container销毁的情况下,其在mountpath下内容会存储在hostpath中。
volume
On-disk files in a container are ephemeral, which presents some problems for non-trivial applications when running in containers. One problem occurs when a container crashes or is stopped. Container state is not saved so all of the files that were created or modified during the lifetime of the container are lost. During a crash, kubelet restarts the container with a clean state. Another problem occurs when multiple containers are running in a Pod and need to share files. It can be challenging to setup and access a shared filesystem across all of the containers. The Kubernetes volume abstraction solves both of these problems. Familiarity with Pods is suggested.
a volume is a directory, possibly with some data in it, which is accessible to the containers in a pod. How that directory comes to be, the medium that backs it, and the contents of it are determined by the particular volume type used.
Ephemeral volume types have a lifetime of a pod, but persistent volumes exist beyond the lifetime of a pod. When a pod ceases to exist, Kubernetes destroys ephemeral volumes; however, Kubernetes does not destroy persistent volumes. For any kind of volume in a given pod, data is preserved across container restarts.
七、使用方法
可以使用python包访问以pod形式存在的redis DB,详细教程参见Python guide | Redis
pip install redis #安装python包

# 使用如下程序完成redis访问
import redis
r = redis.Redis(host='10.97.236.244', port=6379, decode_responses=True)
r.set('foo', 'bar')
print(r.get('foo'))上述程序执行运行时错误:redis.exceptions.AuthenticationError: Authentication required.
  File "/home/ubuntu/Projects/socc23/motivation/logs/load-memory-intensive-req.py", line 3, in
    r.set('foo', 'bar')
....
    response = self._parser.read_response(disable_decoding=disable_decoding)
  File "/home/ubuntu/anaconda3/envs/linkage/lib/python3.10/site-packages/redis/connection.py", line 349, in read_response
    result = self._read_response(disable_decoding=disable_decoding)
  File "/home/ubuntu/anaconda3/envs/linkage/lib/python3.10/site-packages/redis/connection.py", line 372, in _read_response
    raise error
redis.exceptions.AuthenticationError: Authentication required.
上述问题有两种解决办法:
方案一、重新安装redis并在安装过程中指定secretpassword
helm install my-release \
  --set auth.password=secretpassword \
    oci://registry-1.docker.io/bitnamicharts/redis
方法二、获取默认密码并通过redis-cli修改密码
kubectl get secret --namespace default my-redis-nodes -o \
jsonpath="{.data.redis-password}" | base64 --decode #获取default password

import redis
r = redis.Redis(host='10.97.236.244', port=6379, decode_responses=True,password='jWDFay24fY') #这里的password上一步的查询结果


