【pytest-html】深度探索pytest-html测试报告的自定义使用
文章目录
- 一、前言
- 二、安装
-
- 依赖
- 直接安装
- 从源码安装
- 三、基本使用
- 四、深度使用
-
- 1. 改变报告样式
- 示例
- 2. 修改报告标题
-
- 示例
- 3. 修改Enviroment
-
- 在测试运行前修改环境配置`pytest_configure`
- 在测试运行后修改环境配置`pytest_sessionfinish`
- 示例
- 问题
- 4. 修改Summary
-
- 示例
- 5. 增加额外的内容
-
- 示例1
- 示例2
- 示例3
- 6. 修改结果表
-
- 增加description, Time列,移除Links列
- 测试通过的情况下删除所有的单元格
- 钩子函数`pytest_html_results_table_html`修改日志输出和其他HTML
- 7. 自动收起所有的列
- 8. 设置哪些测试结果可见
- 9. 格式化Duration列
- 五、实践
-
- 1. 更改报告样式
- 2. 修改Title及Enviorment部分
- 3. 修改Summry部分
- 4. 修改Reuslts部分,增减列
- 5. 修改results表的Test列,让其显示测试数据
- 六、完整的测试代码
- 七、问题:无法捕获到错误日志
- 八、 问题:报告显示动态的测试环境
-
- 背景
- 报告显示动态的测试环境
一、前言
插件项目地址:https://github.com/pytest-dev/pytest-html
官方文档地址:https://pytest-html.readthedocs.io/en/latest/
二、安装
依赖
- Python >=3.6
- or PyPy3
直接安装
pip install pytest-html
从源码安装
pip install -e .
三、基本使用
# 直接在当前目录生成名称为report.html的报告,同时会自动生成一个assets样式文件目录
pytest --html=report.html
# 直接在当前目录生成名称为report.html的报告,报告自带样式
pytest --html=report.html --self-contained-html
四、深度使用
1. 改变报告样式
pytest --html=report.html --css=自定义的样式文件的路径
"""
注意:自定义的样式文件不要写中文,否则会报错:UnicodeDecodeError: 'gbk' codec can't decode byte 0xad in position 33: illegal multibyte sequence
尝试了在css文件首行增加:@charset "UTF-8";  但是没有解决这个问题。
"""
示例
-
首先新建一个css文件,入如:
report.css

-
打开pytest-html生成的报告,用F12查看标签的相关信息,class,id,标签名等

3. 先尝试直接通过F12更改报告样式,看是否有效。(当前如果你很会css,可以忽略这个步骤)

-
拷贝样式代码到report.css
-
运行测试时,指定该css文件:
pytest --html=report.html --css=report.css

-
再次打开报告,可以看到我们指定的css样式生效了。
2. 修改报告标题
默认情况下,pytest-html会使用报告文件名作为报名标题,这里我们可以通过钩子函数pytest_html_report_title更改报告标题。
def pytest_html_report_title(report):
    report.title = "My very own title!"
示例
-
找到项目根目录下的conftest.py文件,往里面粘贴上面的代码,其中标题是可以自定义的。
-
重新生成报告就可以看到效果了。

3. 修改Enviroment
环境模块是由 pytest-metadata 插件提供的。有两个钩子函数:pytest_configure,pytest_sessionfinish
在测试运行前修改环境配置pytest_configure
def pytest_configure(config):
    config._metadata["键"] = "值"
在测试运行后修改环境配置pytest_sessionfinish
import pytest

@pytest.hookimpl(tryfirst=True)
def pytest_sessionfinish(session, exitstatus):
    session.config._metadata["键"] = "值"
注意:
@pytest.hookimpl(tryfirst=True)非常重要;- 它可以使得
pytest_sessionfinish在任何其他插件(包括pytest-html,pytest-metadata)运行前运行; - 如果我们没有增加
@pytest.hookimpl(tryfirst=True),就会导致环境表不会按照我们预想的发生变化。
示例
-
在conftest.py文件上增加如下代码

-
重新运行生成报告后,报告如下图所示
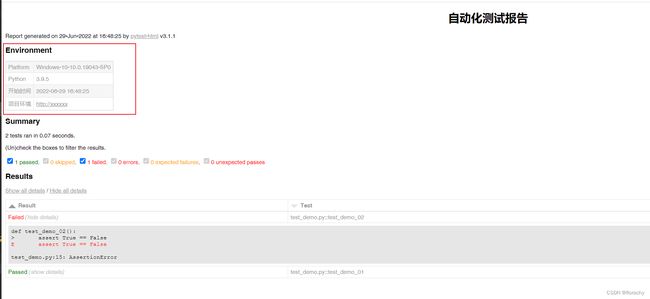
问题
官方文档这部分功能,没有理解,大家如果搞定了可以给我留言,谢谢啦!

4. 修改Summary
我们可以通过钩子函数pytest_html_results_summary修改summary部分内容。
from py.xml import html


def pytest_html_results_summary(prefix, summary, postfix):
    prefix.extend([html.p("追加的内容")])
示例
-
在conftest.py文件上增加如下代码

-
重新运行生成报告后,报告如下图所示
5. 增加额外的内容
我们能通过extra给报告增加更多的详细信息。以下是我们可以增加的内容。
| Type | Example |
|---|---|
| Raw HTML | extra.html(‘
Additional HTML
’) |
| JSON | extra.json({‘name’: ‘pytest’}) |
| Plain text | extra.text(‘Add some simple Text’) |
| URL | extra.url(‘http://www.example.com/’) |
| Image | extra.image(image, mime_type=‘image/gif’, extension=‘gif’) |
| Image | extra.image(‘/path/to/file.png’) |
| Image | extra.image(‘http://some_image.png’) |
注意:
-
当我们从文件中增加一个图片时,图片的路径可以是绝对路径或者相对路径。
-
当我们使用
--self-contained-html, 图片也许无法按照预期的加载出来。(这里我试过,是可以正常加载的。) -
官方文档说图片还可以使用如下格式:
| Image format | Example |
|---|---|
| PNG | extra.png(image) |
| JPEG | extra.jpg(image) |
| SVG | extra.svg(image) |
但是我亲自尝试过,直接使用extras.image就可以加载上述类型的图片。上述指定格式显得稍有点多余。
而且注意:官方文档都是写的extra.image 或者 extra.svg, extra没有带s,实际示例中有s,实际使用也需要用extras。这里不知道是不是我理解的有问题,还是官方文档笔误,大家注意一下。
我们可以在conftest.py中通过钩子函数
pytest_runtest_makereport来增加这些额外的内容。
import pytest


@pytest.hookimpl(hookwrapper=True)
def pytest_runtest_makereport(item, call):
    pytest_html = item.config.pluginmanager.getplugin("html")
    outcome = yield
    report = outcome.get_result()
    extra = getattr(report, "extra", [])
    if report.when == "call":
        # always add url to report
        extra.append(pytest_html.extras.url("http://www.example.com/"))
        xfail = hasattr(report, "wasxfail")
        if (report.skipped and xfail) or (report.failed and not xfail):
            # only add additional html on failure
            extra.append(pytest_html.extras.html("Additional HTML"))
        report.extra = extra
示例1
-
首先修改我们的用例,让用例产生各种类型的数据,方便看效果。
-
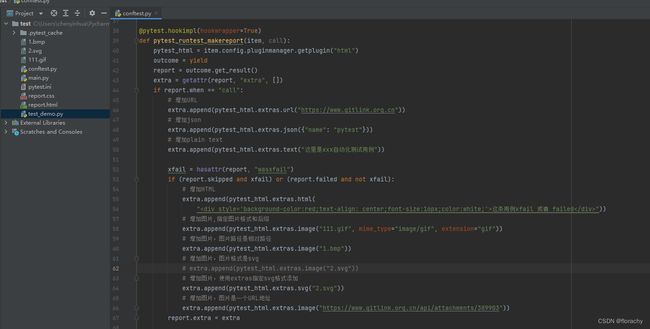
我们在conftest.py文件中增加如下代码
@pytest.hookimpl(hookwrapper=True)
def pytest_runtest_makereport(item, call):
    pytest_html = item.config.pluginmanager.getplugin("html")
    outcome = yield
    report = outcome.get_result()
    extra = getattr(report, "extra", [])
    if report.when == "call":
        # 增加URL
        extra.append(pytest_html.extras.url("https://www.gitlink.org.cn"))
        # 增加json
        extra.append(pytest_html.extras.json({"name": "pytest"}))
        # 增加plain text
        extra.append(pytest_html.extras.text("这里是xxx自动化测试用例"))
        xfail = hasattr(report, "wasxfail")
        if (report.skipped and xfail) or (report.failed and not xfail):
            # 增加HTML
            extra.append(pytest_html.extras.html(
                "这条用例xfail 或者 failed"))
            # 增加图片,指定图片格式和后缀
            extra.append(pytest_html.extras.image("111.gif", mime_type="image/gif", extension="gif"))
            # 增加图片,图片路径是相对路径
            extra.append(pytest_html.extras.image("1.bmp"))
            # 增加图片,图片格式是svg
            # extra.append(pytest_html.extras.image("2.svg"))
            # 增加图片,使用extras指定svg格式添加
            extra.append(pytest_html.extras.svg("2.svg"))
            # 增加图片,图片是一个URL地址
            extra.append(pytest_html.extras.image("https://www.gitlink.org.cn/api/attachments/389903"))
        report.extra = extra
3. 运行生成报告后如下图所示

我们还可以给除了html的其他类型来增加
name来改变增加内容的标题。
extra.append(pytest_html.extras.text("some string", name="Different title"))
示例2
- 修改conftest.py中的
pytest_runtest_makereport的内容
@pytest.hookimpl(hookwrapper=True)
def pytest_runtest_makereport(item, call):
    pytest_html = item.config.pluginmanager.getplugin("html")
    outcome = yield
    report = outcome.get_result()
    extra = getattr(report, "extra", [])
    if report.when == "call":
        # 增加URL
        extra.append(pytest_html.extras.url("https://www.gitlink.org.cn", name="gitlink"))
        # 增加json
        extra.append(pytest_html.extras.json({"name": "pytest"}, name="接口响应数据"))
        # 增加plain text
        extra.append(pytest_html.extras.text("这里是xxx自动化测试用例", name="文本"))
        # 注意:实际报告上会直接显示图片,不会有图片的name
        extra.append(pytest_html.extras.image("1.bmp", name="图片"))
        xfail = hasattr(report, "wasxfail")
        if (report.skipped and xfail) or (report.failed and not xfail):
            # 增加HTML
            extra.append(pytest_html.extras.html(
                "这条用例xfail 或者 failed"))
        report.extra = extra
- 运行生成报告后如下图所示

我们也可以直接在测试方法中将extra当做一个fixture使用,而不使用上述的钩子函数
pytest_runtest_makereport。
from pytest_html import extras

def test_extra(extra):
    extra.append(extras.text("some string"))
示例3
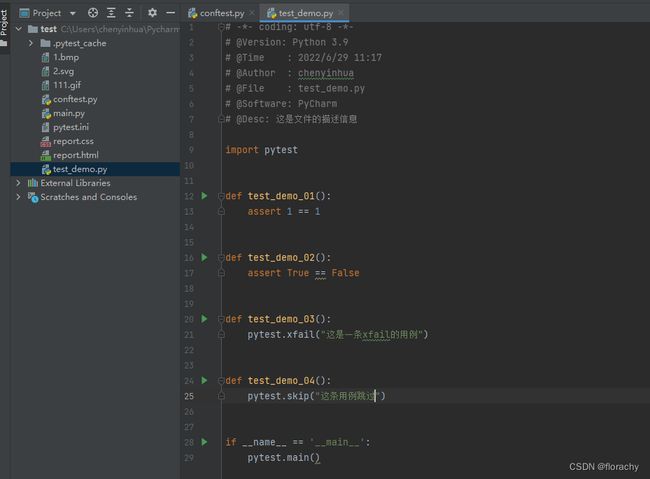
- 在测试函数代码如下:
注意:原先conftest.py中的pytest_runtest_makereport可以注释掉了。
import pytest
from pytest_html import extras
def test_demo_01(extra):
    # 注意:这个语句不能放在断言后
    extra.append(extras.text("这是一条通过的用例", name="测试通过的文本"))
    assert 1 == 1
def test_demo_02(extra):
    extra.append(extras.json("这是一条失败的用例", name="测试失败的JSON"))
    assert True == False
def test_demo_03(extra):
    # 注意:这个语句不能放在xfail之后
    extra.append(extras.html(
        "这条用例xfail 或者 failed"))
    pytest.xfail("这是一条xfail的用例")
def test_demo_04():
    pytest.skip("这条用例跳过")

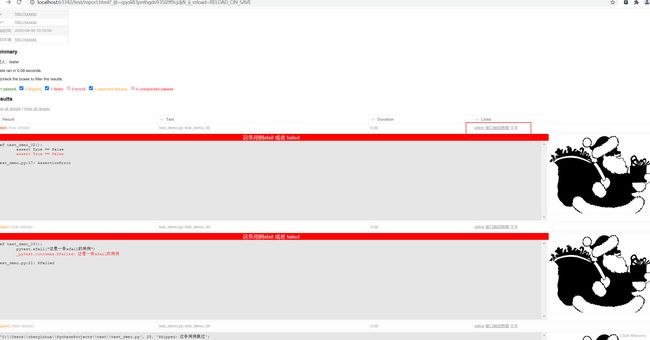
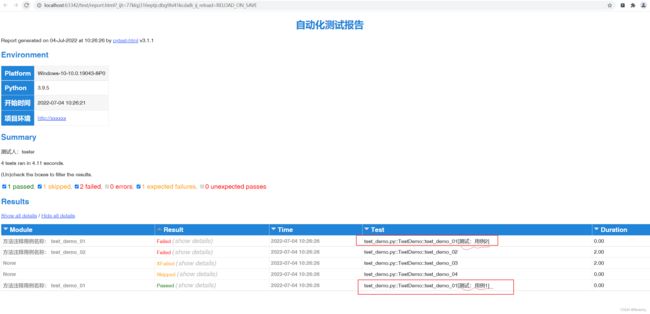
- 运行生成报告后如下图所示
6. 修改结果表
增加description, Time列,移除Links列
-
首先修改一下测试方法,给部分测试方法增加文档注释

-
在conftest.py中增加如下代码
from datetime import datetime
def pytest_html_results_table_header(cells):
    """
    处理结果表的表头
    """
    # 往表格增加一列Description,并且给Description列增加排序
    cells.insert(2, html.th("Description", class_="sortable desc", col="desc"))
    # 往表格增加一列Time,并且给Time列增加排序
    cells.insert(1, html.th("Time", class_="sortable time", col="time"))
    # 移除表格最后一列
    cells.pop()
def pytest_html_results_table_row(report, cells):
    """
    处理结果表的行
    """
    # 往列 Description插入每行的值
    cells.insert(2, html.th(report.description))
    # 往列 Time 插入每行的值
    cells.insert(1, html.th(datetime.utcnow(), class_="col-time"))
    cells.pop()
@pytest.hookimpl(hookwrapper=True)
def pytest_runtest_makereport(item, call):
    outcome = yield
    report = outcome.get_result()
    # 定义列 Description的值,默认为测试方法的文档注释,如果测试方法没有文档注释,就自定义Description的值
    if str(item.function.__doc__) != "None":
        # 结果表的description列的值 = 测试方法的文档注释
        report.description = str(item.function.__doc__)
    else:
        # 结果表的description列的值 = 自定义的信息
        # 注意:这里可以将测试用例中的用例标题或者描述作为列 Description的值
        report.description = "这里是描述信息"
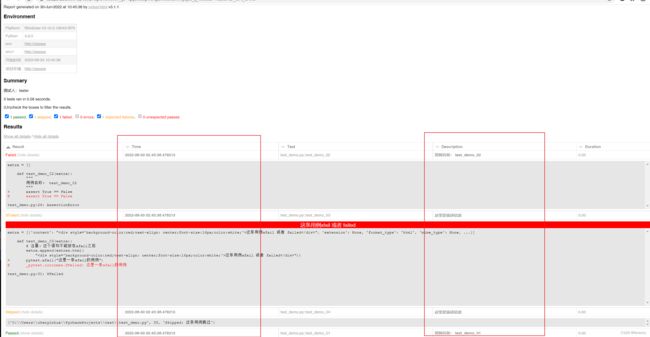
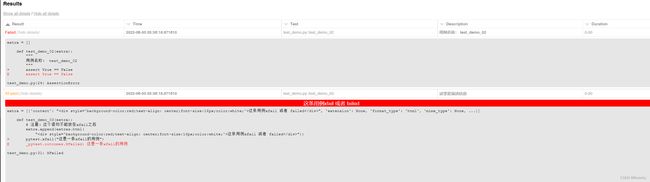
- 运行生成报告后如下图所示
测试通过的情况下删除所有的单元格
注意:这种情况下,我们在报告中无法看到通过用例的任何信息。
在conftest.py中增加如下代码:
def pytest_html_results_table_row(report, cells):
    if report.passed:
        del cells[:]
钩子函数pytest_html_results_table_html修改日志输出和其他HTML
在conftest.py中增加如下代码:
from py.xml import html

def pytest_html_results_table_html(report, data):
    if report.passed:
        del data[:]
        data.append(html.div("这条用例通过啦!", class_="empty log"))
运行后产生的报告如下:
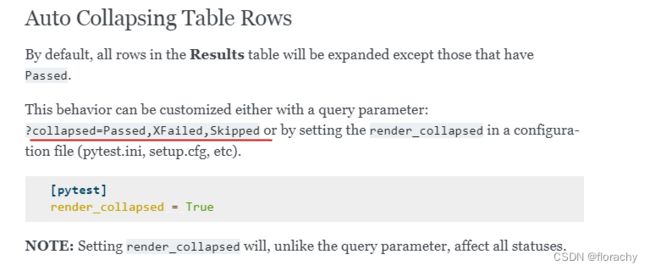
7. 自动收起所有的列
默认情况下,结果表中的所有行都是展开显示的。如下图所示:
我们可以通过在pytest的配置文件pytest.ini中设置来决定是否展开还是收起。
[pytest]
# 收起结果表中的所有行
render_collapsed = True
重新运行生成报告后如下图所示:

官方文档这里提出的设置查询参数,没有搞明白怎么设置,有搞明白的,欢迎给我留言~
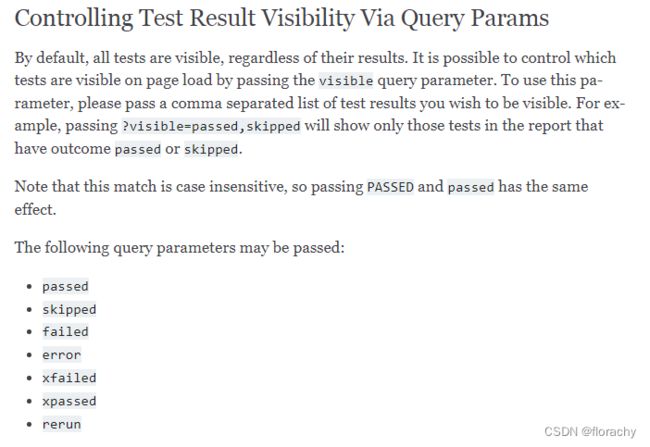
8. 设置哪些测试结果可见
官方文档这里提出的设置查询参数,没有搞明白怎么设置,有搞明白的,欢迎给我留言~
9. 格式化Duration列
默认情况下,Durations列是用得一个格式化的时间戳,使用的是%S.%f ,%S是秒%f 是毫秒, 是通过duration_formatter 设置的。目前pytest-html是支持所有的格式化指令的。
但是我们可以在conftest.py文件中对Duration列进行格式化设置。
import pytest

@pytest.hookimpl(hookwrapper=True)
def pytest_runtest_makereport(item, call):
    outcome = yield
    report = outcome.get_result()
    setattr(report, "duration_formatter", "%H:%M:%S.%f")
NOTE: Milliseconds are always displayed with a precision of 2
五、实践
1. 更改报告样式
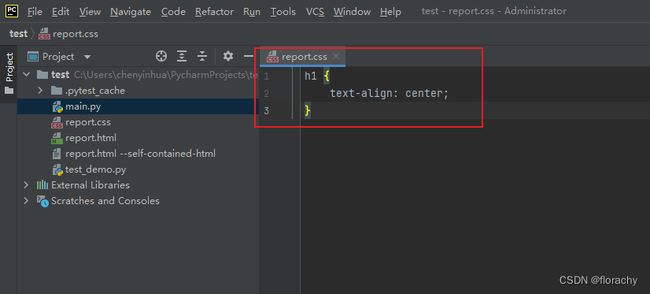
新建一个report.css文件,内容如下:
注意:以下样式仅供参考,自己可以根据自己的想法自定义报告样式
body {
    font-size: 16px;
}
h1 {
     text-align: center;
     color: #2084D9;
     font-size: 30px;
}
h2 {
    font-size: 24px;
    color: #2084D9;
}
a {
    color: #466AFF;
}
span {
    font-size: 20px;
}
#environment td {
    padding: 10px;
}
#results-table {
   font-size: 16px;
}
#results-table-head th{
    font-size: 20px;
    background-color: #2084D9;
    color: #FFFFFF;
}
td {
    color: #000000;
}
#environment tbody tr td:nth-child(1){
    background-color: #2084D9;
    color: #FFFFFF;
    font-weight:bold;
    font-size: 20px
}
- 运行报告的时候增加
--css=report.css
注意:请注意report.css的路径。我这里用的相对路径。
pytest.main(["--html=report.html", "--self-contained-html", "--css=report.css"])
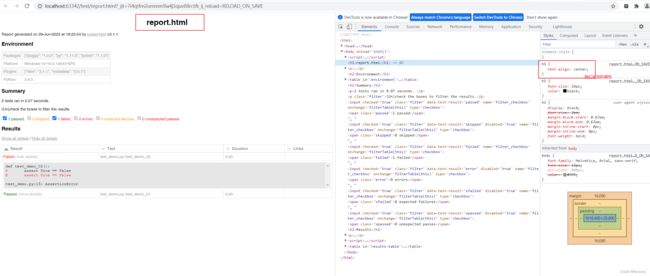
- 运行后效果如下图所示:
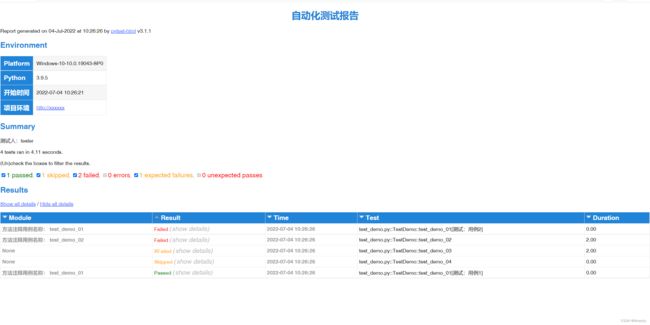
2. 修改Title及Enviorment部分
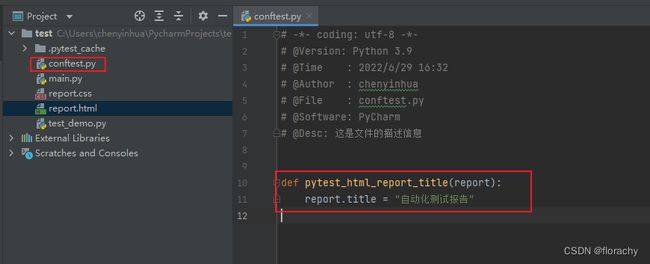
在conftest.py中添加如下代码:
from time import strftime
import pytest

def pytest_html_report_title(report):
	"""修改报告标题"""
    report.title = "自动化测试报告"

def pytest_configure(config):
	"""在测试运行前,修改environment"""
    # 给环境表 添加 开始时间
    config._metadata['开始时间'] = strftime('%Y-%m-%d %H:%M:%S')
    # 给环境表 移除 Packages 及 Plugins
    config._metadata.pop("Packages")
    config._metadata.pop("Plugins")

@pytest.hookimpl(tryfirst=True)
def pytest_sessionfinish(session, exitstatus):
     """在测试运行后,修改environment"""
    # 给环境表 添加 项目环境
    session.config._metadata['项目环境'] = "http://xxxxxx"
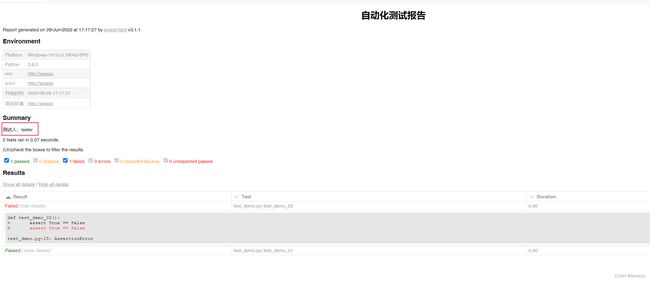
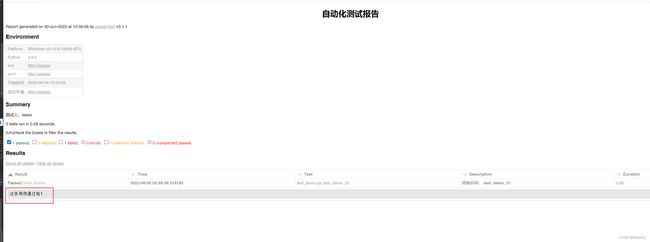
3. 修改Summry部分
在conftest.py中添加如下代码:
def pytest_html_results_summary(prefix, summary, postfix):
    prefix.extend([html.p("测试人:tester")])
4. 修改Reuslts部分,增减列
在conftest.py中添加如下代码:
import pytest
from time import strftime
from py.xml import html
from datetime import datetime

def pytest_html_results_table_header(cells):
    """
    处理结果表的表头
    """
    # # 往表格增加一列Description,并且给Description列增加排序
    cells.insert(0, html.th("Module", class_="sortable desc", col="desc"))
    # 往表格增加一列Time,并且给Time列增加排序
    cells.insert(2, html.th("Time", class_="sortable time", col="time"))
    # 移除表格最后一列
    cells.pop()
def pytest_html_results_table_row(report, cells):
    """
    处理结果表的行
    """
    # # 往列 Description插入每行的值
    cells.insert(0, html.th(report.description))
    # 往列 Time 插入每行的值
    cells.insert(2, html.th(datetime.now().strftime("%Y-%m-%d %H:%M:%S"), class_="col-time"))
    cells.pop()

def pytest_html_results_table_html(report, data):
	"""如果测试通过,则显示“这条用例通过啦!"""
    if report.passed:
        del data[:]
        data.append(html.div("这条用例通过啦!", class_="empty log"))

@pytest.mark.hookwrapper
@pytest.hookimpl(hookwrapper=True)
def pytest_runtest_makereport(item, call):
    """设置列Description的值为方法的文档注释"""
    outcome = yield
    report = outcome.get_result()
    report.description = str(item.function.__doc__)
5. 修改results表的Test列,让其显示测试数据
这里我们要用到pytest.mark.parametrize的ids。
默认情况下,是这样显示的:test_demo.py::TestDemo::test_demo_01[case0] 。这样一条信息,实际是用例的nodeid,而【case0】是测试用例参数化时的每个参数。
其中参数化方法@pytest.mark.parametrize(“case”, cases)的参数ids的作用主要就是用来标记测试用例,增加测试用例执行后输出信息的可读性,因此可以使用这个参数来改变【case0】,让它显测试数据。
修改test.demo.py:
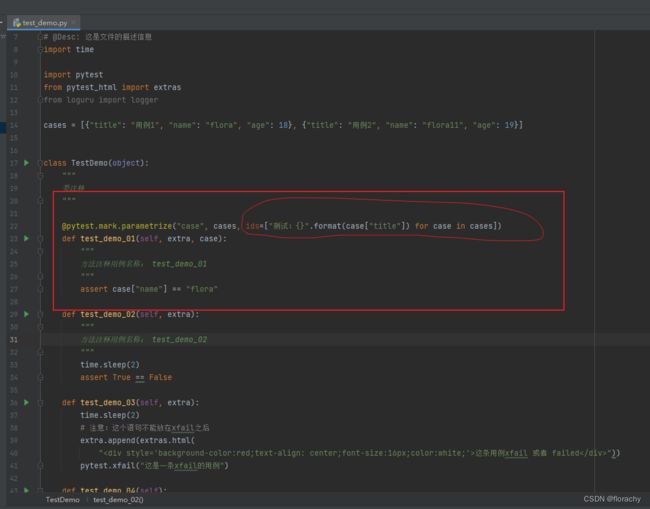
运行后生成报告如下:
六、完整的测试代码
test.demo.py
# -*- coding: utf-8 -*-
# @Version: Python 3.9
# @Time    : 2022/6/29 11:17
# @Author  : chenyinhua
# @File    : test_demo.py
# @Software: PyCharm
# @Desc: 这是文件的描述信息
import time
import pytest
from pytest_html import extras
cases = [{"title": "用例1", "name": "flora", "age": 18}, {"title": "用例2", "name": "flora11", "age": 19}]
class TestDemo(object):
    """
    类注释
    """
    @pytest.mark.parametrize("case", cases, ids=["测试:{}".format(case["title"]) for case in cases])
    def test_demo_01(self, extra, case):
        """
        方法注释用例名称: test_demo_01
        """
        assert case["name"] == "flora"
    def test_demo_02(self, extra):
        """
        方法注释用例名称: test_demo_02
        """
        time.sleep(2)
        assert True == False
    def test_demo_03(self, extra):
        time.sleep(2)
        # 注意:这个语句不能放在xfail之后
        extra.append(extras.html(
            "这条用例xfail 或者 failed"))
        pytest.xfail("这是一条xfail的用例")
    def test_demo_04(self):
        pytest.skip("这条用例跳过")
conftest.py
# -*- coding: utf-8 -*-
# @Version: Python 3.9
# @Time    : 2022/6/29 16:32
# @Author  : chenyinhua
# @File    : conftest.py
# @Software: PyCharm
# @Desc: 这是文件的描述信息
import pytest
from time import strftime
from py.xml import html
from datetime import datetime
from loguru import logger
def pytest_html_results_table_header(cells):
    """
    处理结果表的表头
    """
    # # 往表格增加一列Description,并且给Description列增加排序
    cells.insert(0, html.th("Module", class_="sortable desc", col="desc"))
    # 往表格增加一列Time,并且给Time列增加排序
    cells.insert(2, html.th("Time", class_="sortable time", col="time"))
    # 移除表格最后一列
    cells.pop()
def pytest_html_results_table_row(report, cells):
    """
    处理结果表的行
    """
    # # 往列 Description插入每行的值
    cells.insert(0, html.th(report.description))
    # 往列 Time 插入每行的值
    cells.insert(2, html.th(datetime.now().strftime("%Y-%m-%d %H:%M:%S"), class_="col-time"))
    cells.pop()
def pytest_html_results_table_html(report, data):
    if report.passed:
        del data[:]
        data.append(html.div("这条用例通过啦!", class_="empty log"))
@pytest.mark.hookwrapper
@pytest.hookimpl(hookwrapper=True)
def pytest_runtest_makereport(item, call):
    outcome = yield
    report = outcome.get_result()
    report.description = str(item.function.__doc__)
def pytest_html_results_summary(prefix, summary, postfix):
    prefix.extend([html.p("测试人:tester")])
def pytest_html_report_title(report):
    report.title = "自动化测试报告"
def pytest_configure(config):
    # 给环境表 添加 开始时间
    config._metadata['开始时间'] = strftime('%Y-%m-%d %H:%M:%S')
    # 给环境表 移除 Packages 及 Plugins
    config._metadata.pop("Packages")
    config._metadata.pop("Plugins")
@pytest.hookimpl(tryfirst=True)
def pytest_sessionfinish(session, exitstatus):
    # 给环境表 添加 项目环境
    session.config._metadata['项目环境'] = "http://xxxxxx"
report.css
body {
    font-size: 16px;
}
h1 {
     text-align: center;
     color: #2084D9;
     font-size: 30px;
}
h2 {
    font-size: 24px;
    color: #2084D9;
}
a {
    color: #466AFF;
}
span {
    font-size: 20px;
}
#environment td {
    padding: 10px;
}
#results-table {
   font-size: 16px;
   table-layout:fixed;
}
#results-table td{
    word-break:break-all;
    word-wrap:break-word;
}
#results-table th{
    font-size: 20px;
    background-color: #2084D9;
    color: #FFFFFF;
}
td {
    color: #000000;
}
pytest.ini
[pytest]
render_collapsed=True
main.py
import pytest
if __name__ == '__main__':
    pytest.main(["--html=report.html", "--self-contained-html", "--css=report.css"])
    # pytest.main(["--html=report.html"])
七、问题:无法捕获到错误日志
在使用过程中,我遇到了如下问题,无法捕获到错误日志。如下图所示:
解决这个问题,只需要在命令中加上这行代码--capture=sys就可以了。
完整命令如下:
pytest.main(['-v', '-s', f"--html={report_name}", "--self-contained-html", "--capture=sys", f"--css={report_css}"])
重新运行后,我们就可以看到日志了。

八、 问题:报告显示动态的测试环境
背景
由于被测试系统有多套测试环境,因此为了一套用例可以运行多套测试环境,测试环境我是写成可配置的。
首先在settings.py中定义环境配置,代码参考如下:

然后在conftest.py中使用pytest的钩子函数pytest_addoption来注册命令行参数,再根据传递的参数去匹配对应的环境域名。

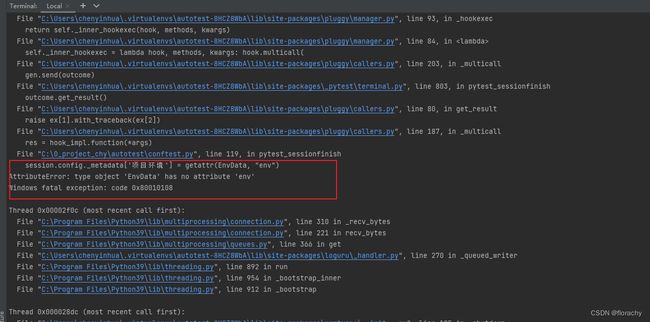
报告显示动态的测试环境
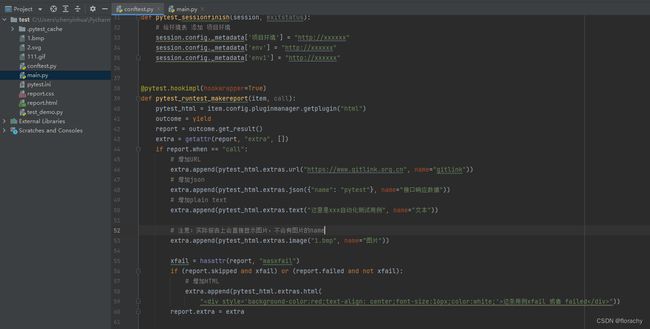
我想在pytest-html的报告的Envrionment部分显示“项目环境”,这个环境根据我运行时候的命令来动态指定。
目前我的解决方法如下:
在confest.py的fixture方法get_env中设置环境为某个测试数据类的属性。如上图所示,我在这里方法中添加了一个如下代码:
setattr(EnvData, "env", env)
注意:类EnvData是我用来保存测试数据的一个类。用例中需要用到的动态的测试数据,会设置成该类的动态属性,然后再动态获取。
然后,我使用钩子函数pytest_sessionfinish去动态的获取。
pytest_sessionfinish
# 参数
session: pytest 会话对象
exitstatus: pytest 将返回系统的状态
# 触发时机:
在整个测试运行完成后调用,就在将退出状态返回给系统之前
具体代码如下:
@pytest.hookimpl(tryfirst=True)
def pytest_sessionfinish(session, exitstatus):
    """
    在测试运行后,修改Environment部分信息
    """
    session.config._metadata['项目环境'] = getattr(EnvData, "env")
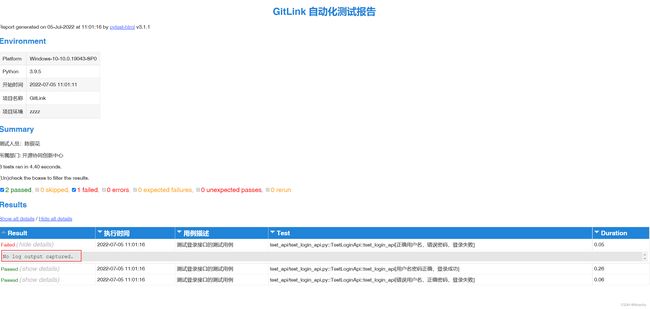
然后运行后就会看到报告上显示了项目环境。
备注:这个方法有时候会报错,容我再探索探索,有好方法的朋友,欢迎给我留言!谢谢!