麒麟SP3X86系统下,安装Oracle11g数据库
目录
1、写在前面
2、准备工作
2.1 环境准备
2.2 数据库安装前准备
2.2.1 安装依赖
2.2.2 系统环境准备
2.2.3 上传软件安装包
2.2.4 安装调图形化界面的依赖和相关设置
3、执行安装程序
1、写在前面
随着国产化进程,各大应用需要在国产服务器上面进行部署动作。掌握国产服务器安装数据库等各项技能显得极为重要。本文详细描述了在麒麟操作系统下。如何安装Oracle11g数据库
2、准备工作
2.1 环境准备
通过Oracle VM VirtualBox虚拟化工具,安装一个麒麟操作系统。本文不描述。整体安装后的效果如下图:

2.2 数据库安装前准备
2.2.1 安装依赖
依次执行如下命令,注意次方式是通过yum安装的方式。服务器必须满足下面两个条件之一:
a、配置了本地yum镜像
b、可以ping通过互联网
[root@kylinsp3-oracle ~]# yum install libnsl*
[root@kylinsp3-oracle ~]# yum install binutils gcc gcc-c++ glibc glibc-devel ksh libaio [root@kylinsp3-oracle ~]# libaio-devel libgcc libstdc++ libstdc++-devel libXext libXtst libX11 libXau libXi
[root@kylinsp3-oracle ~]# yum install gcc gcc-c++ make binutilscompat-libstdc++-33 elfutils-libelf elfutils-libelf-devel glibc glibc-commonglibc-devel libaio libaio-devel libgcclibstdc++ libstdc++-devel unixODBC unixODBC-devel

#手动安装下面几个rpm,下载地址:https://download.csdn.net/download/u011192409/88055771
compat-libpthread-nonshared-2.28-151.el8.x86_64
compat-libstdc++-33-3.2.3-72.el7.x86_64
elfutils-libelf-0.176-2.el7.x86_64
elfutils-libelf-devel-0.176-2.el7.x86_64
glibc-headers-2.17-292.el7.ns7.01.x86_64
libaio-0.3.109-13.el7.x86_64
libaio-devel-0.3.109-13.el7.x86_64

#上传rpm包到/opt目录,进入到/opt目录,依次执行如下命令
[root@kylinsp3-oracle opt]# rpm -ivh elfutils-libelf-0.176-2.el7.x86_64.rpm --nodeps --force
[root@kylinsp3-oracle opt]# rpm -ivh elfutils-libelf-devel-0.176-2.el7.x86_64.rpm --nodeps --force
[root@kylinsp3-oracle opt]# rpm -ivh glibc-headers-2.17-292.el7.ns7.01.x86_64.rpm --nodeps
[root@kylinsp3-oracle opt]# rpm -ivh libaio-0.3.109-13.el7.x86_64.rpm --nodeps --force
[root@kylinsp3-oracle opt]# rpm -ivh libaio-devel-0.3.109-13.el7.x86_64.rpm --nodeps --force
[root@kylinsp3-oracle opt]# rpm -ivh compat-libstdc++-33-3.2.3-72.el7.x86_64.rpm --nodeps --force
[root@kylinsp3-oracle opt]# rpm -ivh compat-libpthread-nonshared-2.28-151.el8.x86_64.rpm --nodeps --force
2.2.2 系统环境准备
#创建 oracle 用户和组,修改 oracle 密码:kylinsp3#123456
[root@kylinsp3-oracle ~]# groupadd -g 54321 oinstall
[root@kylinsp3-oracle ~]# groupadd -g 54322 dba
[root@kylinsp3-oracle ~]# groupadd -g 54323 oper
[root@kylinsp3-oracle ~]# useradd -u 54321 -g oinstall -G dba,oper oracle
[root@kylinsp3-oracle ~]# passwd oracle
更改用户 oracle 的密码 。
新的 密码:
无效的密码: 密码包含用户名在某些地方
passwd: 鉴定令牌操作错误
[root@kylinsp3-oracle ~]# passwd oracle
更改用户 oracle 的密码 。
新的 密码:
重新输入新的 密码:
passwd:所有的身份验证令牌已经成功更新。

#关闭防火墙,禁用 selinux
[root@kylinsp3-oracle ~]# systemctl stop firewalld
[root@kylinsp3-oracle ~]# systemctl disable firewalld
Removed /etc/systemd/system/multi-user.target.wants/firewalld.service.
Removed /etc/systemd/system/dbus-org.fedoraproject.FirewallD1.service.
[root@kylinsp3-oracle ~]# systemctl status firewalld
● firewalld.service - firewalld - dynamic firewall daemon
   Loaded: loaded (/usr/lib/systemd/system/firewalld.service; disabled; vendor preset: enabled)
   Active: inactive (dead)
     Docs: man:firewalld(1)

7月 17 13:11:11 kylinsp3-oracle systemd[1]: Starting firewalld - dynamic firewall daemon...
7月 17 13:11:12 kylinsp3-oracle systemd[1]: Started firewalld - dynamic firewall daemon.
7月 17 13:47:00 kylinsp3-oracle systemd[1]: Stopping firewalld - dynamic firewall daemon...
7月 17 13:47:00 kylinsp3-oracle systemd[1]: firewalld.service: Succeeded.
7月 17 13:47:00 kylinsp3-oracle systemd[1]: Stopped firewalld - dynamic firewall daemon.

[root@kylinsp3-oracle ~]# vim /etc/selinux/config
#修改为如下图所示: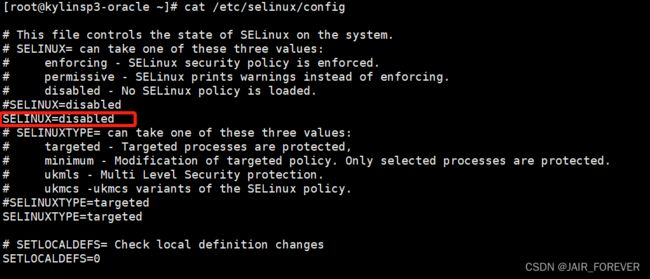
#创建工作目录并赋予权限
[root@kylinsp3-oracle ~]# mkdir -p /u01/app/oracle/
[root@kylinsp3-oracle ~]# chown -R oracle:oinstall /u01/
[root@kylinsp3-oracle ~]# chmod -R 775 /u01/
#配置 oracle 环境变量,切换 oracle 用户,编辑.bash_profile。文末添加如下配置
[oracle@kylinsp3-oracle ~]$ vim ~/.bash_profile

ORACLE_SID=orcl;export ORACLE_SID
ORACLE_UNQNAME=orcl;export ORACLE_SID
ORACLE_BASE=/u01/app/oracle;export ORACLE_BASE
ORACLE_HOME=$ORACLE_BASE/product/11.2.0/dbhome_1;export ORACLE_HOME
NLS_DATE_FORMAT="YYYY:MM:DDHH24:MI:SS";export NLS_DATE_FORMAT
NLS_LANG=american_america.ZHS16GBK;export NLOS_LANG
TNS_ADMIN=$ORACLE_HOME/network/admin;export TNS_ADMIN
ORA_NLS11=$ORACLE_HOME/nls/data;export ORA_NLS11
PATH=.:${JAVA_HOME}/bin:${PATH}:$HOME/bin:$ORACLE_HOME/bin:$ORA_CRS_HOME/bin
PATH=${PATH}:/usr/bin:/bin:/usr/bin/x11:/usr/local/bin
export PATH
LD_LIBRARY_PATH=$ORACLE_HOME/lib
LD_LIBRARY_PATH=${LD_LIBRARY_PATH}:$ORACLE_HOME/oracm/lib
LD_LIBRARY_PATH=${LD_LIBRARY_PATH}:/lib:/usr/lib:/usr/local/lib
export LD_LIBRARY_PATH
CLASSPATH=$ORACLE_HOME/JRE
CLASSPATH=${CLASSPATH}:$ORACLE_HOME/jlib
CLASSPATH=${CLASSPATH}:$ORACLE_HOME/rdbms/jlib
CLASSPATH=${CLASSPATH}:$ORALCE_HOME/network/jlib
export CLASSPATH
THREADS_FLAG=native;export THREADS_FLAG
export TEMP=/tmp
export TMPDIR=/tmp
umask 022

#刷新配置
[oracle@kylinsp3-oracle ~]$ source ~/.bash_profile

#切换 root 用户,修改内核参数,修改sysctl.conf,文末添加如下配置
[oracle@kylinsp3-oracle ~]$ exit
注销
[root@kylinsp3-oracle ~]# vim /etc/sysctl.conf

fs.file-max = 6815744
kernel.sem = 250 32000 100 128
kernel.shmmni = 4096
kernel.shmall = 1073741824
kernel.shmmax = 4398046511104
kernel.panic_on_oops = 1
fs.aio-max-nr = 1048576
net.ipv4.ip_local_port_range = 9000 65500
net.core.rmem_default = 262144
net.core.rmem_max = 4194304
net.core.wmem_default = 262144
net.core.wmem_max = 1048576
fs.aio-max-nr = 1048576
fs.file-max = 6815744

#刷新生效
[root@kylinsp3-oracle ~]# sysctl -p

#修改limits.conf配置文件,文末添加如下配置
[root@kylinsp3-oracle ~]# vim /etc/security/limits.conf

oracle soft nproc 16384
oracle hard nproc 16384

#root 用户打开终端,执行命令
[root@kylinsp3-oracle ~]# export CV_ASSUME_DISTID=RHEL7.6

#增加配置文件,redhat-release,添加如下内容
[root@kylin-oracle etc]# vim /etc/redhat-release

Red Hat Linux release 7.6

#重启系统
[root@kylinsp3-oracle ~]# reboot
2.2.3 上传软件安装包
#上传到/home/oracle目录
[root@kylinsp3-oracle oracle]# su - oracle
上一次登录: 一 7月 17 13:52:12 CST 2023 pts/1 上
[oracle@kylinsp3-oracle ~]$
[oracle@kylinsp3-oracle ~]$ ll
总用量 0
[oracle@kylinsp3-oracle ~]$ pwd
/home/oracle
[oracle@kylinsp3-oracle ~]$ rz
rz waiting to receive.
[oracle@kylinsp3-oracle ~]$ ll
总用量 2487200
-rw-r--r-- 1 oracle oinstall 1395582860  7月 13 09:46 p13390677_112040_Linux-x86-64_1of7.zip
-rw-r--r-- 1 oracle oinstall 1151304589  7月 13 09:45 p13390677_112040_Linux-x86-64_2of7.zip

#依次解压,两个压缩包
[oracle@kylinsp3-oracle ~]$ unzip p13390677_112040_Linux-x86-64_1of7.zip
[oracle@kylinsp3-oracle ~]$ unzip p13390677_112040_Linux-x86-64_2of7.zip
2.2.4 安装调图形化界面的依赖和相关设置
#切换到root用户,安装xhost
[root@kylinsp3-oracle oracle]# yum whatprovides "*/xhost"
上次元数据过期检查:1:00:24 前,执行于 2023年07月17日 星期一 13时21分24秒。
bash-completion-1:2.10-1.ky10.noarch : Completion for bash command
仓库        :@System
匹配来源:
文件名    :/usr/share/bash-completion/completions/xhost

bash-completion-1:2.10-1.ky10.noarch : Completion for bash command
仓库        :ks10-adv-os
匹配来源:
文件名    :/usr/share/bash-completion/completions/xhost

xorg-x11-server-utils-7.7-29.ky10.x86_64 : X.Org X11 X server utilities
仓库        :@System
匹配来源:
文件名    :/usr/bin/xhost

xorg-x11-server-utils-7.7-29.ky10.x86_64 : X.Org X11 X server utilities
仓库        :ks10-adv-os
匹配来源:
文件名    :/usr/bin/xhost

[root@kylinsp3-oracle oracle]# yum install xorg-x11-server-utils-7.7-29.ky10.x86_64
上次元数据过期检查:1:01:10 前,执行于 2023年07月17日 星期一 13时21分24秒。
软件包 xorg-x11-server-utils-7.7-29.ky10.x86_64 已安装。
依赖关系解决。
无需任何处理。
完毕!

#安装vnc服务(服务密码:1qaz#ED)
[root@kylinsp3-oracle oracle]# yum install tigervnc-server
[root@kylinsp3-oracle oracle]# vncserver

You will require a password to access your desktops.

Password:
Verify:
Would you like to enter a view-only password (y/n)? y
Password:
Verify:
xauth:  file /root/.Xauthority does not exist

New 'kylinsp3-oracle:1 (root)' desktop is kylinsp3-oracle:1

Creating default startup script /root/.vnc/xstartup
Creating default config /root/.vnc/config
Starting applications specified in /root/.vnc/xstartup
Log file is /root/.vnc/kylinsp3-oracle:1.log

#为了方便Xmanager调用图形界面。我们需要安装xterm
[root@kylinsp3-oracle oracle]# yum install xterm

#配置转发功能

修改/etc/ssh/ssh_config, 将 ForwardX11 由no修改为yes
修改/etc/ssh/sshd_config,将 X11Forwarding 由no修改为yes
重启SSH服务:service sshd restart

[root@kylinsp3-oracle oracle]# vim /etc/ssh/ssh_config
[root@kylinsp3-oracle oracle]# vim /etc/ssh/sshd_config
[root@kylinsp3-oracle oracle]# service sshd restart
重定向至 /bin/systemctl restart sshd.service
[root@kylinsp3-oracle oracle]# systemctl restart sshd.service
3、执行安装程序
使用Xmanager Enterprise 5套件中的Xstart,如下图所示
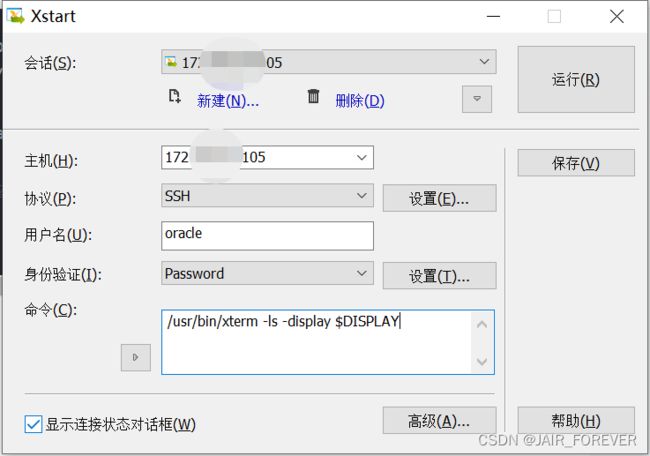
执行运行
再执行,xhost +

#配置unzip
[oracle@kylinsp3-oracle ~]$ cd database/
[oracle@kylinsp3-oracle database]$ ll
总用量 44
drwxr-xr-x  4 oracle oinstall   248  8月 27  2013 install
-rw-r--r--  1 oracle oinstall 30016  8月 27  2013 readme.html
drwxr-xr-x  2 oracle oinstall    61  8月 27  2013 response
drwxr-xr-x  2 oracle oinstall    34  8月 27  2013 rpm
-rwxr-xr-x  1 oracle oinstall  3267  8月 27  2013 runInstaller
drwxr-xr-x  2 oracle oinstall    29  8月 27  2013 sshsetup
drwxr-xr-x 14 oracle oinstall  4096  8月 27  2013 stage
-rw-r--r--  1 oracle oinstall   500  8月 27  2013 welcome.html
[oracle@kylinsp3-oracle database]$ cd install/
[oracle@kylinsp3-oracle install]$ ll
总用量 244
-rwxr-xr-x 1 oracle oinstall     28  8月 27  2013 addLangs.sh
-rwxr-xr-x 1 oracle oinstall    619  8月 27  2013 addNode.sh
-rwxr-xr-x 1 oracle oinstall    275  8月 27  2013 attachHome.sh
-rwxr-xr-x 1 oracle oinstall   7499  8月 27  2013 clusterparam.ini
-rwxr-xr-x 1 oracle oinstall    181  8月 27  2013 detachHome.sh
drwxr-xr-x 2 oracle oinstall     28  8月 27  2013 images
-rwxr-xr-x 1 oracle oinstall  60809  8月 27  2013 lsnodes
-rwxr-xr-x 1 oracle oinstall   2058  8月 27  2013 oraparam.ini
-rwxr-xr-x 1 oracle oinstall   6437  8月 27  2013 oraparamsilent.ini
drwxr-xr-x 2 oracle oinstall    202  8月 27  2013 resource
-rwxr-xr-x 1 oracle oinstall    107  8月 27  2013 runInstaller.sh
-rwxr-xr-x 1 oracle oinstall 145976  8月 27  2013 unzip
[oracle@kylinsp3-oracle install]$ mv unzip unzip_bak
[oracle@kylinsp3-oracle install]$ ln -s `which unzip` unzip
[oracle@kylinsp3-oracle install]$ ll
总用量 244
-rwxr-xr-x 1 oracle oinstall     28  8月 27  2013 addLangs.sh
-rwxr-xr-x 1 oracle oinstall    619  8月 27  2013 addNode.sh
-rwxr-xr-x 1 oracle oinstall    275  8月 27  2013 attachHome.sh
-rwxr-xr-x 1 oracle oinstall   7499  8月 27  2013 clusterparam.ini
-rwxr-xr-x 1 oracle oinstall    181  8月 27  2013 detachHome.sh
drwxr-xr-x 2 oracle oinstall     28  8月 27  2013 images
-rwxr-xr-x 1 oracle oinstall  60809  8月 27  2013 lsnodes
-rwxr-xr-x 1 oracle oinstall   2058  8月 27  2013 oraparam.ini
-rwxr-xr-x 1 oracle oinstall   6437  8月 27  2013 oraparamsilent.ini
drwxr-xr-x 2 oracle oinstall    202  8月 27  2013 resource
-rwxr-xr-x 1 oracle oinstall    107  8月 27  2013 runInstaller.sh
lrwxrwxrwx 1 oracle oinstall     10  7月 17 14:40 unzip -> /bin/unzip
-rwxr-xr-x 1 oracle oinstall 145976  8月 27  2013 unzip_bak
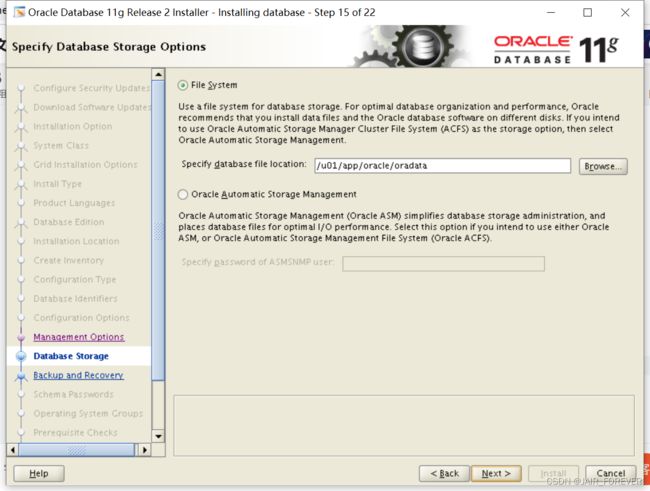
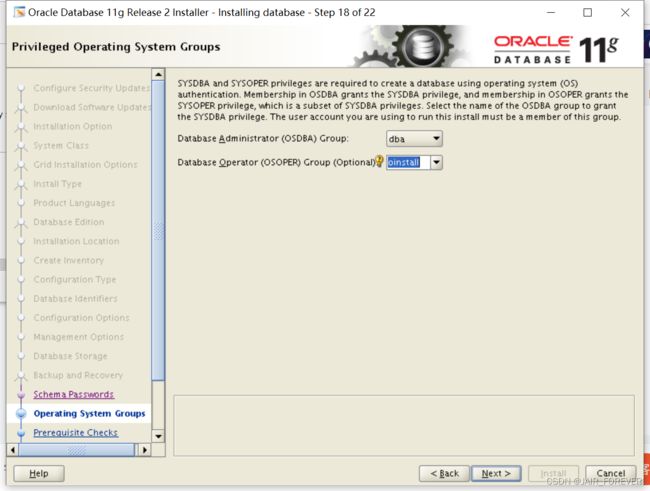
执行安装,如下图所示


选择yes

跳过更新
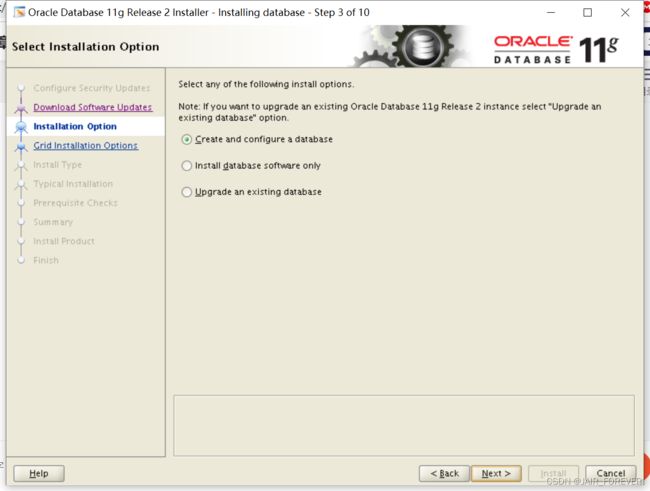

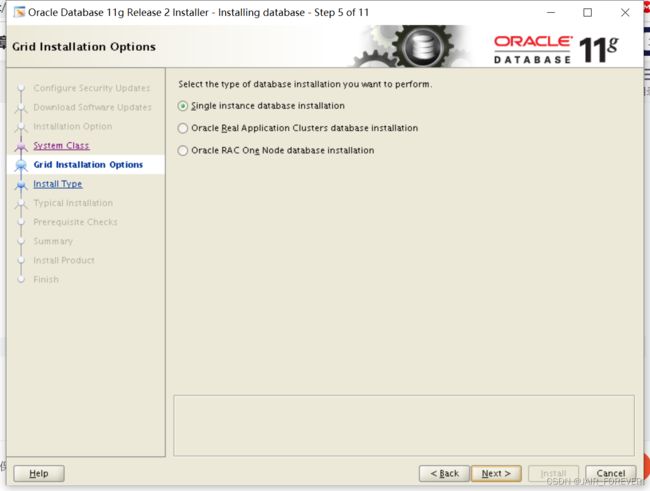


设置统一密码:Ora#168815

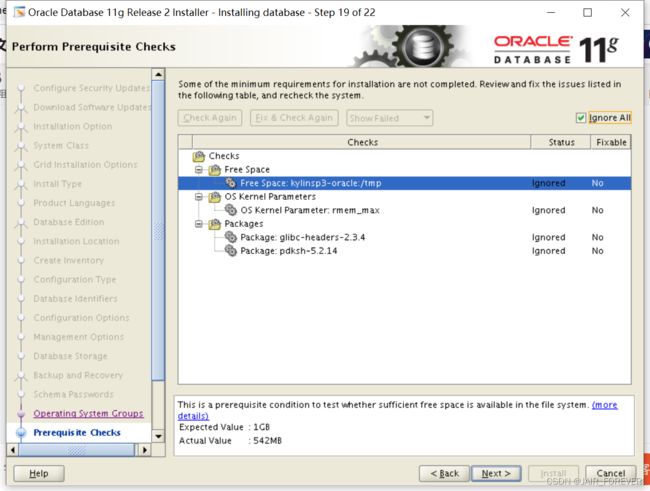
直接忽略,下一步

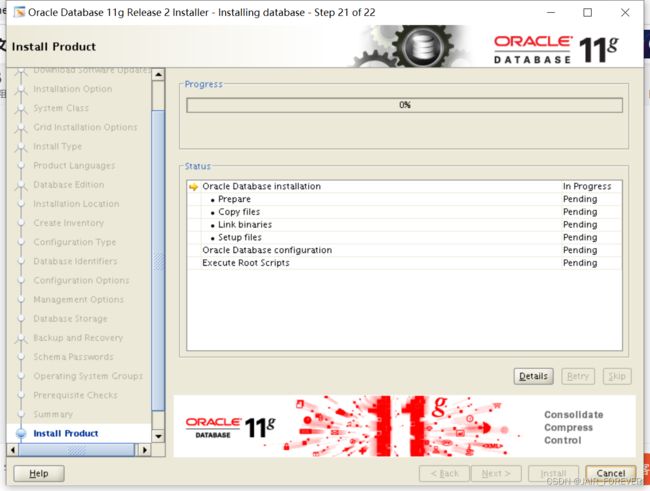
再安装到70%左右会报如下图所示的错误

#解决makefile保持
[oracle@kylinsp3-oracle ~]$ cd $ORACLE_HOME/sysman/lib
[oracle@kylinsp3-oracle lib]$ cp ins_emagent.mk ins_emagent.mk.bak
[oracle@kylinsp3-oracle lib]$ vim ins_emagent.mk

在如下图所示的位置,添加配置:在后面追加参数-lnnz11 第一个是字母l 后面两个是数字1 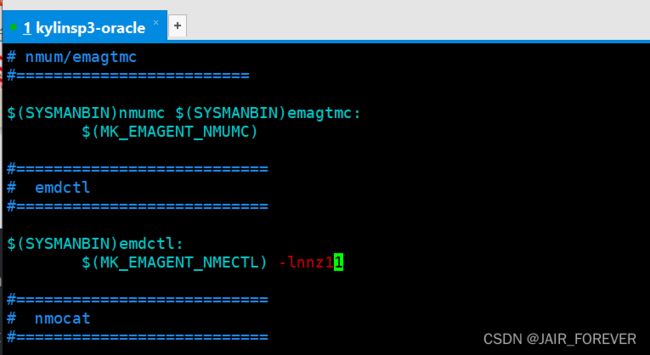
保存退出,然后重试安装
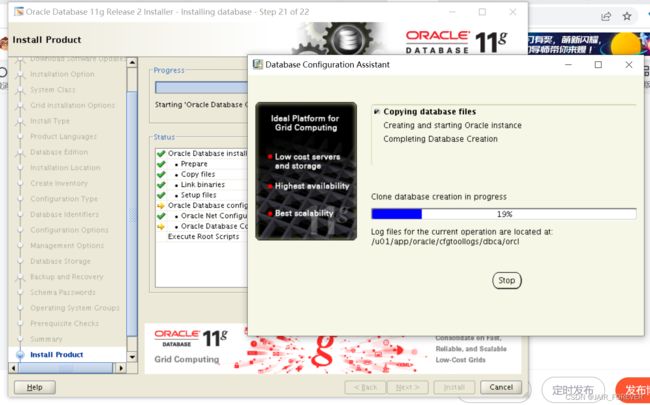
如果出现上图所示,那么基本就没有什么问题。等待完成安装即可!


用root用户执行上述两个脚本
#执行脚本
[root@kylinsp3-oracle ~]# cd /u01/app/oraInventory/
[root@kylinsp3-oracle oraInventory]#
[root@kylinsp3-oracle oraInventory]# ./orainstRoot.sh
Changing permissions of /u01/app/oraInventory.
Adding read,write permissions for group.
Removing read,write,execute permissions for world.

Changing groupname of /u01/app/oraInventory to oinstall.
The execution of the script is complete.
[root@kylinsp3-oracle oraInventory]# cd ..
[root@kylinsp3-oracle app]# cd oracle/product/11.2.0/dbhome_1/
[root@kylinsp3-oracle dbhome_1]# ./root.sh
Performing root user operation for Oracle 11g

The following environment variables are set as:
    ORACLE_OWNER= oracle
    ORACLE_HOME=  /u01/app/oracle/product/11.2.0/dbhome_1

Enter the full pathname of the local bin directory: [/usr/local/bin]:
   Copying dbhome to /usr/local/bin ...
   Copying oraenv to /usr/local/bin ...
   Copying coraenv to /usr/local/bin ...


Creating /etc/oratab file...
Entries will be added to the /etc/oratab file as needed by
Database Configuration Assistant when a database is created
Finished running generic part of root script.
Now product-specific root actions will be performed.
Finished product-specific root actions.
