什么是SystemUI?简单分析
SystemUI概览
SystemUI属于系统级的apk,位置在frameworks\base\packages\SystemUI,主要功能有:
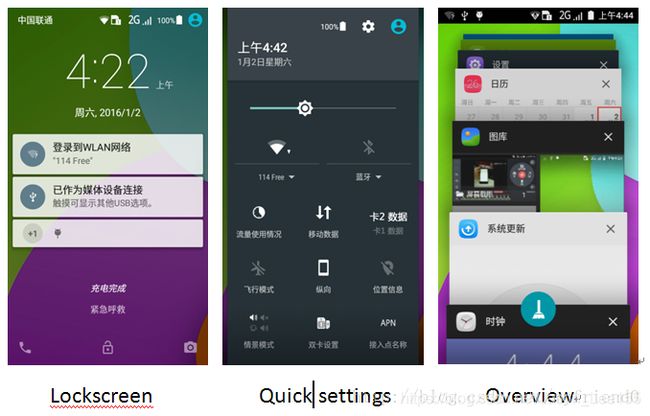
- 状态栏信息显示,比如电池,wifi信号,3G/4G等icon显示
- 通知面板,比如系统消息,第三方应用消息
- 近期任务栏显示面板,比如长按近期任务快捷键,显示近期使用的应用
- 截图服务
- 壁纸服务
- ……
SystemUI的启动流程
SystemServer启动后,会在Main Thread启动ActivityManagerService,当ActivityManagerService systemReady后,会去启动SystemUIService。
SystemServer路径:frameworks/base/services/java/com/android/server/SystemServer.java
mActivityManagerService.systemReady(new Runnable() {
        @Override
        public void run() {
            Slog.i(TAG, "Making services ready");
            ......
            Trace.traceBegin(Trace.TRACE_TAG_SYSTEM_SERVER, "StartSystemUI");
            try {
                startSystemUi(context);
            } catch (Throwable e) {
                reportWtf("starting System UI", e);
            }
            Trace.traceEnd(Trace.TRACE_TAG_SYSTEM_SERVER);
            ......
        }
     });
在这个方法里启动一个SystemUIService服务
static final void startSystemUi(Context context) {
    Intent intent = new Intent();
    intent.setComponent(new ComponentName("com.android.systemui", "com.android.systemui.SystemUIService"));
    intent.addFlags(Intent.FLAG_DEBUG_TRIAGED_MISSING);
    //Slog.d(TAG, "Starting service: " + intent);
    context.startServiceAsUser(intent, UserHandle.SYSTEM);
}
通过startServiceAsUser,SystemUIService就启动了,即SystemUI进程开机启动。
public class SystemUIService extends Service {

    @Override
    public void onCreate() {
        super.onCreate();
        ((SystemUIApplication) getApplication()).startServicesIfNeeded();
    }
    ......
在SystemUIService的onCreate方法中会调用SystemUIApplication的startServicesIfNeeded方法,这个方法会调用 startServicesIfNeeded(SERVICES)方法启动一系列服务(并不是真正的service,都继承自SystemUI)。
public class SystemUIApplication extends Application {
    ......

    /**
     * The classes of the stuff to start.
     */
    private final Class[] SERVICES = new Class[] {
            com.android.systemui.tuner.TunerService.class,
            com.android.systemui.keyguard.KeyguardViewMediator.class,
            com.android.systemui.recents.Recents.class,
            com.android.systemui.volume.VolumeUI.class,
            Divider.class,
            com.android.systemui.statusbar.SystemBars.class,
            com.android.systemui.usb.StorageNotification.class,
            com.android.systemui.power.PowerUI.class,
            com.android.systemui.media.RingtonePlayer.class,
            com.android.systemui.keyboard.KeyboardUI.class,
            com.android.systemui.tv.pip.PipUI.class,
            com.android.systemui.shortcut.ShortcutKeyDispatcher.class,
            com.android.systemui.VendorServices.class
    };

    ......

    public void startServicesIfNeeded() {
        startServicesIfNeeded(SERVICES);
    }
}
所有SERVICES统一继承了SystemUI类:
public abstract class SystemUI {
    ......

    public abstract void start();

    protected void onConfigurationChanged(Configuration newConfig) {
    }

    public void dump(FileDescriptor fd, PrintWriter pw, String[] args) {
    }

    protected void onBootCompleted() {
    }

    ......
}
startServicesIfNeeded方法会遍历SERVICES 这个数组,依次调用service的start方法启动服务。
private void startServicesIfNeeded(Class[] services) {
    ......

    final int N = services.length;
    for (int i=0; i cl = services[i];
        if (DEBUG) Log.d(TAG, "loading: " + cl);
        try {
            Object newService = SystemUIFactory.getInstance().createInstance(cl);
            mServices[i] = (SystemUI) ((newService == null) ? cl.newInstance() : newService);
        } catch (IllegalAccessException ex) {
            throw new RuntimeException(ex);
        } catch (InstantiationException ex) {
            throw new RuntimeException(ex);
        }

        mServices[i].mContext = this;
        mServices[i].mComponents = mComponents;
        if (DEBUG) Log.d(TAG, "running: " + mServices[i]);
        mServices[i].start();

        if (mBootCompleted) {
            mServices[i].onBootCompleted();
        }
    }
    ......
}
状态栏
状态栏(SystemBars)service是SystemUI中最重要的service,代码量最多,最复杂的,界面结构也复杂。根据前面的内容可知,启动SystemBars是通过调用start()方法,如下图:
    public void start() {
        if (DEBUG) Log.d(TAG, "start");
        mServiceMonitor = new ServiceMonitor(TAG, DEBUG,
                mContext, Settings.Secure.BAR_SERVICE_COMPONENT, this);
        mServiceMonitor.start();  // will call onNoService if no remote service is found
    }
这里实质是回调到到SystemBars的onNoService()方法,最后是调用SystemBars的createStatusBarFromConfig()方法:
    private void createStatusBarFromConfig() {
        ......
        String clsName = mContext.getString(R.string.config_statusBarComponent);
        ......
        try {
            cls = mContext.getClassLoader().loadClass(clsName);
        } catch (Throwable t) {
            throw andLog("Error loading status bar component: " + clsName, t);
        }
        try {
            mStatusBar = (BaseStatusBar) cls.newInstance();
        } catch (Throwable t) {
            throw andLog("Error creating status bar component: " + clsName, t);
        }
        ......
        mStatusBar.start();
        ......
    }
上图可以看到,从string资源文件里面读取class name,通过java的映射机制实例化对象,然后调用start()方法启动,class name的值如下图:
com.android.systemui.statusbar.phone.PhoneStatusBar 该配置文件在SystemUI/res/values/config.xml中。所以实质是PhoneStatusBar调用了start()方法。
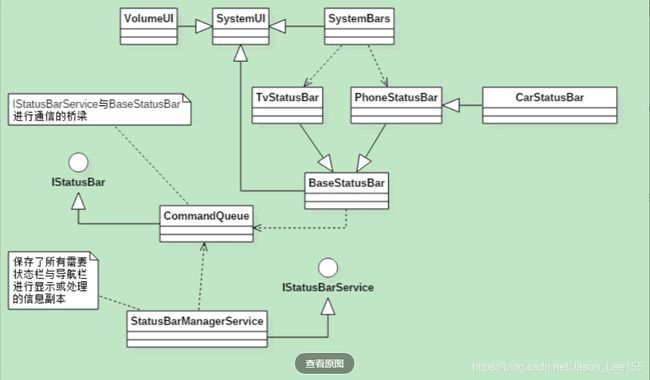
SystemBars模块的初始化过程主要涉及的类有:
SystemUI/src/com/android/systemui/statusbar/phone/PhoneStatusBar.java
SystemUI/src/com/android/systemui/statusbar/BaseStatusBar.java
SystemUI/src/com/android/systemui/statusbar/CommandQueue.java
PhoneStatusBar的父类是BaseStatusBar继承于SystemUI,SystemBars调用PhoneStatusBar中的start()方法,类关系图如下:
PhoneStatusBar的start()
public void start() {
......
super.start(); // calls createAndAddWindows()
......
addNavigationBar();
......
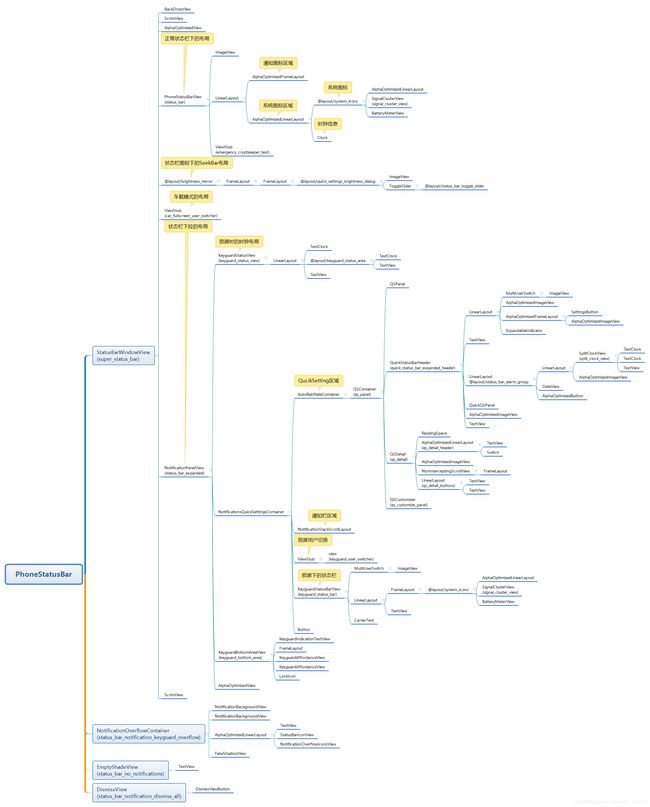
}如上图,调用父类中的start()方法,即BaseStatsuBar中的start()方法。然后调用addNavigationBar()方法实例化导航条。状态栏的布局层次结构如下图:
继续看BaseStatsuBar中的方法。
public void start() {
    ......

    mBarService = IStatusBarService.Stub.asInterface(
            ServiceManager.getService(Context.STATUS_BAR_SERVICE));

    ......

    // Connect in to the status bar manager service
    mCommandQueue = new CommandQueue(this);

    int[] switches = new int[9];
    ArrayList binders = new ArrayList();
    ArrayList iconSlots = new ArrayList<>();
    ArrayList icons = new ArrayList<>();
    Rect fullscreenStackBounds = new Rect();
    Rect dockedStackBounds = new Rect();
    try {
        mBarService.registerStatusBar(mCommandQueue, iconSlots, icons, switches, binders,
                fullscreenStackBounds, dockedStackBounds);
    } catch (RemoteException ex) {
        // If the system process isn't there we're doomed anyway.
    }

    createAndAddWindows();

    ......

    // Set up the initial icon state
    int N = iconSlots.size();
    int viewIndex = 0;
    for (int i=0; i < N; i++) {
        setIcon(iconSlots.get(i), icons.get(i));
    }

    // Set up the initial notification state.
    try {
        mNotificationListener.registerAsSystemService(mContext,
                new ComponentName(mContext.getPackageName(), getClass().getCanonicalName()),
                UserHandle.USER_ALL);
    } catch (RemoteException e) {
        Log.e(TAG, "Unable to register notification listener", e);
    }

    ......
}
如上面BaseStatsuBar中的start()方法,实例化一些对象,此处的对象都是“空值”,然后通过IStatusBarService的实例mBarService对象注册到StatusBarManagerService。
mCommandQueue是CommandQueue的实例,在StatusBarManagerService的远程回调,实现StatusBarManagerService和SystemUI的通信。
然后调用createAndAddWindows()方法,该方法初始化status bar,notification,quick settings等的View控件。
在这里,还需要注意NotificationListenerService的实例mNotificationListener的registerAsSystemService()方法,该方法主要实现StatusBarManagerService和SystemUI的notification的控制通道,也就是说,StatusBarManagerService收到notification变化时,通过此通道通知SystemUI显示notification的变化。
通知显示过程
一个APP需要显示notification首先需要实例化一个NotificationManager的对象,然后调用NotificationManager的方法notify()方法把创建好的Notification对象作为参数传进去。
public void notify(int id, Notification notification){
    notify(null, id, notification);
}
public void notify(String tag, int id, Notification notification){
notifyAsUser(tag, id, notification, new UserHandle(UserHandle.myUserId()));
}public void notifyAsUser(String tag, int id, Notification notification, UserHandle user){
......
INotificationManager service = getService();
......
try {
service.enqueueNotificationWithTag(pkg, mContext.getOpPackageName(), tag, id,
copy, idOut, user.getIdentifier());
......
} catch (RemoteException e) {
throw e.rethrowFromSystemServer();
}
}上图中可以看到一个service的对象调用了enqueueNotificationWithTag()方法,该方法实质是远程调用NotificationManagerService中的enqueueNotificationWithTag()方法,该方法又直接调用enqueueNotificationInternal(),该方法如下:
void enqueueNotificationInternal(final String pkg, final String opPkg, final int callingUid,
        final int callingPid, final String tag, final int id, final Notification notification,
        int[] idOut, int incomingUserId) {
    ......
    final StatusBarNotification n = new StatusBarNotification(
            pkg, opPkg, id, tag, callingUid, callingPid, 0, notification,
            user);

    ......

    final NotificationRecord r = new NotificationRecord(getContext(), n);
    mHandler.post(new EnqueueNotificationRunnable(userId, r));

    ......
}
这里会把NotificationManager传递过来的Notification对象进行很多处理,比如变换成NotificationRecord,实质就是把Notification缓存下来。在上图的这个过程,还有一些其它的处理逻辑,在这里就不详细说明。最后把这个NotificationRecord传递给EnqueueNotificationRunnable线程来处理:
    private class EnqueueNotificationRunnable implements Runnable {
        private final NotificationRecord r;
        private final int userId;

        EnqueueNotificationRunnable(int userId, NotificationRecord r) {
            this.userId = userId;
            this.r = r;
        };

        @Override
        public void run() {

            synchronized (mNotificationList) {
                final StatusBarNotification n = r.sbn;
                ......

                if (notification.getSmallIcon() != null) {
                    StatusBarNotification oldSbn = (old != null) ? old.sbn : null;
                    mListeners.notifyPostedLocked(n, oldSbn);
                } else {
                    ......
                }

                buzzBeepBlinkLocked(r);
            }
        }
    }
代码的末尾调用了buzzBeepBlinkLocked()方法,该方法主要处理Notification的声音和震动的逻辑。mListeners调用了notifyPostedLocked()方法,此方法最终会执行到如下图的代码:
private void notifyPosted(final ManagedServiceInfo info,
        final StatusBarNotification sbn, NotificationRankingUpdate rankingUpdate) {
    final INotificationListener listener = (INotificationListener)info.service;
    StatusBarNotificationHolder sbnHolder = new StatusBarNotificationHolder(sbn);
    try {
        listener.onNotificationPosted(sbnHolder, rankingUpdate);
    } catch (RemoteException ex) {
        Log.e(TAG, "unable to notify listener (posted): " + listener, ex);
    }
}
info.service返回一个INotificationListener的实例对象,该对象在上文中的mNotificationListener.registerAsSystemService()方法进行设置,所以listener.onNotificationPosted()方法实质是远程回调SystemUI中的方法:
private final NotificationListenerService mNotificationListener =
        new NotificationListenerService() {
    ......

    @Override
    public void onNotificationPosted(final StatusBarNotification sbn,
            final RankingMap rankingMap) {
        ......
        if (sbn != null) {
            mHandler.post(new Runnable() {
                @Override
                public void run() {
                    ......

                    if (isUpdate) {
                        updateNotification(sbn, rankingMap);
                    } else {
                        addNotification(sbn, rankingMap, null /* oldEntry */);
                    }
                }
            });
        }
    }
}
代码运行又回到了BaseStatusBar.java类中,从APP调用NotificationManager的notify()方法到BaseStatusBar的addNotification()或updateNotification()方法,经历了一个复杂的过程。就不再往下详情说明Notification到达SystemUI的处理过程了,之后有机会我们继续分析。
锁屏
锁屏(Keyguard)service在SystemUI是一个比较特殊的模块,特殊在于SystemUI启动的service只是一个信息传递者,也就是KeyguardViewMediator,并没有做锁屏或解屏的实质操作。在这里,涉及到三个比较关键的类是:
SystemUI/src/com/android/systemui/keyguard/KeyguardViewMediator.java
SystemUI/src/com/android/systemui/keyguard/KeyguardService.java
Keyguard/src/com/android/keyguard/KeyguardUpdateMonitor.java
KeyguardViewMediator和KeyguardService在源码中位于SystemUI中,而KeyguardUpdateMonitor则位于KeyGuard中。在KeyguardViewMediator的初始化中主要做了三件事,如图:
public void start() {
    synchronized (this) {
        setupLocked();
    }
    putComponent(KeyguardViewMediator.class, this);
}
private void setupLocked() {
......
mUpdateMonitor = KeyguardUpdateMonitor.getInstance(mContext);
......
mStatusBarKeyguardViewManager =
SystemUIFactory.getInstance().createStatusBarKeyguardViewManager(mContext,
mViewMediatorCallback, mLockPatternUtils);
final ContentResolver cr = mContext.getContentResolver();
mDeviceInteractive = mPM.isInteractive();
......
if (soundPath != null) {
mLockSoundId = mLockSounds.load(soundPath, 1);
}
if (soundPath == null || mLockSoundId == 0) {
Log.w(TAG, "failed to load lock sound from " + soundPath);
}
soundPath = Settings.Global.getString(cr, Settings.Global.UNLOCK_SOUND);
if (soundPath != null) {
mUnlockSoundId = mLockSounds.load(soundPath, 1);
}
if (soundPath == null || mUnlockSoundId == 0) {
Log.w(TAG, "failed to load unlock sound from " + soundPath);
}
soundPath = Settings.Global.getString(cr, Settings.Global.TRUSTED_SOUND);
if (soundPath != null) {
mTrustedSoundId = mLockSounds.load(soundPath, 1);
}
if (soundPath == null || mTrustedSoundId == 0) {
Log.w(TAG, "failed to load trusted sound from " + soundPath);
}
......
}实例化KeyguardUpdateMonitor的实例mUpdateMonitor,KeyguardUpdateMonitor负责更新已经锁屏界面上的内容(如时间)。当然,KeyguardUpdateMonitor只是一个信息传递者,实际去刷新界面的是StatusBar模块。Keyguard模块通知StatusBar刷新解密是通过KeyguardUpdateMonitorCallback这个类进行远程回调,该类的实例在StatusBar模块启动时通过KeyguardService获取到IKeyguardService的远端实例,通过IKeyguardService远程调用IKeyguardService的addStateMonitorCallback()方法实例化KeyguardUpdateMonitorCallback对象,SystemUI/src/com/android/systemui/keyguard/KeyguardService.java
private final IKeyguardService.Stub mBinder = new IKeyguardService.Stub() {

    @Override // Binder interface
    public void addStateMonitorCallback(IKeyguardStateCallback callback) {
        checkPermission();
        mKeyguardViewMediator.addStateMonitorCallback(callback);
    }

    ......

    @Override // Binder interface
    public void onScreenTurnedOn() {
        Trace.beginSection("KeyguardService.mBinder#onScreenTurningOn");
        checkPermission();
        mKeyguardViewMediator.onScreenTurnedOn();
        Trace.endSection();
    }

    ......
};
SystemUI启动的Keyguard模块并没有真正的去操作锁屏界面,而是作为一个信息传递者把信息传递给StatusBar模块。
KeyguardService在KeyguardServiceDelegate中绑定调用。frameworks/base/services/core/java/com/android/server/policy/keyguard/KeyguardServiceDelegate.java:
public void bindService(Context context) {
    Intent intent = new Intent();
    final Resources resources = context.getApplicationContext().getResources();

    final ComponentName keyguardComponent = ComponentName.unflattenFromString(
            resources.getString(com.android.internal.R.string.config_keyguardComponent));
    intent.addFlags(Intent.FLAG_DEBUG_TRIAGED_MISSING);
    intent.setComponent(keyguardComponent);

    boolean isBox = isBox();

    if (isBox || !context.bindServiceAsUser(intent, mKeyguardConnection,
            Context.BIND_AUTO_CREATE, mScrimHandler, UserHandle.SYSTEM)) {
        Log.v(TAG, "*** Keyguard: can't bind to " + keyguardComponent);
        mKeyguardState.showing = false;
        mKeyguardState.showingAndNotOccluded = false;
        mKeyguardState.secure = false;
        synchronized (mKeyguardState) {
            // TODO: Fix synchronisation model in this class. The other state in this class
            // is at least self-healing but a race condition here can lead to the scrim being
            // stuck on keyguard-less devices.
            mKeyguardState.deviceHasKeyguard = false;
            hideScrim();
        }
    } else {
        if (DEBUG) Log.v(TAG, "*** Keyguard started");
    }
}

private final ServiceConnection mKeyguardConnection = new ServiceConnection() {
    @Override
    public void onServiceConnected(ComponentName name, IBinder service) {
        if (DEBUG) Log.v(TAG, "*** Keyguard connected (yay!)");
        mKeyguardService = new KeyguardServiceWrapper(mContext,
                IKeyguardService.Stub.asInterface(service), mShowingStateChangedCallback);
        if (mKeyguardState.systemIsReady) {
            // If the system is ready, it means keyguard crashed and restarted.
            mKeyguardService.onSystemReady();
            if (mKeyguardState.currentUser != UserHandle.USER_NULL) {
                // There has been a user switch earlier
                mKeyguardService.setCurrentUser(mKeyguardState.currentUser);
            }
            // This is used to hide the scrim once keyguard displays.
            if (mKeyguardState.interactiveState == INTERACTIVE_STATE_AWAKE) {
                mKeyguardService.onStartedWakingUp();
            }
            if (mKeyguardState.screenState == SCREEN_STATE_ON
                    || mKeyguardState.screenState == SCREEN_STATE_TURNING_ON) {
                mKeyguardService.onScreenTurningOn(
                        new KeyguardShowDelegate(mDrawnListenerWhenConnect));
            }
            if (mKeyguardState.screenState == SCREEN_STATE_ON) {
                mKeyguardService.onScreenTurnedOn();
            }
            mDrawnListenerWhenConnect = null;
        }
        if (mKeyguardState.bootCompleted) {
            mKeyguardService.onBootCompleted();
        }
        if (mKeyguardState.occluded) {
            mKeyguardService.setOccluded(mKeyguardState.occluded, false /* animate */);
        }
    }

    @Override
    public void onServiceDisconnected(ComponentName name) {
        if (DEBUG) Log.v(TAG, "*** Keyguard disconnected (boo!)");
        mKeyguardService = null;
    }

};com.android.internal.R.string.config_keyguardComponent的默认配置值:
com.android.systemui/com.android.systemui.keyguard.KeyguardService KeyguardViewMediator启动的流程图如下:

总结
先大概看一遍流程,这个apk比较复杂,之后还会分析。