# PicGo(图床)安装使用全攻略
PicGo(图床)安装使用全攻略
文章目录
- PicGo(图床)安装使用全攻略
-
- 1 准备 - 注册图床(选其一即可)
-
- smms
- gitee
- 2 安装使用 - 命令行客户端
-
- 2.1 安装node
- 2.2 安装npm
- 2.3 安装picgo
- 2.4 安装picgo插件
- 2.5 获取图床token
- 2.6 设置图床服务器
- 2.7 设置默认图床服务器
- 2.8 命令行上传图片
- 2.9 命令行帮助
- 3 安装使用 - 图形客户端
- 4 安装使用 - Typora自动上传
绝佳的图床工具PicGo
官网:https://github.com/PicGo/PicGo-Core
插件:https://github.com/PicGo/Awesome-PicGo
图形客户端:https://github.com/Molunerfinn/PicGo/releases
1 准备 - 注册图床(选其一即可)
有很多选择,比如:smms 、tcyun 、github 、qiniu 、imgur 、aliyun 、upyun、gitee等等,通可以通过客户端查看支持哪些图床
smms
注册账号:https://sm.ms/register
生成token备用
略
gitee
注册账号:https://gitee.com/
新建一个项目仓库
生成token备用(仅给projects权限)
略
2 安装使用 - 命令行客户端
使用简单,逼格高
2.1 安装node
$ sudo apt install nodejs
2.2 安装npm
$ sudo apt install npm
2.3 安装picgo
$ npm install picgo -g 或 npm install picgo
2.4 安装picgo插件
官方有很多超棒的插件,请自行选择:https://github.com/PicGo/Awesome-PicGo
这里安装gitee(码云)插件,及命令行下自动拷贝链接插件
$ picgo install  picgo-plugin-gitee-uploader  #---需在当前用户下安装
$ picgo install  picgo-plugin-autocopy        #---自动拷贝链接
2.5 获取图床token
前面准备工作,可根据需要可以设置一个图床或多个图床
这里设置smms及gitee为例
2.6 设置图床服务器
# 设置smms
$ picgo set uploader
? Choose a(n) uploader smms
? api token xxxxxxxxxxxxxxx你的token
[PicGo SUCCESS]: Configure config successfully!

# 设置gitee
$ picgo set uploader
? Choose a(n) uploader gitee
? repo: yyyy/xxxx(gitee用户名/仓库名)
? branch: master
? token: xxxxxxxxxxxxxxx你的token
? path: img
? customPath: 年
? customUrl:
[PicGo SUCCESS]: Configure config successfully!
2.7 设置默认图床服务器
# 根据提示选择(smms)
$ picgo use
? Use an uploader smms
? Use a transformer path
? Use plugins (Press <space> to select, <a> to toggle all, <i> to invert selection)picgo-plugin-gitee-uploader
[PicGo SUCCESS]: Configure config successfully!

# 根据提示选择(gitee)
$ picgo use
? Use an uploader gitee
? Use a transformer path
? Use plugins picgo-plugin-autocopy, picgo-plugin-gitee-uploader
[PicGo SUCCESS]: Configure config successfully!
配置文件路径:~/.picgo/config.json
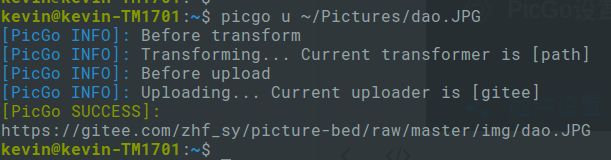
2.8 命令行上传图片
$ picgo upload 图片.jpg
2.9 命令行帮助
$ picgo --help
Usage: picgo [options] [command]

Options:
  -v, --version                        output the version number
  -d, --debug                          debug mode
  -s, --silent                         silent mode
  -c, --config <path>                  set config path
  -p, --proxy <url>                    set proxy for uploading
  -h, --help                           output usage information

Commands:
  install|add [options] <plugins...>   install picgo plugin
  uninstall|rm <plugins...>            uninstall picgo plugin
  update [options] <plugins...>        update picgo plugin
  set|config <module> [name]           configure config of picgo modules
  upload|u [input...]                  upload, go go go
  use [module]                         use modules of picgo
  init [options] <template> [project]  create picgo plugin's development templates
可能会用到的选项:
-s, --silent
-p, --proxy
-c, --config
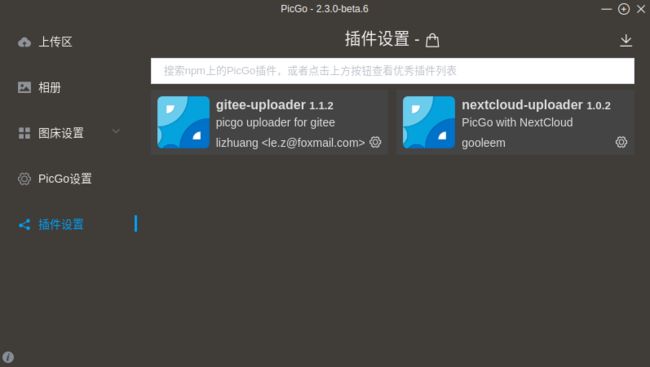
3 安装使用 - 图形客户端
安装简单,使用简单
从https://github.com/Molunerfinn/PicGo/releases下载安装客户端
安装配置请参考https://www.bilibili.com/read/cv10288009/
配置文件路径:~/.config/picgo/data.json
如图:

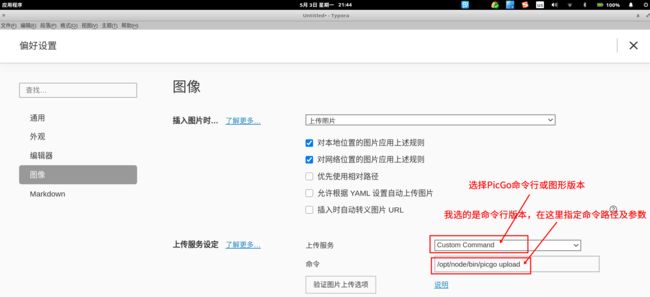
4 安装使用 - Typora自动上传
使用简单、方便
安装优秀的markdown编辑器:Typora(自行百度)
他需要上面的【命令行客户端或者图形客户端】支持,安装配置请参考https://www.yht7.com/news/114454
如图:
最后