Go语言实现原理——锁实现原理
本文目录
- 锁实现原理
-
- 1、概述
- 2、实现原理
- 3、互斥锁
-
- 3.1、Lock
- 3.2、Unlock
- 4、读写锁
-
- 4.1、概述
- 4.2、原理
- 5、小结
锁实现原理
1、概述
在多线程环境下,经常会设有临界区, 我们这个时候只希望同时只能有一个线程进入临界区执行,可以利用操作系统的原子操作来构建互斥锁 ,这种方式简单高效,但是却无法处理一些复杂的情况,例如:
- 锁被某一个线程长时间占用,其他协程将无意义的空转等待,浪费CPU资源
- 因为锁是大家一起在抢,所以某些线程可能一直都抢不到锁
为了解决上述问题,在操作系统的内部会为锁构建一个等待队列 , 用于之后的唤醒,防止其其一直空转。操作系统级别的锁会锁住整个线程,并且锁的抢占也会发生上下文切换。
在Go语言中,拥有比线程更加轻量的协程,并且也在协程的基础之上实现了更加轻量级的互斥锁,用法示例如下:
var count int64 = 0
var m sync.Mutex

func main() {
	go add()
	go add()
}

func add() {
	m.Lock()
	count++
	m.Unlock()
}
2、实现原理
Go语言的互斥锁使用sync/atomic包中的原子操作来构建自旋锁 ,其实说白了就是CAS(还不知道的小伙伴可以去了解一下此算法的原理),示例代码如下:
var count int64 = 0
var flag int64 = 0

func main() {
	go add()
	go add()
}

func add() {
	for {
		// 尝试将flag设置成新值 1
		if atomic.CompareAndSwapInt64(&flag, 0, 1) {
			count++
			// 将flag还原成旧值 0
			atomic.StoreInt64(&flag, 0)
		}
	}
}
上面的例子展示了CompareAndSwap 方法,其实atomic包下还有AddInt64方法,可以实现原子性的加法操作。
3、互斥锁
互斥锁的源码位于src/sync/mutex.go中,下面将通过源码来对互斥锁的原理进行解释
3.1、Lock
Lock方法
// Lock locks m.
// If the lock is already in use, the calling goroutine
// blocks until the mutex is available.
// 翻译:如果互斥锁锁已经被使用,调用此方法的goroutine会阻塞,直到互斥锁可用为止。
func (m *Mutex) Lock() {
	// Fast path: grab unlocked mutex.
	// 快速路径
	if atomic.CompareAndSwapInt32(&m.state, 0, mutexLocked) {
		if race.Enabled {
			race.Acquire(unsafe.Pointer(m))
		}
		return
	}
	// Slow path (outlined so that the fast path can be inlined)
	// 慢路径
	m.lockSlow()
}
通过上述代码不难看出,调用Lock方法时,会先尝试快速路径,也就是一次CAS操作,如果成功了就会直接返回,不会阻塞。如果没有成功,说明当前的互斥锁正在被使用,接着便会进入lockSlow方法。
lockSlow方法
func (m *Mutex) lockSlow() {
	var waitStartTime int64
	starving := false
	awoke := false
	iter := 0
	old := m.state
	for {
		// Don't spin in starvation mode, ownership is handed off to waiters
		// so we won't be able to acquire the mutex anyway.
		// 在正常模式下(非饥饿模式),如果可以自旋,则会继续自旋下去
		if old&(mutexLocked|mutexStarving) == mutexLocked && runtime_canSpin(iter) {
			// Active spinning makes sense.
			// Try to set mutexWoken flag to inform Unlock
			// to not wake other blocked goroutines.
			if !awoke && old&mutexWoken == 0 && old>>mutexWaiterShift != 0 &&
				atomic.CompareAndSwapInt32(&m.state, old, old|mutexWoken) {
				awoke = true
			}
			// 第一阶段:自旋(空转一定时间)
			runtime_doSpin()
			iter++
			old = m.state
			continue
		}
		new := old
		// Don't try to acquire starving mutex, new arriving goroutines must queue.
		// 饥饿模式下不会尝试获取锁,而是直接加入到等待队列中
		if old&mutexStarving == 0 {
			new |= mutexLocked
		}
		if old&(mutexLocked|mutexStarving) != 0 {
			new += 1 << mutexWaiterShift
		}
		// The current goroutine switches mutex to starvation mode.
		// But if the mutex is currently unlocked, don't do the switch.
		// Unlock expects that starving mutex has waiters, which will not
		// be true in this case.
		// 切换至饥饿模式,如果此时互斥锁已经解锁,则不切换
		if starving && old&mutexLocked != 0 {
			new |= mutexStarving
		}
		if awoke {
			// The goroutine has been woken from sleep,
			// so we need to reset the flag in either case.
			if new&mutexWoken == 0 {
				throw("sync: inconsistent mutex state")
			}
			new &^= mutexWoken
		}
		if atomic.CompareAndSwapInt32(&m.state, old, new) {
			if old&(mutexLocked|mutexStarving) == 0 {
				break // locked the mutex with CAS
			}
			// If we were already waiting before, queue at the front of the queue.
			// 如果之前就在等,则加到等待队列的头部
			queueLifo := waitStartTime != 0
			// 计时(防止一个协程长时间占有互斥锁)
			if waitStartTime == 0 {
				waitStartTime = runtime_nanotime()
			}
			// 第二阶段:通过信号量进行控制
			runtime_SemacquireMutex(&m.sema, queueLifo, 1)
			// runtime_nanotime()-waitStartTime > starvationThresholdNs 表示不能占有独占锁超过1ms
			// 长时间未获取到锁,进入饥饿模式
			starving = starving || runtime_nanotime()-waitStartTime > starvationThresholdNs
			old = m.state
			if old&mutexStarving != 0 {
				// If this goroutine was woken and mutex is in starvation mode,
				// ownership was handed off to us but mutex is in somewhat
				// inconsistent state: mutexLocked is not set and we are still
				// accounted as waiter. Fix that.
				if old&(mutexLocked|mutexWoken) != 0 || old>>mutexWaiterShift == 0 {
					throw("sync: inconsistent mutex state")
				}
				delta := int32(mutexLocked - 1<<mutexWaiterShift)
				if !starving || old>>mutexWaiterShift == 1 {
					// Exit starvation mode.
					// Critical to do it here and consider wait time.
					// Starvation mode is so inefficient, that two goroutines
					// can go lock-step infinitely once they switch mutex
					// to starvation mode.
					// 退出饥饿模式
					delta -= mutexStarving
				}
				atomic.AddInt32(&m.state, delta)
				break
			}
			awoke = true
			iter = 0
		} else {
			old = m.state
		}
	}

	if race.Enabled {
		race.Acquire(unsafe.Pointer(m))
	}
}
lockSlow方法内部其实是一个for循环,for循环的第一个if其实就是自旋,其中,runtime_canSpin方法的源码如下:
const(
	...
	active_spin = 4
	...
)
func sync_runtime_canSpin(i int) bool {
	// sync.Mutex is cooperative, so we are conservative with spinning.
	// Spin only few times and only if running on a multicore machine and
	// GOMAXPROCS>1 and there is at least one other running P and local runq is empty.
	// As opposed to runtime mutex we don't do passive spinning here,
	// because there can be work on global runq or on other Ps.
	if i >= active_spin || ncpu <= 1 || gomaxprocs <= int32(sched.npidle+sched.nmspinning)+1 {
		return false
	}
	if p := getg().m.p.ptr(); !runqempty(p) {
		return false
	}
	return true
}
通过注释,可以知道自旋的条件:
- 自旋次数小于4次
- CPU核数大于1
- 逻辑处理器P的数量>1且有一个P上没有运行的协程
如果满足自旋的条件,则会进入if语句块,接着会执行runtime_doSpin()方法,源码如下:
const (
	active_spin_cnt = 30
)

func sync_runtime_doSpin() {
	procyield(active_spin_cnt)
}
调用的procyield其实是一段汇编代码,会执行30次的PAUSE指令,相当于告诉处理器,这段代码序列是个循环等待。
自旋结束后,如果还没有获取到锁,则会进入第二阶段:通过信号量进行同步控制,在源码中对应的是runtime_SemacquireMutex(&m.sema, queueLifo, 1)方法,具体的源码如下:
func sync_runtime_SemacquireMutex(addr *uint32, lifo bool, skipframes int) {
	semacquire1(addr, lifo, semaBlockProfile|semaMutexProfile, skipframes)
}
func semacquire1(addr *uint32, lifo bool, profile semaProfileFlags, skipframes int) {
	gp := getg()
	if gp != gp.m.curg {
		throw("semacquire not on the G stack")
	}

	// Easy case.
	if cansemacquire(addr) {
		return
	}

	// Harder case:
	//	increment waiter count
	//	try cansemacquire one more time, return if succeeded
	//	enqueue itself as a waiter
	//	sleep
	//	(waiter descriptor is dequeued by signaler)
	s := acquireSudog()
	root := semroot(addr)
	t0 := int64(0)
	s.releasetime = 0
	s.acquiretime = 0
	s.ticket = 0
	if profile&semaBlockProfile != 0 && blockprofilerate > 0 {
		t0 = cputicks()
		s.releasetime = -1
	}
	if profile&semaMutexProfile != 0 && mutexprofilerate > 0 {
		if t0 == 0 {
			t0 = cputicks()
		}
		s.acquiretime = t0
	}
	for {
		lockWithRank(&root.lock, lockRankRoot)
		// Add ourselves to nwait to disable "easy case" in semrelease.
		atomic.Xadd(&root.nwait, 1)
		// Check cansemacquire to avoid missed wakeup.
		if cansemacquire(addr) {
			atomic.Xadd(&root.nwait, -1)
			unlock(&root.lock)
			break
		}
		// Any semrelease after the cansemacquire knows we're waiting
		// (we set nwait above), so go to sleep.
		root.queue(addr, s, lifo)
		goparkunlock(&root.lock, waitReasonSemacquire, traceEvGoBlockSync, 4+skipframes)
		if s.ticket != 0 || cansemacquire(addr) {
			break
		}
	}
	if s.releasetime > 0 {
		blockevent(s.releasetime-t0, 3+skipframes)
	}
	releaseSudog(s)
}
上面这段源码看起来可能会比较困难,其中最主要的还是for循环中的代码。当执行加锁操作后,信号量会加一,执行解锁操作后信号量会减一,这里的信号量可以理解成waiter(等待的协程)的数量。
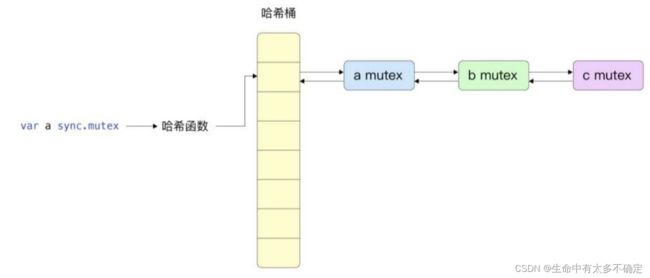
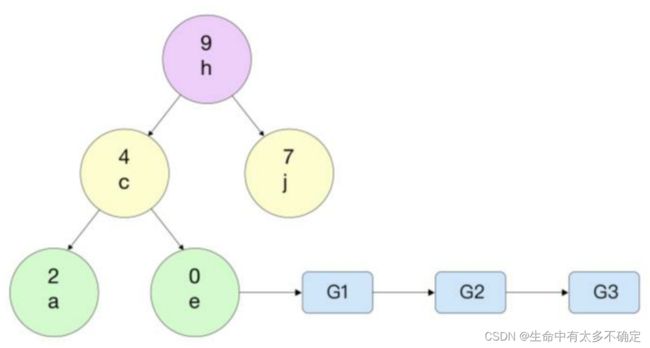
说的通俗一点,这一阶段将会使用信号量来控制对互斥锁的竞争。为了组织数据,通过semaRoot结构体来封装互斥锁,此结构体被存储在semtable这一哈希表结构中,当发生哈希冲突的时候,同一个table中的semaRoot会组织成一个treap树(一种平衡二叉树)。下面是结构体源码:
封装互斥锁与等待者的结构体 semaRoot
type semaRoot struct {
   lock  mutex
   treap *sudog // root of balanced tree of unique waiters.
   nwait uint32 // Number of waiters. Read w/o the lock.
}
保存semaRoot 的结构体 semtable (哈希表)
const semTabSize = 251

var semtable [semTabSize]struct {
	root semaRoot
	pad  [cpu.CacheLinePadSize - unsafe.Sizeof(semaRoot{})]byte
}
图解:
将互斥锁封装成semaRoot结构体,然后根据互斥锁的地址计算哈希值然后取模得到其所在的桶,并通过双向链表解决哈希冲突
双向链表也会被组织成treap树,这样做的原因是为了快速查找( L o g 2 N Log_2N Log2N的复杂度)
在上图中,G1 G2 G3是获取互斥锁e的协程
若在上述的第二阶段长时间无法获取到锁,当前互斥锁会进入到饥饿模式 ,之后如果可以很快获取到锁则会恢复到正常模式
小结
Go语言中的锁其实是一种混合锁,使用了 原子操作、自旋、信号量、操作系统界别的锁、等待队列、全局哈希表。
3.2、Unlock
源码:
// Unlock unlocks m.
// It is a run-time error if m is not locked on entry to Unlock.
//
// A locked Mutex is not associated with a particular goroutine.
// It is allowed for one goroutine to lock a Mutex and then
// arrange for another goroutine to unlock it.
func (m *Mutex) Unlock() {
	if race.Enabled {
		_ = m.state
		race.Release(unsafe.Pointer(m))
	}

	// Fast path: drop lock bit.
	// 快速路径:
	new := atomic.AddInt32(&m.state, -mutexLocked)
	if new != 0 {
		// Outlined slow path to allow inlining the fast path.
		// To hide unlockSlow during tracing we skip one extra frame when tracing GoUnblock.
		m.unlockSlow(new)
	}
}
unlockSlow方法
func (m *Mutex) unlockSlow(new int32) {
	if (new+mutexLocked)&mutexLocked == 0 {
		throw("sync: unlock of unlocked mutex")
	}
	if new&mutexStarving == 0 {
		old := new
		for {
			// If there are no waiters or a goroutine has already
			// been woken or grabbed the lock, no need to wake anyone.
			// In starvation mode ownership is directly handed off from unlocking
			// goroutine to the next waiter. We are not part of this chain,
			// since we did not observe mutexStarving when we unlocked the mutex above.
			// So get off the way.
			if old>>mutexWaiterShift == 0 || old&(mutexLocked|mutexWoken|mutexStarving) != 0 {
				return
			}
			// Grab the right to wake someone.
			new = (old - 1<<mutexWaiterShift) | mutexWoken
			// 正常模式:不断通过CAS争抢互斥锁
			if atomic.CompareAndSwapInt32(&m.state, old, new) {
				runtime_Semrelease(&m.sema, false, 1)
				return
			}
			old = m.state
		}
	} else {
		// Starving mode: handoff mutex ownership to the next waiter, and yield
		// our time slice so that the next waiter can start to run immediately.
		// Note: mutexLocked is not set, the waiter will set it after wakeup.
		// But mutex is still considered locked if mutexStarving is set,
		// so new coming goroutines won't acquire it.
		// 饥饿模式:直接唤醒等待队列中等待最久的协程
		runtime_Semrelease(&m.sema, true, 1)
	}
}
看过Lock的源码后再看Unlock的源码就会感觉简单很多了,Unlock也有一个快速路径,也就是通过原子操作尝试抢一下锁,如果没能成功则会进入unlockSlow方法中,之后再根据当前模式(正常模式/饥饿模式)去做不一样的事,但是所做的事都被封装成了一个runtime_Semrelease方法,如果是饥饿模式,则第二个参数为true
4、读写锁
4.1、概述
在一些并发读写的场景中,如果继续使用互斥锁的话会严重影响性能,尤其是一些读多写少的场景。对于这种情况是允许并发读,但是不允许并发写,为此,Go语言封装了一个互斥锁,结构体如下:
type RWMutex struct {
	w           Mutex  // held if there are pending writers    互斥锁
	writerSem   uint32 // semaphore for writers to wait for completing readers    写信号量
	readerSem   uint32 // semaphore for readers to wait for completing writers    读信号量
	readerCount int32  // number of pending readers    当前正在执行的读操作数量(因为读操作可以并发)
	readerWait  int32  // number of departing readers    进行写操作时,等待读的协程的数量
}
通过与源码其实不难看出,读写锁是基于互斥锁的
4.2、原理
因为是基于互斥锁做的封装,比较简单,所以就不展示源码了。具体的原理其实很简单,在读之前,如果有写操作正在执行,则需要等写操作完成后才能读。换句话说,就是除了并发读可以被运行之外,并发的读+写或者并发的写都是会阻塞的。
5、小结
本节介绍了原子操作、互斥锁与读写锁,Go语言的互斥锁是专门为协程所设计的,通过上面的分析可以知道其本质是一种混合锁,其目的也很简单:不到万不得已不使用系统级别的锁(因为这会锁住整个线程)。后面还介绍了读写锁,这是基于互斥锁为特定的场景而封装的,其读操作会优于互斥锁。实际使用时还是需要根据业务需求去进行选择

