redis学习笔记
文章目录
-
- Redis基础
-
- Redis中的五种数据类型
-
- String
- Hash
- List
- Set
- Zset
- Redis 数据类型应用场景总结:
- Java中Redis的使用
-
- 直接使用jedis
- ssm整合redis
- SpringBoot整合redis
- redis 中的缓存问题
-
- 缓存和数据库数据一致性问题
- 缓存雪崩
- 缓存穿透
- 缓存击穿
- redis的线程问题
-
- redis是单线程还是多线程的?
- 单线程的redis为什么还能那么快?
- Redis 和 Memcached 的区别
- 淘汰策略
- redis 持久化机制
-
- RDB
-
- 原理
- 优缺点
- AOF
-
- 优缺点
- 选择性
- 补充内容
-
- Redis 4.0 对于持久化机制的优化
- AOF 重写
- redis的主从复制
-
- 主从复制过程
- 数据同步过程
- 哨兵
-
- 主从复制存在的问题
- 解决方案--哨兵
一直以来用的都是mysql ,直到近期做了一个项目,发现数据的检索奇慢无比,这还是数据量很小的情况下, 由此开始进入redis的世界!
Redis基础
Redis 是 C 语言开发的一个开源的(遵从 BSD 协议)高性能键值对(key-value)的内存数据库,可以用作数据库、缓存、消息中间件等。它是一种 NoSQL(not-only sql,泛指非关系型数据库)的数据库。
Redis 作为一个内存数据库:
- 性能优秀,数据在内存中,读写速度非常快,支持并发 10W QPS。
- 单进程单线程,是线程安全的,采用 IO 多路复用机制。
- 丰富的数据类型,支持字符串(strings)、散列(hashes)、列表(lists)、集合(sets)、有序集合(sorted sets)等。
- 支持数据持久化,可以将内存中数据保存在磁盘中,重启时加载。
- 主从复制,哨兵,高可用。
- 可以用作分布式锁。
- 可以作为消息中间件使用,支持发布订阅。
Redis中的五种数据类型

Redis 内部使用一个 redisObject 对象来表示所有的 key 和 value。redisObject 最主要的信息如上图所示:type 表示一个 value 对象具体是何种数据类型,encoding 是不同数据类型在 Redis 内部的存储方式。比如:type=string 表示 value 存储的是一个普通字符串,那么 encoding 可以是 raw 或者 int。
String
1:介绍:
string 是 redis 最基本的类型,可以理解成与 memcached 一模一样的类型,一个 key 对应一个 value。value 不仅是 string,也可以是数字。string 类型是二进制安全的,意思是 redis 的 string 类型可以包含任何数据,比如 jpg 图片或者序列化的对象。string 类型的值最大能存储 512M。
2:常用命令:
set key value [expiration EX seconds|PX milliseconds] [NX|XX] #设置key与值
EX seconds : 将键的过期时间设置为 seconds 秒。 执行 SET key value EX seconds
的效果等同于执行 SETEX key seconds value。
PX milliseconds : 将键的过期时间设置为milliseconds 毫秒。 执行 SET key value PX milliseconds 的效果等同于执行 PSETEX key milliseconds value 。
NX : 只在键不存在时, 才对键进行设置操作。 执行 SET key value NX 的效果等同于执行 SETNX key value。
XX : 只在键已经存在时, 才对键进行设置操作。
setnx key value           #当key不存在时为key设置值
get key       #获取key的值
getrange key start end  # 对key的值进行字符串截取
getset key value  # 先取旧值,再设新值
strlen key # value的长度
append key value  # 为key的值拼接对应的值,如果key不存在,创建key并赋值

incr key   # 将key值增1,如果key不存在,创建key,并将key赋值为0,然后再执行incr 语句
incrby key increment  # increment 增量值

decr key  #将key值减1,如果key不存在,创建key,并将key赋值为0,然后再执行decr 语句
decrby key increment  # increment 减量值
3:应用场景 :常规 key-value 缓存应用;常规计数:微博数,粉丝数等。
Hash
1:介绍 :
Hash 是一个键值(key-value)的集合。redis 的 hash 是一个 string 的 key 和 value 的映射表,Hash 特别适合存储对象。
2:常用命令:
****赋值****
hset key field value  # 给对应键的单个属性赋值
hmset key field value [field value ...]  # 给对应键的多个属性赋值

****取值/字段****
hget key field  # 取key中单个属性值
hmget key field [field ...]  # 取key中多个属性值
hgetall key  # 返回所有字段和值
hkeys key  # 返回所有字段
hlen key  # 返回字段数

****删除字段****
hdel key field [field ...]
3:应用场景 :
hash 特别适合用于存储对象,后续操作的时候,你可以直接仅仅修改这个对象中的某个字段的值。比如我们可以 hash 数据结构来存储用户信息,商品信息等等。
List
1:介绍 :
list 列表是简单的字符串列表,按照插入顺序排序。可以添加一个元素到列表的头部(左边)或者尾部(右边)
list 就是链表,可以用来当消息队列用。redis 提供了 List 的 push 和 pop 操作,还提供了操作某一段的 api,可以直接查询或者删除某一段的元素。redis list 的是实现是一个双向链表,既可以支持反向查找和遍历,更方便操作,不过带来了额外的内存开销。
2:常用命令:
lpush/rpush key value [value ...]  # 将一个或多个值从左/右侧插入
lpushx/rpushx key value   # 将一个值从左侧/右侧插入,key不存在时无效

******取值******
lrange key start stop  # 根据下标取值,下标从0开始,stop的取值可为负数,-1表示取到结尾,-2表示取到倒数第二位,以此类推
lindex key index  # 根据下标索引取值
llen key   # 列表长度

******删除语法******
lpop/rpop key   # 移除最左侧/右侧元素,并返回值

******阻塞删除语法******
blpop/brpop key [key ...] timeout  # 移除并获取列表的最左侧/右侧元素,没有对应的key时,会进如阻塞状态,
                                   # 直到有对应的key生成,其中timeout为过期时间,需要一个大于等于0 的参数值,当key不存
                                   #  在并且经过过期时间内没有生成的情况下,客户端会解除阻塞状态并且返回一个 nil 的多组
                                   # 合值(multi-bulk value)。

********修剪列表********
ltrim key start stop

lset key index value   # 通过下标对值进行修改

linsert key BEFORE|AFTER pivot value  # 在对应的值前/后插入值    BEFORE|AFTER 必须为大写

rpoplpush source destination   # 移除source 中最右侧元素并将其添加到destination   最左侧
3:应用场景 :
list 应用场景非常多,也是 Redis 最重要的数据结构之一,比如 twitter 的关注列表,粉丝列表都可以用 list 结构来实现。
Set
1:介绍 :
set 是 string 类型的无序集合。集合是通过 hashtable 实现的。set 中的元素是没有顺序的,而且是没有重复的。
2:常用命令:
********赋值********
sadd key member [member ...]

********取值********
scard key  # 获取集合成员数量
smembers key  # 获取集合成员

sismember key member   # 判断 member   是否为 key 内的成员,是返回1,否则返回0

srandmember key [count]   # 随机返回key内的一个或多个值

********删除********
srem key member [member ...]   # 删除一个或多个成员
spop key [count]   # 随机删除一个或多个成员

********移动********
smove source destination member  # 将成员 member从 source  移动到 destination

********差集/交集/并集********
sdiff/sinter/sunion key [key ...]   # 两个集合的差集/交集/并集

sdiffstore/sinterstore/sunionstore destination key [key ...]  # 将差集/交集/并集存入 destination 中
3:应用场景 :redis set 对外提供的功能和 list 一样是一个列表,特殊之处在于 set 是自动去重的,而且 set 提供了判断某个成员是否在一个 set 集合中。
Zset
1:介绍 :zset 和 set 一样是 string 类型元素的集合,且不允许重复的元素。
2:常用命令:
ZADD key [NX|XX] [CH] [INCR] score member [score member ...]
将所有指定成员添加到键为key有序集合(sorted set)里面。 添加时可以指定多个分数/成员(score/member)对。 如果指定添加的成员已经是有序集合里面的成员,则会更新改成员的分数(scrore)并更新到正确的排序位置。
如果key不存在,将会创建一个新的有序集合(sorted set)并将分数/成员(score/member)对添加到有序集合,就像原来存在一个空的有序集合一样。如果key存在,但是类型不是有序集合,将会返回一个错误应答。
XX: 仅仅更新存在的成员,不添加新成员。
NX: 不更新存在的成员。只添加新成员。
CH: 修改返回值为发生变化的成员总数,原始是返回新添加成员的总数 (CH 是 changed 的意思)。更改的元素是新添加的成员,已经存在的成员更新分数。 所以在命令中指定的成员有相同的分数将不被计算在内。注:在通常情况下,ZADD返回值只计算新添加成员的数量。
INCR: 当ZADD指定这个选项时,成员的操作就等同ZINCRBY命令,对成员的分数进行递增操作。
分数值是一个双精度的浮点型数字字符串。+inf和-inf都是有效值。
zcard key # 获取成员数
zcount key min max # 获取区间的成员数
zrank key member  # 根据成员名称获得索引
zrange key start stop [WITHSCORES]  #通过索引区间返回成员集合(低-->高)
zrevrange key start stop [WITHSCORES]  # #通过索引区间返回成员集合(高-->低)
zscore key member  # 获取成员分数

********删除********
zrem key member [member ...]  #  删除成员
zremrangebyrank key start stop  # 移除给定排名区间的成员
zremrangebyscore key min max  # 移除给定分数区间的成员
3:应用场景 :
sorted set 可以通过用户额外提供一个优先级(score)的参数来为成员排序,并且是插入有序的,即自动排序。当你需要一个有序的并且不重复的集合列表,那么可以选择 sorted set 结构。和 set 相比,sorted set 关联了一个 double 类型权重的参数 score,使得集合中的元素能够按照 score 进行有序排列,redis 正是通过分数来为集合中的成员进行从小到大的排序。
Redis sorted set 的内部使用 HashMap 和跳跃表(skipList)来保证数据的存储和有序,HashMap 里放的是成员到 score 的映射,而跳跃表里存放的是所有的成员,排序依据是 HashMap 里存的 score,使用跳跃表的结构可以获得比较高的查找效率,并且在实现上比较简单。
Redis 数据类型应用场景总结:

Java中Redis的使用
直接使用jedis
1:导入maven依赖
      redis.clients
      jedis
      3.2.0
2:创建连接池工具类
       public class RedisPoolUtil{

    //服务器IP地址
    private static String ADDR = "192.168.41.65";
    //端口
    private static int PORT = 6379;
    //密码
    private static String AUTH = "123456";
    //连接实例的最大连接数
    private static int MAX_ACTIVE = 1024;
    //控制一个pool最多有多少个状态为idle(空闲的)的jedis实例,默认值也是8。
    private static int MAX_IDLE = 200;
    //等待可用连接的最大时间,单位毫秒,默认值为-1,表示永不超时。如果超过等待时间,则直接抛出JedisConnectionException
    private static int MAX_WAIT = 10000;
    //连接超时的时间
    private static int TIMEOUT = 10000;
    // 在borrow一个jedis实例时,是否提前进行validate操作;如果为true,则得到的jedis实例均是可用的;
    private static boolean TEST_ON_BORROW = true;

    private static JedisPool jedisPool = null;
    //数据库模式是16个数据库 0~15
    public static final int DEFAULT_DATABASE = 0;
    /**
     * 初始化Redis连接池
     */

    static {

        try {

            JedisPoolConfig config = new JedisPoolConfig();
            config.setMaxTotal(MAX_ACTIVE);
            config.setMaxIdle(MAX_IDLE);
            config.setMaxWaitMillis(MAX_WAIT);
            config.setTestOnBorrow(TEST_ON_BORROW);
            jedisPool = new JedisPool(config, ADDR, PORT, TIMEOUT,AUTH,DEFAULT_DATABASE);

        } catch (Exception e) {

            e.printStackTrace();
        }

    }

    /**
     * 获取Jedis实例
     */

    public synchronized static Jedis getJedis() {

        try {

            if (jedisPool != null) {
                Jedis resource = jedisPool.getResource();
                System.out.println("redis--服务正在运行: "+resource.ping());
                return resource;
            } else {
                return null;
            }

        } catch (Exception e) {
            e.printStackTrace();
            return null;
        }

    }

    /***
     *
     * 释放资源
     */

    public static void returnResource(final Jedis jedis) {
            if(jedis != null) {
                jedisPool.returnResource(jedis);
            }

    }
}
ssm整合redis
我下面的配置是根据web项目的情形进行配置的:
1:导入maven依赖
  redis.clients
  jedis
  2.9.0


  org.springframework.data
  spring-data-redis
  1.6.2.RELEASE
2、redis.properties
redis.host=127.0.0.1
redis.port=6379
redis.password=root
redis.timeout=100000

redis.maxTotal=300
redis.maxIdle=200
redis.maxWait=10000
redis.testOnBorrow=true
redis.testOnReturn=true

# 默认缓存失效时间
defaultCacheExpireTime=3600
web.xml
    contextConfigLocation
    classpath:spring-mybatis.xml


    org.springframework.web.context.ContextLoaderListener


    CharacterEncodingFilter
    org.springframework.web.filter.CharacterEncodingFilter

      encoding
      utf-8


    CharacterEncodingFilter
    /


    DispatcherServlet
    org.springframework.web.servlet.DispatcherServlet

      contextConfigLocation
      classpath:spring-mvc.xml

    1


    DispatcherServlet
    /*
spring-redis.xml
spring-mybatis.xml
                classpath:database.properties
                classpath:redis.properties
spring-mvc.xml
配置的时候遇到两个坑:
坑一:初始的时候导入的jedis包的版本是3.X,但是在运行的时候报出错误如下:
20:33:54.903 [main] ERROR org.springframework.test.context.TestContextManager - Caught exception while allowing TestExecutionListener [org.springframework.test.context.support.DependencyInjectionTestExecutionListener@53d102a2] to prepare test instance [mapper.MovieTest@6c45ee6e]
java.lang.IllegalStateException: Failed to load ApplicationContext
	at org.springframework.test.context.cache.DefaultCacheAwareContextLoaderDelegate.loadContext(DefaultCacheAwareContextLoaderDelegate.java:132) ~[spring-test-5.2.4.RELEASE.jar:5.2.4.RELEASE]
	at org.springframework.test.context.support.DefaultTestContext.getApplicationContext(DefaultTestContext.java:123) ~[spring-test-5.2.4.RELEASE.jar:5.2.4.RELEASE]
	at org.springframework.test.context.support.DependencyInjectionTestExecutionListener.injectDependencies(DependencyInjectionTestExecutionListener.java:118) ~[spring-test-5.2.4.RELEASE.jar:5.2.4.RELEASE]
	at org.springframework.test.context.support.DependencyInjectionTestExecutionListener.prepareTestInstance(DependencyInjectionTestExecutionListener.java:83) ~[spring-test-5.2.4.RELEASE.jar:5.2.4.RELEASE]
	at org.springframework.test.context.TestContextManager.prepareTestInstance(TestContextManager.java:244) [spring-test-5.2.4.RELEASE.jar:5.2.4.RELEASE]
	at org.springframework.test.context.junit4.SpringJUnit4ClassRunner.createTest(SpringJUnit4ClassRunner.java:227) [spring-test-5.2.4.RELEASE.jar:5.2.4.RELEASE]
	at org.springframework.test.context.junit4.SpringJUnit4ClassRunner$1.runReflectiveCall(SpringJUnit4ClassRunner.java:289) [spring-test-5.2.4.RELEASE.jar:5.2.4.RELEASE]
	at org.junit.internal.runners.model.ReflectiveCallable.run(ReflectiveCallable.java:12) [junit-4.12.jar:4.12]
	at org.springframework.test.context.junit4.SpringJUnit4ClassRunner.methodBlock(SpringJUnit4ClassRunner.java:291) [spring-test-5.2.4.RELEASE.jar:5.2.4.RELEASE]
	at org.springframework.test.context.junit4.SpringJUnit4ClassRunner.runChild(SpringJUnit4ClassRunner.java:246) [spring-test-5.2.4.RELEASE.jar:5.2.4.RELEASE]
	at org.springframework.test.context.junit4.SpringJUnit4ClassRunner.runChild(SpringJUnit4ClassRunner.java:97) [spring-test-5.2.4.RELEASE.jar:5.2.4.RELEASE]
	at org.junit.runners.ParentRunner$3.run(ParentRunner.java:290) [junit-4.12.jar:4.12]
	at org.junit.runners.ParentRunner$1.schedule(ParentRunner.java:71) [junit-4.12.jar:4.12]
	at org.junit.runners.ParentRunner.runChildren(ParentRunner.java:288) [junit-4.12.jar:4.12]
	at org.junit.runners.ParentRunner.access$000(ParentRunner.java:58) [junit-4.12.jar:4.12]
	at org.junit.runners.ParentRunner$2.evaluate(ParentRunner.java:268) [junit-4.12.jar:4.12]
	at org.springframework.test.context.junit4.statements.RunBeforeTestClassCallbacks.evaluate(RunBeforeTestClassCallbacks.java:61) [spring-test-5.2.4.RELEASE.jar:5.2.4.RELEASE]
	at org.springframework.test.context.junit4.statements.RunAfterTestClassCallbacks.evaluate(RunAfterTestClassCallbacks.java:70) [spring-test-5.2.4.RELEASE.jar:5.2.4.RELEASE]
	at org.junit.runners.ParentRunner.run(ParentRunner.java:363) [junit-4.12.jar:4.12]
	at org.springframework.test.context.junit4.SpringJUnit4ClassRunner.run(SpringJUnit4ClassRunner.java:190) [spring-test-5.2.4.RELEASE.jar:5.2.4.RELEASE]
	at org.junit.runner.JUnitCore.run(JUnitCore.java:137) [junit-4.12.jar:4.12]
	at com.intellij.junit4.JUnit4IdeaTestRunner.startRunnerWithArgs(JUnit4IdeaTestRunner.java:68) [junit-rt.jar:?]
	at com.intellij.rt.junit.IdeaTestRunner$Repeater.startRunnerWithArgs(IdeaTestRunner.java:33) [junit-rt.jar:?]
	at com.intellij.rt.junit.JUnitStarter.prepareStreamsAndStart(JUnitStarter.java:230) [junit-rt.jar:?]
	at com.intellij.rt.junit.JUnitStarter.main(JUnitStarter.java:58) [junit-rt.jar:?]
Caused by: org.springframework.beans.factory.BeanCreationException: Error creating bean with name 'JedisConnectionFactory': Lookup method resolution failed; nested exception is java.lang.IllegalStateException: Failed to introspect Class [org.springframework.data.redis.connection.jedis.JedisConnectionFactory] from ClassLoader [sun.misc.Launcher$AppClassLoader@18b4aac2]
	at org.springframework.beans.factory.annotation.AutowiredAnnotationBeanPostProcessor.determineCandidateConstructors(AutowiredAnnotationBeanPostProcessor.java:289) ~[spring-beans-5.2.4.RELEASE.jar:5.2.4.RELEASE]
	at org.springframework.beans.factory.support.AbstractAutowireCapableBeanFactory.determineConstructorsFromBeanPostProcessors(AbstractAutowireCapableBeanFactory.java:1286) ~[spring-beans-5.2.4.RELEASE.jar:5.2.4.RELEASE]
	at org.springframework.beans.factory.support.AbstractAutowireCapableBeanFactory.createBeanInstance(AbstractAutowireCapableBeanFactory.java:1201) ~[spring-beans-5.2.4.RELEASE.jar:5.2.4.RELEASE]
	at org.springframework.beans.factory.support.AbstractAutowireCapableBeanFactory.doCreateBean(AbstractAutowireCapableBeanFactory.java:557) ~[spring-beans-5.2.4.RELEASE.jar:5.2.4.RELEASE]
	at org.springframework.beans.factory.support.AbstractAutowireCapableBeanFactory.createBean(AbstractAutowireCapableBeanFactory.java:517) ~[spring-beans-5.2.4.RELEASE.jar:5.2.4.RELEASE]
	at org.springframework.beans.factory.support.AbstractBeanFactory.lambda$doGetBean$0(AbstractBeanFactory.java:323) ~[spring-beans-5.2.4.RELEASE.jar:5.2.4.RELEASE]
	at org.springframework.beans.factory.support.DefaultSingletonBeanRegistry.getSingleton(DefaultSingletonBeanRegistry.java:222) ~[spring-beans-5.2.4.RELEASE.jar:5.2.4.RELEASE]
	at org.springframework.beans.factory.support.AbstractBeanFactory.doGetBean(AbstractBeanFactory.java:321) ~[spring-beans-5.2.4.RELEASE.jar:5.2.4.RELEASE]
	at org.springframework.beans.factory.support.AbstractBeanFactory.getBean(AbstractBeanFactory.java:202) ~[spring-beans-5.2.4.RELEASE.jar:5.2.4.RELEASE]
	at org.springframework.beans.factory.support.DefaultListableBeanFactory.preInstantiateSingletons(DefaultListableBeanFactory.java:879) ~[spring-beans-5.2.4.RELEASE.jar:5.2.4.RELEASE]
	at org.springframework.context.support.AbstractApplicationContext.finishBeanFactoryInitialization(AbstractApplicationContext.java:878) ~[spring-context-5.2.4.RELEASE.jar:5.2.4.RELEASE]
	at org.springframework.context.support.AbstractApplicationContext.refresh(AbstractApplicationContext.java:550) ~[spring-context-5.2.4.RELEASE.jar:5.2.4.RELEASE]
	at org.springframework.test.context.support.AbstractGenericContextLoader.loadContext(AbstractGenericContextLoader.java:128) ~[spring-test-5.2.4.RELEASE.jar:5.2.4.RELEASE]
	at org.springframework.test.context.support.AbstractGenericContextLoader.loadContext(AbstractGenericContextLoader.java:60) ~[spring-test-5.2.4.RELEASE.jar:5.2.4.RELEASE]
	at org.springframework.test.context.support.AbstractDelegatingSmartContextLoader.delegateLoading(AbstractDelegatingSmartContextLoader.java:275) ~[spring-test-5.2.4.RELEASE.jar:5.2.4.RELEASE]
	at org.springframework.test.context.support.AbstractDelegatingSmartContextLoader.loadContext(AbstractDelegatingSmartContextLoader.java:243) ~[spring-test-5.2.4.RELEASE.jar:5.2.4.RELEASE]
	at org.springframework.test.context.cache.DefaultCacheAwareContextLoaderDelegate.loadContextInternal(DefaultCacheAwareContextLoaderDelegate.java:99) ~[spring-test-5.2.4.RELEASE.jar:5.2.4.RELEASE]
	at org.springframework.test.context.cache.DefaultCacheAwareContextLoaderDelegate.loadContext(DefaultCacheAwareContextLoaderDelegate.java:124) ~[spring-test-5.2.4.RELEASE.jar:5.2.4.RELEASE]
	... 24 more
Caused by: java.lang.IllegalStateException: Failed to introspect Class [org.springframework.data.redis.connection.jedis.JedisConnectionFactory] from ClassLoader [sun.misc.Launcher$AppClassLoader@18b4aac2]
	at org.springframework.util.ReflectionUtils.getDeclaredMethods(ReflectionUtils.java:481) ~[spring-core-5.2.4.RELEASE.jar:5.2.4.RELEASE]
	at org.springframework.util.ReflectionUtils.doWithLocalMethods(ReflectionUtils.java:321) ~[spring-core-5.2.4.RELEASE.jar:5.2.4.RELEASE]
	at org.springframework.beans.factory.annotation.AutowiredAnnotationBeanPostProcessor.determineCandidateConstructors(AutowiredAnnotationBeanPostProcessor.java:267) ~[spring-beans-5.2.4.RELEASE.jar:5.2.4.RELEASE]
	at org.springframework.beans.factory.support.AbstractAutowireCapableBeanFactory.determineConstructorsFromBeanPostProcessors(AbstractAutowireCapableBeanFactory.java:1286) ~[spring-beans-5.2.4.RELEASE.jar:5.2.4.RELEASE]
	at org.springframework.beans.factory.support.AbstractAutowireCapableBeanFactory.createBeanInstance(AbstractAutowireCapableBeanFactory.java:1201) ~[spring-beans-5.2.4.RELEASE.jar:5.2.4.RELEASE]
	at org.springframework.beans.factory.support.AbstractAutowireCapableBeanFactory.doCreateBean(AbstractAutowireCapableBeanFactory.java:557) ~[spring-beans-5.2.4.RELEASE.jar:5.2.4.RELEASE]
	at org.springframework.beans.factory.support.AbstractAutowireCapableBeanFactory.createBean(AbstractAutowireCapableBeanFactory.java:517) ~[spring-beans-5.2.4.RELEASE.jar:5.2.4.RELEASE]
	at org.springframework.beans.factory.support.AbstractBeanFactory.lambda$doGetBean$0(AbstractBeanFactory.java:323) ~[spring-beans-5.2.4.RELEASE.jar:5.2.4.RELEASE]
	at org.springframework.beans.factory.support.DefaultSingletonBeanRegistry.getSingleton(DefaultSingletonBeanRegistry.java:222) ~[spring-beans-5.2.4.RELEASE.jar:5.2.4.RELEASE]
	at org.springframework.beans.factory.support.AbstractBeanFactory.doGetBean(AbstractBeanFactory.java:321) ~[spring-beans-5.2.4.RELEASE.jar:5.2.4.RELEASE]
	at org.springframework.beans.factory.support.AbstractBeanFactory.getBean(AbstractBeanFactory.java:202) ~[spring-beans-5.2.4.RELEASE.jar:5.2.4.RELEASE]
	at org.springframework.beans.factory.support.DefaultListableBeanFactory.preInstantiateSingletons(DefaultListableBeanFactory.java:879) ~[spring-beans-5.2.4.RELEASE.jar:5.2.4.RELEASE]
	at org.springframework.context.support.AbstractApplicationContext.finishBeanFactoryInitialization(AbstractApplicationContext.java:878) ~[spring-context-5.2.4.RELEASE.jar:5.2.4.RELEASE]
	at org.springframework.context.support.AbstractApplicationContext.refresh(AbstractApplicationContext.java:550) ~[spring-context-5.2.4.RELEASE.jar:5.2.4.RELEASE]
	at org.springframework.test.context.support.AbstractGenericContextLoader.loadContext(AbstractGenericContextLoader.java:128) ~[spring-test-5.2.4.RELEASE.jar:5.2.4.RELEASE]
	at org.springframework.test.context.support.AbstractGenericContextLoader.loadContext(AbstractGenericContextLoader.java:60) ~[spring-test-5.2.4.RELEASE.jar:5.2.4.RELEASE]
	at org.springframework.test.context.support.AbstractDelegatingSmartContextLoader.delegateLoading(AbstractDelegatingSmartContextLoader.java:275) ~[spring-test-5.2.4.RELEASE.jar:5.2.4.RELEASE]
	at org.springframework.test.context.support.AbstractDelegatingSmartContextLoader.loadContext(AbstractDelegatingSmartContextLoader.java:243) ~[spring-test-5.2.4.RELEASE.jar:5.2.4.RELEASE]
	at org.springframework.test.context.cache.DefaultCacheAwareContextLoaderDelegate.loadContextInternal(DefaultCacheAwareContextLoaderDelegate.java:99) ~[spring-test-5.2.4.RELEASE.jar:5.2.4.RELEASE]
	at org.springframework.test.context.cache.DefaultCacheAwareContextLoaderDelegate.loadContext(DefaultCacheAwareContextLoaderDelegate.java:124) ~[spring-test-5.2.4.RELEASE.jar:5.2.4.RELEASE]
	... 24 more
Caused by: java.lang.NoClassDefFoundError: redis/clients/util/Pool
	at java.lang.Class.getDeclaredMethods0(Native Method) ~[?:1.8.0_192]
	at java.lang.Class.privateGetDeclaredMethods(Class.java:2701) ~[?:1.8.0_192]
	at java.lang.Class.getDeclaredMethods(Class.java:1975) ~[?:1.8.0_192]
	at org.springframework.util.ReflectionUtils.getDeclaredMethods(ReflectionUtils.java:463) ~[spring-core-5.2.4.RELEASE.jar:5.2.4.RELEASE]
	at org.springframework.util.ReflectionUtils.doWithLocalMethods(ReflectionUtils.java:321) ~[spring-core-5.2.4.RELEASE.jar:5.2.4.RELEASE]
	at org.springframework.beans.factory.annotation.AutowiredAnnotationBeanPostProcessor.determineCandidateConstructors(AutowiredAnnotationBeanPostProcessor.java:267) ~[spring-beans-5.2.4.RELEASE.jar:5.2.4.RELEASE]
	at org.springframework.beans.factory.support.AbstractAutowireCapableBeanFactory.determineConstructorsFromBeanPostProcessors(AbstractAutowireCapableBeanFactory.java:1286) ~[spring-beans-5.2.4.RELEASE.jar:5.2.4.RELEASE]
	at org.springframework.beans.factory.support.AbstractAutowireCapableBeanFactory.createBeanInstance(AbstractAutowireCapableBeanFactory.java:1201) ~[spring-beans-5.2.4.RELEASE.jar:5.2.4.RELEASE]
	at org.springframework.beans.factory.support.AbstractAutowireCapableBeanFactory.doCreateBean(AbstractAutowireCapableBeanFactory.java:557) ~[spring-beans-5.2.4.RELEASE.jar:5.2.4.RELEASE]
	at org.springframework.beans.factory.support.AbstractAutowireCapableBeanFactory.createBean(AbstractAutowireCapableBeanFactory.java:517) ~[spring-beans-5.2.4.RELEASE.jar:5.2.4.RELEASE]
	at org.springframework.beans.factory.support.AbstractBeanFactory.lambda$doGetBean$0(AbstractBeanFactory.java:323) ~[spring-beans-5.2.4.RELEASE.jar:5.2.4.RELEASE]
	at org.springframework.beans.factory.support.DefaultSingletonBeanRegistry.getSingleton(DefaultSingletonBeanRegistry.java:222) ~[spring-beans-5.2.4.RELEASE.jar:5.2.4.RELEASE]
	at org.springframework.beans.factory.support.AbstractBeanFactory.doGetBean(AbstractBeanFactory.java:321) ~[spring-beans-5.2.4.RELEASE.jar:5.2.4.RELEASE]
	at org.springframework.beans.factory.support.AbstractBeanFactory.getBean(AbstractBeanFactory.java:202) ~[spring-beans-5.2.4.RELEASE.jar:5.2.4.RELEASE]
	at org.springframework.beans.factory.support.DefaultListableBeanFactory.preInstantiateSingletons(DefaultListableBeanFactory.java:879) ~[spring-beans-5.2.4.RELEASE.jar:5.2.4.RELEASE]
	at org.springframework.context.support.AbstractApplicationContext.finishBeanFactoryInitialization(AbstractApplicationContext.java:878) ~[spring-context-5.2.4.RELEASE.jar:5.2.4.RELEASE]
	at org.springframework.context.support.AbstractApplicationContext.refresh(AbstractApplicationContext.java:550) ~[spring-context-5.2.4.RELEASE.jar:5.2.4.RELEASE]
	at org.springframework.test.context.support.AbstractGenericContextLoader.loadContext(AbstractGenericContextLoader.java:128) ~[spring-test-5.2.4.RELEASE.jar:5.2.4.RELEASE]
	at org.springframework.test.context.support.AbstractGenericContextLoader.loadContext(AbstractGenericContextLoader.java:60) ~[spring-test-5.2.4.RELEASE.jar:5.2.4.RELEASE]
	at org.springframework.test.context.support.AbstractDelegatingSmartContextLoader.delegateLoading(AbstractDelegatingSmartContextLoader.java:275) ~[spring-test-5.2.4.RELEASE.jar:5.2.4.RELEASE]
	at org.springframework.test.context.support.AbstractDelegatingSmartContextLoader.loadContext(AbstractDelegatingSmartContextLoader.java:243) ~[spring-test-5.2.4.RELEASE.jar:5.2.4.RELEASE]
	at org.springframework.test.context.cache.DefaultCacheAwareContextLoaderDelegate.loadContextInternal(DefaultCacheAwareContextLoaderDelegate.java:99) ~[spring-test-5.2.4.RELEASE.jar:5.2.4.RELEASE]
	at org.springframework.test.context.cache.DefaultCacheAwareContextLoaderDelegate.loadContext(DefaultCacheAwareContextLoaderDelegate.java:124) ~[spring-test-5.2.4.RELEASE.jar:5.2.4.RELEASE]
	... 24 more
Caused by: java.lang.ClassNotFoundException: redis.clients.util.Pool
	at java.net.URLClassLoader.findClass(URLClassLoader.java:382) ~[?:1.8.0_192]
	at java.lang.ClassLoader.loadClass(ClassLoader.java:424) ~[?:1.8.0_192]
	at sun.misc.Launcher$AppClassLoader.loadClass(Launcher.java:349) ~[?:1.8.0_192]
	at java.lang.ClassLoader.loadClass(ClassLoader.java:357) ~[?:1.8.0_192]
	at java.lang.Class.getDeclaredMethods0(Native Method) ~[?:1.8.0_192]
	at java.lang.Class.privateGetDeclaredMethods(Class.java:2701) ~[?:1.8.0_192]
	at java.lang.Class.getDeclaredMethods(Class.java:1975) ~[?:1.8.0_192]
	at org.springframework.util.ReflectionUtils.getDeclaredMethods(ReflectionUtils.java:463) ~[spring-core-5.2.4.RELEASE.jar:5.2.4.RELEASE]
	at org.springframework.util.ReflectionUtils.doWithLocalMethods(ReflectionUtils.java:321) ~[spring-core-5.2.4.RELEASE.jar:5.2.4.RELEASE]
	at org.springframework.beans.factory.annotation.AutowiredAnnotationBeanPostProcessor.determineCandidateConstructors(AutowiredAnnotationBeanPostProcessor.java:267) ~[spring-beans-5.2.4.RELEASE.jar:5.2.4.RELEASE]
	at org.springframework.beans.factory.support.AbstractAutowireCapableBeanFactory.determineConstructorsFromBeanPostProcessors(AbstractAutowireCapableBeanFactory.java:1286) ~[spring-beans-5.2.4.RELEASE.jar:5.2.4.RELEASE]
	at org.springframework.beans.factory.support.AbstractAutowireCapableBeanFactory.createBeanInstance(AbstractAutowireCapableBeanFactory.java:1201) ~[spring-beans-5.2.4.RELEASE.jar:5.2.4.RELEASE]
	at org.springframework.beans.factory.support.AbstractAutowireCapableBeanFactory.doCreateBean(AbstractAutowireCapableBeanFactory.java:557) ~[spring-beans-5.2.4.RELEASE.jar:5.2.4.RELEASE]
	at org.springframework.beans.factory.support.AbstractAutowireCapableBeanFactory.createBean(AbstractAutowireCapableBeanFactory.java:517) ~[spring-beans-5.2.4.RELEASE.jar:5.2.4.RELEASE]
	at org.springframework.beans.factory.support.AbstractBeanFactory.lambda$doGetBean$0(AbstractBeanFactory.java:323) ~[spring-beans-5.2.4.RELEASE.jar:5.2.4.RELEASE]
	at org.springframework.beans.factory.support.DefaultSingletonBeanRegistry.getSingleton(DefaultSingletonBeanRegistry.java:222) ~[spring-beans-5.2.4.RELEASE.jar:5.2.4.RELEASE]
	at org.springframework.beans.factory.support.AbstractBeanFactory.doGetBean(AbstractBeanFactory.java:321) ~[spring-beans-5.2.4.RELEASE.jar:5.2.4.RELEASE]
	at org.springframework.beans.factory.support.AbstractBeanFactory.getBean(AbstractBeanFactory.java:202) ~[spring-beans-5.2.4.RELEASE.jar:5.2.4.RELEASE]
	at org.springframework.beans.factory.support.DefaultListableBeanFactory.preInstantiateSingletons(DefaultListableBeanFactory.java:879) ~[spring-beans-5.2.4.RELEASE.jar:5.2.4.RELEASE]
	at org.springframework.context.support.AbstractApplicationContext.finishBeanFactoryInitialization(AbstractApplicationContext.java:878) ~[spring-context-5.2.4.RELEASE.jar:5.2.4.RELEASE]
	at org.springframework.context.support.AbstractApplicationContext.refresh(AbstractApplicationContext.java:550) ~[spring-context-5.2.4.RELEASE.jar:5.2.4.RELEASE]
	at org.springframework.test.context.support.AbstractGenericContextLoader.loadContext(AbstractGenericContextLoader.java:128) ~[spring-test-5.2.4.RELEASE.jar:5.2.4.RELEASE]
	at org.springframework.test.context.support.AbstractGenericContextLoader.loadContext(AbstractGenericContextLoader.java:60) ~[spring-test-5.2.4.RELEASE.jar:5.2.4.RELEASE]
	at org.springframework.test.context.support.AbstractDelegatingSmartContextLoader.delegateLoading(AbstractDelegatingSmartContextLoader.java:275) ~[spring-test-5.2.4.RELEASE.jar:5.2.4.RELEASE]
	at org.springframework.test.context.support.AbstractDelegatingSmartContextLoader.loadContext(AbstractDelegatingSmartContextLoader.java:243) ~[spring-test-5.2.4.RELEASE.jar:5.2.4.RELEASE]
	at org.springframework.test.context.cache.DefaultCacheAwareContextLoaderDelegate.loadContextInternal(DefaultCacheAwareContextLoaderDelegate.java:99) ~[spring-test-5.2.4.RELEASE.jar:5.2.4.RELEASE]
	at org.springframework.test.context.cache.DefaultCacheAwareContextLoaderDelegate.loadContext(DefaultCacheAwareContextLoaderDelegate.java:124) ~[spring-test-5.2.4.RELEASE.jar:5.2.4.RELEASE]
	... 24 more
最后的解决办法是导入jedis2.X的版本进行解决,具体原因未知。
坑二:还是报错,不过是日志方面的报错,虽不影响运行,但是强迫症患者看着实在蛋疼,报错如下:
SLF4J: Failed to load class "org.slf4j.impl.StaticLoggerBinder".
SLF4J: Defaulting to no-operation (NOP) logger implementation
SLF4J: See http://www.slf4j.org/codes.html#StaticLoggerBinder for further details.
具体原因查了下,报出错误的地方主要是slf4j的jar包,而故障码中“Failed to load class ’org.slf4j.impl.StaticLoggerBinder‘”的意思则是“加载类文件org.slf4j.impl.StaticLoggerBinder时失败”。
而官网上刊登的解决办法是:
This error is reported when the org.slf4j.impl.StaticLoggerBinder
class could not be loaded into memory. This happens when no
appropriate SLF4J binding could be found on the class path. Placing
one (and only one) of slf4j-nop.jar, slf4j-simple.jar,
slf4j-log4j12.jar, slf4j-jdk14.jar or logback-classic.jar on the class
path should solve the problem.
翻译过来如下所示:
这个错误是当org.slf4j.impl报道。StaticLoggerBinder类不能被加载到内存中。发生这种情况时,无法找到合适的SLF4J绑定类路径。slf4j-nop.jar放置一个(且只有一个), slf4j-simple.jar, slf4j-log4j12.jar, slf4j-jdk14.jar 或 logback-classic.jar 的类路径应该解决这个问题。
解决办法:
导入以下jar包
      org.slf4j
      slf4j-nop
      1.7.2
SpringBoot整合redis
- 接通过 RedisTemplate 来使用
- 使用 Spring Cache 集成 Redis pom.xml 中加入以下依赖:
        org.springframework.boot
        spring-boot-starter-data-redis


        org.apache.commons
        commons-pool2


        org.springframework.boot
        spring-boot-starter-web


        org.springframework.session
        spring-session-data-redis


        org.projectlombok
        lombok
        true


        org.springframework.boot
        spring-boot-starter-test
        test
- spring-boot-starter-data-redis :在 spring boot 2.x 以后底层不再使用 Jedis,而是换成了 Lettuce。
- commons-pool2 :用作 redis 连接池,如不引入启动会报错
- spring-session-data-redis :spring session 引入,用作共享 session。配置文件
application.yml 的配置:
server:
  port: 8082
  servlet:
    session:
      timeout: 30ms
spring:
  cache:
    type: redis
  redis:
    host: 127.0.0.1
    port: 6379
    password:
    # redis默认情况下有16个分片,这里配置具体使用的分片,默认为0
    database: 0
    lettuce:
      pool:
        # 连接池最大连接数(使用负数表示没有限制),默认8
        max-active: 100
创建实体类 User.java
public class User implements Serializable{

    private static final long serialVersionUID = 662692455422902539L;

    private Integer id;

    private String name;

    private Integer age;

    public User() {
    }

    public User(Integer id, String name, Integer age) {
        this.id = id;
        this.name = name;
        this.age = age;
    }

    public Integer getId() {
        return id;
    }

    public void setId(Integer id) {
        this.id = id;
    }

    public String getName() {
        return name;
    }

    public void setName(String name) {
        this.name = name;
    }

    public Integer getAge() {
        return age;
    }

    public void setAge(Integer age) {
        this.age = age;
    }

    @Override
    public String toString() {
        return "User{" +
                "id=" + id +
                ", name='" + name + '\'' +
                ", age=" + age +
                '}';
    }
}
RedisTemplate 的使用方式
默认情况下的模板只能支持 RedisTemplate
@Configuration
@AutoConfigureAfter(RedisAutoConfiguration.class)
public class RedisCacheConfig {

    @Bean
    public RedisTemplate redisCacheTemplate(LettuceConnectionFactory connectionFactory) {

        RedisTemplate template = new RedisTemplate<>();
        template.setKeySerializer(new StringRedisSerializer());
        template.setValueSerializer(new GenericJackson2JsonRedisSerializer());
        template.setConnectionFactory(connectionFactory);
        return template;
    }
}
测试类:
@RestController
@RequestMapping("/user")
public class UserController {

    public static Logger logger = LogManager.getLogger(UserController.class);

    @Autowired
    private StringRedisTemplate stringRedisTemplate;

    @Autowired
    private RedisTemplate redisCacheTemplate;

    @RequestMapping("/test")
    public void test() {
        redisCacheTemplate.opsForValue().set("userkey", new User(1, "张三", 25));
        User user = (User) redisCacheTemplate.opsForValue().get("userkey");
        logger.info("当前获取对象:{}", user.toString());
    }
然后在浏览器访问,观察后台日志 http://localhost:8082/user/test 。

使用 Spring Cache 集成 Redis
Spring Cache 具备很好的灵活性,不仅能够使用 SPEL(spring expression language)来定义缓存的 Key 和各种 Condition,还提供了开箱即用的缓存临时存储方案,也支持和主流的专业缓存如 EhCache、Redis、Guava 的集成。
定义接口 UserService.java
public interface UserService {

    User save(User user);

    void delete(int id);

    User get(Integer id);
}
接口实现类 UserServiceImpl.java
@Service
public class UserServiceImpl implements UserService{

    public static Logger logger = LogManager.getLogger(UserServiceImpl.class);

    private static Map userMap = new HashMap<>();
    static {
        userMap.put(1, new User(1, "肖战", 25));
        userMap.put(2, new User(2, "王一博", 26));
        userMap.put(3, new User(3, "杨紫", 24));
    }


    @CachePut(value ="user", key = "#user.id")
    @Override
    public User save(User user) {
        userMap.put(user.getId(), user);
        logger.info("进入save方法,当前存储对象:{}", user.toString());
        return user;
    }

    @CacheEvict(value="user", key = "#id")
    @Override
    public void delete(int id) {
        userMap.remove(id);
        logger.info("进入delete方法,删除成功");
    }

    @Cacheable(value = "user", key = "#id")
    @Override
    public User get(Integer id) {
        logger.info("进入get方法,当前获取对象:{}", userMap.get(id)==null?null:userMap.get(id).toString());
        return userMap.get(id);
    }
}
为了方便演示数据库的操作,这里直接定义了一个Map
这里的核心是三个注解:
- @Cachable
- @CachePut
- @CacheEvict
测试类:UserController
@RestController
@RequestMapping("/user")
public class UserController {

    public static Logger logger = LogManager.getLogger(UserController.class);

    @Autowired
    private StringRedisTemplate stringRedisTemplate;

    @Autowired
    private RedisTemplate redisCacheTemplate;

    @Autowired
    private UserService userService;

    @RequestMapping("/test")
    public void test() {
        redisCacheTemplate.opsForValue().set("userkey", new User(1, "张三", 25));
        User user = (User) redisCacheTemplate.opsForValue().get("userkey");
        logger.info("当前获取对象:{}", user.toString());
    }


    @RequestMapping("/add")
    public void add() {
        User user = userService.save(new User(4, "李现", 30));
        logger.info("添加的用户信息:{}",user.toString());
    }

    @RequestMapping("/delete")
    public void delete() {
        userService.delete(4);
    }

    @RequestMapping("/get/{id}")
    public void get(@PathVariable("id") String idStr) throws Exception{
        if (StringUtils.isBlank(idStr)) {
            throw new Exception("id为空");
        }
        Integer id = Integer.parseInt(idStr);
        User user = userService.get(id);
        logger.info("获取的用户信息:{}",user.toString());
    }
}
用缓存要注意,启动类要加上一个注解开启缓存:
@SpringBootApplication(exclude=DataSourceAutoConfiguration.class)
@EnableCaching
public class Application {

    public static void main(String[] args) {
        SpringApplication.run(Application.class, args);
    }

}
1、先调用添加接口:http://localhost:8082/user/add
![]() 2、再调用查询接口,查询 id=4 的用户信息:
2、再调用查询接口,查询 id=4 的用户信息:
![]()
可以看出,这里已经从缓存中获取数据了,因为上一步 add 方法已经把 id=4 的用户数据放入了 redis 缓存 3、调用删除方法,删除 id=4 的用户信息,同时清除缓存
![]()
4、再次调用查询接口,查询 id=4 的用户信息:
![]()
没有了缓存,所以进入了 get 方法,从 userMap 中获取。
缓存注解
1、@Cacheable 根据方法的请求参数对其结果进行缓存
- key:缓存的 key,可以为空,如果指定要按照 SPEL 表达式编写,如果不指定,则按照方法的所有参数进行组合。
- value:缓存的名称,必须指定至少一个(如 @Cacheable (value=‘user’)或者@Cacheable(value={‘user1’,‘user2’}))
- condition:缓存的条件,可以为空,使用 SPEL 编写,返回 true 或者 false,只有为 true 才进行缓存。
@Cacheable 注解不支持配置过期时间,所有需要通过配置 cacheManager来配置默认的过期时间和针对每个类或者是方法进行缓存失效时间配置。
2、@CachePut根据方法的请求参数对其结果进行缓存,和@Cacheable 不同的是,它每次都会触发真实方法的调用。参数描述见上。
3、@CacheEvict根据条件对缓存进行清空
- key:同上
- value:同上
- condition:同上
- allEntries:是否清空所有缓存内容,缺省为 false,如果指定为 true,则方法调用后将立即清空所有缓存
- beforeInvocation:是否在方法执行前就清空,缺省为 false,如果指定为 true,则在方法还没有执行的时候就清空缓存。缺省情况下,如果方法执行抛出异常,则不会清空缓存。
redis 中的缓存问题
缓存和数据库数据一致性问题
分布式环境下非常容易出现缓存和数据库间数据一致性问题,针对这一点,如果项目对缓存的要求是强一致性的,那么就不要使用缓存。我们只能采取合适的策略来降低缓存和数据库间数据不一致的概率,而无法保证两者间的强一致性。合适的策略包括合适的缓存更新策略,更新数据库后及时更新缓存、缓存失败时增加重试机制。
缓存雪崩
目前电商首页以及热点数据都会去做缓存,一般缓存都是定时任务去刷新,或者查不到之后去更新缓存的,定时任务刷新就有一个问题。举个栗子:如果首页所有 Key 的失效时间都是 12 小时,中午 12 点刷新的,我零点有个大促活动大量用户涌入,假设每秒 6000 个请求,本来缓存可以抗住每秒 5000 个请求,但是缓存中所有 Key 都失效了。此时 6000 个/秒的请求全部落在了数据库上,数据库必然扛不住,真实情况可能 DBA 都没反应过来直接挂了,此时,如果没什么特别的方案来处理,DBA 很着急,重启数据库,但是数据库立马又被新流量给打死了。
同一时间缓存中的key大面积失效,大量的请求瞬间落在关系型数据库上,导致数据库挂掉。
前瞻性解决方案:
- 在批量往 Redis 存数据的时候,把每个 Key 的失效时间都加个随机值就好了,这样可以保证数据不会再同一时间大面积失效。
- 如果 Redis 是集群部署,将热点数据均匀分布在不同的 Redis 库中也能避免全部失效。或者设置热点数据永不过期,有更新操作就更新缓存就好了(比如运维更新了首页商品,那你刷下缓存就好了,不要设置过期时间),电商首页的数据也可以用这个操作,保险。
缓存穿透
缓存穿透是指缓存和数据库中都没有的数据,而用户(黑客)不断发起请求,举个栗子:我们数据库的 id 都是从 1 自增的,如果发起 id=-1 的数据或者 id 特别大不存在的数据,这样的不断攻击导致数据库压力很大,严重会击垮数据库。
解决方案:
- 在接口层增加校验,比如用户鉴权,参数做校验,不合法的校验直接 return,比如 id 做基础校验,id<=0 直接拦截。
- Redis 里还有一个高级用法**布隆过滤器(Bloom Filter)**这个也能很好的预防缓存穿透的发生,他的原理也很简单,就是利用高效的数据结构和算法快速判断出你这个 Key 是否在数据库中存在,不存在你 return 就好了,存在你就去查 DB 刷新 KV 再 return。缓存击穿的话,设置热点数据永不过期,或者加上互斥锁就搞定了。
public static String getData(String key) throws InterruptedException {
        //从Redis查询数据
        String result = getDataByKV(key);
        //参数校验
        if (StringUtils.isBlank(result)) {
            try {
                //获得锁
                if (reenLock.tryLock()) {
                    //去数据库查询
                    result = getDataByDB(key);
                    //校验
                    if (StringUtils.isNotBlank(result)) {
                        //插进缓存
                        setDataToKV(key, result);
                    }
                } else {
                    //睡一会再拿
                    Thread.sleep(100L);
                    result = getData(key);
                }
            } finally {
                //释放锁
                reenLock.unlock();
            }
        }
        return result;
    }
缓存击穿
缓存击穿跟缓存雪崩有点像,但是又有一点不一样,缓存雪崩是因为大面积的缓存失效,打崩了 DB,而缓存击穿不同的是缓存击穿是指一个 Key 非常热点,在不停地扛着大量的请求,大并发集中对这一个点进行访问,当这个 Key 在失效的瞬间,持续的大并发直接落到了数据库上,就在这个 Key 的点上击穿了缓存。
redis的线程问题
redis是单线程还是多线程的?
单线程指的是网络请求模块使用了一个线程(所以不需考虑并发安全性),即一个线程处理所有网络请求,其他模块仍用了多个线程。
单线程的redis为什么还能那么快?
- Redis 完全基于内存,绝大部分请求是纯粹的内存操作,非常迅速,数据存在内存中,类似于HashMap,HashMap的优势就是查找和操作的时间复杂度是 O(1)。
- 数据结构简单,对数据操作也简单。
- 采用单线程,避免了不必要的上下文切换和竞争条件,不存在多线程导致的 CPU切换,不用去考虑各种锁的问题,不存在加锁释放锁操作,没有死锁问题导致的性能消耗。
- 使用多路复用 IO 模型,非阻塞 IO。
Redis 和 Memcached 的区别
- 存储方式上 :memcache 会把数据全部存在内存之中,断电后会挂掉,数据不能超过内存大小。redis
有部分数据存在硬盘上,这样能保证数据的持久性。 - 数据支持类型上 :memcache 对数据类型的支持简单,只支持简单的 key-value,,而 redis 支持五种数据类型。
- 使用底层模型不同: 它们之间底层实现方式以及与客户端之间通信的应用协议不一样。redis 直接自己构建了 VM机制,因为一般的系统调用系统函数的话,会浪费一定的时间去移动和请求。
- value 的大小 :redis 可以达到 1GB,而 memcache 只有 1MB。
淘汰策略
Redis 有六种淘汰策略
| 策略 | 描述 |
|---|---|
| volatile-lru | 从已设置过期时间的 KV 集中优先对最近最少使用(less recently used)的数据淘汰 |
| volitile-ttl | 从已设置过期时间的 KV 集中优先对剩余时间短(time to live)的数据淘汰 |
| volitile-random | 从已设置过期时间的 KV 集中随机选择数据淘汰 |
| allkeys-lru | 从所有 KV 集中优先对最近最少使用(less recently used)的数据淘汰 |
| allKeys-random | 从所有 KV 集中随机选择数据淘汰 |
| noeviction | 不淘汰策略,若超过最大内存,返回错误信息 |
4.0 版本后增加以下两种:
- volatile-lfu:从已设置过期时间的数据集(server.db[i].expires)中挑选最不经常使用的数据淘汰
- allkeys-lfu:当内存不足以容纳新写入数据时,在键空间中,移除最不经常使用的 key
redis 持久化机制
redis 为了保证效率,数据缓存在了内存中,但是会周期性的把更新的数据写入磁盘或者把修改操作写入追加的记录文件中,以保证数据的持久化。Redis 的持久化策略有两种:1、RDB:快照形式是直接把内存中的数据保存到一个 dump 的文件中,定时保存,保存策略。2、AOF:把所有的对 Redis 的服务器进行修改的命令都存到一个文件里,命令的集合。Redis 默认是快照 RDB 的持久化方式。当 Redis 重启的时候,它会优先使用 AOF 文件来还原数据集,因为 AOF 文件保存的数据集通常比 RDB 文件所保存的数据集更完整。你甚至可以关闭持久化功能,让数据只在服务器运行时存。
RDB
原理
默认 Redis 是会以快照"RDB"的形式将数据持久化到磁盘的一个二进制文件 dump.rdb。工作原理简单说一下:当 Redis 需要做持久化时,Redis 会 fork 一个子进程,子进程将数据写到磁盘上一个临时 RDB 文件中。当子进程完成写临时文件后,将原来的 RDB 替换掉,这样的好处是可以 copy-on-write。
优缺点
- RDB 的优点是:这种文件非常适合用于备份:比如,你可以在最近的 24 小时内,每小时备份一次,并且在每个月的每一天也备份一个 RDB文件。这样的话,即使遇上问题,也可以随时将数据集还原到不同的版本。RDB 非常适合灾难恢复。
- RDB 的缺点是:如果你需要尽量避免在服务器故障时丢失数据,那么 RDB 不合适你。
AOF
使用 AOF 做持久化,每一个写命令都通过 write 函数追加到 appendonly.aof 中,配置方式如下:
appendfsync yes
appendfsync always     #每次有数据修改发生时都会写入AOF文件。
appendfsync everysec   #每秒钟同步一次,该策略为AOF的缺省策略。
AOF 可以做到全程持久化,只需要在配置中开启 appendonly yes。这样 redis 每执行一个修改数据的命令,都会把它添加到 AOF 文件中,当 redis 重启时,将会读取 AOF 文件进行重放,恢复到 redis 关闭前的最后时刻。
优缺点
- AOF 的优点是会让 redis 变得非常耐久。可以设置不同的 fsync 策略,aof 的默认策略是每秒钟 fsync
一次,在这种配置下,就算发生故障停机,也最多丢失一秒钟的数据。 - 缺点是对于相同的数据集来说,AOF 的文件体积通常要大于 RDB 文件的体积。根据所使用的 fsync 策略,AOF 的速度可能会慢于 RDB。
选择性
如果你非常关心你的数据,但仍然可以承受数分钟内的数据丢失,那么可以额只使用 RDB 持久。AOF 将 Redis 执行的每一条命令追加到磁盘中,处理巨大的写入会降低 Redis 的性能,不知道你是否可以接受。数据库备份和灾难恢复:定时生成 RDB 快照非常便于进行数据库备份,并且 RDB 恢复数据集的速度也要比 AOF 恢复的速度快。当然了,redis 支持同时开启 RDB 和 AOF,系统重启后,redis 会优先使用 AOF 来恢复数据,这样丢失的数据会最少。
补充内容
Redis 4.0 对于持久化机制的优化
Redis 4.0 开始支持 RDB 和 AOF 的混合持久化(默认关闭,可以通过配置项 aof-use-rdb-preamble 开启)。
如果把混合持久化打开,AOF 重写的时候就直接把 RDB 的内容写到 AOF 文件开头。这样做的好处是可以结合 RDB 和 AOF 的优点, 快速加载同时避免丢失过多的数据。当然缺点也是有的, AOF 里面的 RDB 部分是压缩格式不再是 AOF 格式,可读性较差。
AOF 重写
AOF 重写可以产生一个新的 AOF 文件,这个新的 AOF 文件和原有的 AOF 文件所保存的数据库状态一样,但体积更小。
AOF 重写是一个有歧义的名字,该功能是通过读取数据库中的键值对来实现的,程序无须对现有 AOF 文件进行任何读入、分析或者写入操作。
在执行 BGREWRITEAOF 命令时,Redis 服务器会维护一个 AOF 重写缓冲区,该缓冲区会在子进程创建新 AOF 文件期间,记录服务器执行的所有写命令。当子进程完成创建新 AOF 文件的工作之后,服务器会将重写缓冲区中的所有内容追加到新 AOF 文件的末尾,使得新旧两个 AOF 文件所保存的数据库状态一致。最后,服务器用新的 AOF 文件替换旧的 AOF 文件,以此来完成 AOF 文件重写操作
redis的主从复制
redis 单节点存在单点故障问题,为了解决单点问题,一般都需要对 redis 配置从节点,然后使用哨兵来监听主节点的存活状态,如果主节点挂掉,从节点能继续提供缓存功能。
主从配置结合哨兵模式能解决单点故障问题,提高 redis 可用性。从节点仅提供读操作,主节点提供写操作。对于读多写少的状况,可给主节点配置多个从节点,从而提高响应效率。
主从复制过程
- 从节点执行slaveof[masterIP][masterPort],保存主节点信息
- 从节点中的定时任务发现主节点信息,建立和主节点的 socket 连接
- 从节点发送 Ping 信号,主节点返回 Pong,两边能互相通信
- 连接建立后,主节点将所有数据发送给从节点(数据同步)
- 主节点把当前的数据同步给从节点后,便完成了复制的建立过程。接下来,主节点就会持续的把写命令发送给从节点,保证主从数据一致性。
数据同步过程
redis2.8 之前使用sync[runId][offset]同步命令,redis2.8 之后使用psync[runId][offset]命令。两者不同在于,sync 命令仅支持全量复制过程,psync 支持全量和部分复制。
相关概念:
- runId:每个 redis 节点启动都会生成唯一的 uuid,每次 redis 重启后,runId 都会发生变化。
- offset:主节点和从节点都各自维护自己的主从复制偏移量 offset,当主节点有写入命令时,offset=offset+命令的字节长度。从节点在收到主节点发送的命令后,也会增加自己的 offset,并把自己的 offset 发送给主节点。这样,主节点同时保存自己的 offset 和从节点的 offset,通过对比 offset 来判断主从节点数据是否一致。
- repl_backlog_size:保存在主节点上的一个固定长度的先进先出队列,默认大小是 1MB。
(1)主节点发送数据给从节点过程中,主节点还会进行一些写操作,这时候的数据存储在复制缓冲区中。从节点同步主节点数据完成后,主节点将缓冲区的数据继续发送给从节点,用于部分复制。(2)主节点响应写命令时,不但会把命名发送给从节点,还会写入复制积压缓冲区,用于复制命令丢失的数据补救。

上面是 psync 的执行流程:
从节点发送 psync[runId][offset]命令,主节点有三种响应:
1:FULLRESYNC :第一次连接,进行全量复制
2:CONTINUE :进行部分复制
3:ERR :不支持 psync 命令,进行全量复制
全量复制和部分复制的过程

上面是全量复制的流程。主要有以下几步:
1:从节点发送 psync ? -1 命令(因为第一次发送,不知道主节点的 runId,所以为?,因为是第一次复制,所以 offset=-1)。
2:主节点发现从节点是第一次复制,返回 FULLRESYNC {runId} {offset},runId是主节点的 runId,offset 是主节点目前的 offset。
3:从节点接收主节点信息后,保存到 info 中。
4:主节点在发送FULLRESYNC 后,启动 bgsave 命令,生成 RDB 文件(数据持久化)。
5:主节点发送 RDB文件给从节点。到从节点加载数据完成这段期间主节点的写命令放入缓冲区
6:从节点清理自己的数据库数据。
7:从节点加载 RDB文件,将数据保存到自己的数据库中。
8:如果从节点开启了 AOF,从节点会异步重写 AOF 文件。
关于部分复制有以下几点说明:
1:部分复制主要是 Redis 针对全量复制的过高开销做出的一种优化措施,使用psync[runId][offset]命令实现。当从节点正在复制主节点时,如果出现网络闪断或者命令丢失等异常情况时,从节点会向主节点要求补发丢失的命令数据,主节点的复制积压缓冲区将这部分数据直接发送给从节点,这样就可以保持主从节点复制的一致性。补发的这部分数据一般远远小于全量数据。
2:主从连接中断期间主节点依然响应命令,但因复制连接中断命令无法发送给从节点,不过主节点内的复制积压缓冲区依然可以保存最近一段时间的写命令数据。
3:当主从连接恢复后,由于从节点之前保存了自身已复制的偏移量和主节点的运行 ID。因此会把它们当做 psync 参数发送给主节点,要求进行部分复制。
4:主节点接收到 psync 命令后首先核对参数 runId 是否与自身一致,如果一致,说明之前复制的是当前主节点;之后根据参数 offset 在复制积压缓冲区中查找,如果 offset 之后的数据存在,则对从节点发送+COUTINUE 命令,表示可以进行部分复制。因为缓冲区大小固定,若发生缓冲溢出,则进行全量复制。
5:主节点根据偏移量把复制积压缓冲区里的数据发送给从节点,保证主从复制进入正常状态。
哨兵
主从复制存在的问题
1:一旦主节点宕机,从节点晋升为主节点,同时需要修改应用方的主节点地址,还需要命令所有从节点去复制新的主节点,整个过程需要人工干预。
2:主节点的写能力受到单机的限制。
3:主节点的存储能力受到单机的限制。
4:原生复制的弊端在早期的版本中也会比较突出,比如:redis 复制中断后,从节点会发起 psync。此时如果同步不成功,则会进行全量同步,主库执行全量备份的同时,可能会造成毫秒或秒级的卡顿。
解决方案–哨兵
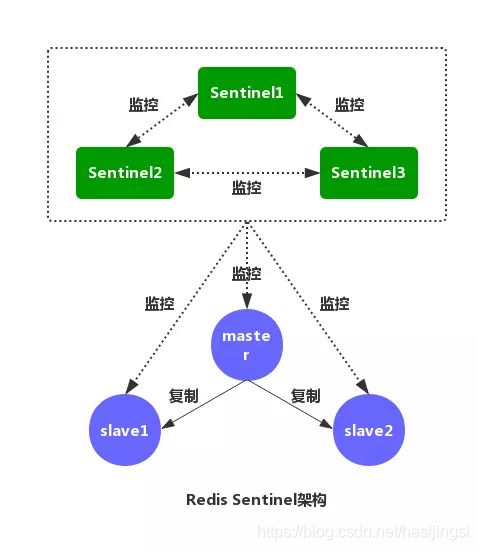
如图,是 Redis Sentinel(哨兵)的架构图。Redis Sentinel(哨兵)主要功能包括主节点存活检测、主从运行情况检测、自动故障转移、主从切换。Redis Sentinel 最小配置是一主一从。Redis 的 Sentinel 系统可以用来管理多个 Redis 服务器,该系统可以执行以下四个任务:
- 监控 :不断检查主服务器和从服务器是否正常运行。
- 通知 :当被监控的某个 redis 服务器出现问题,Sentinel 通过 API 脚本向管理员或者其他应用程序发出通知。
- 自动故障转移 :当主节点不能正常工作时,Sentinel
会开始一次自动的故障转移操作,它会将与失效主节点是主从关系的其中一个从节点升级为新的主节点,并且将其他的从节点指向新的主节点,这样人工干预就可以免了。 - 配置提供者 :在 Redis Sentinel 模式下,客户端应用在初始化时连接的是 Sentinel 节点集合,从中获取主节点的信息。
哨兵的工作原理

1、每个 Sentinel 节点都需要定期执行以下任务:每个 Sentinel 以每秒一次的频率,向它所知的主服务器、从服务器以及其他的 Sentinel 实例发送一个 PING 命令。(如上图)
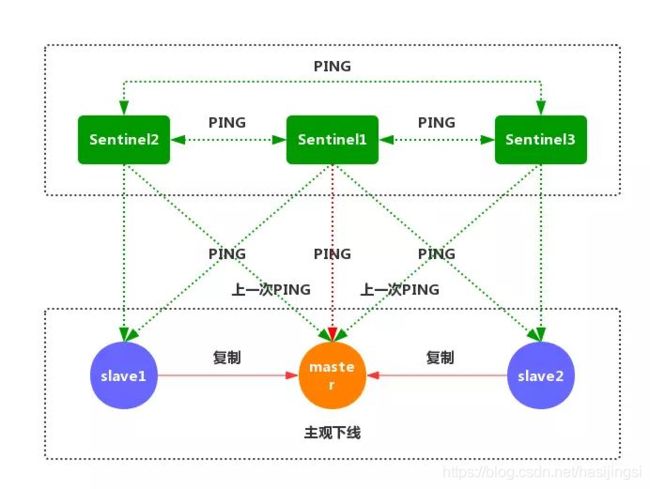
2、如果一个实例距离最后一次有效回复 PING 命令的时间超过down-after-milliseconds所指定的值,那么这个实例会被 Sentinel 标记为主观下线。(如上图)
3、如果一个主服务器被标记为主观下线,那么正在监视这个服务器的所有 Sentinel 节点,要以每秒一次的频率确认主服务器的确进入了主观下线状态。

4、如果一个主服务器被标记为主观下线,并且有足够数量的 Sentinel(至少要达到配置文件指定的数量)在指定的时间范围内同意这一判断,那么这个主服务器被标记为客观下线。

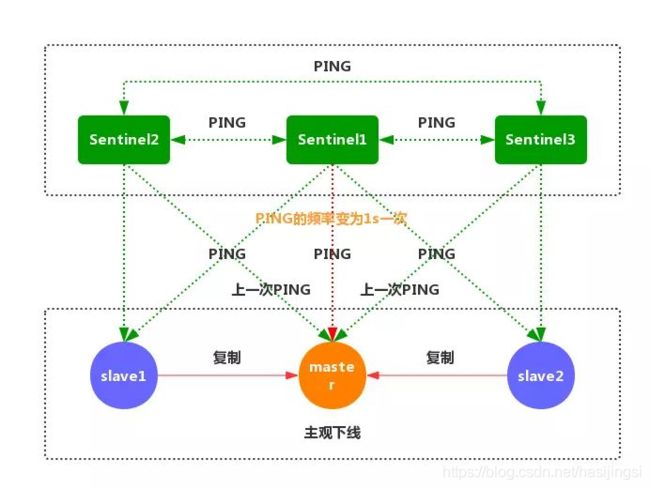
5、一般情况下,每个 Sentinel 会以每 10 秒一次的频率向它已知的所有主服务器和从服务器发送 INFO 命令,当一个主服务器被标记为客观下线时,Sentinel 向下线主服务器的所有从服务器发送 INFO 命令的频率,会从 10 秒一次改为每秒一次。

6、Sentinel 和其他 Sentinel 协商客观下线的主节点的状态,如果处于 SDOWN 状态,则投票自动选出新的主节点,将剩余从节点指向新的主节点进行数据复制。

7、当没有足够数量的 Sentinel 同意主服务器下线时,主服务器的客观下线状态就会被移除。当主服务器重新向 Sentinel 的 PING 命令返回有效回复时,主服务器的主观下线状态就会被移除。