Jenkins持续集成
文章目录
- Jenkins介绍
-
- Jenkins的特征
- Jenkins架构
- Gitlab安装
-
- 1. Gitlab代码托管服务器安装
- 2. Gitlab添加组、创建用户、创建项目
- jenkins安装
-
- 安装Jenkins
- Jenkins插件管理
- Jenkins用户权限管理
- Jenkins凭证管理
-
- 安装Git插件和Git工具
- 设置SSH免密登录
- Maven安装和配置
- Jenkins+Docker+springCloud
-
- 安装Docker
-
- 使用Dockerfile制作微服务镜像
- 安装Harbor
-
- 在Harbor创建用户和项目
- 从Harbor下载镜像
- Nginx安装与配置
- Jenkins上配置
- 微服务项目配置
- 部署前端静态web网站
Jenkins介绍
Jenkins 是一个开源的持续集成(Continuous Integration)工具,它可以帮助开发团队自动化构建、测试和部署应用程序。以下是使用 Jenkins 进行持续集成的一般步骤:
Jenkins官网: http://jenkins-ci.org/
Jenkins的特征
- 开源的Java语言开发持续集成工具,支持持续集成,持续部署。
- 易于安装部署配置:可通过yum安装,或下载war包以及通过docker容器等快速实现安装部署,可方便web界面配置管理。
- 消息通知及测试报告:集成RSS/E-mail通过RSS发布构建结果或当构建完成时通过e-mail通知,生成JUnit/TestNG测试报告。
- 分布式构建:支持Jenkins能够让多台计算机一起构建/测试。
- 文件识别:Jenkins能够跟踪哪次构建生成哪些jar,哪次构建使用哪个版本的jar等。
- 丰富的插件支持:支持扩展插件,你可以开发适合自己团队使用的工具,如git,svn,maven,docker等。
Jenkins架构
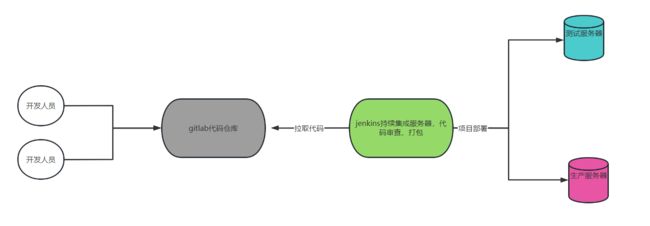
- 首先,开发人员每天进行代码提交,提交到Git仓库。
- 然后,Jenkins作为持续集成工具,使用Git工具到Git仓库拉取代码到集成服务器,再配合JDK,Maven等软件完成代码编译,代码测试与审查,测试,打包等工作,在这个过程中每一步出错,都重新再执行一次整个流程。
- 最后,Jenkins把生成的jar或war包分发到测试服务器或者生产服务器,测试人员或用户就可以访问应用。
Gitlab安装
1. Gitlab代码托管服务器安装
- 安装相关依赖
yum -y install policycoreutils policycoreutils-python openssh-server openssh-clients postfix
- 启动ssh服务&设置为开机启动
systemctl enable sshd && sudo systemctl start sshd
- 设置postfix开机自启,并启动postfix支持gitlab发信功能
systemctl enable postfix && systemctl start postfix
- 开放ssh以及http服务,然后重新加载防火墙列表
如果关闭防火墙就不需要做该配置。
firewall-cmd --add-service=ssh --permanent
firewall-cmd --add-service=http --permanent
firewall-cmd --reload
- 下载gitlab包,并且安装
软件源地址:https://mirrors.tuna.tsinghua.edu.cn/gitlab-ce/yum/
注意:centos7只能安装el6,或者el7的gitlab。
wget https://mirrors.tuna.tsinghua.edu.cn/gitlab-ce/yum/el7/gitlab-ce-14.6.0-ce.0.el7.x86_64.rpm --no-check-certificate
rpm -i gitlab-ce-14.6.0-ce.0.el7.x86_64.rpm
- 修改gitlab配置
vim /etc/gitlab/gitlab.rb

# 修改gitlab访问地址和端口,默认为80,我们改为82
external_url 'http://192.168.1.22:82'
nginx['listen_port'] = 82
- 重载配置及启动gitlab
gitlab-ctl reconfigure
gitlab-ctl restart
- 获取初始密码
--重载配置后控制台会打印如下信息
Username: root  管理员账号
Password: You didn't opt-in to print initial root password to STDOUT.
Password stored to /etc/gitlab/initial_root_password.   初始密码所在文件

--拿到初始密码
cat  /etc/gitlab/initial_root_password
Password: 7UgjZYA9VYEbGzp83FZdAbw/7RwxZuy7rGpIKQ08H9w=
- 把端口添加到防火墙
firewall-cmd --zone=public --add-port=82/tcp --permanent
firewall-cmd --reload
-
访问gitlab:http://192.168.1.22:82/
输入管理员账号root,密码7UgjZYA9VYEbGzp83FZdAbw/7RwxZuy7rGpIKQ08H9w=,登录即可。 -
修改管理员账号密码
默认的管理员账号密码24小时后会失效,需要自己重置。
访问:http://192.168.1.22:82/admin/users/root/edit 页面修改账号root的密码。
2. Gitlab添加组、创建用户、创建项目
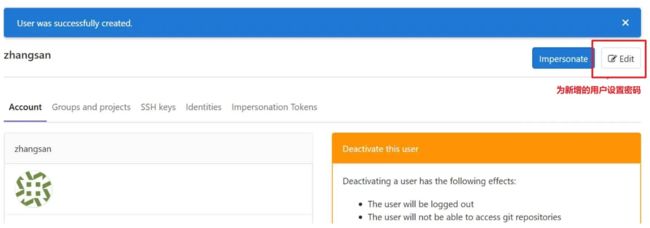
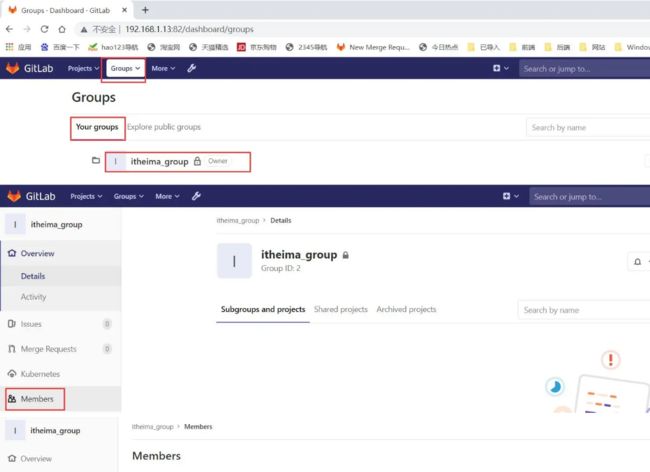
- Gitlab添加组—itheima_group
使用管理员 root 创建组,一个组里面可以有多个项目分支,可以将开发添加到组里面进行设置权限,不同的组就是公司不同的开发项目或者服务模块,不同的组添加不同的开发即可实现对开发设置权限的管理。
Gitlab用户在组里面有5种不同权限:
Guest:可以创建issue、发表评论,不能读写版本库。
Reporter:可以克隆代码,不能提交,QA、PM可以赋予这个权限。
Developer:可以克隆代码、开发、提交、push,普通开发可以赋予这个权限。
Maintainer:可以创建项目、添加tag、保护分支、添加项目成员、编辑项目,核心开发可以赋予这个权限。
Owner:可以设置项目访问权限 - Visibility Level、删除项目、迁移项目、管理组成员,开发组组长可以赋予这个权限。
jenkins安装
Jenkins需要依赖JDK,所以先安装JDK1.8。
tar -zxvf jdk-8u171-linux-x64.tar.gz -C /opt/install/

# /opt/install/jdk1.8.0_171/bin/java -version
java version "1.8.0_171"
Java(TM) SE Runtime Environment (build 1.8.0_171-b11)
Java HotSpot(TM) 64-Bit Server VM (build 25.171-b11, mixed mode)
安装Jenkins
- 下载并安装jenkins
Jenkins下载地址1(官网):https://jenkins.io/zh/download/
Jenkins下载地址2:https://mirrors.tuna.tsinghua.edu.cn/jenkins/redhat-stable/
yum -y install epel-release
yum -y install daemonize

wget https://mirrors.tuna.tsinghua.edu.cn/jenkins/redhat-stable/jenkins-2.319.1-1.1.noarch.rpm

rpm -ivh jenkins-2.319.1-1.1.noarch.rpm
- 修改Jenkins配置
vim /etc/sysconfig/jenkins

# jdk目录
JENKINS_JAVA_CMD=/opt/install/jdk1.8.0_171/bin/java
#jenkins用户
JENKINS_USER="root"
#jenkins端口
JENKINS_PORT="8888"
- 启动Jenkins
# systemctl start jenkins
# systemctl status jenkins
● jenkins.service - LSB: Jenkins Automation Server
   Loaded: loaded (/etc/rc.d/init.d/jenkins; bad; vendor preset: disabled)
   Active: active (running) since Thu 2022-01-06 16:33:56 CST; 31s ago
- 开放8888端口
firewall-cmd --zone=public --add-port=8888/tcp --permanent
firewall-cmd --reload
- 访问Jenkins:http://192.168.1.25:8888/
- 获取并输入admin账户密码
# cat /var/lib/jenkins/secrets/initialAdminPassword
d59cfa55bd8f4e39ac91ef1aa26effa3
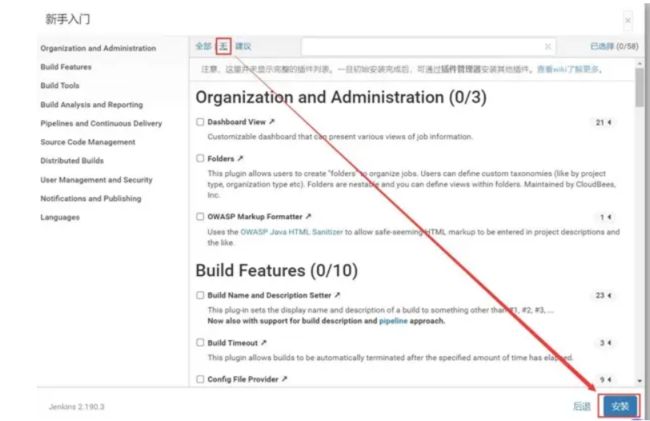
- 跳过插件安装
因为Jenkins插件需要连接默认官网下载,速度非常慢,而且经常会失败,所以我们暂时先跳过插件安装。
Jenkins插件管理
Jenkins本身不提供很多功能,我们可以通过使用插件来满足我们的使用。例如从Gitlab拉取代码,使用Maven构建项目等功能需要依靠插件完成。接下来演示如何下载插件。
jenkins插件默认下载地址:https://updates.jenkins-ci.org/download/plugins
jenkins插件默认存储目录:/var/lib/jenkins/plugins
- 修改插件下载地址为国内
Jenkins国外官方插件地址下载速度非常慢,所以可以修改为国内插件地址。
(1)Jenkins -> Manage Jenkins -> Manage Plugins -> Available。
(2)修改地址文件,替换为国内插件地址。
cd /var/lib/jenkins/updates
sed -i 's/http:\/\/updates.jenkinsci.org\/download/https:\/\/mirrors.tuna.tsinghua.edu.cn\/jenkins/g' default.json
sed -i 's/http:\/\/www.google.com/https:\/\/www.baidu.com/g' default.json
(3)点击Advanced,把Update Site改为国内插件下载地址。
默认地址:https://updates.jenkins.io/update-center.json
国内插件下载地址:https://mirrors.tuna.tsinghua.edu.cn/jenkins/updates/update-center.json
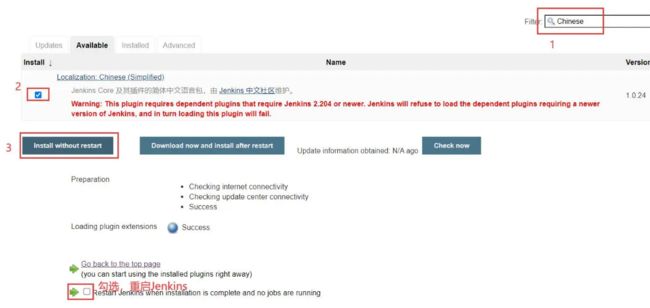
(4)Sumbit后,浏览器访问 http://192.168.1.25:8888/restart 重启Jenkins。
(2)重启后就看到Jenkins汉化了!(PS:但可能部分菜单汉化会失败)。
Jenkins用户权限管理
我们可以利用 Role-based Authorization Strategy 插件来管理Jenkins用户权限。
- 安装 Role-based Authorization Strategy 插件
- 开启权限全局安全配置
系统管理(Manage Jenkins) -> 全局安全配置(Configure Global Security)-> 授权策略 -> 选【Role-Based Strategy】-> 应用。 - 创建角色
(1)系统管理(Manage Jenkins) -> Manage and Assign Roles -> Manage Roles。
(2)添加角色。

- Global roles:管理员等高级用户可以创建基于全局的角色。
- Item roles:针对某个或者某些项目的角色。
在这里添加如下三个角色:
baseRole:该角色为全局角色。这个角色需要绑定Overall(全部)下面的Read权限,是为了给所有用户绑
定最基本的Jenkins访问权限。注意:如果不给后续用户绑定这个角色,会报错误:用户名 is
missing the Overall/Read permission。
role1:该角色为项目角色。使用正则表达式绑定 itcast.,意思是只能操作itcast开头的项目。
role2:该角色也为项目角色。绑定 itheima.,意思是只能操作itheima开头的项目。
- 给用户分配角色
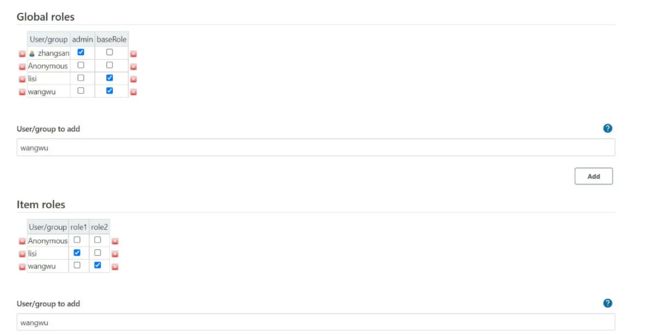
(1)系统管理(Manage Jenkins) -> Manage and Assign Roles -> Assign Roles。
(2)绑定规则如下。
Jenkins凭证管理
凭据可以用来存储需要密文保护的数据库密码、Gitlab密码信息、Docker私有仓库密码等,以便Jenkins可以和这些第三方的应用进行交互。
- 安装Credentials Binding插件
要在Jenkins使用凭证管理功能,需要安装Credentials Binding插件。
安装Git插件和Git工具
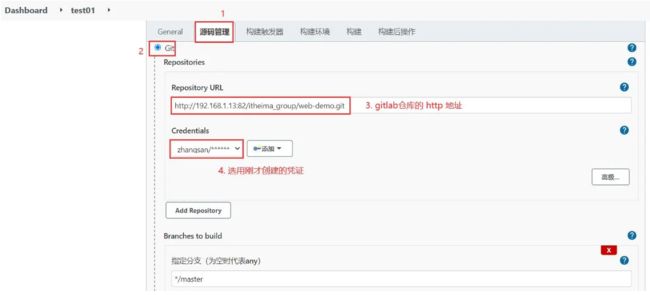
接下来以使用Git工具到Gitlab拉取项目源码为例,演示Jenkins如何管理Gitlab的凭证。
# yum install git -y
# git --version
git version 1.8.3.1
- 创建凭证
系统管理 -> Manage Credentials。
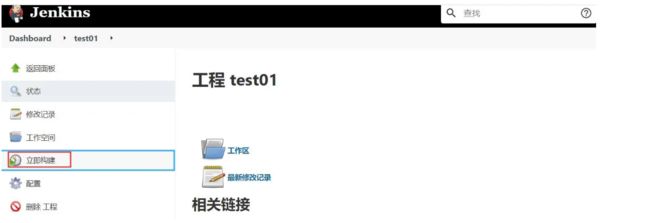
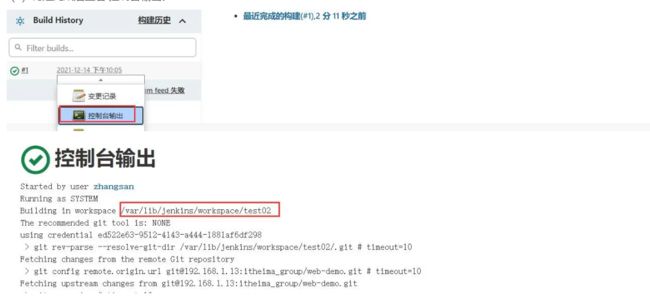
(3)构建完成后查看 控制台输出。
(4)到 Jenkins 机器上查看,发现已经从Gitlab成功拉取了代码到Jenkins中。
# cd /var/lib/jenkins/workspace/test01
# ll
total 20
-rw-r--r--. 1 root root 2636 Dec 14 22:05 email.html
-rw-r--r--. 1 root root 1374 Dec 14 22:05 Jenkinsfile
-rw-r--r--. 1 root root  625 Dec 14 22:05 pom.xml
-rw-r--r--. 1 root root  579 Dec 14 22:05 sonar-project.properties
drwxr-xr-x. 3 root root   17 Dec 14 22:05 src
-rw-r--r--. 1 root root 1499 Dec 14 22:05 web_demo.iml
设置SSH免密登录
SSH免密登录示意图
- 在 Jenkins 机器以root用户生成公钥和私钥
# ssh-keygen -t rsa
# cd /root/.ssh/
# ll
-rw-------. 1 root root 1675 Dec 15 10:52 id_rsa 私钥
-rw-r--r--. 1 root root  394 Dec 15 10:52 id_rsa.pub 公钥
(4)到 Jenkins 机器上查看,发现已经从Gitlab成功拉取了代码到Jenkins中。
# cd /var/lib/jenkins/workspace/test02
# ll
total 20
-rw-r--r--. 1 root root 2636 Dec 15 10:57 email.html
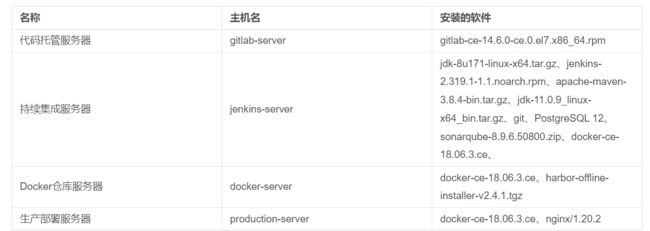
-rw-r--r--. 1 root root 1374 Dec 15 10:57 Jenkinsfile
-rw-r--r--. 1 root root  625 Dec 15 10:57 pom.xml
-rw-r--r--. 1 root root  579 Dec 15 10:57 sonar-project.properties
drwxr-xr-x. 3 root root   17 Dec 15 10:57 src
-rw-r--r--. 1 root root 1499 Dec 15 10:57 web_demo.iml
Maven安装和配置
在Jenkins集成服务器上,我们需要安装Maven来编译和打包项目。
- 安装Maven与配置环境变量
maven下载地址:https://maven.apache.org/download.cgi
wget https://dlcdn.apache.org/maven/maven-3/3.8.4/binaries/apache-maven-3.8.4-bin.tar.gz

tar -xzf apache-maven-3.8.4-bin.tar.gz -C /opt/install
cd /opt/install/apache-maven-3.8.4/

# pwd
/opt/install/apache-maven-3.8.4

--配置环境变量
# vim /etc/profile
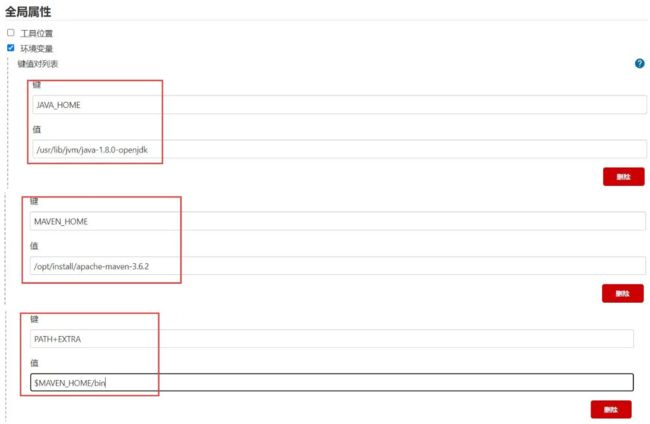
export JAVA_HOME=/opt/install/jdk1.8.0_171
export PATH=$PATH:$JAVA_HOME/bin
export MAVEN_HOME=/opt/install/apache-maven-3.8.4
export PATH=$PATH:$MAVEN_HOME/bin

# source /etc/profile
# mvn -v
Apache Maven 3.8.4 (9b656c72d54e5bacbed989b64718c159fe39b537)
Maven home: /opt/install/apache-maven-3.8.4
Java version: 1.8.0_171, vendor: Oracle Corporation, runtime: /opt/install/jdk1.8.0_171/jre
Default locale: en_US, platform encoding: UTF-8
OS name: "linux", version: "3.10.0-1160.49.1.el7.x86_64", arch: "amd64", family: "unix"

--修改本地仓库目录为/opt/install/apache-maven-3.8.4/repo
# vim /opt/install/apache-maven-3.8.4/conf/settings.xml
<localRepository>/opt/install/apache-maven-3.8.4/repo</localRepository>
(2)系统管理 -> 全局工具配置 -> Maven -> 新增Maven。

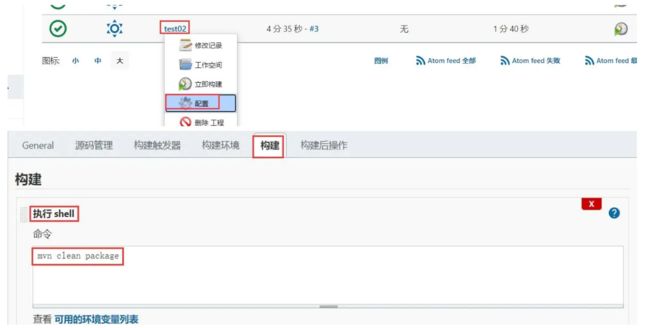
再次构建,控制台看到把项目打成 war,代码Maven配置成功。

Jenkins+Docker+springCloud
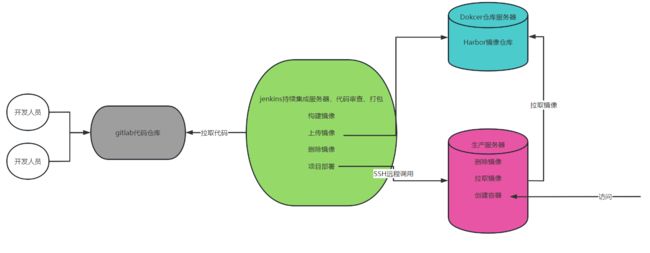
大致流程说明:
1)开发人员每天把代码提交到Gitlab代码仓库。
2)Jenkins从Gitlab中拉取项目源码,编译并打成jar包,然后构建成Docker镜像,将镜像上传到Harbor私有仓库。
3)Jenkins发送SSH远程命令,让生产部署服务器到Harbor私有仓库拉取镜像到本地,然后创建容器。
4)最后,用户可以访问到容器。
安装Docker
- 卸载旧版本
yum list installed | grep docker
yum -y remove docker的包名称
--删除docker的所有镜像和容器
rm -rf /var/lib/docker
- 安装必要的软件包
yum install -y yum-utils \
device-mapper-persistent-data \
lvm2
- 设置下载的镜像仓库
yum-config-manager \
--add-repo \
https://download.docker.com/linux/centos/docker-ce.repo
- 列出有哪些docker版本
# yum list docker-ce --showduplicates | sort -r
docker-ce.x86_64            18.06.3.ce-3.el7                    docker-ce-stable
docker-ce.x86_64            18.06.2.ce-3.el7                    docker-ce-stable
docker-ce.x86_64            18.06.1.ce-3.el7                    docker-ce-stable
docker-ce.x86_64            18.06.0.ce-3.el7                    docker-ce-stable
docker-ce.x86_64            18.03.1.ce-1.el7.centos             docker-ce-stable
- 安装指定版本(这里使用18.06.3.ce-3.el7版本)
yum install docker-ce-18.06.3.ce
- 查看版本
# docker -v
Docker version 18.06.3-ce, build d7080c1
- 启动Docker
# systemctl start docker
# systemctl enable docker
# systemctl status docker
● docker.service - Docker Application Container Engine
   Loaded: loaded (/usr/lib/systemd/system/docker.service; enabled; vendor preset: disabled)
   Active: active (running)
- 添加阿里云镜像下载地址
# vim /etc/docker/daemon.json
{
	"registry-mirrors": ["https://zydiol88.mirror.aliyuncs.com"]
}
- 重启Docker
# systemctl restart docker
# systemctl status docker
● docker.service - Docker Application Container Engine
   Loaded: loaded (/usr/lib/systemd/system/docker.service; enabled; vendor preset: disabled)
   Active: active (running)
使用Dockerfile制作微服务镜像
下面演示利用Dockerfile制作一个Eureka注册中心的镜像。
- 上传 tensquare-eureka-server-1.0-SNAPSHOT.jar 包到 production-server 机器上
- 编写Dockerfile文件
# vim Dockerfile
FROM openjdk:8-jdk-alpine
ARG JAR_FILE
COPY ${JAR_FILE} /target/tensquare-eureka-server-1.0-SNAPSHOT.jar
EXPOSE 10086
ENTRYPOINT ["java","-jar","/target/tensquare-eureka-server-1.0-SNAPSHOT.jar"]
- 构建镜像
docker build --build-arg JAR_FILE=tensquare-eureka-server-1.0-SNAPSHOT.jar -t tensquare-eureka-server:v1.0 .
- 查看镜像是否构建成功
# docker images
REPOSITORY                TAG                 IMAGE ID            CREATED             SIZE
tensquare-eureka-server   v1.0                70b977ee0289        35 seconds ago      150MB
- 创建容器
docker run -i --name=tensquare-eureka-server -p 10086:10086 tensquare-eureka-server:v1.0
- 浏览器访问容器:http://192.168.1.30:10086/
安装Harbor
- 安装Docker并启动Docker(已完成)
- 安装docker-compose
sudo curl -L https://github.com/docker/compose/releases/download/1.21.2/docker-compose-$(uname -s)-$(uname -m)  \
-o /usr/local/bin/docker-compose
- 给docker-compose添加执行权限
sudo chmod +x /usr/local/bin/docker-compose
- 查看docker-compose是否安装成功
# docker-compose -version
docker-compose version 1.21.2, build a133471
- 下载Harbor压缩包并解压
下载地址:https://github.com/goharbor/harbor/releases
wget https://github.com/goharbor/harbor/releases/download/v2.4.1/harbor-offline-installer-v2.4.1.tgz

tar -xzf harbor-offline-installer-v2.4.1.tgz -C /opt/install
- 修改Harbor的配置
cd /opt/install/harbor/
cp harbor.yml.tmpl harbor.yml

# vim harbor.yml
hostname: 192.168.1.29
port: 85

--将https的都注释掉
#https:
  # https port for harbor, default is 443
 # port: 443
  # The path of cert and key files for nginx
 # certificate: /your/certificate/path
 # private_key: /your/private/key/path
- 安装Harbor
./prepare
./install.sh
- 启动Harbor
--启动。 ps. 如果下面的命令启动失败则用该命令 docker-compose -f /opt/install/harbor/harbor.yml up -d 启动
docker-compose up -d
--停止
docker-compose stop
--重启
docker-compose restart
- 浏览器访问Harbor:http://192.168.1.29:85
默认账户admin,默认密码Harbor12345。
在Harbor创建用户和项目
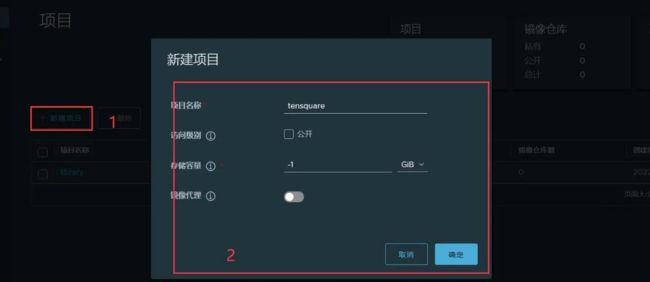
- 创建项目tensquare
Harbor的项目分为公开和私有的:
公开项目:所有用户都可以访问,通常存放公共的镜像,默认有一个library公开项目。
私有项目:只有授权用户才可以访问,通常存放项目本身的镜像。
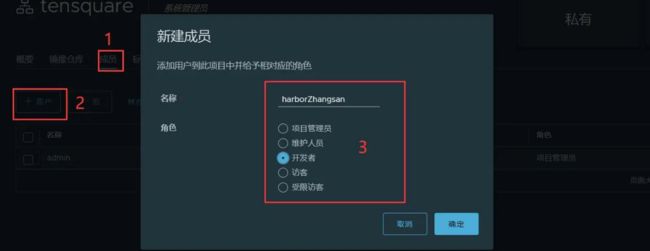
| 角色 | 权限说明 |
|---|---|
| 访客 | 对于指定项目拥有只读权限 |
| 开发人员 | 对于指定项目拥有读写权限 |
| 维护人员 | 对于指定项目拥有读写权限,创建 Webhooks |
| 项目管理员 | 除了读写权限,同时拥有用户管理/镜像扫描等管理权限 |
- 把镜像上传到Harbor
下面演示将production-server机器上的镜像上传到位于docker-server机器上的Harbor。
1. 在production-server机器上完成下面步骤

(1) 把Harbor地址加入到Docker信任列表
# vim /etc/docker/daemon.json
{
    "registry-mirrors":[
        "https://zydiol88.mirror.aliyuncs.com"
    ],
    "insecure-registries":[
        "192.168.1.29:85" --这个是harbor地址
    ]
}

(2) 重启docker
systemctl restart docker

(3) 登录Harbor
docker login -u harbor账号 -p harbor密码 192.168.1.29:85

(4) 给需要上传到Harbor的镜像打标签
--查看当前机器有哪些镜像
# docker images
REPOSITORY                                              TAG                 IMAGE ID            CREATED             SIZE
tensquare-eureka-server                                 v1.0                b82ccd24a80b        About an hour ago   150MB

--给 tensquare-eureka-server 镜像打标签
docker tag tensquare-eureka-server:v1.0 192.168.1.29:85/tensquare/tensquare-eureka-server:v1.0

(5) 推送镜像到Harbor
docker push 192.168.1.29:85/tensquare/tensquare-eureka-server:v1.0
从Harbor下载镜像
下面演示从Harbor上下载镜像。
- 在需要从Harbor上拉取镜像的机器需要完成如下步骤
(1) 安装Docker,并启动Docker

(2) 把Harbor地址加入到Docker信任列表
# vim /etc/docker/daemon.json
{
    "registry-mirrors":[
        "https://zydiol88.mirror.aliyuncs.com"
    ],
    "insecure-registries":[
        "192.168.1.29:85" --这个是harbor地址
    ]
}

(3) 重启docker
systemctl restart docker

(4) 登录Harbor
docker login -u harbor账号 -p harbor密码 192.168.1.29:85
docker pull 192.168.1.29:85/tensquare/tensquare-eureka-server@sha256:f8e52604958377d7934d3f211d0537df2fbd41a085e7f48673f963ce03b82a54

或者如下拉取:
docker pull 192.168.1.29:85/tensquare/tensquare-eureka-server:v1.0
Nginx安装与配置
(1) 安装必要环境
yum -y install gcc gcc-c++ make libtool zlib zlib-devel openssl openssl-devel pcre pcre-devel

(2) 解压并安装
tar -zxvf nginx-1.20.2.tar.gz -C /opt/install/
cd /opt/install/nginx-1.20.2
./configure
make
make install

--采用默认的配置安装,则启动命令在/usr/local/nginx/sbin
# cd /usr/local/nginx/sbin
# ./nginx -v
nginx version: nginx/1.20.2

--启动
# ./nginx
--停止
# ./nginx -s stop
--退出
# ./nginx -s quit
--重启
# ./nginx -s reload

--查看是否启动了
# ps -ef | grep nginx
root     11112     1  0 23:30 ?        00:00:00 nginx: master process ./nginx
nobody   11113 11112  0 23:30 ?        00:00:00 nginx: worker process
root     11115  8395  0 23:30 pts/0    00:00:00 grep --color=auto nginx
Jenkins上配置
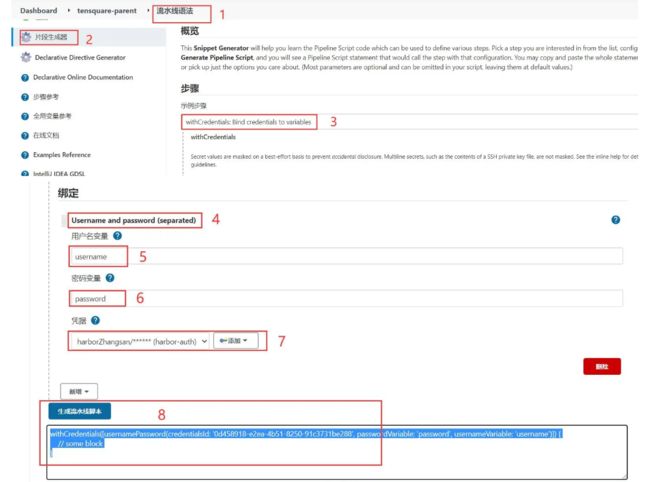
withCredentials([usernamePassword(credentialsId: '0d458918-e2ea-4b51-8250-91c3731be288', passwordVariable: 'password', usernameVariable: 'username')]) {
    // some block
}
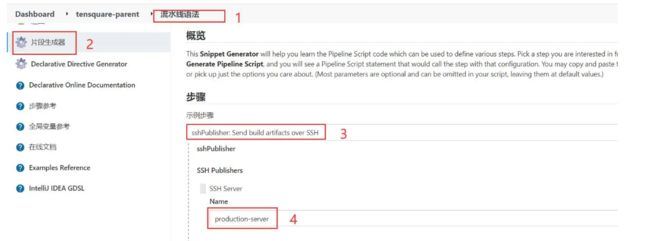
- 在Jenkins上安装插件 Publish Over SSH
该插件,可以实现远程发送Shell命令。 - 配置远程部署服务器
(1)拷贝 jenkins-server 机器上的公钥到远程部署服务器 production-server。
--在jenkins机器执行下面命令,将公钥复制到 192.168.1.30(production-server)
ssh-copy-id 192.168.1.30
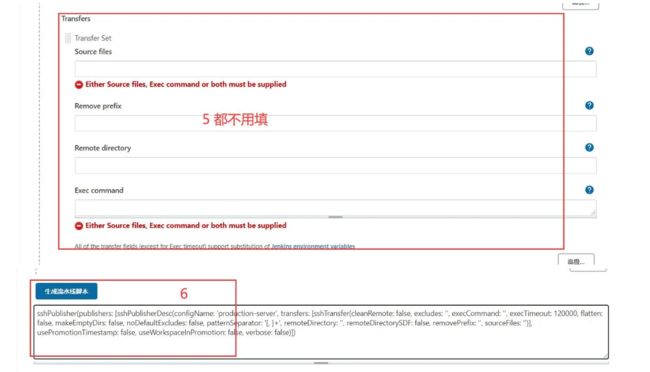
(2)系统管理 -> 系统配置 -> Publish over SSH。

sshPublisher(publishers: [sshPublisherDesc(configName: 'production-server', transfers: [sshTransfer(cleanRemote: false, excludes: '', execCommand: '', execTimeout: 120000, flatten: false, makeEmptyDirs: false, noDefaultExcludes: false, patternSeparator: '[, ]+', remoteDirectory: '', remoteDirectorySDF: false, removePrefix: '', sourceFiles: '')], usePromotionTimestamp: false, useWorkspaceInPromotion: false, verbose: false)])
微服务项目配置
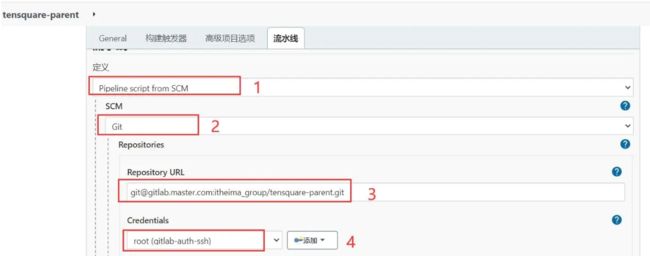
//gitlab凭证ID
def git_auth = "e4e02eb6-f6bb-4040-b842-c1423c397493"
//gitlab的url地址
def git_url = "[email protected]:itheima_group/tensquare-parent.git"
//镜像的版本号
def tag = "latest"
//Harbor的url地址
def harbor_url = "reg.myharbor.com:85"
//harbor镜像库项目名称
def harbor_project_name = "tensquare"
//Harbor的登录凭证ID
def harbor_auth = "0d458918-e2ea-4b51-8250-91c3731be288"

node {
    stage('拉取代码') {
        checkout([$class                             : 'GitSCM', branches: [[name: '*/${branch}']]
                  , doGenerateSubmoduleConfigurations: false
                  , extensions                       : []
                  , submoduleCfg                     : []
                  , userRemoteConfigs                : [
                [credentialsId: "${git_auth}", url: "${git_url}"]
        ]])
    }
    stage('代码审查') {
        //定义当前Jenkins的SonarQubeScanner工具
        def scannerHome = tool 'sonarqube-scanner'
        //引用当前JenkinsSonarQube环境
        withSonarQubeEnv('sonarqube-8.9.6.50800') {
            sh """
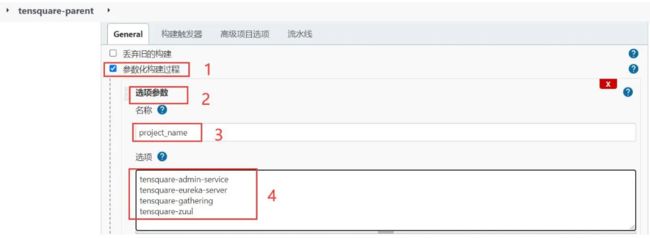
                         cd ${project_name}
                         ${scannerHome}/bin/sonar-scanner
                 """
        }
    }
    stage('编译/构建镜像') {
        //定义镜像名称
        def imageName = "${project_name}:${tag}"
        //编译,安装公共工程
        sh "mvn -f tensquare-common clean install"
        //编译,构建本地镜像
        sh "mvn -f ${project_name} clean package dockerfile:build"
        //给镜像打标签
        sh "docker tag ${imageName} ${harbor_url}/${harbor_project_name}/${imageName}"
        //登录harbor并上传镜像
        withCredentials([
                usernamePassword(credentialsId: "${harbor_auth}"
                        , passwordVariable: 'password'
                        , usernameVariable: 'username')]) {
            //登录Harbor
            sh "docker login -u ${username} -p ${password} ${harbor_url}"
            //推送镜像到Harbor
            sh "docker push ${harbor_url}/${harbor_project_name}/${imageName}"
        }

        //上传完成后删除本地镜像
        sh "docker rmi -f ${imageName}"
        sh "docker rmi -f ${harbor_url}/${harbor_project_name}/${imageName}"
    }
    stage('部署服务') {
        sshPublisher(
                publishers: [
                        sshPublisherDesc(
                                configName: 'production-server'
                                , transfers: [
                                sshTransfer(
                                        cleanRemote: false
                                        , excludes: ''
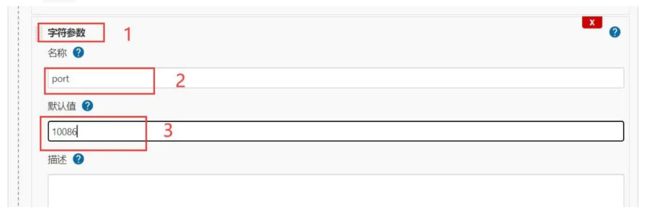
                                        , execCommand: "/opt/jenkins_shell/tensquare/deploy.sh $harbor_url $harbor_project_name $project_name $tag $port"
                                        , execTimeout: 120000
                                        , flatten: false
                                        , makeEmptyDirs: false
                                        , noDefaultExcludes: false
                                        , patternSeparator: '[, ]+'
                                        , remoteDirectory: ''
                                        , remoteDirectorySDF: false
                                        , removePrefix: ''
                                        , sourceFiles: ''
                                )]
                                , usePromotionTimestamp: false
                                , useWorkspaceInPromotion: false
                                , verbose: false)
                ])
    }
}
- 在部署服务器 production-server 机器上编写部署脚本
(1)/opt/jenkins_shell/tensquare/deploy.sh。
#!/bin/sh

#接收外部参数
harbor_url=$1
harbor_project_name=$2
project_name=$3
tag=$4
port=$5

imageName=$harbor_url/$harbor_project_name/$project_name:$tag
echo "$imageName"

#查询容器是否存在,存在则删除
containerId=`docker ps -a | grep -w ${project_name}:${tag} | awk '{print $1}'`
if [ "$containerId" != "" ] ; then
    #停掉容器
    docker stop $containerId
    #删除容器
    docker rm $containerId
    echo "成功删除容器"
fi

#查询镜像是否存在,存在则删除
imageId=`docker images | grep -w $project_name | awk '{print $3}'`
if [ "$imageId" != "" ] ; then
    #删除镜像
    docker rmi -f $imageId
    echo "成功删除镜像"JAR_FILE
fi

# 登录Harbor私服
docker login -u harborZhangsan -p harborZhang3 $harbor_url
# 下载镜像
docker pull $imageName
# 启动容器
docker run -di -p $port:$port $imageName
echo "容器启动成功"
(2)给该脚本执行权限。
chmod +x deploy.sh
3.为每个微服务项目编写各自的sonar-project.properties文件
下面是微服务项目 tensquare-eureka-server 的一个例子,记得到Harbor上创建对应的项目哦。
# must be unique in a given SonarQube instance
sonar.projectKey=tensquare-eureka-server
# this is the name and version displayed in the SonarQube UI. Was mandatory prior to SonarQube 6.1.
sonar.projectName=tensquare-eureka-server
sonar.projectVersion=1.0

# Path is relative to the sonar-project.properties file. Replace "\" by "/" on Windows.
# This property is optional if sonar.modules is set.
sonar.sources=.
sonar.exclusions=**/test/**,**/target/**
sonar.java.binaries=.

sonar.java.source=1.8
sonar.java.target=1.8
#sonar.java.libraries=**/target/classes/**

# Encoding of the source code. Default is default system encoding
sonar.sourceEncoding=UTF-8
4.为每个微服务项目编写各自的Dockerfile文件
(1)每个微服务项目的pom.xml添加如下插件。
<build>
    <plugins>
        <plugin>
            <groupId>org.springframework.boot</groupId>
            <artifactId>spring-boot-maven-plugin</artifactId>
        </plugin>
        <plugin>
            <groupId>com.spotify</groupId>
            <artifactId>dockerfile-maven-plugin</artifactId>
            <version>1.3.6</version>
            <configuration>
                <repository>${project.artifactId}</repository>
                <buildArgs>
                    <JAR_FILE>target/${project.build.finalName}.jar</JAR_FILE>
                </buildArgs>
            </configuration>
        </plugin>
    </plugins>
</build>
(2)tensquare-eureka-server 微服务的Dockerfile文件示例。
#FROM java:8
FROM openjdk:8-jdk-alpine
ARG JAR_FILE
COPY ${JAR_FILE} app.jar

EXPOSE 10086 --注意每个微服务项目的端口都不一样

ENTRYPOINT ["java","-jar","/app.jar"]
部署前端静态web网站

生产部署服务器 production-server 已经安装了Nginx
2. Jenkins上安装NodeJS插件
3. Jenkins配置NodeJS服务器
Manage Jenkins(系统管理) -> Global Tool Configuration(全局工具配置) -> NodeJS。

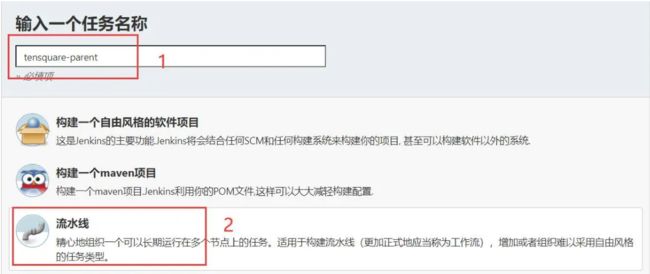
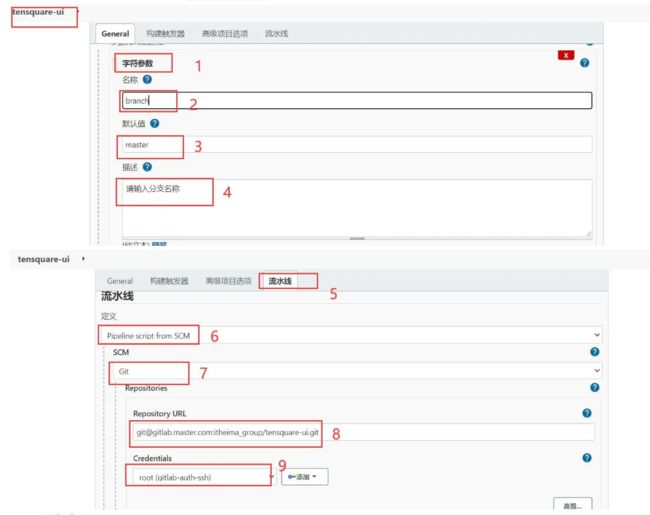
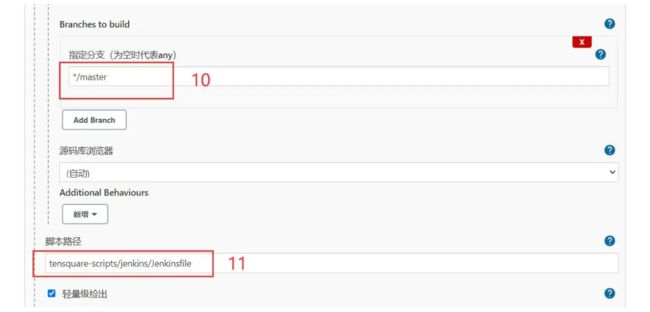
- 在Jenkins上创建前端流水线项目tensquare-ui
- 编写Jenkinsfifile构建脚本
