SpringAMQP使用
说明:SpringAMQP(官网:https://spring.io/projects/spring-amqp)是基于RabbitMQ封装的一套模板,并利用了SpringBoot对其实现了自动装配,使用起来非常方便。安装和原始使用参考:http://t.csdn.cn/51qyD
基础操作
创建两个模块,一个用于发送消息(sender),一个用于接收消息(receiver),两个模块拥有共同的父模块
第一步:添加依赖
在父模块的pom.xml文件中,添加依赖,如下:
    <parent>
        <groupId>org.springframework.bootgroupId>
        <artifactId>spring-boot-starter-parentartifactId>
        <version>2.3.9.RELEASEversion>
        <relativePath/>
    parent>

    <dependencies>

        <dependency>
            <groupId>org.projectlombokgroupId>
            <artifactId>lombokartifactId>
        dependency>


        <dependency>
            <groupId>org.springframework.bootgroupId>
            <artifactId>spring-boot-starter-amqpartifactId>
        dependency>


        <dependency>
            <groupId>org.springframework.bootgroupId>
            <artifactId>spring-boot-starter-testartifactId>
        dependency>
    dependencies>
第二步:创建配置文件
配置文件(application.yml)内容如下,两个模块的内容一样
spring:
  rabbitmq:
    # MQ ip地址
    host: XXX.XXX.XXX.XXX
    # MQ的端口号
    port: 5672
    # 虚拟主机 每个用户单独对应一个 不同用户之间无法访问彼此的虚拟主机
    virtual-host: /
    # 用户名
    username: root
    # 密码
    password: 123456
第三步:创建Listener类
在接收方,创建监听类,用来接收消息,如下:
import org.springframework.amqp.rabbit.annotation.RabbitListener;
import org.springframework.stereotype.Component;

@Component
public class RabbitListenerDemo {

    @RabbitListener(queues = "demo.queue")
    public void listenDemoQueueMessage(String msg){
        System.out.println("msg = " + msg);
    }
}
第四步:编写发送端代码
在发送方的测试类中,写测试代码,发消息给接收方,其中RunWith()注解用于构建程序运行的上下文环境;
import org.junit.Test;
import org.junit.runner.RunWith;
import org.springframework.amqp.rabbit.core.RabbitTemplate;
import org.springframework.beans.factory.annotation.Autowired;
import org.springframework.boot.test.context.SpringBootTest;
import org.springframework.test.context.junit4.SpringRunner;

@RunWith(SpringRunner.class)
@SpringBootTest
public class SenderTest {

    @Autowired
    private RabbitTemplate rabbitTemplate;

    @Test
    public void testSender() {
        rabbitTemplate.convertAndSend("demo.queue","hello rabbit mq!");
    }
}
第五步:启动
先启动接收方(这是因为,如果队列在RabbitMQ管理平台上不存在的话,先启动发送方会造成消息丢失,而先启动接收方,RabbitMQ会根据队列名先创建出队列),再启动发送方;
可以看到,测试完成,接收方可以接收到消息
工作队列
实际的业务情况是一个发送方,可能会有多个接收方来接收,而且接收方处理效率可能各不相同。这样,接收方的代码可以写成这样,使用线程休眠模拟接收方执行的效率,再设置变量用于统计各个接收方执行的次数:
(RabbitListenerDemo.java)
import org.springframework.amqp.rabbit.annotation.RabbitListener;
import org.springframework.stereotype.Component;

@Component
public class RabbitListenerDemo {

    private static int count1 = 0;
    private static int count2 = 0;
    private static int count3 = 0;

    @RabbitListener(queues = "demo.queue")
    public void listenDemoQueueMessage1(String msg) throws InterruptedException {
        System.out.println("msg1 = " + msg + "======= count1 =" + (++count1));
        Thread.sleep(10);
    }

    @RabbitListener(queues = "demo.queue")
    public void listenDemoQueueMessage2(String msg) throws InterruptedException {
        System.out.println("msg2 = " + msg + "======= count2 =" + (++count2));
        Thread.sleep(20);
    }

    @RabbitListener(queues = "demo.queue")
    public void listenDemoQueueMessage3(String msg) throws InterruptedException {
        System.out.println("msg3 = " + msg + "======= count3 =" + (++count3));
        Thread.sleep(50);
    }
}
(SenderTest:循环发送200次,休眠10毫秒)
import org.junit.Test;
import org.junit.runner.RunWith;
import org.springframework.amqp.rabbit.core.RabbitTemplate;
import org.springframework.beans.factory.annotation.Autowired;
import org.springframework.boot.test.context.SpringBootTest;
import org.springframework.test.context.junit4.SpringRunner;

@RunWith(SpringRunner.class)
@SpringBootTest
public class SenderTest {

    @Autowired
    private RabbitTemplate rabbitTemplate;

    @Test
    public void testSender() throws InterruptedException {
        for (int i = 0; i < 200; i++) {
            rabbitTemplate.convertAndSend("demo.queue","hello rabbit mq!======>" + i);
            Thread.sleep(10);
        }
    }
}
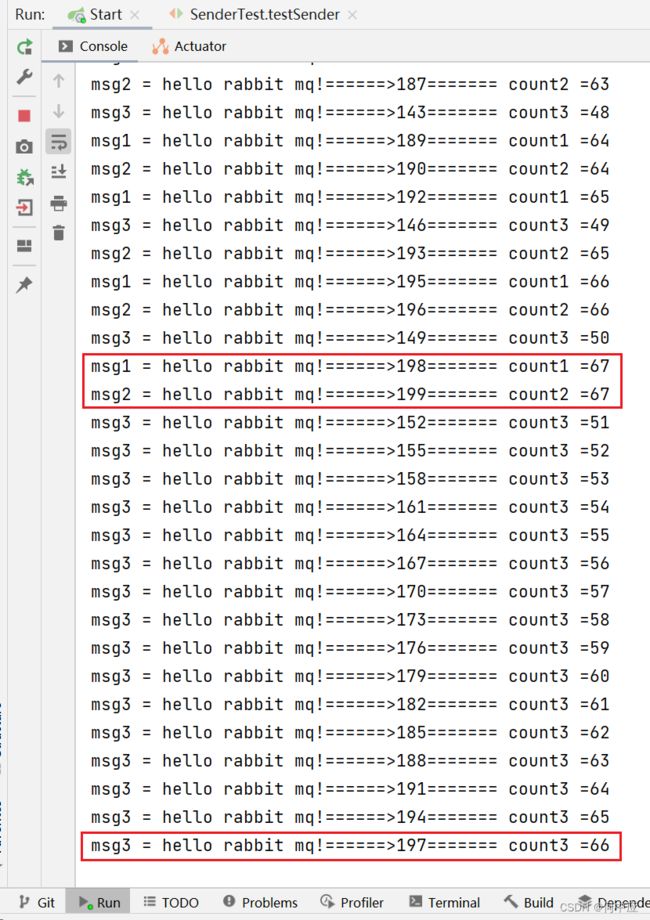
启动,可以看到执行效率最低的3号,也和1号、2号接收到了等量的消息量,
这是因为RabbitMQ有默认的分配策略,使每个接收方都可以接收到等量的消息量,而不是处理越快的处理越多。可以在接收方的配置文件中,添加这个配置,表示每个接收方只能一个消息一个消息处理(可以推测默认是先按照接收方数量,把请求都平均分配好之后,再让它们各自处理的);
spring:
  rabbitmq:
    listener:
      simple:
        prefetch: 1
重启测试,可以看到,达到了“能者多劳”的效果
发布/订阅
发布/订阅,是指在消息发给队列前,对消息所绑定的队列信息做判断,然后按照绑定的队列对消息进行分发;
根据分发的情况,可分为以下三种:
-
广播(Fanout):消息分发给所有队列;
-
路由(Direct):消息只分发给拥有关键字(RoutingKey)的队列;
-
主题(Topic):消息只分发给符合条件的队列;
Fanout(广播)
创建一个广播配置类,用于绑定队列与广播交换机(FanoutExchange);
import org.springframework.amqp.core.Binding;
import org.springframework.amqp.core.BindingBuilder;
import org.springframework.amqp.core.FanoutExchange;
import org.springframework.amqp.core.Queue;
import org.springframework.context.annotation.Bean;
import org.springframework.context.annotation.Configuration;


/**
 * 广播配置类
 */
@Configuration
public class FanoutConfig {

    /**
     * 声明交换机
     * @return
     */
    @Bean
    public FanoutExchange fanoutExchange(){
        return new FanoutExchange("essay.fanout");
    }

    /**
     * 生成第一个队列
     * @return
     */
    @Bean
    public Queue fanoutQueue1(){
        return new Queue("fanout.queue1");
    }

    /**
     * 绑定队列和交换机
     *
     * @return
     */
    @Bean
    public Binding bindingQueue1(){
        return BindingBuilder.bind(fanoutQueue1()).to(fanoutExchange());
    }

    /**
     * 生成第二个队列
     * @return
     */
    @Bean
    public Queue fanoutQueue2(){
        return new Queue("fanout.queue2");
    }

    /**
     * 绑定队列和交换机
     *
     * @return
     */
    @Bean
    public Binding bindingQueue2(){
        return BindingBuilder.bind(fanoutQueue2()).to(fanoutExchange());
    }
}
接收方代码
    @RabbitListener(queues = "fanout.queue1")
    public void listenFanoutQueue1(String msg){
        System.out.println("接收者1接收到了消息:" + msg);
    }

    @RabbitListener(queues = "fanout.queue2")
    public void listenFanoutQueue2(String msg){
        System.out.println("接收者2接收到了消息:" + msg);
    }
发送方代码:消息并不直接发送给队列,而是发送个交换机;
    @Test
    public void fanoutExchangeTest(){
    	// 第二个参数是routeKey(路由转发关键字)不能不加,可以为空字符串
        rabbitTemplate.convertAndSend("essay.fanout","", "hello everyone!");
    }
测试结果,每个队列都接收到了消息,并发给各自的接收方
Direct(路由)
在接收方的接收方法上,创建对应的队列、路由交换机,并设置routeKey(路由关键字),接收者1号(group1, group2),接收者2号(group1, group3)
    @RabbitListener(bindings = @QueueBinding(
            value = @Queue(name = "direct.queue1"),
            exchange = @Exchange(name = "essay.direct",type = ExchangeTypes.DIRECT),
            key = {"group1", "group2"}
    ))
    public void listenDirectQueue1(String msg){
        System.out.println("接收者1号接收到了消息:" + msg);
    }

    @RabbitListener(bindings = @QueueBinding(
            value = @Queue(name = "direct.queue2"),
            exchange = @Exchange(name = "essay.direct",type = ExchangeTypes.DIRECT),
            key = {"group1", "group3"}
    ))
    public void listenDirectQueue2(String msg){
        System.out.println("接收者2号接收到了消息:" + msg);
    }
发送方发送消息,routeKey = group1
rabbitTemplate.convertAndSend("essay.direct","group1", "hello group1!");
发送方发送消息,routeKey = group2
rabbitTemplate.convertAndSend("essay.direct","group2", "hello group2!");
只有接收者1号拥有group2,故只有接收者1号接收到消息
Topic(主题)
与路由类似,不同的是ExchangeTypes的类型和key的组成,key由通配符和关键字组成
-
#:表示一个或多个字符;
-
*:表示一个字符;
如下面的三个key分别表示:
-
group.#:表示以“group”开头的消息都发过来;
-
#.class:表示以“class”结尾的消息都发过来;
-
*.person:表示两个字符,并以“person”结尾的消息都发过来;
    @RabbitListener(bindings = @QueueBinding(
            value = @Queue(name = "topic.queue1"),
            exchange = @Exchange(name = "essay.topic",type = ExchangeTypes.TOPIC),
            key = "group.#"
    ))
    public void listenTopicQueue1(String msg){
        System.out.println("接收者1号接收到了消息:" + msg);
    }

    @RabbitListener(bindings = @QueueBinding(
            value = @Queue(name = "topic.queue2"),
            exchange = @Exchange(name = "essay.topic",type = ExchangeTypes.TOPIC),
            key = "#.class"
    ))
    public void listenTopicQueue2(String msg){
        System.out.println("接收者2号接收到了消息:" + msg);
    }

    @RabbitListener(bindings = @QueueBinding(
            value = @Queue(name = "topic.queue3"),
            exchange = @Exchange(name = "essay.topic",type = ExchangeTypes.TOPIC),
            key = "*.person"
    ))
    public void listenTopicQueue3(String msg){
        System.out.println("接收者3号接收到了消息:" + msg);
    }
发送方测试
	// 1号接收
	rabbitTemplate.convertAndSend("essay.topic","group.b.c.d", "hello NO.1!");

	// 2号接收
	rabbitTemplate.convertAndSend("essay.topic","b.c.d.class", "hello NO.2!");

	// 3号接收
	rabbitTemplate.convertAndSend("essay.topic","b.person", "hello NO.3!");
启动,测试结果如下,可以看到达到了预期结果
总结
RabbitMQ是一门异步通信的技术,SpringAMQP是基于RabbitMQ的模版,可以省去原始操作RabbitMQ的繁琐(建立连接、设置连接参数、创建通道、创建队列、发送消息/接收消息)。
另外,可以使用SpringAMQP建立工作队列、发布/订阅等模式,其中工作队列可设置spring.rabbitmq.listener.simple.prefetch=1,达到“能者多劳”的效果;
而发布/订阅模式又分为广播、路由和主题,广播模式需要手动建立队列和路由交换机的关联,路由与主题的区别在于路由交换机的类型和路由关键字的格式。


