JS-26 认识防抖和节流函数;自定义防抖、节流函数;自定义深拷贝、事件总线函数
目录
- 1_防抖和节流
-
- 1.1_认识防抖和节流函数
- 1.2_认识防抖debounce函数
- 1.3_防抖函数的案例
- 1.4_认识节流throttle函数
- 2_Underscore实现防抖和节流
-
- 2.1_Underscore实现防抖和节流
- 2.2_自定义防抖函数
- 2.3_自定义节流函数
- 3_自定义深拷贝函数
- 4_自定义事件总线
1_防抖和节流
1.1_认识防抖和节流函数
防抖和节流的概念其实最早并不是出现在软件工程中,防抖是出现在电子元件中,节流出现在流体流动中
- 而JavaScript是事件驱动的,大量的操作会触发事件,加入到事件队列中处理。
- 而对于某些频繁的事件处理会造成性能的损耗,就可以通过防抖和节流来限制事件频繁的发生;
防抖和节流函数目前已经是前端实际开发中两个非常重要的函数,也是面试经常被问到的面试题。
但是很多前端开发者面对这两个功能,有点摸不着头脑:
- 某些开发者根本无法区分防抖和节流有什么区别(面试经常会被问到);
- 某些开发者可以区分,但是不知道如何应用;
- 某些开发者会通过一些第三方库来使用,但是不知道内部原理,更不会编写;
学习防抖和节流函数,不仅仅要区分清楚防抖和节流两者的区别,也要明白在实际工作中哪些场景会用到;
1.2_认识防抖debounce函数
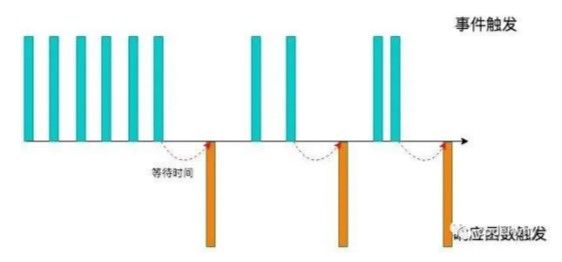
- 当事件触发时,相应的函数并不会立即触发,而是会等待一定的时间;
- 当事件密集触发时,函数的触发会被频繁的推迟;
- 只有等待了一段时间也没有事件触发,才会真正的执行响应函数;
防抖的应用场景很多:
- 输入框中频繁的输入内容,搜索或者提交信息;
- 频繁的点击按钮,触发某个事件;
- 监听浏览器滚动事件,完成某些特定操作;
- 用户缩放浏览器的resize事件;
1.3_防抖函数的案例
场景,在某个搜索框中输入自己想要搜索的内容
比如想要搜索一个MacBook:
- 当输入m时,为了更好的用户体验,通常会出现对应的联想内容,这些联想内容通常是保存在服务器的,所以需要一次网络请求;
- 当继续输入ma时,再次发送网络请求;
- 那输入macbook一共需要发送7次网络请求;
- 这大大损耗整个系统的性能,无论是前端的事件处理,还是对于服务器的压力;
问题:真的需要这么多次的网络请求吗?
- 不需要,正确的做法应该是在合适的情况下再发送网络请求;
- 比如如果用户快速的输入一个macbook,那只发送一次网络请求;
- 比如如果用户是输入一个m想了一会儿,这个时候m确实应该发送一次网络请求;
- 也就应该监听用户在某个时间,比如500ms内,没有再次触发时间时,再发送网络请求;
这就是防抖的操作:只有在某个时间内,没有再次触发某个函数时,才真正的调用这个函数;
1.4_认识节流throttle函数
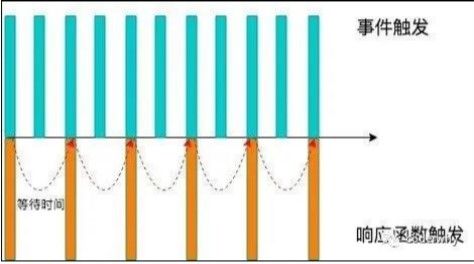
当事件触发时,会执行这个事件的响应函数;
- 如果这个事件会被频繁触发,那么节流函数会按照一定的频率来执行函数;
- 不管在这个中间有多少次触发这个事件,执行函数的频繁总是固定的;
节流的应用场景:
-
监听页面的滚动事件;
-
鼠标移动事件;
-
用户频繁点击按钮操作;
-
游戏中的一些设计;
2_Underscore实现防抖和节流
2.1_Underscore实现防抖和节流
可以通过一些第三方库来实现防抖操作: lodash、 underscore
使用underscore
- 可以理解成lodash是underscore的升级版,它更重量级,功能也更多;
- 但是目前underscore还在维护,lodash已经很久没有更新了;
Underscore的官网: https://underscorejs.org/
Underscore的安装有很多种方式:
- 下载Underscore,本地引入;
  <!-- 本地引入: 下载js文件, 并且本地引入 -->
  <script src="./js/underscore.js"></script>
- 通过CDN直接引入;
  <!-- CDN引入: 网络的js文件 -->
<script src="https://cdn.jsdelivr.net/npm/[email protected]/underscore-umd-min.js"></script>
- 通过包管理工具(npm)管理安装;(略)
补充:引入这个库后,如何操作防抖函数?(基本实现防抖而已)
// 2.underscore防抖处理代码
 let counter = 1
inputEl.oninput = _.debounce(function() {
   console.log(`发送网络请求${counter++}:`, this.value)
}, 1000)
2.2_自定义防抖函数
防抖基本功能实现:可以实现防抖效果【面试】
<body>
  <button>按钮</button>
  <input type="text">

  <script>
      //自己实现防抖的基本功能
    function mydebounce(fn, delay) {
      // 1.用于记录上一次事件触发的timer
      let timer = null
      // 2.触发事件时执行的函数
      const _debounce = () => {
        // 2.1.如果有再次触发(更多次触发)事件, 那么取消上一次的事件
        if (timer) clearTimeout(timer)
        // 2.2.延迟去执行对应的fn函数(传入的回调函数)
        timer = setTimeout(() => {
          fn()
          timer = null // 执行过函数之后, 将timer重新置null
        }, delay);
      }
      // 返回一个新的函数
      return _debounce
    }
  </script>

  <script>
    // 1.获取input元素
    const inputEl = document.querySelector("input")
   // 3.自己实现的防抖
    let counter = 1
    inputEl.oninput = mydebounce(function() {
      console.log(`发送网络请求${counter++}`)
    }, 1000)

  </script>
- 优化一:优化参数和this指向
<body>
  <button>按钮</button>
  <input type="text">
  <script>
    function mydebounce(fn, delay) {
      // 1.用于记录上一次事件触发的timer
      let timer = null
      // 2.触发事件时执行的函数
      const _debounce = function(...args) {
        // 2.1.如果有再次触发(更多次触发)事件, 那么取消上一次的事件
        if (timer) clearTimeout(timer)
        // 2.2.延迟去执行对应的fn函数(传入的回调函数)
        timer = setTimeout(() => {
          fn.apply(this, args)  //事件绑定this
          timer = null // 执行过函数之后, 将timer重新置null
        }, delay);
      }
      // 返回一个新的函数
      return _debounce
    }
  </script>

  <script>
    // 1.获取input元素
    const inputEl = document.querySelector("input")

    // 3.自己实现的防抖
    let counter = 1
    inputEl.oninput = mydebounce(function(event) {  //参数event,是为了让this绑定input事件
      console.log(`发送网络请求${counter++}:`, this, event)
    }, 1000)

  </script>
</body>
- 优化二:优化取消操作(增加取消功能)
//body 添加“取消按钮”
  <button class="cancel">取消</button>

  //function mydebounce(fn, delay) {} 添加“取消”事件的代码
 function mydebounce(fn, delay) {
      // 1.用于记录上一次事件触发的timer
      let timer = null
      // 2.触发事件时执行的函数
      const _debounce = function(...args) {
        // 2.1.如果有再次触发(更多次触发)事件, 那么取消上一次的事件
        if (timer) clearTimeout(timer)
        // 2.2.延迟去执行对应的fn函数(传入的回调函数)
        timer = setTimeout(() => {
          fn.apply(this, args)  //事件绑定this
          timer = null // 执行过函数之后, 将timer重新置null
        }, delay);
      }
// 3.给_debounce绑定一个取消的函数
      _debounce.cancel = function() {
        if (timer) clearTimeout(timer)
      }
      // 返回一个新的函数
      return _debounce
    }

//“取消”按钮,添加“取消”事件的功能
 cancelBtn.onclick = function() {
      debounceFn.cancel()
    }
- 优化三:优化立即执行效果(第一次立即执行)
// 原则: 一个函数进行做一件事情, 一个变量也用于记录一种状态
function mydebounce(fn, delay, immediate = false) {
      // 1.用于记录上一次事件触发的timer
      let timer = null
      let isInvoke = false
      // 2.触发事件时执行的函数
      const _debounce = function(...args) {
        // 2.1.如果有再次触发(更多次触发)事件, 那么取消上一次的事件
        if (timer) clearTimeout(timer)
// 第一次操作不需要延迟,立即执行
        if (immediate && !isInvoke) {
          fn.apply(this, args)
          isInvoke = true
          return
        }
        // 2.2.延迟去执行对应的fn函数(传入的回调函数)
        timer = setTimeout(() => {
          fn.apply(this, args)
          timer = null // 执行过函数之后, 将timer重新置null
          isInvoke = false
        }, delay);
      }
      // 3.给_debounce绑定一个取消的函数
      _debounce.cancel = function() {
        if (timer) clearTimeout(timer)
        timer = null
        isInvoke = false
      }
      // 返回一个新的函数
      return _debounce
    }
- 优化四:优化返回值
    // 原则: 一个函数进行做一件事情, 一个变量也用于记录一种状态
    function mydebounce(fn, delay, immediate = false, resultCallback) {
      // 1.用于记录上一次事件触发的timer
      let timer = null
      let isInvoke = false

      // 2.触发事件时执行的函数
      const _debounce = function(...args) {
        return new Promise((resolve, reject) => { //用Promise决定返回值的类型
          try {
            // 2.1.如果有再次触发(更多次触发)事件, 那么取消上一次的事件
            if (timer) clearTimeout(timer)
            // 第一次操作不需要延迟,立即执行
            let res = undefined
            if (immediate && !isInvoke) {
              res = fn.apply(this, args)
              if (resultCallback) resultCallback(res)
              resolve(res)
              isInvoke = true
              return
            }
            // 2.2.延迟去执行对应的fn函数(传入的回调函数)
            timer = setTimeout(() => {
              res = fn.apply(this, args)
              if (resultCallback) resultCallback(res)
              resolve(res)
              timer = null // 执行过函数之后, 将timer重新置null
              isInvoke = false
            }, delay);
          } catch (error) {
            reject(error)
          }
        })
      }
      // 3.给_debounce绑定一个取消的函数
      _debounce.cancel = function() {
        if (timer) clearTimeout(timer)
        timer = null
        isInvoke = false
      }
      // 返回一个新的函数
      return _debounce
    }


    // 2.手动绑定函数和执行
    const myDebounceFn = mydebounce(function(name, age, height) {
      console.log("----------", name, age, height)
      return "coderhhh 哈哈哈哈"
    }, 1000, false)

    myDebounceFn("wmy", 18, 1.88).then(res => {
      console.log("拿到执行结果:", res)
    })
2.3_自定义节流函数
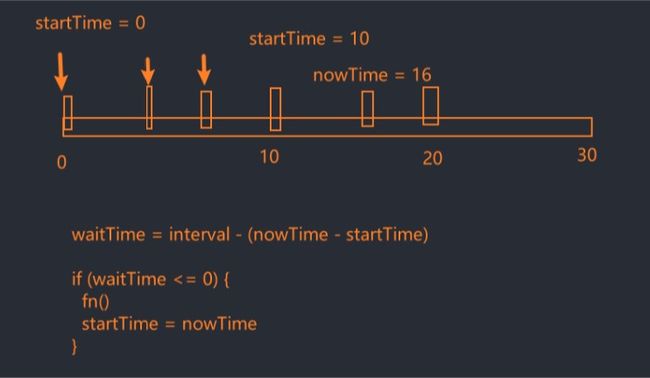
interval表示间隔时间,nowtime-startime,是为了计算距离函数开始执行经过多少时间,当这个经过时间等于间隔时间的时候,说明该再次执行某函数。
节流函数的基本实现:可以实现节流效果【面试】
<body>

  <button>按钮</button>
  <input type="text">

  <script>
  //基本实现节流函数  。fn代表要执行的函数,interval表示间隔时间
    function mythrottle(fn, interval) {
      let startTime = 0

      const _throttle = function() {
        const nowTime = new Date().getTime()
        const waitTime = interval - (nowTime - startTime)
        if (waitTime <= 0) {
          fn()
          startTime = nowTime
        }
      }

      return _throttle
    }
  </script>
<script>
    // 获取input元素
    const inputEl = document.querySelector("input")
    // 自己实现的节流函数
    let counter = 1
    inputEl.oninput = mythrottle(function() {
      console.log(`发送网络请求${counter++}:`, this.value)
    }, 1000)

  </script>
优化一:节流立即执行
    // 加入”立即执行“状态变量leading
    function mythrottle(fn, interval, leading = true) {
      let startTime = 0
      const _throttle = function(...args) {
        // 1.获取当前时间
        const nowTime = new Date().getTime()
        // 如果立即执行状态变量为false
        if (!leading && startTime === 0) {
          startTime = nowTime
        }
        // 2.计算需要等待的时间执行函数
        const waitTime = interval - (nowTime - startTime)
        if (waitTime <= 0) {
          fn.apply(this, args)
          startTime = nowTime
        }
      }
      return _throttle
    }

    let counter = 1
    inputEl.oninput = mythrottle(function(event) {
      console.log(`发送网络请求${counter++}:`, this.value, event)
    }, 1000)
优化二:节流最后一次也可以执行(尾部执行,了解即可)
    // 加入trailing,决定是否尾部执行
function mythrottle(fn, interval, { leading = true, trailing = false } = {}) {
      let startTime = 0
      let timer = null

      const _throttle = function(...args) {
        // 1.获取当前时间
        const nowTime = new Date().getTime()

        // 对立即执行进行控制
        if (!leading && startTime === 0) {
          startTime = nowTime
        }

        // 2.计算需要等待的时间执行函数
        const waitTime = interval - (nowTime - startTime)
        if (waitTime <= 0) {
          // console.log("执行操作fn")
          if (timer) clearTimeout(timer)
          fn.apply(this, args)
          startTime = nowTime
          timer = null
          return
        }

        // 3.判断是否需要执行尾部
        if (trailing && !timer) {
          timer = setTimeout(() => {
            // console.log("执行timer")
            fn.apply(this, args)
            startTime = new Date().getTime()
            timer = null
          }, waitTime);
        }
      }

      return _throttle
    }
优化三:优化添加取消功能
//添加取消 按钮
//在节流函数加入取消的代码
_throttle.cancel = function() {
if (timer) clearTimeout(timer)
startTime = 0
timer = null
}
//调用取消 按钮的代码
cancelBtn.onclick = function() {
throttleFn.cancel()
}
优化四:优化返回值问题
    function mythrottle(fn, interval, { leading = true, trailing = false } = {}) {
      let startTime = 0
      let timer = null

      const _throttle = function(...args) {
        return new Promise((resolve, reject) => { //用Promise优化返回值
          try {
             // 1.获取当前时间
            const nowTime = new Date().getTime()
            // 对立即执行进行控制
            if (!leading && startTime === 0) {
              startTime = nowTime
            }
            // 2.计算需要等待的时间执行函数
            const waitTime = interval - (nowTime - startTime)
            if (waitTime <= 0) {
              // console.log("执行操作fn")
              if (timer) clearTimeout(timer)
              const res = fn.apply(this, args)
              resolve(res)
              startTime = nowTime
              timer = null
              return
            }
            // 3.判断是否需要执行尾部
            if (trailing && !timer) {
              timer = setTimeout(() => {
                // console.log("执行timer")
                const res = fn.apply(this, args)
                resolve(res)
                startTime = new Date().getTime()
                timer = null
              }, waitTime);
            }
          } catch (error) {
            reject(error)
          }
        })
      }
      //取消节流
      _throttle.cancel = function() {
        if (timer) clearTimeout(timer)
        startTime = 0
        timer = null
      }
      return _throttle
    }
3_自定义深拷贝函数
对象相互赋值的一些关系,分别包括:
- 引入的赋值:指向同一个对象,相互之间会影响;
- 对象的浅拷贝:只是浅层的拷贝,内部引入对象时,依然会相互影响;
- 对象的深拷贝:两个对象不再有任何关系,不会相互影响;
前面可以通过一种方法来实现深拷贝了:JSON.parse
- 这种深拷贝的方式其实对于函数、Symbol等是无法处理的;
- 并且如果存在对象的循环引用,也会报错的;
   const info = {
      name: "hhh",
      age: 18,
      friend: {
        name: "kobe"
      },
      running: function() {},
      [Symbol()]: "abc",
      // obj: info
    }
    info.obj = info

    // 1.操作一: 引用赋值
    const obj1 = info

    // 2.操作二: 浅拷贝
    const obj2 = { ...info }
    obj2.name = "james"
    obj2.friend.name = "james"
    console.log(info.friend.name)

    const obj3 = Object.assign({}, info)
    // obj3.name = "curry"
    obj3.friend.name = "curry"
    console.log(info.friend.name)

    // 3.操作三: 深拷贝
    // 3.1.JSON方法   缺点,不能拷贝一些特殊的值,比如函数
    const obj4 = JSON.parse(JSON.stringify(info))
    info.friend.name = "curry"
    console.log(obj4.friend.name)
    console.log(obj4)
自定义深拷贝的基本功能【面试】
// 需求: 判断一个标识符是否是对象类型
function isObject(value) {
  const valueType = typeof value
  return (value !== null) && ( valueType === "object" || valueType === "function" )
}


// 深拷贝函数
    function deepCopy(originValue) {
      // 1.如果是原始类型, 直接返回
      if (!isObject(originValue)) {
        return originValue
      }
      // 2.如果是对象类型, 才需要创建对象
      const newObj = {}
      for (const key in originValue) {
        newObj[key] = deepCopy(originValue[key]);
      }
      return newObj
    }

    const info = {
      name: "hhh",
      age: 18,
      friend: {
        name: "kobe",
        address: {
          name: "洛杉矶",
          detail: "斯坦普斯中心"
        }
      }
    }

    const newObj = deepCopy(info)
    info.friend.address.name = "北京市"
    console.log(info.friend.address.name) //北京市
    console.log(newObj.friend.address.name)	//洛杉矶
//说明深拷贝函数执行正确,让原对象与新对象互不影响
对Symbol的key进行处理;以及其他数据类型的值进程处理:数组、函数、Symbol、Set、Map;
    // 深拷贝函数
    function deepCopy(originValue) {

      // 0.如果值是Symbol的类型
      if (typeof originValue === "symbol") {
        return Symbol(originValue.description)	//返回其原型
      }

      // 1.如果是原始类型, 直接返回
      if (!isObject(originValue)) {
        return originValue
      }

      // 2.如果是set类型
      if (originValue instanceof Set) {
        const newSet = new Set()
        for (const setItem of originValue) {
          newSet.add(deepCopy(setItem))
        }
        return newSet
      }

      // 3.如果是函数function类型, 不需要进行深拷贝
      if (typeof originValue === "function") {
        return originValue
      }

      // 2.如果是对象/数组类型, 才需要创建对象
      const newObj = Array.isArray(originValue) ? []: {}
      // 遍历普通的key
      for (const key in originValue) {
        newObj[key] = deepCopy(originValue[key]);
      }
      // 单独遍历symbol
      const symbolKeys = Object.getOwnPropertySymbols(originValue)
      for (const symbolKey of symbolKeys) {
        newObj[Symbol(symbolKey.description)] = deepCopy(originValue[symbolKey])
      }

      return newObj
    }
对循环引用的处理;
    // 深拷贝函数   循环引用
    // let map = new WeakMap()
    function deepCopy(originValue, map = new WeakMap()) {
      // const map = new WeakMap()

      // 0.如果值是Symbol的类型
      if (typeof originValue === "symbol") {
        return Symbol(originValue.description)
      }

      // 1.如果是原始类型, 直接返回
      if (!isObject(originValue)) {
        return originValue
      }

      // 2.如果是set类型
      if (originValue instanceof Set) {
        const newSet = new Set()
        for (const setItem of originValue) {
          newSet.add(deepCopy(setItem))
        }
        return newSet
      }

      // 3.如果是函数function类型, 不需要进行深拷贝
      if (typeof originValue === "function") {
        return originValue
      }

      // 4.如果是对象类型, 才需要创建对象
      if (map.get(originValue)) {
        return map.get(originValue)
      }
      const newObj = Array.isArray(originValue) ? []: {}
      map.set(originValue, newObj)
      // 遍历普通的key
      for (const key in originValue) {
        newObj[key] = deepCopy(originValue[key], map);
      }
      // 单独遍历symbol
      const symbolKeys = Object.getOwnPropertySymbols(originValue)
      for (const symbolKey of symbolKeys) {
        newObj[Symbol(symbolKey.description)] = deepCopy(originValue[symbolKey], map)
      }

      return newObj
    }

    const info = {
      name: "hhh",
      age: 18,
      friend: {
        name: "kobe",
        address: {
          name: "洛杉矶",
          detail: "斯坦普斯中心"
        }
      },
      // self: info
    }
    info.self = info

    let newObj = deepCopy(info)
    console.log(newObj)
    console.log(newObj.self === newObj)
4_自定义事件总线
自定义事件总线属于一种观察者模式,其中包括三个角色:
-
发布者(Publisher):发出事件(Event);
-
订阅者(Subscriber):订阅事件(Event),并且会进行响应(Handler);
-
事件总线(EventBus):无论是发布者还是订阅者都是通过事件总线作为中台的;
可以选择一些第三方的库:
-
Vue2默认是带有事件总线的功能;
-
Vue3中推荐一些第三方库,比如mitt;
也可以实现自己的事件总线:
-
事件的监听方法on;
-
事件的发射方法emit;
-
事件的取消监听off;
<body>

  <button class="nav-btn">nav button</button>

  <script>

    // 类EventBus -> 事件总线对象
    class HYEventBus {
      constructor() {
        this.eventMap = {}
      }
    // 监听
      on(eventName, eventFn) {
        let eventFns = this.eventMap[eventName]
        if (!eventFns) {
          eventFns = []
          this.eventMap[eventName] = eventFns
        }
        eventFns.push(eventFn)
      }
      // 取消监听
      off(eventName, eventFn) {
        let eventFns = this.eventMap[eventName]
        if (!eventFns) return
        for (let i = 0; i < eventFns.length; i++) {
          const fn = eventFns[i]
          if (fn === eventFn) {
            eventFns.splice(i, 1) //删除数组eventFns中第i个序号的元素
            break
          }
        }
        // 如果eventFns已经清空了
        if (eventFns.length === 0) {
          delete this.eventMap[eventName]
        }
      }
     // 事件发射
      emit(eventName, ...args) {
        let eventFns = this.eventMap[eventName]
        if (!eventFns) return
        eventFns.forEach(fn => {
          fn(...args)
        })
      }
    }


    // 使用过程
    const eventBus = new HYEventBus()

    // aside.vue组件中监听事件
    eventBus.on("navclick", (name, age, height) => {
      console.log("navclick listener 01", name, age, height)
    })

    const click =  () => {
      console.log("navclick listener 02")
    }
    eventBus.on("navclick", click)

    setTimeout(() => {
      eventBus.off("navclick", click)
    }, 5000);

    eventBus.on("asideclick", () => {
      console.log("asideclick listener")
    })

    // nav.vue
    const navBtnEl = document.querySelector(".nav-btn")
    navBtnEl.onclick = function() {
      console.log("自己监听到")
      eventBus.emit("navclick", "hhh", 18, 1.88)
    }

  </script>

</body>


