rk3588使用gstreamer推流
rk3588使用gstreamer推流
-
- ppa搜索需要的软件包
- 安装gstreamer
- gstreamer基础操作
- udp本地传输视频
- 摄像头udp传输
- 安装支持gstreamer的cv2
ppa搜索需要的软件包
在https://launchpad.net/上搜索软件名+ppa
找到需要的包后下面命令安装
sudo add-apt-repository ppa:george-coolpi/multimedia
sudo apt update
如果不需要了下面命令删除
sudo add-apt-repository -r ppa:george-coolpi/multimedia
sudo apt-get update
安装gstreamer
apt-get install libgstreamer1.0-dev libgstreamer-plugins-base1.0-dev libgstreamer-plugins-bad1.0-dev gstreamer1.0-plugins-base gstreamer1.0-plugins-good gstreamer1.0-plugins-bad gstreamer1.0-plugins-ugly gstreamer1.0-libav gstreamer1.0-tools gstreamer1.0-x gstreamer1.0-alsa gstreamer1.0-gl gstreamer1.0-gtk3 gstreamer1.0-qt5 gstreamer1.0-pulseaudio
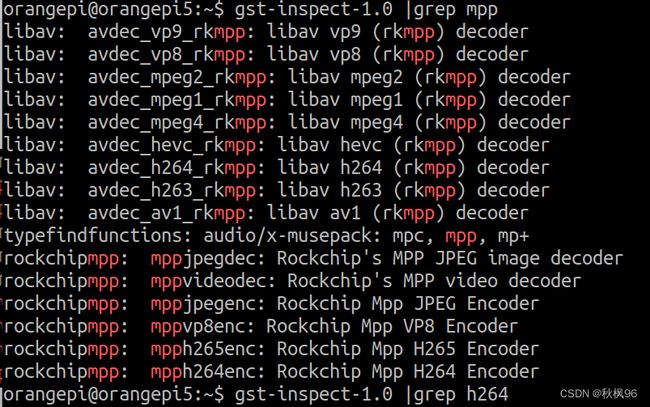
查看支持的编码器
gst-inspect-1.0 |grep mpp

不支持rkmpp的硬编码
下面安装插件gstreamer1.0-rockchip
 sudo apt-get install gstreamer1.0-rockchip
 gst-inspect-1.0 |grep mpp
gstreamer基础操作
#播放自带测试视频
gst-launch-1.0  videotestsrc ! video/x-raw,format=YUY2,framerate=30/1 ! videoconvert ! autovideosink
#videorate 更改桢率
gst-launch-1.0  videotestsrc ! video/x-raw,format=YUY2,framerate=30/1 ! videorate ! video/x-raw,format=YUY2,framerate=1/1 !  videoconvert ! autovideosink
#videoscale更改尺寸
gst-launch-1.0  videotestsrc ! video/x-raw,format=YUY2,framerate=30/1 ! videoscale ! video/x-raw,format=YUY2,width=800,height=700 !  videoconvert ! autovideosink
#播放自带测试音频
gst-launch-1.0 audiotestsrc ! audioconvert ! autoaudiosink
播放本地视频mp4
#仅视频
#方法1
gst-launch-1.0 filesrc location=a.mp4 ! qtdemux ! avdec_h264 ! autovideosink
#方法2
gst-launch-1.0 filesrc location=xx.mp4 !  decodebin !  autovideosink
#仅音频
gst-launch-1.0 filesrc location=a.mp4 ! qtdemux name=a  ! faad ! audioconvert ! audioresample ! autoaudiosink
#视频+音频
gst-launch-1.0 filesrc location=a.mp4 ! qtdemux name=a  ! queue ! faad ! audioconvert ! audioresample ! autoaudiosink a. ! queue !  decodebin ! autovideosink
udp本地传输视频
#服务端264编码
gst-launch-1.0 -v videotestsrc ! "video/x-raw,framerate=30/1" ! x264enc key-int-max=30 ! rtph264pay ! udpsink host=127.0.0.1 port=1234
#服务端本地视频h264编码
#方法1
gst-launch-1.0 -v filesrc location=a.mp4 ! decodebin !  x264enc key-int-max=30 ! rtph264pay ! udpsink host=127.0.0.1 port=1234
#方法2
gst-launch-1.0 -v filesrc location=a.mp4 ! qtdemux ! avdec_h264 ! x264enc key-int-max=30 !  rtph264pay ! udpsink host=127.0.0.1 port=1234
#客户端
gst-launch-1.0 udpsrc port=1234 ! "application/x-rtp, payload=96" ! rtph264depay ! decodebin ! autovideosink sync=false
摄像头udp传输
查找设备
v4l2-ctl --list-devices
H65 USB CAMERA: H65 USB CAMERA (usb-0000:00:14.0-1):
	/dev/video2
	/dev/video3
播放视频画面
gst-launch-1.0 v4l2src device=/dev/video0 ! video/x-raw,width=640,height=480,framerate=30/1 ! videoconvert ! autovideosink
rk3588 硬件编码mpph264enc,使用gstreamer udp 传输视频流分辨率为640x480
#服务端
 gst-launch-1.0 v4l2src device=/dev/video0  !  video/x-raw,width=640,height=480,framerate=30/1 ! videoconvert ! video/x-raw,format=NV12 !  mpph264enc ! queue ! h264parse ! rtph264pay ! udpsink host=10.42.0.1 port=1234
 #接收端
 gst-launch-1.0 udpsrc port=1234 ! "application/x-rtp, payload=96" ! rtph264depay ! decodebin ! autovideosink sync=false
由于yuy2格式只支持640X480分辨率30帧的图像,现在用压缩过的mjpeg格式图像支持更高的分辨率,图像明显大了许多分辨率为1280x720
#服务端
 gst-launch-1.0 v4l2src device=/dev/video0  ! image/jpeg !  avdec_mjpeg ! videoconvert ! video/x-raw,height=720,width=1280,frame=30/1,format=NV12 !  mpph264enc ! queue ! h264parse ! rtph264pay ! udpsink host=10.42.0.1 port=1234
 #接收端
 gst-launch-1.0 udpsrc port=1234 ! "application/x-rtp, payload=96" ! rtph264depay ! decodebin ! autovideosink sync=false

安装支持gstreamer的cv2
添加ppa仓库
sudo add-apt-repository ppa:trinitronx/focal-backport-buildeps
sudo apt update
查看包名
apt list | grep opencv
安装python3-opencv
sudo apt-get installl python3-opencv
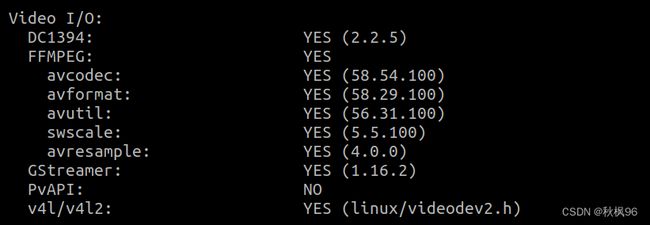
查看是否支持gstreamer
import cv2
print(cv2.getBuildInformation())


