用pySimpleGUI写一个自动点击脚本
用pySimpleGUI写一个自动点击脚本
- 写在前面
- 运行思路
- 编写说明
-
- pySimpleGUI界面设计
- 坐标点选中
- 开始、暂停运行
- 鼠标点击
- 自动关机
- 运行效果
- 参考
写在前面
发现在玩游戏或者使用电脑期间,有时候会存在重复性比较高的操作,于是想写一个Python脚本来写一个自动点击的脚本
运行思路
每隔1s检测一次选定坐标点的坐标,当检测坐标的的像素与选定时的相同,则将光标移动到该坐标点并点击一次.
编写说明
pySimpleGUI界面设计
由于只是举例设计,所以只设计了两个鼠标点击点,需要的话可以再加
layout = [  [sg.Button('开始/暂停',key='start',size=(9,1)),sg.Button('使用说明',key='use_ins',size=(9,1)),sg.Button('更新日志',key='upd_log',size=(9,1)),sg.Quit('退出',key='Quit',size=(9,1))],
            [sg.Text('当前状态:'),sg.Text('', key='notice', size=(14, 1))],
            [sg.Text('运行时长:'), sg.Text('', key='runtime', size=(6, 1)), sg.Text('设置时长:'), sg.Input(60, key='time_set', size=(5, 1)),sg.Button('自动关机',key='sys_shutdown',size=(9,1))],
            [sg.Text('开始:',size=(6, 1)), sg.Text('', key='st_xy',size=(10, 1)), sg.Text('', key='st_RGB', size=(12, 1)), sg.Button('两秒后检测', key='st_detect',size=(9,1))],
            [sg.Text('结束:', size=(6, 1)), sg.Text('', key='end_xy', size=(10, 1)), sg.Text('', key='end_RGB', size=(12, 1)), sg.Button('两秒后检测', key='end_detect',size=(9,1))]
        ]
window = sg.Window('自动点击', layout, font='微软雅黑')
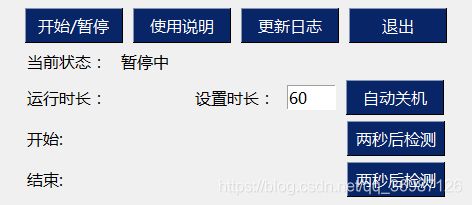
运行界面如下所示
使用方法很简单,就是通过《两秒后检测》按钮选定两个坐标点,然后设置运行时长(默认60s,输入整数),点击《开始/暂停》按钮,运行过程中可以随时更改开始坐标点和结束坐标点,更改设置运行时长,之后我又加了自动关机功能,用于人不在的时候,到了运行时长就自动关机。
坐标点选中
    if event == 'st_detect':
        time.sleep(2)
        st_x, st_y = pyautogui.position()
        st_xy = [st_x, st_y]
        im = pyautogui.screenshot()
        st_RGB = im.getpixel((int(st_x), int(st_y)))
        window.Element('st_xy').Update(st_xy)
        window.Element('st_RGB').Update(st_RGB)
    if event == 'end_detect':
        time.sleep(2)
        end_x, end_y = pyautogui.position()		#获取坐标
        end_xy = [end_x, end_y]
        im = pyautogui.screenshot()		#获取屏幕信息
        end_RGB = im.getpixel((int(end_x), int(end_y)))
        window.Element('end_xy').Update(end_xy)		#更新GUI信息
        window.Element('end_RGB').Update(end_RGB)
两段代码原理一样所以就一起说了
在GUI中点击相应的按钮之后,触发事件,在使用time.sleep(2),等待两秒后用pyautogui.position()检测光标坐标
开始、暂停运行
    time_set = int(values['time_set'])	#时间设定值从GUI获取
    if event == 'start':
        timer_running = not timer_running
    if timer_running and runtime <= time_set:
        time.sleep(0.1)
        curr_time = datetime.datetime.now() #获取系统时间
        window.Element('runtime').Update(runtime)
        if runtime1 != int(curr_time.second):	#runtime作为运行时间,通过系统时间确保准确性
            runtime += 1
            runtime2 += 1
            runtime1 = int(curr_time.second)
        if runtime2 == 1:					#每隔1s检测一次
            window.Element('notice').Update('检测坐标信息中')
            mouse_click(st_x, st_y, st_RGB)			#调用光标信息检测点击
            mouse_click(end_x, end_y, end_RGB)
            runtime2 = 0
    elif not timer_running:
        window.element('notice').update('暂停中')
    else:
        window.element('notice').update('达到设定时间')
        if shut_down:
            os.system('shutdown -s -f -t 59')			#到时间自动关机
鼠标点击
def mouse_click(x, y, RGB):
    im = pyautogui.screenshot()
    imGRB = im.getpixel((int(x), int(y)))
    if RGB == imGRB:			#对应坐标RGB相同时点击左键,更新GUI显示
        window.Element('notice').Update('检测到匹配坐标')
        pyautogui.click(x, y, button='left', )
自动关机
    if event == 'sys_shutdown':
        shut_down = not shut_down
        if shut_down:
            window.element('notice').update('到点自动关机')
        else:
            window.element('notice').update('取消自动关机')
运行效果

对程序稍微更改一下,就可以在游戏中使用了,手机游戏的话注意在模拟器里运行,程序文件在下边的链接
链接:百度网盘地址
提取码:kjer
参考
[1] https://pysimplegui.readthedocs.io/en/latest/cookbook/
[2] https://www.jb51.net/article/146786.htm