Swift UI控件
swift是对OC语法的简化,使用函数式编码方式,编码更简洁灵活。使用let来声明常量,var来声明变量。一些类方法的调用可以直接使用点来获取类方法,省去类名,编译器会自动识别对应的类。下面是对一些控件的初始化及展示的写法。
import UIKit
import WebKit
import MapKit

class ViewController: UIViewController,UITableViewDelegate,UITableViewDataSource,UICollectionViewDelegate,UICollectionViewDataSource,UIPickerViewDelegate,UIPickerViewDataSource {

    override func viewDidLoad() {
        super.viewDidLoad()
        //1、UIButton
        let button = UIButton.init(type: UIButton.ButtonType.custom)
        button.frame = CGRect(x: 100, y: 60, width: 100, height: 40)
        button.backgroundColor = .red
        button.setTitle("按钮", for: .normal)
        button.titleLabel?.textColor = .white
        button.addTarget(self, action: #selector(btn(button:)), for: .touchUpInside)
        self.view.addSubview(button)
        self.setTitle(view: button)

        //2、UILabel
        let label = UILabel.init(frame: CGRect(x: 100, y: 110, width: 100, height: 40));
        label.text = "这是个label"
        label.backgroundColor = .gray
        label.textColor = .white
        label.textAlignment = .center
        self.view.addSubview(label)
        self.setTitle(view: label)

        //3、UIView
        let view = UIView.init(frame: CGRect(x: 100, y: 160, width: 100, height: 50))
        view.backgroundColor = .yellow
        view.layer.cornerRadius = 5.0
        view.isUserInteractionEnabled = true
        let tap = UITapGestureRecognizer.init(target: self, action: #selector(tap(tap:)))
        view.addGestureRecognizer(tap)
        self.view.addSubview(view)
        self.setTitle(view: view)

        //4、UIImageView
        let imageview = UIImageView.init(frame: CGRect(x: 100, y: 220, width: 100, height: 100))
        imageview.image = UIImage.init(named: "hibo.jpg")
        self.view.addSubview(imageview)
        self.setTitle(view: imageview)

        //5、UITextField
        let textfield = UITextField.init(frame: CGRect(x: 100, y: 330, width: 100, height: 40))
        textfield.borderStyle = .roundedRect
        textfield.placeholder = "请输入内容"
        textfield.clearButtonMode = .whileEditing
        self.view.addSubview(textfield)
        self.setTitle(view: textfield)

        //6、UITextView
        let textview = UITextView.init(frame: CGRect(x: 100, y: 380, width: 100, height: 50))
        textview.backgroundColor = .init(red: 0.8, green: 0.8, blue: 0.8, alpha: 1)
        textview.text = "我再textview中显示"
        self.view.addSubview(textview)
        self.setTitle(view: textview)

        //7、UIAlertController
        let alertBtn = UIButton.init(type: UIButton.ButtonType.custom)
        alertBtn.frame = CGRect(x: 100, y: 440, width: 100, height: 40)
        alertBtn.backgroundColor = UIColor.red
        alertBtn.setTitle("弹框", for: .normal)
        alertBtn.titleLabel?.textColor = .white
        alertBtn.addTarget(self, action: #selector(alert), for: .touchUpInside)
        self.view.addSubview(alertBtn)
        self.setTitle(view: alertBtn)

        //8、UISwitch
        let swc = UISwitch.init(frame: CGRect(x: 100, y: 490, width: 100, height: 40))
        swc.isOn = true
        self.view.addSubview(swc)
        self.setTitle(view: swc)

        //9、UIProgressView
        let progress = UIProgressView.init(frame: CGRect(x: 100, y: 560, width: 100, height: 40))
        progress.progress = 0.5
        self.view.addSubview(progress)
        self.setTitle(view: progress)

        //10、UISlider
        let slider = UISlider.init(frame: CGRect(x: 100, y: 600, width: 100, height: 40))
        slider.value = 0.6
        self.view.addSubview(slider)
        self.setTitle(view: slider)

        //11、UIPickerView
        let datePic = UIPickerView.init(frame: CGRect(x: 100, y: 660, width: 100, height: 120))
        datePic.delegate = self
        datePic.dataSource = self
        self.view.addSubview(datePic)
        self.setTitle(view: datePic)

        //12、MKMapView
        let map = MKMapView.init(frame: CGRect(x: 300, y: button.frame.origin.y, width: 100, height: 100))
        map.showsUserLocation = true
        map.mapType = .satellite
        self.view.addSubview(map)
        self.setTitle(view:map)

        //13、UITableView
        let tableview = UITableView.init(frame: CGRect(x: 300, y: map.frame.origin.y+map.frame.size.height+10, width: 100, height: 100), style: .plain)
        tableview.delegate = self
        tableview.dataSource = self
        tableview.register(UITableViewCell.self, forCellReuseIdentifier: "cell")
        self.view.addSubview(tableview)
        self.setTitle(view:tableview)

        //14、UICollectionView
        let layout = UICollectionViewFlowLayout.init()
        layout.itemSize = CGSize(width: 30, height: 30)
        layout.minimumLineSpacing = 5//设置最小行间距
        layout.minimumInteritemSpacing = 0//设置最小列间距
        let collection = UICollectionView.init(frame: CGRect(x: 300, y: tableview.frame.origin.y+tableview.frame.size.height+10, width: 100, height: 100), collectionViewLayout: layout)
        collection.delegate = self
        collection.dataSource = self
        collection.register(UICollectionViewCell.self, forCellWithReuseIdentifier: "collection")
        self.view.addSubview(collection)
        self.setTitle(view:collection)

        //15、WKWebView
        let webview = WKWebView.init(frame: CGRect(x: 300, y: collection.frame.origin.y+collection.frame.size.height+10, width: 100, height: 240), configuration: WKWebViewConfiguration.init())
        webview.backgroundColor = .gray
        webview.load(URLRequest.init(url: URL.init(string: "https://www.baidu.com")!))
        self.view.addSubview(webview)
        self.setTitle(view: webview)
    }
    //设置标题
    @objc func setTitle(view:UIView){
        let label = UILabel.init(frame: CGRect(x: view.frame.origin.x-90, y: view.frame.origin.y, width: 90, height: 30))
        label.font = .systemFont(ofSize: 12)
        label.numberOfLines = 0
        label.text = NSStringFromClass(view.classForCoder)+":"
        self.view.addSubview(label)
    }
    //点击时间带参数方法
    @objc func btn(button:UIButton){
        print(button);
        print("点击了按钮")
    }
    //手势事件
    @objc func tap(tap:UITapGestureRecognizer){
        print(tap)
    }
    //弹框
    @objc func alert(){
        //UIAlertController
        let alert = UIAlertController.init(title: "提示", message: "message", preferredStyle: .alert)
        alert .addAction(UIAlertAction.init(title: "取消", style: .cancel, handler: { (UIAlertAction) in
            print("取消")
        }))
        alert.addAction(UIAlertAction.init(title: "确定", style: .default, handler: { (UIAlertAction) in
            print("确定")
        }))
        self.present(alert, animated: true) {print("弹出")}
    }

    //UIPickerView
    func numberOfComponents(in pickerView: UIPickerView) -> Int {
        return 2;
    }
    func pickerView(_ pickerView: UIPickerView, numberOfRowsInComponent component: Int) -> Int {
        return 10
    }
    func pickerView(_ pickerView: UIPickerView, titleForRow row: Int, forComponent component: Int) -> String? {
        return "hibo"
    }
    func pickerView(_ pickerView: UIPickerView, viewForRow row: Int, forComponent component: Int, reusing view: UIView?) -> UIView {
        let label = UILabel.init(frame: CGRect(x: 0, y: 0, width: 50, height: 30))
        label.text = "hibo"
        return label
    }

    //tableview
    func tableView(_ tableView: UITableView, numberOfRowsInSection section: Int) -> Int {
        return 100
    }
    func tableView(_ tableView: UITableView, cellForRowAt indexPath: IndexPath) -> UITableViewCell {
        let cell = tableView.dequeueReusableCell(withIdentifier: "cell")
        cell?.textLabel?.text = "row:"+indexPath.row.description
        return cell!
    }

    //collectionview
    func collectionView(_ collectionView: UICollectionView, numberOfItemsInSection section: Int) -> Int {
        return 10
    }
    func collectionView(_ collectionView: UICollectionView, cellForItemAt indexPath: IndexPath) -> UICollectionViewCell {
        let cell = collectionView.dequeueReusableCell(withReuseIdentifier: "collection", for: indexPath)
        cell.backgroundColor = .red
        return cell
    }
}
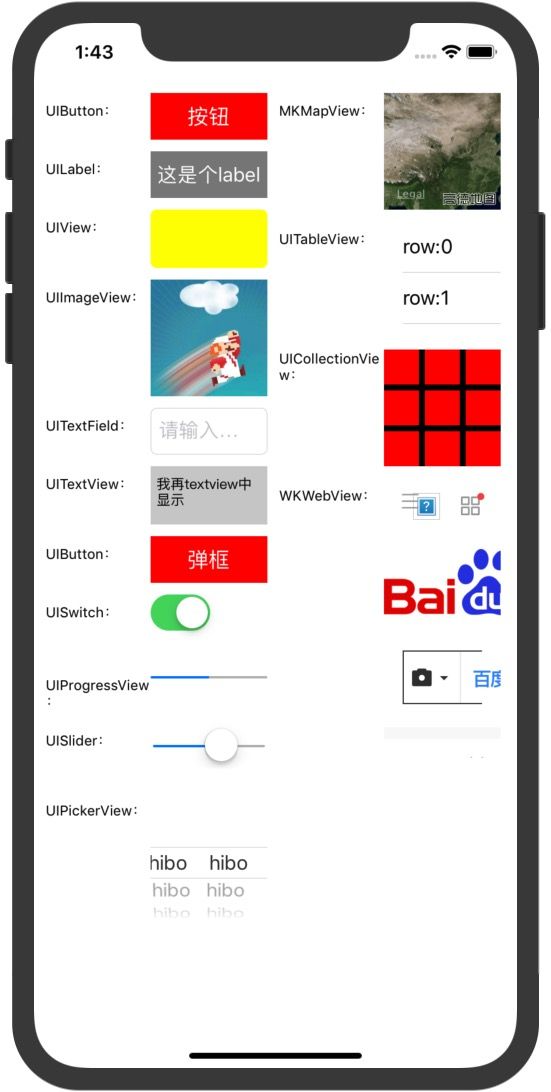
运行结果:
通过上面的练习,就已经熟悉了Swift语法了,可以搭建项目了。
