Java基础之《微服务(10)—消息驱动》
一、什么是bus
1、什么是spring cloud bus
spring cloud bus集成了市面上常用的消息代理(rabbit mq、kafka等2种),连接微服务系统中的所有节点,当有数据变更时,可以通过消息代理广播通知微服务及时变更数据。例如微服务的配置更新。
2、bus解决了什么问题
解决了微服务数据变更,及时同步的问题。
二、消息发送模块
1、复制或者新建一个maven模块mycloud-stream-sender
2、pom文件
添加rabbit依赖包spring-cloud-starter-stream-rabbit
	4.0.0

		org.springframework.boot
		spring-boot-starter-parent
		2.1.8.RELEASE


	com.example
	mycloud-stream-sender
	0.0.1-SNAPSHOT
	mycloud-stream-sender
	Demo project for Spring Boot


		1.8
		Greenwich.SR5


			org.springframework.boot
			spring-boot-starter


			org.springframework.boot
			spring-boot-starter-test
			test


			org.springframework.cloud
			spring-cloud-starter-netflix-eureka-client


			org.springframework.boot
			spring-boot-starter-web


			org.springframework.boot
			spring-boot-starter-actuator


			org.springframework.cloud
			spring-cloud-starter-stream-rabbit


				org.springframework.cloud
				spring-cloud-dependencies
				${spring-cloud.version}
				pom
				import


				org.springframework.boot
				spring-boot-maven-plugin
3、发送接口
ISendService.java
package com.example.mycloud.resource;

import org.springframework.cloud.stream.annotation.Output;
import org.springframework.messaging.SubscribableChannel;

/**
 * 发送的接口
 * @author user
 *
 */
public interface ISendService {

	@Output("stream-exchange")
	public SubscribableChannel send();

}
4、测试类
TestSender.java
package com.example.mycloud.resource;

import org.springframework.beans.factory.annotation.Autowired;
import org.springframework.messaging.Message;
import org.springframework.messaging.support.MessageBuilder;
import org.springframework.web.bind.annotation.RequestMapping;
import org.springframework.web.bind.annotation.RestController;

@RestController
public class TestSender {

	@Autowired
	private ISendService sendService;

	@RequestMapping("/send")
	public void send() {
		String msg = "abc..........";
		Message message = MessageBuilder.withPayload(msg.getBytes()).build();
		sendService.send().send(message);
	}
}
5、启动类
StreamSenderApplication.java
package com.example.mycloud.run;

import org.springframework.boot.SpringApplication;
import org.springframework.boot.autoconfigure.SpringBootApplication;
import org.springframework.cloud.client.discovery.EnableDiscoveryClient;
import org.springframework.cloud.stream.annotation.EnableBinding;
import org.springframework.context.annotation.ComponentScan;

import com.example.mycloud.resource.ISendService;

@EnableBinding({ISendService.class}) //把发送接口绑定进来
@EnableDiscoveryClient
@SpringBootApplication
@ComponentScan("com.example.mycloud")
public class StreamSenderApplication {

	public static void main(String[] args) {
        SpringApplication.run(StreamSenderApplication.class, args);
    }
}
6、配置文件
spring:
  application:
    name: stream-sender
  rabbitmq:
    host: 127.0.0.1
    port: 5672
    username: admin
    password: admin
    virtual-host: my_vhost

server:
  port: 8017

eureka:
  server:
    port: 8010
  instance:
    hostname: localhost
  client:
    registerWithEureka: true
    fetchRegistry: true
    serviceUrl:
      defaultZone: http://admin:123456@${eureka.instance.hostname}:${eureka.server.port}/eureka/

#暴露actuator的所有端口
management:
  endpoints:
    web:
      exposure:
        include: "*"
  endpoint:
    health:
      show-details: ALWAYS
    shutdown:
      #启用shutdown
      enabled: true
      #禁用密码验证
      sensitive: false
三、消息接收模块
1、复制或者新建一个maven模块mycloud-stream-receiver
2、pom文件
	4.0.0

		org.springframework.boot
		spring-boot-starter-parent
		2.1.8.RELEASE


	com.example
	mycloud-stream-receiver
	0.0.1-SNAPSHOT
	mycloud-stream-receiver
	Demo project for Spring Boot


		1.8
		Greenwich.SR5


			org.springframework.boot
			spring-boot-starter


			org.springframework.boot
			spring-boot-starter-test
			test


			org.springframework.cloud
			spring-cloud-starter-netflix-eureka-client


			org.springframework.boot
			spring-boot-starter-web


			org.springframework.boot
			spring-boot-starter-actuator


			org.springframework.cloud
			spring-cloud-starter-stream-rabbit


				org.springframework.cloud
				spring-cloud-dependencies
				${spring-cloud.version}
				pom
				import


				org.springframework.boot
				spring-boot-maven-plugin
3、接收接口
IReceiveService.java
package com.example.mycloud.resource;

import org.springframework.cloud.stream.annotation.Input;
import org.springframework.messaging.SubscribableChannel;

/**
 * 接收的接口
 * @author user
 *
 */
public interface IReceiveService {

	@Input("stream-exchange")
	public SubscribableChannel receive();

}
4、监听类
ReceiveService.java
package com.example.mycloud.service;

import org.springframework.cloud.stream.annotation.EnableBinding;
import org.springframework.cloud.stream.annotation.StreamListener;
import org.springframework.stereotype.Service;

import com.example.mycloud.resource.IReceiveService;

@Service
@EnableBinding(IReceiveService.class) //绑定
public class ReceiveService {

	@StreamListener("stream-exchange")
	public void onReceive(byte[] msg) {
		System.out.println("receive: " + new String(msg));
	}
}
5、启动类
StreamReceiverApplication.java
package com.example.mycloud.run;

import org.springframework.boot.SpringApplication;
import org.springframework.boot.autoconfigure.SpringBootApplication;
import org.springframework.cloud.client.discovery.EnableDiscoveryClient;
import org.springframework.context.annotation.ComponentScan;

@EnableDiscoveryClient
@SpringBootApplication
@ComponentScan("com.example.mycloud")
public class StreamReceiverApplication {

	public static void main(String[] args) {
        SpringApplication.run(StreamReceiverApplication.class, args);
    }
}
6、配置文件
spring:
  application:
    name: stream-receiver
  rabbitmq:
    host: 127.0.0.1
    port: 5672
    username: admin
    password: admin
    virtual-host: my_vhost

server:
  port: 8018

eureka:
  server:
    port: 8010
  instance:
    hostname: localhost
  client:
    registerWithEureka: true
    fetchRegistry: true
    serviceUrl:
      defaultZone: http://admin:123456@${eureka.instance.hostname}:${eureka.server.port}/eureka/

#暴露actuator的所有端口
management:
  endpoints:
    web:
      exposure:
        include: "*"
  endpoint:
    health:
      show-details: ALWAYS
    shutdown:
      #启用shutdown
      enabled: true
      #禁用密码验证
      sensitive: false
四、stream解决了什么问题
1、应用图
Application Core:应用服务
2、stream解决了开发人员无感知使用消息中间件的问题
因为stream对消息中间件的进一步封装,可以做到代码层面对消息中间件的无感知,甚至于动态的切换中间件(例如从rabbitmq切换为kafka)。使得微服务开发的高度解耦,服务可以关注更多自己的业务流程。
3、middleware
消息中间件,目前只支持rabbitmq和kafka。
4、binder
binder是应用与消息中间件之间的封装。目前实现了kafka和rabbitmq的binder。通过binder,可以很方便的连接中间件,可以动态改变消息类型。
5、@Input
注解标识输入通道,通过该输入通道接收到的消息进入应用程序。
6、@Output
注解标识输出通道,发布的消息将通过该通道离开应用程序。
7、@StreamListener
监听队列,用于消费者的队列的消息接收。
8、@EnableBinding
指信道channel和exchange绑定在一起。
五、消息的分组
1、之前的服务有什么问题
(1)队列是临时队列
(2)如果起多个receiver就会有多个队列queue绑定到exchange上,多个服务会同时接收到消息,消费多次
2、指定信道绑定交换器,交换器绑定队列
stream-sender模块
ISendService.java添加:
package com.example.mycloud.resource;

import org.springframework.cloud.stream.annotation.Output;
import org.springframework.messaging.SubscribableChannel;

/**
 * 发送的接口
 * @author user
 *
 */
public interface ISendService {

	@Output("stream-exchange")
	public SubscribableChannel send();

	//消息分组
	String OUTPUT = "groupOutput";

	@Output(ISendService.OUTPUT)
	public SubscribableChannel send2();

}
TestSender.java添加:
package com.example.mycloud.resource;

import org.springframework.beans.factory.annotation.Autowired;
import org.springframework.messaging.Message;
import org.springframework.messaging.support.MessageBuilder;
import org.springframework.web.bind.annotation.RequestMapping;
import org.springframework.web.bind.annotation.RestController;

import com.example.mycloud.bean.Product;

@RestController
public class TestSender {

	@Autowired
	private ISendService sendService;

	@RequestMapping("/send")
	public void send() {
		String msg = "abc..........";
		Message message = MessageBuilder.withPayload(msg.getBytes()).build();
		sendService.send().send(message);
	}

	//消息分组
	@RequestMapping("/send2")
	public void send2() {
		Product product = new Product();
		product.setId("1");
		product.setName("abc");
		Message message = MessageBuilder.withPayload(product).build();
		sendService.send().send(message);
	}
}
配置文件添加:
spring:
  cloud:
    stream:
      bindings:
        groupOutput:
          #指定输出通道对应的exchange主题名
          destination: object-exchange
stream-receiver模块
IReceiveService.java添加:
package com.example.mycloud.resource;

import org.springframework.cloud.stream.annotation.Input;
import org.springframework.messaging.SubscribableChannel;

/**
 * 接收的接口
 * @author user
 *
 */
public interface IReceiveService {

	@Input("stream-exchange")
	public SubscribableChannel receive();

	//消息分组
	String INPUT = "groupInput";

	@Input(IReceiveService.INPUT)
	public SubscribableChannel receive2();
}
ReceiveService.java添加:
package com.example.mycloud.service;

import org.springframework.cloud.stream.annotation.EnableBinding;
import org.springframework.cloud.stream.annotation.StreamListener;
import org.springframework.stereotype.Service;

import com.example.mycloud.bean.Product;
import com.example.mycloud.resource.IReceiveService;

@Service
@EnableBinding(IReceiveService.class) //绑定
public class ReceiveService {

	@StreamListener("stream-exchange")
	public void onReceive(byte[] msg) {
		System.out.println("receive: " + new String(msg));
	}

	//消息分组
	@StreamListener(IReceiveService.INPUT)
	public void onReceive2(Product obj) {
		System.out.println("receive: " + obj.toString());
	}
}
配置文件添加:
spring:
  cloud:
    stream:
      bindings:
        groupInput:
          #指定输入通道对应的exchange主题名
          destination: object-exchange
          #具体分组对应MQ的队列名称,并持久化队列
          group: groupQueue
3、查看绑定情况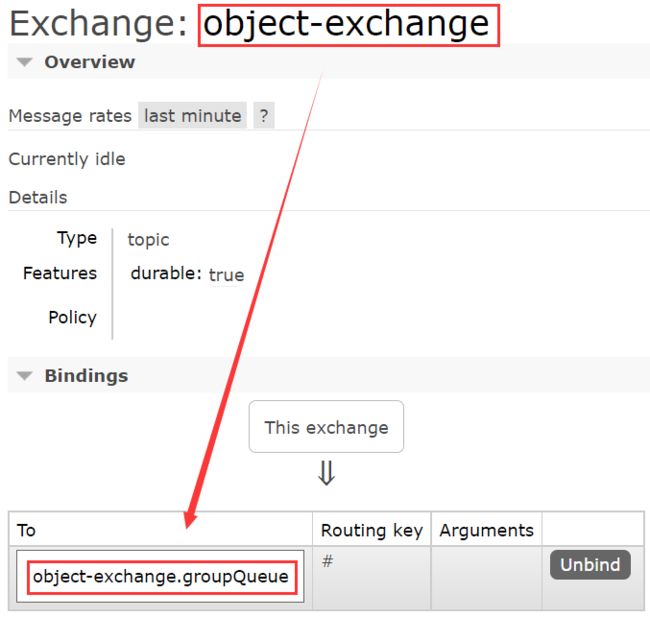
消息分组解决了,队列持久化问题。还有集群中一个队列对应多个consumer,只消费一次。
六、消息的分区
集群环境下,多个服务组成一个集群,如果想让相同的消息被同一个服务消费
1、stream-receiver模块,修改配置文件
spring:
  cloud:
    stream:
      bindings:
        partInput:
          consumer:
            #开启消费者分区功能
            partitioned: true
      #指定了当前消费者的总示例数量
      instanceCount: 2
      #设置当前实例的索引号,从0开始
      instanceIndex: 0
2、stream-sender模块,修改配置文件
spring:
  cloud:
    stream:
      bindings:
        partOutput:
          producer:
            #通过该参数指定了分区键的表达式规则
            partitionKeyExpression: payload
            #指定了消息分区的数量
            partitionCount: 2