RabbitMQ集群高可用的部署
RabbitMQ集群高可用的部署
- 1 RabbitMQ集群部署
-
- 1.1 实验环境
- 1.2 配置 Erlang Cookie
- 1.3 集群搭建
- 2 集群的负载均衡HAProxy
- 3 keepalived实现集群高可用
1 RabbitMQ集群部署
1.1 实验环境
(1)修改主机名:
hostnamectl set-hostname mq01 ## 172.25.12.1
hostnamectl set-hostname mq02  ##172.25.12.2
(2)编辑DNS解析文件:vim /etc/hosts
172.25.12.1  mq01
172.25.12.2  mq02
1.2 配置 Erlang Cookie
集群中的 RabbitMQ 节点需要通过交换密钥令牌以获得相互认证,处于同一集群的所有节点需要具有相同的密钥令牌(Erlang Cookie),否则在搭建过程中会出现 Authentication Fail 错误。
RabbitMQ 服务启动时,erlang VM 会自动创建该 cookie 文件,在本次搭建中将mq01作为集群的基本节点
同步mq01主机的 erlang Cookie:
scp /var/lib/rabbitmq/.erlang.cookie root@mq02:/var/lib/rabbitmq/.erlang.cookie
- 在两个节点上启动 RabbitMQ 服务:
service rabbitmq-server start - 在mq01节点查看集群状态:
rabbitmqctl cluster_status
1.3 集群搭建
(1)将mq02节点加入主节点为mq01的集群中
- 在RabbitMQ集群中的节点只有两种类型:内存节点/磁盘节点,单节点系统只运行磁盘类型的节点。在这里将mq02节点作为集群内存节点。
- 在mq02节点执行以下命令:
rabbitmqctl stop_app #停止当前机器中rabbitmq的服务
rabbitmqctl reset  #重置状态
rabbitmqctl join_cluster --ram rabbit@mq01 #把mq02中的rabbitmq作为内存节点加入到集群中来
rabbitmqctl start_app  #启动服务
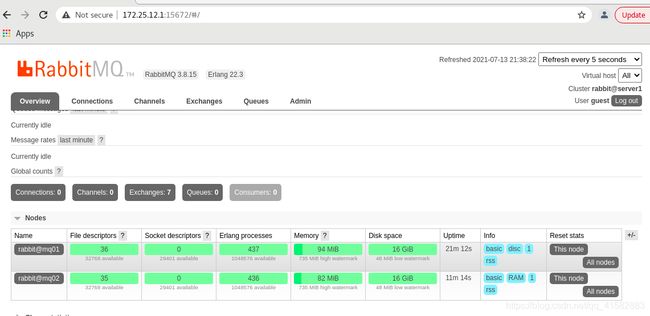
(2) 查看集群节点的状态:mq02成功作为内存节点加入到集群中
[root@mq01 ~]# rabbitmqctl cluster_status
Cluster status of node rabbit@mq01 ...
Basics

Cluster name: rabbit@server1

Disk Nodes

rabbit@mq01

RAM Nodes

rabbit@mq02

Running Nodes

rabbit@mq01
rabbit@mq02

Versions

rabbit@mq01: RabbitMQ 3.8.15 on Erlang 22.3
rabbit@mq02: RabbitMQ 3.8.15 on Erlang 22.3

Maintenance status

Node: rabbit@mq01, status: not under maintenance
Node: rabbit@mq02, status: not under maintenance

Alarms

(none)

Network Partitions

(none)

Listeners

Node: rabbit@mq01, interface: [::], port: 15672, protocol: http, purpose: HTTP API
Node: rabbit@mq01, interface: [::], port: 25672, protocol: clustering, purpose: inter-node and CLI tool communication
Node: rabbit@mq01, interface: [::], port: 5672, protocol: amqp, purpose: AMQP 0-9-1 and AMQP 1.0
Node: rabbit@mq02, interface: [::], port: 25672, protocol: clustering, purpose: inter-node and CLI tool communication
Node: rabbit@mq02, interface: [::], port: 5672, protocol: amqp, purpose: AMQP 0-9-1 and AMQP 1.0
Node: rabbit@mq02, interface: [::], port: 15672, protocol: http, purpose: HTTP API

Feature flags

Flag: drop_unroutable_metric, state: enabled
Flag: empty_basic_get_metric, state: enabled
Flag: implicit_default_bindings, state: enabled
Flag: maintenance_mode_status, state: enabled
Flag: quorum_queue, state: enabled
Flag: user_limits, state: enabled
Flag: virtual_host_metadata, state: enabled
(3)在浏览器段验证:http://172.25.12.1:15672
2 集群的负载均衡HAProxy
(1)在两个节点部署Haproxy:yum install haproxy.x86_64 -y
- 编辑hapeoxy的配置文件:
vim /etc/haproxy/haproxy.cfg
#---------------------------------------------------------------------
# Example configuration for a possible web application.  See the
# full configuration options online.
#
#   http://haproxy.1wt.eu/download/1.4/doc/configuration.txt
#
#---------------------------------------------------------------------

#---------------------------------------------------------------------
# Global settings
#---------------------------------------------------------------------
global
    # to have these messages end up in /var/log/haproxy.log you will
    # need to:
    #
    # 1) configure syslog to accept network log events.  This is done
    #    by adding the '-r' option to the SYSLOGD_OPTIONS in
    #    /etc/sysconfig/syslog
    #
    # 2) configure local2 events to go to the /var/log/haproxy.log
    #   file. A line like the following can be added to
    #   /etc/sysconfig/syslog
    #
    #    local2.*                       /var/log/haproxy.log
    #

    log         127.0.0.1    local0    info
    chroot      /var/lib/haproxy
  #  pidfile     /var/run/haproxy.pid
    maxconn     4000
    user        haproxy
    group       haproxy
    daemon

    # turn on stats unix socket
   # stats socket /var/lib/haproxy/stats

#---------------------------------------------------------------------
# common defaults that all the 'listen' and 'backend' sections will
# use if not designated in their block
#---------------------------------------------------------------------
defaults
    mode                    http
    log                     global
    option                  httplog
    option                  dontlognull
    option http-server-close
  #  option forwardfor       except 127.0.0.0/8
    option                  redispatch
    retries                 3
    timeout http-request    10s
    timeout queue           1m
    timeout connect         10s
    timeout client          1m
    timeout server          1m
    timeout http-keep-alive 10s
    timeout check           10s
    maxconn                 3000
  #  stats uri /status
  #  stats auth admin:admin

listen admin_stats  :8100  ## 绑定端口
    stats    uri /status    ## 统计页面URI
    stats    auth admin:admin    ## 设置统计页面认证的用户和密码,如果要设置多个,另起一行写入即可
    mode    http
    option    httplog
#---------------------------------------------------------------------
# main frontend which proxys to the backends
#---------------------------------------------------------------------
#frontend  main *:5672
#    acl url_static       path_beg       -i /static /images /javascript /stylesheets
#    acl url_static       path_end       -i .jpg .gif .png .css .js
#
#    use_backend static          if url_static
#    default_backend             app

#---------------------------------------------------------------------
# static backend for serving up images, stylesheets and such
#---------------------------------------------------------------------
#backend static
#    balance     roundrobin
#    server      static 127.0.0.1:4331 check
#
#---------------------------------------------------------------------
# round robin balancing between the various backends
#---------------------------------------------------------------------
listen  rabbitmq_cluter  0.0.0.0:5670
    balance     roundrobin
    option tcplog
    mode tcp
    server  mqnode1 10.80.65.31:5672 check   inter 2000 rise 2 fall 3 weight 1
    server  mqnode2 10.80.65.32:5672 check   inter 2000 rise 2 fall 3 weight 1
(2)服务开机自动启动并立刻生效:systemctl enable --now haproxy.service
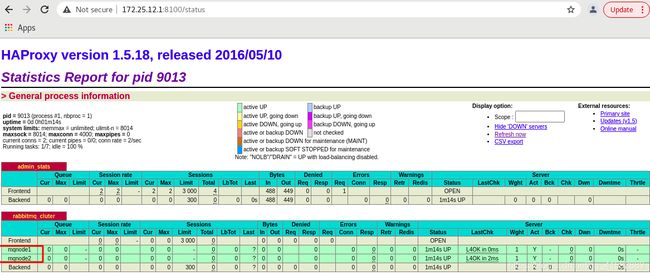
http://172.25.12.1:8100/status
(3)在浏览器段验证:http://172.25.12.1:8100/status


(4)测试
- 停止mq01的rabbitmq服务:
service rabbitmq-server stop
- 启动mq01的rabbitmq服务:
service rabbitmq-server start
3 keepalived实现集群高可用
(1)在两个节点部署keepalived
yum install -y keepalived.x86_64
- 配置Keepalived 的 MASTER 节点和 BACKUP 节点,并设置对外提供服务的VIP 为 172.25.12.100
(2)mq01作为master节点
- 编辑配置文件:
vim /etc/keepalived/keepalived.conf
! Configuration File for keepalived

global_defs {
   notification_email {
   root@localhost
   }
   notification_email_from [email protected]
   smtp_server 127.0.0.1
   smtp_connect_timeout 30
   router_id mq01  ## 不同节点要区分
   vrrp_skip_check_adv_addr
   # vrrp_strict
   vrrp_garp_interval 0
   vrrp_gna_interval 0
}

vrrp_script chk_haproxy {
    # 脚本位置
    script "/etc/keepalived/haproxy_check.sh"
    # 脚本执行的时间间隔
    interval 5
    weight 10
}


vrrp_instance VI_1 {
    state MASTER
    interface eth0
    virtual_router_id 51
    priority 100  ## master高于backup节点
    nopreempt
    advert_int 1
    # 如果两节点的上联交换机禁用了组播,则采用 vrrp 单播通告的方式
    unicast_src_ip 172.25.12.1
    unicast_peer {
        172.25.12.2
    }
    authentication {
        auth_type PASS
        auth_pass 1111
    }
    track_script {
        chk_haproxy  # 调用上面自定义的监控脚本
    }
    virtual_ipaddress {
        172.25.12.100 ## VIP
    }
}
(3)编写监控HAProxy 的脚本
- 通过 haproxy_check.sh 来对 HAProxy 进行监控,实现集群中haproxy的高可用
vim /etc/keepalived/haproxy_check.sh
#!/bin/bash
# 判断haproxy是否已经启动
if [ ${ps -C haproxy --no-header |wc -l} -eq 0 ] ; then
    #如果没有启动,则启动
    haproxy -f /etc/haproxy/haproxy.cfg
fi
#睡眠3秒以便haproxy完全启动
sleep 3

#如果haproxy还是没有启动,此时需要将本机的keepalived服务停掉,以便让VIP自动漂移到另外一台haproxy
if [ ${ps -C haproxy --no-header |wc -l} -eq 0 ] ; then
    systemctl stop keepalived
fi
- 给脚本添加执行权限:
chmod +x /etc/keepalived/haproxy_check.sh
(4)mq02作为BACKUP节点
- 编辑配置文件:
vim /etc/keepalived/keepalived.conf
! Configuration File for keepalived

global_defs {
   notification_email {
   root@localhost
   }
   notification_email_from [email protected]
   smtp_server 127.0.0.1
   smtp_connect_timeout 30
   router_id mq02
   vrrp_skip_check_adv_addr
   # vrrp_strict
   vrrp_garp_interval 0
   vrrp_gna_interval 0
}

vrrp_script chk_haproxy {
    # 脚本位置
    script "/etc/keepalived/haproxy_check.sh"
    # 脚本执行的时间间隔
    interval 5
    weight 10
}


vrrp_instance VI_1 {
    state BACKUP
    interface eth0
    virtual_router_id 51
    priority 50
    advert_int 1
    unicast_src_ip 172.25.12.2
    unicast_peer {
        172.25.12.1
    }
    authentication {
        auth_type PASS
        auth_pass 1111
    }
    track_script {
        chk_haproxy
    }
    virtual_ipaddress {
        172.25.12.100
    }
}
(5)在mq01和02节点配置 IP 转发
echo "net.ipv4.ip_nonlocal_bind = 1" >> /etc/sysctl.conf
sysctl -p ## 使更改生效
(6)测试
- 在两个节点上启动服务:
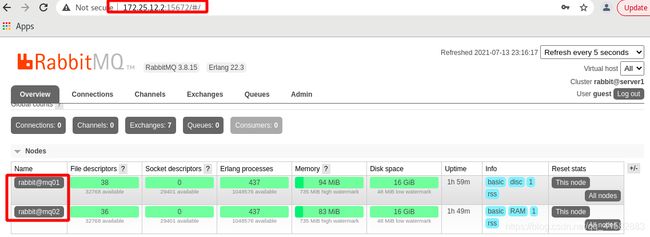
systemctl enable --now keepalived,VIP漂移到mq01上
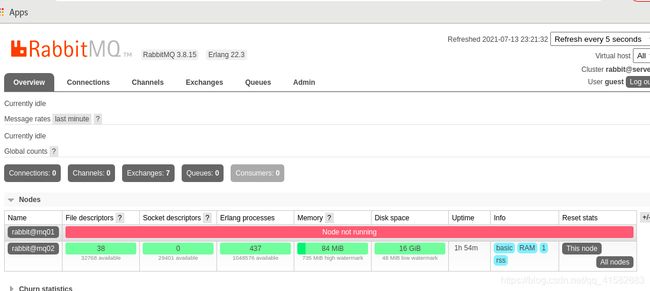
- 停止mq01的keepalived服务,可以发现 MASTER 上的 VIP 在MASTER(mq01)
- 重启 MASTER 服务器,会发现 VIP 又重新漂移回 MASTER 服务器


