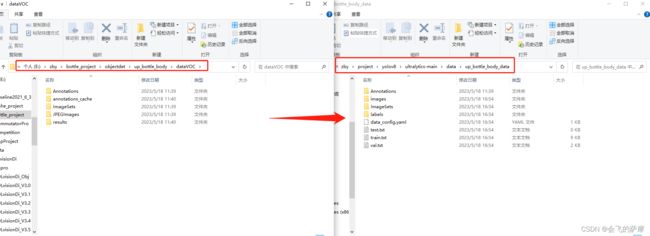
VOC格式数据集转适用YOLOv8格式
直接设置VOC数据集的文件夹目录、生成的v8格式数据集存放目录以及标签的名字就行了
直接执行后就会是下面这图这样重新创建一个文件夹存放符合yolov8格式的数据集,yolov8直接加载那个yaml文件就行

我下边只有一类,注意最后的yaml文件,里面存放的是train.txt、val.txt、test.txt的绝对路径,我这边默认是获取当前路径加相对路径作为其值的,想放在别的地方也可以手动更改或者把里面的当前路径wd替换掉
还有一个要注意的是数据集的划分,是split_dataset_by_xml函数进行划分的,我默认是90%用于训练,10%用于验证,请根据自己需求更改参数
# -*- coding: utf-8 -*-
# xml解析包
import random
import xml.etree.ElementTree as ET
import pickle
import os
import shutil
from os import listdir, getcwd
from os.path import join
from PIL import Image
import yaml


def convert_images_to_jpg(source_folder, destination_folder):
    # 检查目标文件夹是否存在,如果不存在则创建
    if not os.path.exists(destination_folder):
        os.makedirs(destination_folder)

    # 遍历源文件夹中的所有文件
    for file_name in os.listdir(source_folder):
        source_file = os.path.join(source_folder, file_name)

        # 检查文件是否为图像文件
        if os.path.isfile(source_file) and any(
                file_name.lower().endswith(extension) for extension in ['.jpg', '.jpeg', '.png', '.gif', '.bmp']):
            # 打开图像文件
            image = Image.open(source_file)

            # 将图像文件转换为 JPG 格式
            image = image.convert('RGB')

            # 构造目标文件路径
            destination_file = os.path.join(destination_folder,
                                            file_name.lower().replace('.png', '.jpg').replace('.jpeg', '.jpg').replace(
                                                '.gif', '.jpg').replace('.bmp', '.jpg'))

            # 保存图像文件为 JPG 格式
            image.save(destination_file, 'JPEG')

    print("Image conversion completed.")


def split_dataset_by_xml(xml_dir='data/Annotations', output_dir='data/ImageSets', train_percent=0.9, trainval_percent=1):
    """
    根据xml文件划分符合yolo格式的txt,输入voc格式数据集的Annotations文件夹路径,以及要存放的txt路径,还有训练验证比例,剩下的作为测试
    Args:
        xml_dir:
        output_dir:
        train_percent:
        trainval_percent:

    Returns:

    """
    xml_files = os.listdir(xml_dir)

    num = len(xml_files)
    tv = int(num * trainval_percent)
    tr = int(tv * train_percent)

    trainval = random.sample(xml_files, tv)
    train = random.sample(trainval, tr)

    with open(os.path.join(output_dir, 'trainval.txt'), 'w') as ftrainval, \
            open(os.path.join(output_dir, 'train.txt'), 'w') as ftrain, \
            open(os.path.join(output_dir, 'val.txt'), 'w') as fval, \
            open(os.path.join(output_dir, 'test.txt'), 'w') as ftest:

        for xml_file in xml_files:
            name = xml_file[:-4] + '\n'
            if xml_file in trainval:
                ftrainval.write(name)
                if xml_file in train:
                    ftrain.write(name)
                else:
                    fval.write(name)
            else:
                ftest.write(name)


# 进行归一化操作
def convert(size, box):  # size:(原图w,原图h) , box:(xmin,xmax,ymin,ymax)
    dw = 1. / size[0]  # 1/w
    dh = 1. / size[1]  # 1/h
    x = (box[0] + box[1]) / 2.0  # 物体在图中的中心点x坐标
    y = (box[2] + box[3]) / 2.0  # 物体在图中的中心点y坐标
    w = box[1] - box[0]  # 物体实际像素宽度
    h = box[3] - box[2]  # 物体实际像素高度
    x = x * dw  # 物体中心点x的坐标比(相当于 x/原图w)
    w = w * dw  # 物体宽度的宽度比(相当于 w/原图w)
    y = y * dh  # 物体中心点y的坐标比(相当于 y/原图h)
    h = h * dh  # 物体宽度的宽度比(相当于 h/原图h)
    return (x, y, w, h)  # 返回 相对于原图的物体中心点的x坐标比,y坐标比,宽度比,高度比,取值范围[0-1]


# year ='2012', 对应图片的id(文件名)
def convert_annotation(root, image_id, classes):
    '''
    将对应文件名的xml文件转化为label文件,xml文件包含了对应的bunding框以及图片长款大小等信息,
    通过对其解析,然后进行归一化最终读到label文件中去,也就是说
    一张图片文件对应一个xml文件,然后通过解析和归一化,能够将对应的信息保存到唯一一个label文件中去
    labal文件中的格式:calss x y w h  同时,一张图片对应的类别有多个,所以对应的bunding的信息也有多个
    '''
    # 对应的通过year 找到相应的文件夹,并且打开相应image_id的xml文件,其对应bund文件
    in_file = open(f'{root}/Annotations/%s.xml' % (image_id), encoding='utf-8')
    # 准备在对应的image_id 中写入对应的label,分别为
    #
    out_file = open(f'{root}/labels/%s.txt' % (image_id), 'w', encoding='utf-8')
    # 解析xml文件
    tree = ET.parse(in_file)
    # 获得对应的键值对
    root = tree.getroot()
    # 获得图片的尺寸大小
    size = root.find('size')
    # 如果xml内的标记为空,增加判断条件
    if size != None:
        # 获得宽
        w = int(size.find('width').text)
        # 获得高
        h = int(size.find('height').text)
        # 遍历目标obj
        for obj in root.iter('object'):
            # 获得difficult ??
            difficult = obj.find('difficult').text
            # 获得类别 =string 类型
            cls = obj.find('name').text
            # 如果类别不是对应在我们预定好的class文件中,或difficult==1则跳过
            if cls not in classes or int(difficult) == 1:
                continue
            # 通过类别名称找到id
            cls_id = classes.index(cls)
            # 找到bndbox 对象
            xmlbox = obj.find('bndbox')
            # 获取对应的bndbox的数组 = ['xmin','xmax','ymin','ymax']
            b = (float(xmlbox.find('xmin').text), float(xmlbox.find('xmax').text), float(xmlbox.find('ymin').text),
                 float(xmlbox.find('ymax').text))
            print(image_id, cls, b)
            # 带入进行归一化操作
            # w = 宽, h = 高, b= bndbox的数组 = ['xmin','xmax','ymin','ymax']
            bb = convert((w, h), b)
            # bb 对应的是归一化后的(x,y,w,h)
            # 生成 calss x y w h 在label文件中
            out_file.write(str(cls_id) + " " + " ".join([str(a) for a in bb]) + '\n')


if __name__ == '__main__':
    # ------------------------------------------ 参数 ------------------------------------------------------------------
    voc_path = r'E:\zby\bottle_project\objectdet\up_bottle_body\dataVOC'          # 原来存放voc数据集的目录 !!!
    cur_path = 'data/up_bottle_body_data'                                         # 当前数据集目录 !!!
    sets = ['train', 'test', 'val']                                               # 数据集的划分名字,一般不用改
    classes = ['ng']                                                              # 标签名字!!!

    # 返回当前工作目录
    wd = getcwd()
    print(wd)

    # 先把xml文件、图片文件复制过去,由于我原本的图片是bmp的,太大,所以转成jpg再复制过去
    # shutil.copytree 函数在复制文件夹时要求目标文件夹不存在
    if os.path.exists(cur_path + '/Annotations'):
        shutil.rmtree(cur_path + '/Annotations')
    shutil.copytree(voc_path + '/Annotations', cur_path + '/Annotations')
    convert_images_to_jpg(voc_path + '/JPEGImages', cur_path + '/images')
    suffix = 'jpg'
    # 创建labels,ImageSets文件夹
    if not os.path.exists(f'{cur_path}/labels/'):
        os.makedirs(f'{cur_path}/labels/')
    if not os.path.exists(f'{cur_path}/ImageSets/'):
        os.makedirs(f'{cur_path}/ImageSets/')

    # 划分数据集,事后重新划分也可单独执行这一函数
    split_dataset_by_xml(xml_dir=voc_path + '/Annotations',
                         output_dir=cur_path + '/ImageSets',
                         train_percent=0.9,
                         trainval_percent=1)

    # 根据划分的几个txt去各自进行坐标转化
    for image_set in sets:
        '''
        对所有的文件数据集进行遍历
        做了两个工作:
        1.将所有图片文件都遍历一遍,并且将其所有的全路径都写在对应的txt文件中去,方便定位
        2.同时对所有的图片文件进行解析和转化,将其对应的bundingbox 以及类别的信息全部解析写到label 文件中去
             最后再通过直接读取文件,就能找到对应的label 信息
        '''

        # 读取在ImageSets/Main 中的train、test..等文件的内容
        # 包含对应的文件名称
        image_ids = open(f'{cur_path}/ImageSets/%s.txt' % (image_set)).read().strip().split()
        # 打开对应的2012_train.txt 文件对其进行写入准备
        list_file = open(f'{cur_path}/%s.txt' % (image_set), 'w')
        # 将对应的文件_id以及全路径写进去并换行

        for image_id in image_ids:
            list_file.write(f'{cur_path}/images/%s.{suffix}\n' % (image_id))
            # 调用  year = 年份  image_id = 对应的文件名_id
            convert_annotation(cur_path, image_id, classes)
        # 关闭文件
        list_file.close()

    # 写入到yaml
    data = {
        'train': f'{wd}/{cur_path}/train.txt',
        'val': f'{wd}/{cur_path}/val.txt',
        'test': f'{wd}/{cur_path}/test.txt',
        'nc': len(classes),
        'names': classes
    }

    # 将内容写入YAML文件
    with open(f'{cur_path}/data_config.yaml', 'w') as file:
        yaml.dump(data, file, default_flow_style=False)
这是使用示例
from ultralytics import YOLO


if __name__ == '__main__':
    # 1 模型训练
    model = YOLO("yolov8s.pt", task='detect')  # n,s,m,l [detect、segment、classification]

    model.train(
        name='down_bottle_body',  # 用于保存训练文件夹名,默认exp,依次累加
        data="data/down_bottle_body_data/data_config.yaml",
        imgsz=480,
        epochs=200,
        batch=4,
        pretrained=True,
        optimizer='SGD',  # [‘SGD’, ‘Adam’, ‘AdamW’, ‘RMSProp’]
        lr0=0.01,  # 初始学习率(SGD=1E-2, Adam=1E-3)
        lrf=0.01,  # 最终学习率(lr0 * lrf)
        exist_ok=True,  # 是否覆盖现有保存文件夹,默认Flase
        save=True,  # 是否需要保存训练的模型和预测结果
    )