《Entity Framework 6 Recipes》中文翻译系列 (20) -----第四章 ASP.NET MVC中使用实体框架之在MVC中构建一个CRUD示例
翻译的初衷以及为什么选择《Entity Framework 6 Recipes》来学习,请看本系列开篇
第四章 ASP.NET MVC中使用实体框架
ASP.NET是一个免费的Web框架,它支持3种不同的技术来创建websites(网站)和Web应用;他们分别是,Web Pages,Web Forms,和MVC。虽然MVC是一种非常流行的,有完整的用于软件开发模式理论的技术,但它在ASP.NET中却是一种新的技术。 目前最新的版本是2012年发布的ASP.NET MVC4。自从2008年发布最初的版本后,它已经变成继ASP.NET Web-Forms后的一种流行的开发方式。因此,本章将展示ASP.NET MVC4和实体框架的开发技巧,不覆盖ASP.NET中另外两种技术---ASP.NET Web Forms和ASP.NET Web Pages。
本章将全面地介绍构建一个包含插入、更新、删除和实现列表页搜索的应用。
本章的每一技巧都是使用Visual Studio2012中的ASP.NET MVC4 Web应用来展示,我们尽可能地保持示例的简单,因此不打算包含默认模板中的所有功能。
4.1. 构建一个包含CRUD操作的ASP.NET MVC页
创建、读取、更新、删除(CRUD)操作,几乎是所有软件应用最基本的功能。我们打算在本节使用ASP.NET MVC来实现这些操作。
问题
你想一个ASP.NET MVC页,它能从模型中插入、更新、删除和读取数据。
解决方案
假设你有一个Web 应用 ,它管理着一个移动应用的app列表。你有如图4-1所示的模型。
图4-1 一个包含Category实体类型的模型,该实体类型包含一个应用目录名(Name)和描述(Description)属性
这个模型包含一个category实体类型,你想创建一个简单的ASP.NET MVC 页面来展示app的目录列表。同时,你允许用户创建一个新的app目录,更新和删除一个存在的目录。虽然有很多方式可以实现这个需求,但我们将采用一种非常简单的方式,让你理解在ASP.NET MVC中集成实体框架。为了创建一个MVC应用,你需要三个部分,一个model,一个controller和一个view. 我们将使用文件MyStore.mdf作为我们数据库。我们将在视图中使用Razor视图引擎。依据动作或操作的需要,虽然只需要一个model,但会有多个views。在我们的示例中,我们将使用4个视图,一个用于创建,一个用于更新,一个用于删除,一个用于列表显示。
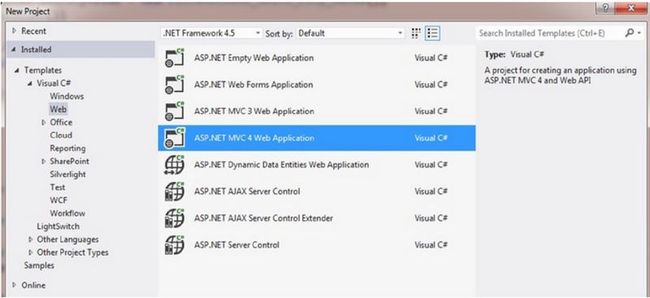
首先,我们要创建一个ASP.NET MVC4 的Web应用,如图4-2和4-3所演示的,我将使用项目模板Internet Application。
图4-2 在Visua Studio2012中选择ASP.NET MVC Web Application 项目
图4-3 选择项目模型 ASP.NET MVC application
一个新的带了一些默认文件和文件夹的项目被创建了。
现在可以为应用准备数据库了,为了使示例简单清晰,我们在项目中使用数据库文件MyStore.mdf。
在Visual Studio开发环境中,很容易创建MDF格式的数据库文件,这个文件能被附加到SQL Server Experess实例中,并像正常的,完整的数据一样使用。不同之处在于,这只是通过数据库连接字符串附加,并不是永久地将其附加到SQL Server的实例中。
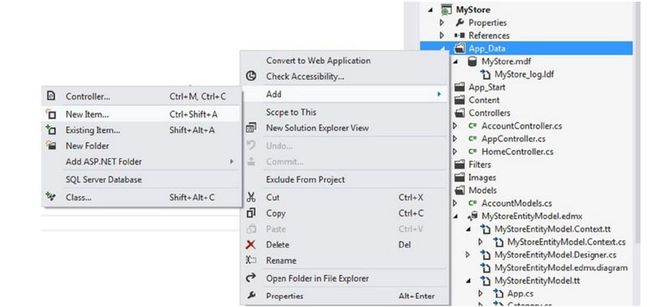
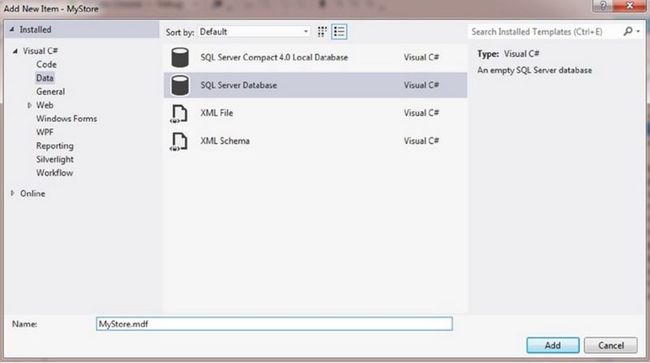
右键文件夹App_Data并添加一个新的.mdf文件,这个文件可以用两种方式添加 ,在Add上下文添加中选择New Item(新建项),如图4-4所示,或者选择 SQL Server Database,如图4-5所示。
图4-5 在app_data文件夹中添加新项
图4-5 选择一个SQL Server Database文件作为新建项添加
在.mdf文件中创建三张表后,我们使用实体框架生成一个新的模型,如图4-6所示
图4-6 三张表及其他们之前的关联
这个模型是能过添加ADO.NET Entity Data Model到你的项目的Models文件夹中生成的,如图4-7所示:
图4-7 添加一个实体数据模型
正如我们在前面讨论的那样,ASP.NET MVC应用需要三个部分,model,view 和controller。我已经完成对model部分的创建。接下来,我们需要创建一个controller,最后创建 views。views的数量,由controller中执行的动作来决定。
如图4-8所示,添加一个controller,右键Controllers文件夹,然后选择添加一个Controller,并命名为CategoryController.
图4-8 添加一个controller
正如你看到的那样,我们在添加CategoryCntroller的窗口中选择了模板 empty read/write actions。它会在controller中创建一些动作方法。需要使用的数据库上下文如代码清单4-1所示。
代码清单4-1. 继承自DbContext类的上下文对象,它将使用实体框架在数据库执行操作
 1 public partial class MyStoreEntities : DbContext
 2     {
 3         public MyStoreEntities()
 4             : base("name=MyStoreEntities")
 5         {
 6         }
 7
 8         protected override void OnModelCreating(DbModelBuilder modelBuilder)
 9         {
10             throw new UnintentionalCodeFirstException();
11         }
12
13         public DbSet<App> Apps { get; set; }
14         public DbSet<Category> Categories { get; set; }
15         public DbSet<Developer> Developers { get; set; }
16     }
如代码清单4-2所示,我们修改了控制器中的代码,使它能通过DbContext类执行插入、删除 、编辑和显示。
  1 //
  2         // GET: /Category/
  3
  4         public ActionResult Index()
  5         {
  6             using (var db = new MyStoreEntities())
  7             {
  8                 return View(db.Categories.ToList());
  9             }
 10         }
 11
 12         //
 13         // GET: /Category/Details/5
 14
 15         public ActionResult Details(int id)
 16         {
 17             using (var db = new MyStoreEntities())
 18             {
 19                 return View(db.Categories.Find(id));
 20             }
 21         }
 22
 23         //
 24         // GET: /Category/Create
 25
 26         public ActionResult Create()
 27         {
 28             return View();
 29         }
 30
 31         //
 32         // POST: /Category/Create
 33
 34         [HttpPost]
 35         public ActionResult Create(Category categoryValue)
 36         {
 37             try
 38             {
 39                 using (var db = new MyStoreEntities())
 40                 {
 41                     db.Categories.Add(categoryValue);
 42                     db.SaveChanges();
 43                 }
 44                 return RedirectToAction("Index");
 45             }
 46             catch
 47             {
 48                 return View();
 49             }
 50         }
 51
 52         //
 53         // GET: /Category/Edit/5
 54
 55         public ActionResult Edit(int id)
 56         {
 57             using (var db = new MyStoreEntities())
 58             {
 59                 return View(db.Categories.Find(id));
 60             }
 61         }
 62
 63         //
 64         // POST: /Category/Edit/5
 65
 66         [HttpPost]
 67         public ActionResult Edit(int id, Category categoryValue)
 68         {
 69             try
 70             {
 71                 using (var db = new MyStoreEntities())
 72                 {
 73                     db.Entry(categoryValue).State = System.Data.Entity.EntityState.Modified;
 74                     db.SaveChanges();
 75                     return RedirectToAction("Index");
 76                 }
 77             }
 78             catch
 79             {
 80                 return View();
 81             }
 82         }
 83
 84         //
 85         // GET: /Category/Delete/5
 86
 87         public ActionResult Delete(int id)
 88         {
 89             using (var db = new MyStoreEntities())
 90             {
 91                 return View(db.Categories.Find(id));
 92             }
 93         }
 94
 95         //
 96         // POST: /Category/Delete/5
 97
 98         [HttpPost]
 99         public ActionResult Delete(int id, Category categoryValue)
100         {
101             try
102             {
103                 using (var db = new MyStoreEntities())
104                 {
105                     db.Entry(categoryValue).State = System.Data.Entity.EntityState.Deleted;
106                     db.SaveChanges();
107                     return RedirectToAction("Index");
108                 }
109             }
110             catch
111             {
112                 return View();
113             }
114         }
为CategoryController中的动作,新建、删除、明细、编辑和Index添加五个视图。你可以按图4-9所示添加视图,在controller里的动作方法上右键并选择AddView。这样一个新的视图将被添加到Views ➤Category文件夹。
图4-9 通过在controller中的动作方法添加视图
在添加视图的对话框,如图4-10所示,选择Razor视图引擎(CSHTML),然后勾选上创建一个强类型的视图,最后选择Category(MyStore.Models)类作为Model.
图4-10 添加一个视图
代码清单4-3中的Index视图,是一个显示app目录的视图页,它上面有New(新建)按钮,editing(编辑)按钮、deleting(删除)按钮。代码清单4-4创建的视图页用来插入一个应用目录。
代码清单4-3. Index视图代码
 1 @model IEnumerable<MyStore.Models.Category>
 2
 3 @{
 4     Layout = null;
 5 }
 6
 7 <!DOCTYPE html>
 8
 9 <html>
10 <head>
11     <meta name="viewport" content="width=device-width" />
12     <title>Index</title>
13 </head>
14 <body>
15     <p>
16         @Html.ActionLink("Create New", "Create")
17     </p>
18     <table>
19         <tr>
20             <th>
21                 @Html.DisplayNameFor(model => model.Name)
22             </th>
23             <th>
24                 @Html.DisplayNameFor(model => model.Description)
25             </th>
26             <th></th>
27         </tr>
28
29     @foreach (var item in Model) {
30         <tr>
31             <td>
32                 @Html.DisplayFor(modelItem => item.Name)
33             </td>
34             <td>
35                 @Html.DisplayFor(modelItem => item.Description)
36             </td>
37             <td>
38                 @Html.ActionLink("Edit", "Edit", new { id=item.CategoryId }) |
39                 @Html.ActionLink("Details", "Details", new { id=item.CategoryId }) |
40                 @Html.ActionLink("Delete", "Delete", new { id=item.CategoryId })
41             </td>
42         </tr>
43     }
44
45     </table>
46 </body>
47 </html>
代码清单4-4. Create视图代码
 1 @model MyStore.Models.Category
 2
 3 @{
 4     Layout = null;
 5 }
 6
 7 <!DOCTYPE html>
 8
 9 <html>
10 <head>
11     <meta name="viewport" content="width=device-width" />
12     <title>Create</title>
13 </head>
14 <body>
15     <script src="~/Scripts/jquery-1.8.2.min.js"></script>
16     <script src="~/Scripts/jquery.validate.min.js"></script>
17     <script src="~/Scripts/jquery.validate.unobtrusive.min.js"></script>
18
19     @using (Html.BeginForm()) {
20         @Html.AntiForgeryToken()
21         @Html.ValidationSummary(true)
22
23         <fieldset>
24             <legend>Category</legend>
25
26             <div class="editor-label">
27                 @Html.LabelFor(model => model.Name)
28             </div>
29             <div class="editor-field">
30                 @Html.EditorFor(model => model.Name)
31                 @Html.ValidationMessageFor(model => model.Name)
32             </div>
33
34             <div class="editor-label">
35                 @Html.LabelFor(model => model.Description)
36             </div>
37             <div class="editor-field">
38                 @Html.EditorFor(model => model.Description)
39                 @Html.ValidationMessageFor(model => model.Description)
40             </div>
41
42             <p>
43                 <input type="submit" value="Create" />
44             </p>
45         </fieldset>
46     }
47
48     <div>
49         @Html.ActionLink("Back to List", "Index")
50     </div>
51 </body>
52 </html>
代码清单4-3中的代码显示了一个app目录列表视图页,以及插入目录,编辑、删除当前目录的按钮。该页的效果如图4-11所示。
图4-11 app目录列表
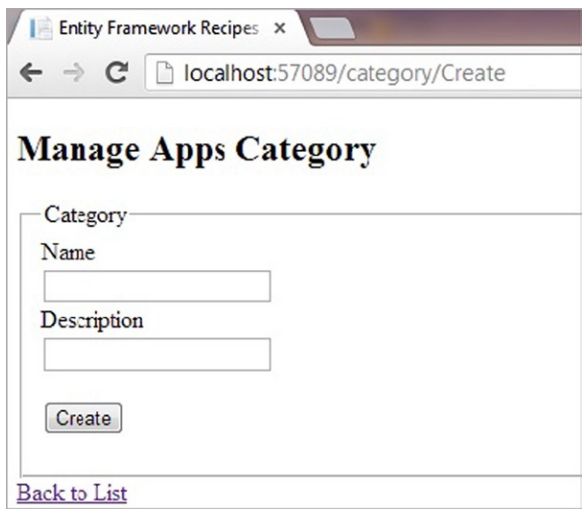
图4-12所示的,文本框允许用户输入目录信息,点击Create按钮,将会在数据库中添加一条新的记录。
图4-12 插入一个新的app目录
如图4-13所示,在Index视图上单击Edit按钮,将会显示允许你编辑一个存在的app目录的视图页。
图4-13 编辑一个app目录
原理
整个代码分为三个部分:
1、上下文对象类(代码清单4-1);
2、Controller代码(代码清单4-2);
3、视图代码(代码清单4-3,4-4);
controller代码是最大的一部分,它提供了整个操作的核心功能。视图是基于Controller中的动作方法创建的。所有的获取,创建,更新,删除都是在动作方法中处理。视图无论是通过URL或是另一个视图访问,相应的controller中的动作方法都会被调用。我们在创建视图时选择了scaffoleding 选项。通过选择这个选项,它会使用razor视图引擎自动生成编辑、创建 、和显示列表的HTML代码。
本篇有点长,主要是图有点多,辛苦大家了,感谢你们的阅读!
完整示例,请在群共享下载,文件大小超过了博客园的限制,所以这里提供不了下载。
实体框架交流QQ群: 458326058,欢迎有兴趣的朋友加入一起交流
谢谢大家的持续关注,我的博客地址:http://www.cnblogs.com/VolcanoCloud/


