- css预编译
风不在乎
前端csscss前端scsslessstylus
前言定义我们使用css来编写样式,但是随着样式效果的多样化以及复杂化,css变量常量的缺失、语法的呆板等一成不变的写法就会十分臃肿难以维护。所以基于css扩展了一套属于自己的语法,通过专门的编程语言,扩展css的编程能力,在编译成css。常见的库有less、scss/sass、stylus等。特点完美兼容css代码,结构清晰便于扩展支持css定义变量常量、代码嵌套提供函数,支持循环语句支持模块化,
- 使用Three.js渲染器创建炫酷3D场景
Front_Yue
3D技术实践指南javascriptthree.js3d
引言在当今数字化的时代,3D图形技术正以其独特的魅力在各个领域掀起波澜。从影视制作到游戏开发,从虚拟现实到网页交互,3D场景以其强烈的视觉冲击力和沉浸式的体验,成为了吸引用户、传达信息的重要手段。而Three.js,作为一款功能强大且广受欢迎的JavaScript3D库,为我们提供了便捷、高效的途径来创建令人炫目的3D场景。本文将深入探讨使用Three.js渲染器创建炫酷3D场景的方方面面,带领读
- 04.文本标签
龙哥带你学编程
#html前端
一、文本简介1、页面组成元素1)以淘宝购物官网为例,分析网页:在淘宝购物官网的首页上,我们可以看到它是由超链接,文字,图片等元素构成。2)页面组成元素①一个静态页面绝大部分由以下四种元素组成:文本图片超链接音频和视频②思考:符合以下特点的网页是静态还是动态页面?带有音频和视频带有flash动画带有css动画带有JavaScript特效不是。动态页面和静态页面区别在于:是否用到了后端技术,以及是否与
- PyCharm v2024.3.5 强大的Python IDE工具 支持M、Intel芯片
2401_89264762
pythonidepycharm
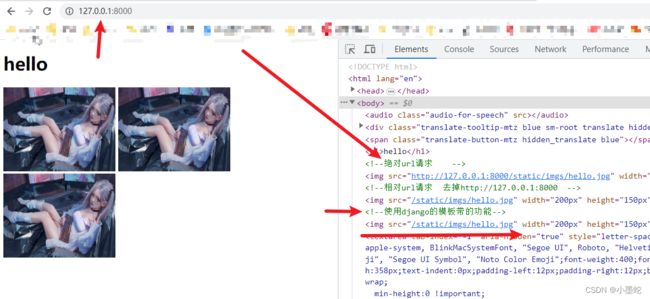
PyCharm是一种PythonIDE,带有一整套可以帮助用户在使用Python语言开发时提高其效率的工具,比如调试、语法高亮、Project管理、代码跳转、智能提示、自动完成、单元测试、版本控制。此外,该IDE提供了一些高级功能,以用于支持Django框架下的专业Web开发。应用介绍PyCharm是由JetBrains打造的一款PythonIDE,VS2010的重构插件Resharper就是出自
- 基于python+django的旅游信息网站-旅游景点门票管理系统源码+运行步骤
冷琴1996
Python系统设计pythondjango旅游
该系统是基于python+django开发的旅游景点门票管理系统。是给师弟做的课程作业。大家学习过程中,遇到问题可以在github咨询作者。学习过程问题可以留言哦演示地址前台地址:http://travel.gitapp.cn后台地址:http://travel.gitapp.cn/admin后台管理帐号:用户名:admin123密码:admin123源码地址https://github.com/
- 50个常见的python毕业设计/课程设计(源码+文档)
冷琴1996
Python系统设计python课程设计开发语言
计算机课程设计/毕业设计指南,为计算机相关专业毕业生提供源码、数据库安装、远程调试等相关服务,提供功能讲解视频。下面是50个基于python/django/vue的毕业设计/课程设计。1.网上商城系统这是一个基于python+vue开发的商城网站,平台采用B/S结构,后端采用主流的Python语言进行开发,前端采用主流的Vue.js进行开发。整个平台包括前台和后台两个部分。前台功能包括:首页、商品
- 9种JavaScript数组去重的高阶方法
2501_90226133
javascriptjava算法
给定一个数组[1,2,2,4,null,null,‘3’,‘abc’,3,5,4,1,2,2,4,null,null,‘3’,‘abc’,3,5,4]去除重复项。letarr=[1,2,2,4,null,null,‘3’,‘abc’,3,5,4,1,2,2,4,null,null,‘3’,‘abc’,3,5,4]1、利用对象的key唯一众所周知,对象的key不可重复,否则后者将覆盖前者。利用该特性
- 基于python+django+mysql的小区物业管理系统源码+运行步骤
冷琴1996
Python系统设计python开发语言
该系统是基于python+django开发的小区物业管理系统。适用场景:大学生、课程作业、毕业设计。学习过程中,如遇问题可以在github给作者留言。主要功能有:业主管理、报修管理、停车管理、资产管理、小区管理、用户管理、日志管理、系统信息。源码学习技术。演示地址http://wuye.gitapp.cn/admin后台管理帐号:用户名:admin123密码:admin123源码地址https:/
- Ark-TS 语言:鸿蒙生态的高效开发利器,让我们用大白话说一说
harmonyos-next
Ark-TS(华为专门为鸿蒙系统——就是华为自己的手机、平板、智能设备操作系统——设计的编程语言,基于TypeScript,一种比普通JavaScript更严格、能减少错误的语言)是鸿蒙应用开发的主力工具。它就像给开发者配备了一套趁手的工具包,让写代码又快又稳。简单来说,Ark-TS有几个厉害的地方:静态类型检查(写代码时必须给变量指定类型,比如数字、文字,这样电脑能在运行前就发现类型错误,避免程
- 单例模式实现
后端
一、是什么单例模式(SingletonPattern):创建型模式,提供了一种创建对象的最佳方式,这种模式涉及到一个单一的类,该类负责创建自己的对象,同时确保只有单个对象被创建在应用程序运行期间,单例模式只会在全局作用域下创建一次实例对象,让所有需要调用的地方都共享这一单例对象,如下图所示:二、实现在javascript中,实现一个单例模式可以用一个变量来标志当前的类已经创建过对象,如果下次获取当
- 【css酷炫效果】css酷炫效果100篇合集
冰夏之夜影
css前端
【css酷炫效果】纯CSS实现立体纸张折叠动效缘创作背景动画效果合集【css酷炫效果】实现鱼群游动动态效果【css酷炫效果】纯CSS实现无限旋转加载动画【css酷炫效果】纯CSS实现悬浮放大卡片【css酷炫效果】纯CSS创建流体渐变背景动画【css酷炫效果】纯CSS实现3D翻转卡片动画【css酷炫效果】纯CSS实现文字逐字显现打字效果【css酷炫效果】纯CSS实现霓虹文字呼吸灯效果【css酷炫效果
- JavaScript HTML DOM 节点列表
宇哥资料
JavaScriptjavascripthtml开发语言
NodeList对象是一个从文档中获取的节点列表(集合)。NodeList对象类似HTMLCollection对象。一些旧版本浏览器中的方法(如:getElementsByClassName())返回的是NodeList对象,而不是HTMLCollection对象。所有浏览器的childNodes属性返回的是NodeList对象。大部分浏览器的querySelectorAll()返回NodeLis
- js知识点-拓展运算符和剩余运算符
lmryBC49
javascript开发语言ecmascript
概述在现代JavaScript开发中,ES6引入的拓展运算符(SpreadOperator)和剩余运算符(RestOperator)让代码更加简洁和灵活。无论是数组、对象的拆分与合并,还是函数参数的处理,这两个运算符都是非常实用的工具。拓展运算符1.什么是拓展运算符?拓展运算符(SpreadOperator)由三个连续的点...表示,用于将一个可迭代对象(例如数组、字符串等)展开成多个元素。拓展运
- 快速入手-基于Django的mysql操作(四)
神奇侠2024
djangodjango
1、数据的增删改查defadd(request):UserInfo.objects.create(username="admin",password="1234561",age=18)UserInfo.objects.create(username="admin2",password="1234562",age=19)UserInfo.objects.create(username="admin3
- 基于python+django的家教预约网站-家教信息管理系统源码+运行步骤
冷琴1996
Python系统设计pythondjango开发语言
该系统是基于python+django开发的家教预约网站。是给师妹做的课程作业。大家在学习过程中,遇到问题可以在github给作者留言。共同学习进步哦效果演示前台地址:http://jiajiao.gitapp.cn后台地址:http://jiajiao.gitapp.cn/admin后台管理帐号:用户名:admin123密码:admin123源码地址https://github.com/geee
- Vue.js 性能优化:虚拟 DOM 与虚拟滚动
vvilkim
vuevue.js前端javascript
在现代前端开发中,性能优化是一个永恒的话题。Vue.js作为一款流行的前端框架,提供了许多强大的工具和技术来提升应用的性能。其中,虚拟DOM和虚拟滚动是两个非常重要的概念。本文将深入探讨它们的原理、优势以及如何在Vue.js中使用它们来优化性能。什么是虚拟DOM?虚拟DOM(VirtualDOM)是Vue.js用于提升性能的核心技术之一。它是一个轻量级的JavaScript对象树,用于表示真实DO
- python基于Django的旅游景点数据分析及可视化的设计与实现 7blk7
qq2295116502
pythondjango数据分析
目录项目介绍技术栈具体实现截图Scrapy爬虫框架关键技术和使用的工具环境等的说明解决的思路开发流程爬虫核心代码展示系统设计论文书写大纲详细视频演示源码获取项目介绍大数据分析是现下比较热门的词汇,通过分析之后可以得到更多深入且有价值的信息。现实的科技手段中,越来越多的应用都会涉及到大数据随着大数据时代的到来,数据挖掘、分析与应用成为多个行业的关键,本课题首先介绍了网络爬虫的基本概念以及技术实现方法
- 用python执行js代码:PyExecJS库详解
数据知道
2025年爬虫和逆向教程pythonjavascript爬虫数据采集nodejs
更多内容请见:爬虫和逆向教程-专栏介绍和目录文章目录1.介绍和安装1.1PyExecJS介绍1.2安装JavaScript运行时1.3安装PyExecJS2.PyExecJS的基本使用2.1执行简单的JavaScript代码2.2使用外部JavaScript文件2.3先编译、后调用2.4传递参数和获取返回值3.PyExecJS的高级功能3.1指定JavaScript运行时3.2处理异步JavaSc
- JAVA毕业设计BS架构考研交流学习平台设计与实现计算机源码+lw文档+系统+调试部署+数据库
瑞致网络
java开发语言jvm
JAVA毕业设计BS架构考研交流学习平台设计与实现计算机源码+lw文档+系统+调试部署+数据库JAVA毕业设计BS架构考研交流学习平台设计与实现计算机源码+lw文档+系统+调试部署+数据库本源码技术栈:项目架构:B/S架构开发语言:Java语言开发软件:ideaeclipse前端技术:Layui、HTML、CSS、JS、JQuery等技术后端技术:JAVA运行环境:Win10、JDK1.8数据库:
- 5-1 使用ECharts将MySQL数据库中的数据可视化
上课的牛马
实训大数据
方法一:使用PythonFlask框架搭建API对于技术小白来说,使用ECharts将MySQL数据库中的数据可视化需要分步骤完成。以下是详细的实现流程:一、技术架构后端服务:使用PythonFlask框架搭建API(简单易学,适合新手)数据库连接:通过Python的pymysql库连接MySQL前端可视化:HTML+JavaScript+ECharts数据流向:MySQL数据库→Pyt
- 计算机毕业设计JavaBS景区票务管理系统设计与实现(源码+系统+mysql数据库+lw文档)
毅铭科技
数据库
计算机毕业设计JavaBS景区票务管理系统设计与实现(源码+系统+mysql数据库+lw文档)计算机毕业设计JavaBS景区票务管理系统设计与实现(源码+系统+mysql数据库+lw文档)本源码技术栈:项目架构:B/S架构开发语言:Java语言开发软件:ideaeclipse前端技术:Layui、HTML、CSS、JS、JQuery等技术后端技术:JAVA运行环境:Win10、JDK1.8数据库:
- 亿级分布式系统架构演进实战(五)- 横向扩展(缓存策略设计)
power-辰南
java技术架构师成长专栏多级缓存策略springcloud分布式系统缓存一致性高并发缓存问题解决方案
亿级分布式系统架构演进实战(一)-总体概要亿级分布式系统架构演进实战(二)-横向扩展(服务无状态化)亿级分布式系统架构演进实战(三)-横向扩展(数据库读写分离)亿级分布式系统架构演进实战(四)-横向扩展(负载均衡与弹性伸缩)核心目标降低数据库读压力,提升响应速度一、多级缓存架构客户端CDN/浏览器缓存本地应用缓存分布式缓存数据库缓冲池1.1客户端缓存缓存数据类型:•静态资源(JS/CSS/图片)•
- HTML5响应式使用css媒体查询
前段技术人
html5css媒体
HTML负责搭建页面结构,CSS负责样式设计,并且通过媒体查询实现了较好的响应式效果,能够适应不同屏幕尺寸下面就是写了一个详细的实例。CSS部分*{margin:0;padding:0;box-sizing:border-box;}*是通配选择器,会选中页面上的所有元素。margin:0;将所有元素的外边距设置为0。padding:0;将所有元素的内边距设置为0。box-sizing:border
- 前端面试:[React] Recoil 里面 selector 支持哪些参数?
returnShitBoy
前端面试react.js
在Recoil中,selector用于派生状态并可以通过传递不同的参数来实现更强大的功能。创建selector时,可以传入以下参数:1.key类型:string描述:是selector的唯一标识符。每个selector和atom都必须有一个唯一的key,否则会抛出错误。这个key用于在Recoil状态树中进行识别。示例:javascriptconstmySelector=selector({key
- 使用Three.js渲染器创建炫酷3D场景
引言在当今数字化的时代,3D图形技术正以其独特的魅力在各个领域掀起波澜。从影视制作到游戏开发,从虚拟现实到网页交互,3D场景以其强烈的视觉冲击力和沉浸式的体验,成为了吸引用户、传达信息的重要手段。而Three.js,作为一款功能强大且广受欢迎的JavaScript3D库,为我们提供了便捷、高效的途径来创建令人炫目的3D场景。本文将深入探讨使用Three.js渲染器创建炫酷3D场景的方方面面,带领读
- 用Babel操作AST实现JavaScript代码的自动化生成与转换
目录目录环境搭建代码:修改AST的逻辑重命名函数名重命名变量并修改变量值函数调用替换控制流扁平化还原删除未使用的变量对象属性简化条件表达式优化表达式还原环境搭建安装环境npminstall@babel/parser@babel/traverse@babel/generator@babel/typesast转换的代码框架constfs=require('fs');constvm=require('n
- 【sass】学会这个技巧,少写很多css
蒜香拿铁
csssass前端
sass的高级用法我发现,大多数人使用sass预处理器最多的就是嵌套和变量这两种用法。现在我在列举一些常用的高级用法,希望让大家少敲两行代码。@extend意思是将某个选择器下的所有样式继承过来.error{border:1px#f00;background-color:#fdd;}.seriousError{@extend.error;border-width:3px;}@mixin样式混入,搭
- 3.1css选择器优先级和常用文本属性
chxii
go语言#前端css前端
在CSS(层叠样式表)中,选择器的优先级决定了当多个选择器应用于同一个元素时,哪个样式的规则会被应用。选择器的优先级是通过特定的规则来计算的,这些规则决定了样式声明的权重。以下是CSS选择器优先级的基本规则:重要性(!important)如果某个样式声明使用了!important,那么它将覆盖没有使用!important的任何规则。例如:p{color:red!important;}在这种情况下,
- Node.js 格式化时间的两种方法:原生 Date 与 npm 包 moment 详解
还是鼠鼠
node.jsnode.jsnpm前端javascriptvscode
目录Node.js格式化时间的两种做法:内置方法与npm包1.使用JavaScript内置方法格式化时间示例:使用Date对象格式化时间运行程序示例输出原理解析2.使用npm包moment进行时间格式化安装moment示例:使用moment格式化时间运行程序示例输出原理解析3.两种方法的对比4.结论在Node.js开发中,格式化时间是一个常见的需求。例如,将时间格式化为YYYY-MM-DDHH:m
- 如何使用webpack预加载 CSS 中定义的资源和预加载 CSS 文件
混血哲谈
webpackcss前端
在Webpack中预加载CSS文件及其内部定义的资源(如图片、字体等),可以通过资源预加载(Preloading)技术优化关键资源的加载优先级。以下是具体的实现方法和步骤:一、预加载CSS文件1.使用@vue/preload-webpack-plugin或手动注入Webpack默认不直接支持CSS文件的预加载,但可以通过插件或手动添加实现。方法一:通过@vue/preload-webpack-pl
- 多线程编程之理财
周凡杨
java多线程生产者消费者理财
现实生活中,我们一边工作,一边消费,正常情况下会把多余的钱存起来,比如存到余额宝,还可以多挣点钱,现在就有这个情况:我每月可以发工资20000万元 (暂定每月的1号),每月消费5000(租房+生活费)元(暂定每月的1号),其中租金是大头占90%,交房租的方式可以选择(一月一交,两月一交、三月一交),理财:1万元存余额宝一天可以赚1元钱,
- [Zookeeper学习笔记之三]Zookeeper会话超时机制
bit1129
zookeeper
首先,会话超时是由Zookeeper服务端通知客户端会话已经超时,客户端不能自行决定会话已经超时,不过客户端可以通过调用Zookeeper.close()主动的发起会话结束请求,如下的代码输出内容
Created /zoo-739160015
CONNECTEDCONNECTED
.............CONNECTEDCONNECTED
CONNECTEDCLOSEDCLOSED
- SecureCRT快捷键
daizj
secureCRT快捷键
ctrl + a : 移动光标到行首ctrl + e :移动光标到行尾crtl + b: 光标前移1个字符crtl + f: 光标后移1个字符crtl + h : 删除光标之前的一个字符ctrl + d :删除光标之后的一个字符crtl + k :删除光标到行尾所有字符crtl + u : 删除光标至行首所有字符crtl + w: 删除光标至行首
- Java 子类与父类这间的转换
周凡杨
java 父类与子类的转换
最近同事调的一个服务报错,查看后是日期之间转换出的问题。代码里是把 java.sql.Date 类型的对象 强制转换为 java.sql.Timestamp 类型的对象。报java.lang.ClassCastException。
代码:
- 可视化swing界面编辑
朱辉辉33
eclipseswing
今天发现了一个WindowBuilder插件,功能好强大,啊哈哈,从此告别手动编辑swing界面代码,直接像VB那样编辑界面,代码会自动生成。
首先在Eclipse中点击help,选择Install New Software,然后在Work with中输入WindowBui
- web报表工具FineReport常用函数的用法总结(文本函数)
老A不折腾
finereportweb报表工具报表软件java报表
文本函数
CHAR
CHAR(number):根据指定数字返回对应的字符。CHAR函数可将计算机其他类型的数字代码转换为字符。
Number:用于指定字符的数字,介于1Number:用于指定字符的数字,介于165535之间(包括1和65535)。
示例:
CHAR(88)等于“X”。
CHAR(45)等于“-”。
CODE
CODE(text):计算文本串中第一个字
- mysql安装出错
林鹤霄
mysql安装
[root@localhost ~]# rpm -ivh MySQL-server-5.5.24-1.linux2.6.x86_64.rpm Preparing... #####################
- linux下编译libuv
aigo
libuv
下载最新版本的libuv源码,解压后执行:
./autogen.sh
这时会提醒找不到automake命令,通过一下命令执行安装(redhat系用yum,Debian系用apt-get):
# yum -y install automake
# yum -y install libtool
如果提示错误:make: *** No targe
- 中国行政区数据及三级联动菜单
alxw4616
近期做项目需要三级联动菜单,上网查了半天竟然没有发现一个能直接用的!
呵呵,都要自己填数据....我了个去这东西麻烦就麻烦的数据上.
哎,自己没办法动手写吧.
现将这些数据共享出了,以方便大家.嗯,代码也可以直接使用
文件说明
lib\area.sql -- 县及县以上行政区划分代码(截止2013年8月31日)来源:国家统计局 发布时间:2014-01-17 15:0
- 哈夫曼加密文件
百合不是茶
哈夫曼压缩哈夫曼加密二叉树
在上一篇介绍过哈夫曼编码的基础知识,下面就直接介绍使用哈夫曼编码怎么来做文件加密或者压缩与解压的软件,对于新手来是有点难度的,主要还是要理清楚步骤;
加密步骤:
1,统计文件中字节出现的次数,作为权值
2,创建节点和哈夫曼树
3,得到每个子节点01串
4,使用哈夫曼编码表示每个字节
- JDK1.5 Cyclicbarrier实例
bijian1013
javathreadjava多线程Cyclicbarrier
CyclicBarrier类
一个同步辅助类,它允许一组线程互相等待,直到到达某个公共屏障点 (common barrier point)。在涉及一组固定大小的线程的程序中,这些线程必须不时地互相等待,此时 CyclicBarrier 很有用。因为该 barrier 在释放等待线程后可以重用,所以称它为循环的 barrier。
CyclicBarrier支持一个可选的 Runnable 命令,
- 九项重要的职业规划
bijian1013
工作学习
一. 学习的步伐不停止 古人说,活到老,学到老。终身学习应该是您的座右铭。 世界在不断变化,每个人都在寻找各自的事业途径。 您只有保证了足够的技能储
- 【Java范型四】范型方法
bit1129
java
范型参数不仅仅可以用于类型的声明上,例如
package com.tom.lang.generics;
import java.util.List;
public class Generics<T> {
private T value;
public Generics(T value) {
this.value =
- 【Hadoop十三】HDFS Java API基本操作
bit1129
hadoop
package com.examples.hadoop;
import org.apache.hadoop.conf.Configuration;
import org.apache.hadoop.fs.FSDataInputStream;
import org.apache.hadoop.fs.FileStatus;
import org.apache.hadoo
- ua实现split字符串分隔
ronin47
lua split
LUA并不象其它许多"大而全"的语言那样,包括很多功能,比如网络通讯、图形界面等。但是LUA可以很容易地被扩展:由宿主语言(通常是C或 C++)提供这些功能,LUA可以使用它们,就像是本来就内置的功能一样。LUA只包括一个精简的核心和最基本的库。这使得LUA体积小、启动速度快,从 而适合嵌入在别的程序里。因此在lua中并没有其他语言那样多的系统函数。习惯了其他语言的字符串分割函
- java-从先序遍历和中序遍历重建二叉树
bylijinnan
java
public class BuildTreePreOrderInOrder {
/**
* Build Binary Tree from PreOrder and InOrder
* _______7______
/ \
__10__ ___2
/ \ /
4
- openfire开发指南《连接和登陆》
开窍的石头
openfire开发指南smack
第一步
官网下载smack.jar包
下载地址:http://www.igniterealtime.org/downloads/index.jsp#smack
第二步
把smack里边的jar导入你新建的java项目中
开始编写smack连接openfire代码
p
- [移动通讯]手机后盖应该按需要能够随时开启
comsci
移动
看到新的手机,很多由金属材质做的外壳,内存和闪存容量越来越大,CPU速度越来越快,对于这些改进,我们非常高兴,也非常欢迎
但是,对于手机的新设计,有几点我们也要注意
第一:手机的后盖应该能够被用户自行取下来,手机的电池的可更换性应该是必须保留的设计,
- 20款国外知名的php开源cms系统
cuiyadll
cms
内容管理系统,简称CMS,是一种简易的发布和管理新闻的程序。用户可以在后端管理系统中发布,编辑和删除文章,即使您不需要懂得HTML和其他脚本语言,这就是CMS的优点。
在这里我决定介绍20款目前国外市面上最流行的开源的PHP内容管理系统,以便没有PHP知识的读者也可以通过国外内容管理系统建立自己的网站。
1. Wordpress
WordPress的是一个功能强大且易于使用的内容管
- Java生成全局唯一标识符
darrenzhu
javauuiduniqueidentifierid
How to generate a globally unique identifier in Java
http://stackoverflow.com/questions/21536572/generate-unique-id-in-java-to-label-groups-of-related-entries-in-a-log
http://stackoverflow
- php安装模块检测是否已安装过, 使用的SQL语句
dcj3sjt126com
sql
SHOW [FULL] TABLES [FROM db_name] [LIKE 'pattern']
SHOW TABLES列举了给定数据库中的非TEMPORARY表。您也可以使用mysqlshow db_name命令得到此清单。
本命令也列举数据库中的其它视图。支持FULL修改符,这样SHOW FULL TABLES就可以显示第二个输出列。对于一个表,第二列的值为BASE T
- 5天学会一种 web 开发框架
dcj3sjt126com
Web框架framework
web framework层出不穷,特别是ruby/python,各有10+个,php/java也是一大堆 根据我自己的经验写了一个to do list,按照这个清单,一条一条的学习,事半功倍,很快就能掌握 一共25条,即便很磨蹭,2小时也能搞定一条,25*2=50。只需要50小时就能掌握任意一种web框架
各类web框架大同小异:现代web开发框架的6大元素,把握主线,就不会迷路
建议把本文
- Gson使用三(Map集合的处理,一对多处理)
eksliang
jsongsonGson mapGson 集合处理
转载请出自出处:http://eksliang.iteye.com/blog/2175532 一、概述
Map保存的是键值对的形式,Json的格式也是键值对的,所以正常情况下,map跟json之间的转换应当是理所当然的事情。 二、Map参考实例
package com.ickes.json;
import java.lang.refl
- cordova实现“再点击一次退出”效果
gundumw100
android
基本的写法如下:
document.addEventListener("deviceready", onDeviceReady, false);
function onDeviceReady() {
//navigator.splashscreen.hide();
document.addEventListener("b
- openldap configuration leaning note
iwindyforest
configuration
hostname // to display the computer name
hostname <changed name> // to change
go to: /etc/sysconfig/network, add/modify HOSTNAME=NEWNAME to change permenately
dont forget to change /etc/hosts
- Nullability and Objective-C
啸笑天
Objective-C
https://developer.apple.com/swift/blog/?id=25
http://www.cocoachina.com/ios/20150601/11989.html
http://blog.csdn.net/zhangao0086/article/details/44409913
http://blog.sunnyxx
- jsp中实现参数隐藏的两种方法
macroli
JavaScriptjsp
在一个JSP页面有一个链接,//确定是一个链接?点击弹出一个页面,需要传给这个页面一些参数。//正常的方法是设置弹出页面的src="***.do?p1=aaa&p2=bbb&p3=ccc"//确定目标URL是Action来处理?但是这样会在页面上看到传过来的参数,可能会不安全。要求实现src="***.do",参数通过其他方法传!//////
- Bootstrap A标签关闭modal并打开新的链接解决方案
qiaolevip
每天进步一点点学习永无止境bootstrap纵观千象
Bootstrap里面的js modal控件使用起来很方便,关闭也很简单。只需添加标签 data-dismiss="modal" 即可。
可是偏偏有时候需要a标签既要关闭modal,有要打开新的链接,尝试多种方法未果。只好使用原始js来控制。
<a href="#/group-buy" class="btn bt
- 二维数组在Java和C中的区别
流淚的芥末
javac二维数组数组
Java代码:
public class test03 {
public static void main(String[] args) {
int[][] a = {{1},{2,3},{4,5,6}};
System.out.println(a[0][1]);
}
}
运行结果:
Exception in thread "mai
- systemctl命令用法
wmlJava
linuxsystemctl
对比表,以 apache / httpd 为例 任务 旧指令 新指令 使某服务自动启动 chkconfig --level 3 httpd on systemctl enable httpd.service 使某服务不自动启动 chkconfig --level 3 httpd off systemctl disable httpd.service 检查服务状态 service h