Flutter 组件集录 | 新一代 Button 按钮参上
theme: cyanosis
持续创作,加速成长!这是我参与「掘金日新计划 · 10 月更文挑战」的第 2 天,点击查看活动详情
0. 按钮一族现状
随着 Flutter 3.3 的发布,RaisedButton 组件从 Flutter 框架中移除,曾为界面开疆拓土的 按钮三兄弟 彻底成为历史。
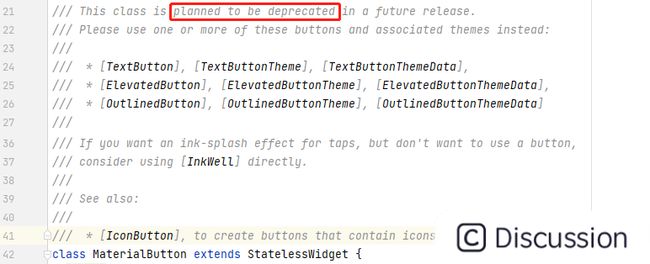
另外 MaterialButton、RawMaterialButton 也将在未来计划被废弃,所以不建议大家再使用了:
目前,取而代之的是 TextButton 、ElevatedButton 、 OutlinedButton 三个按钮组件,本文将重点介绍这三者的使用方式。
另外,一些简单的按钮封装组件仍可使用:
dart CupertinoButton : iOS 风格按钮 CupertinoNavigationBarBackButton : iOS 导航栏返回按钮 BackButton : 返回按钮 IconButton : 图标按钮 CloseButton : 关闭按钮 FloatingActionButton : 浮动按钮
还有一些 多按钮 集成的组件,将在后续文章中详细介绍:
CupertinoSegmentedControl CupertinoSlidingSegmentedControl ButtonBar DropdownButton ToggleButtons
1. 三个按钮组件的默认表现
如下,是 ElevatedButton 的默认表现:有圆角和阴影,在点击时有水波纹。构造时必须传入点击回调函数onPressed 和子组件 child :
ElevatedButton( onPressed: () {}, child: Text('ElevatedButton'), ),
如下,是 OutlinedButton 的默认表现:有圆角和外边线,内部无填充,在点击时有水波纹。构造时必须传入点击回调函数onPressed 和子组件 child :
dart OutlinedButton( onPressed: () {}, child: Text('OutlinedButton'), );
如下,是 TextButton 的默认表现:无边线,无填充,在点击时有水波纹。构造时必须传入点击回调函数onPressed 和子组件 child :
dart TextButton( onPressed: () {}, child: Text('TextButton'), );
2. 按钮样式的更改
如果稍微翻一下源码就可以看到,这三个按钮本质上是一样的,都是 ButtonStyleButton 的衍生类。只不过他们的默认样式 ButtonStyle 不同而已:
如下所示,在 ButtonStyleButton 类中队列两个抽象方法,需要子类去实现,返回默认按钮样式:
拿下面的 ElevatedButton 组件来说,它需要实现 defaultStyleOf 方法来返回默认主题。在未使用 Material3 时,通过 styleFrom 静态方法根据主题进行相关属性设置:比如各种颜色、阴影、文字样式、边距、形状等。
所以,需要修改按钮样式,只要提供 style 属性设置即可:该属性类型为 ButtonStyle,三个按钮组件都提供了 styleFrom 静态方法创建 ButtonStyle 对象,使用如下:
``` ButtonStyle style = ElevatedButton.styleFrom( backgroundColor: Colors.orange, foregroundColor: Colors.white, elevation: 0, padding: const EdgeInsets.symmetric(horizontal: 40), shape: const StadiumBorder(), side: const BorderSide(color: Colors.black,), );
ElevatedButton( onPressed: () {}, child: Text('Login'), style: style ); ```
通过指定 shape 可以形状,如下所示,通过 CircleBorder 实现圆形组件:
``` ButtonStyle style = ElevatedButton.styleFrom( backgroundColor: Colors.blue, foregroundColor: Colors.white, elevation: 2, shape: const CircleBorder(), );
ElevatedButton( onPressed: () {}, style: style, child: const Icon(Icons.add) ); ```
TextButton 、ElevatedButton 、 OutlinedButton 这三个按钮,只是默认主题不同。如果提供相同的配置,OutlinedButton 因为可以实现下面的显示效果。
``` ButtonStyle style = OutlinedButton.styleFrom( backgroundColor: Colors.blue, foregroundColor: Colors.white, elevation: 0, shape: const CircleBorder(), side:BorderSide.none );
OutlinedButton( onPressed: () {}, style: style, child: const Icon(Icons.add) ); ```
常见样式属性:
| 属性名 | 类型 | 用途 | | --- | --- | --- | | foregroundColor| Color? | 前景色 | backgroundColor| Color? | 背景色 | disabledForegroundColor| Color? | 禁用时前景色 | disabledBackgroundColor| Color? | 禁用时背景色 | shadowColor| Color? | 阴影色 | elevation| double? | 阴影深度 | textStyle| TextStyle? | 文字样式 | padding| EdgeInsetsGeometry? | 边距 | side| BorderSide? | 边线 | shape| OutlinedBorder? | 形状
另外,还有一些不常用的属性,了解一下即可:
| 属性名 | 类型 | 用途 | | --- | --- | --- | | alignment| AlignmentGeometry? | 子组件区域中对齐方式 | enableFeedback| bool? | 是否启用反馈,如长按震动 | enabledMouseCursor| MouseCursor? | 桌面端鼠标样式 | disabledMouseCursor| MouseCursor? | 禁用时桌面端鼠标样式 | animationDuration| Duration? | 动画时长 | minimumSize| Size? | 最小尺寸 | maximumSize| Size? | 最大尺寸 | fixedSize| Size? | 固定尺寸 | padding| EdgeInsetsGeometry? | 边距
3. 按钮的事件
这三个按钮在构造时都需要传入 onPressed 参数作为点击回调。另外,还有三个回调 onLongPress 用于监听长按事件;onHover 用于监听鼠标悬浮事件;onFocusChange 用于监听焦点变化的事件。
ElevatedButton( onPressed: () { print('========Login=========='); }, onHover: (bool value) { print('=====onHover===$value=========='); }, onLongPress: () { print('========onLongPress=========='); }, onFocusChange: (bool focus) { print('=====onFocusChange===$focus=========='); }, child: const Text('Login'), );
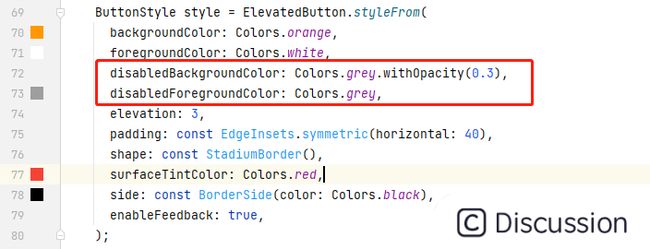
当按钮的 onPressed 和 onLongPress 都为 null 时,按钮会处于 禁用状态 。此时按钮不会响应点击,也没有水波纹效果;另外,按钮的背景色,前景色分别取用 disabledBackgroundColor 和 disabledForegroundColor 属性:
dart ElevatedButton( onPressed: null, style: style, child: const Text('Login'), );
4. 按钮的尺寸
在按钮默认样式中,规定了最小尺寸是 Size(64, 36) , 最大尺寸无限。
也就是说,在父级区域约束的允许范围,按钮的尺寸由 子组件 和 边距 确定的。如下所示,子组件中文字非常大,按钮尺寸会适用文字的大小。
``` ButtonStyle style = ElevatedButton.styleFrom( // 略... padding: const EdgeInsets.symmetric(horizontal: 40,vertical: 10), );
ElevatedButton( onPressed: null, style: style, child: const Text('Login',style: TextStyle(fontSize: 50),), ); ```
父级约束 是绝对不能违逆的,在紧约束下,按钮的尺寸会被锁死。如下,通过 SizedBox 为按钮施加一个 200*40 的紧约束:
SizedBox( width: 200, height: 40, child: ElevatedButton( onPressed: (){}, style: style, child: const Text('Login'), ), );
如下,将紧约束宽度设为 10 ,可以看出按钮也只能遵循。即使它本身最小尺寸是 Size(64, 36),也不能违背父级的约束:
所以,想要修改按钮的尺寸,有两种方式:
-
- 从
子组件尺寸 边距入手,调整按钮尺寸。
- 从
-
- 为按钮施加
紧约束,锁死按钮尺寸。
- 为按钮施加
5. 简看 ButtonStyleButton 组件的源码实现
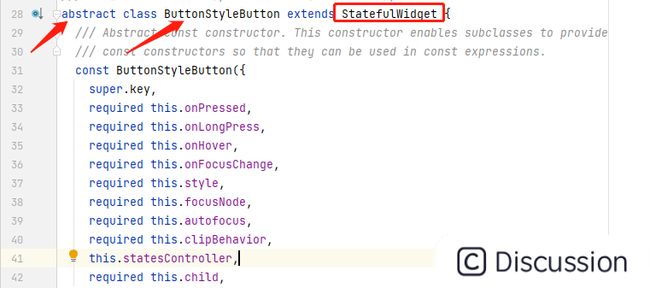
首先,ButtonStyleButton 是一个抽象类,其继承自 StatefulWidget, 说明其需要依赖状态类实现内部的变化。
在 createState 方法中返回 _ButtonStyleState 状态对象,说明按钮构建的逻辑在该状态类中:
@override State
直接来看 _ButtonStyleState 中的构造方法,一开始会触发组件的 themeStyleOf 和 defaultStyleOf 抽象方法获取 ButtonStyle 对象。这也就是TextButton 、ElevatedButton 、 OutlinedButton 三者作为实现类需要完成的逻辑。
构建的组件也就是按钮的最终表现,其中使用了 ConstrainedBox 组件处理约束;Material 组件处理基本表现内容;InkWell 处理水波纹和相关事件;Padding 用于处理内边距;Align 处理对齐方式。
使用,总的来看:ButtonStyleButton 组件就是一些常用组件的组合体而已,通过 ButtonStyle 类进行样式配置,来简化构建逻辑。通过封装,简化使用。另外,我们可以通过主题来统一样式,无需一个个进行配置,这个在后面进行介绍。那本文就到这里,谢谢观看 ~


