43:Three.js - 中
一、相机
-
相机,类似于眼睛,用于在3D舞台中,放置在不同的位置,实现通过不同的角度观察物体。
-
查看 Three.js 的文档,可以看到 Camera 是一个抽象类,一般不直接使用,其他类型的 Camera 实现了这个抽象类。有以下的几种相机
-
- ArrayCamera:包含着一组子摄像机,常用于多人同屏的渲染,更好地提升VR场景的渲染性能
- StereoCamera:双透视摄像机(立体相机),常用于创建 3D 立体影像,比如 3D 电影之类或 VR
- CubeCamera:有6个渲染,分别是立方体的6个面,常用于渲染环境、反光等
- OrthographicCamera:正交相机,在这种投影模式下,无论物体距离相机距离远或者近,在最终渲染的图片中物体的大小都保持不变。这对于渲染2D场景或者UI元素是非常有用的。
- PerspectiveCamera:透视相机,这一投影模式被用来模拟人眼所看到的景象,它是3D场景的渲染中使用得最普遍的投影模式。
-
此处以透视相机(PerspectiveCamera)和正交相机(OrthographicCamera)作为主要重点。
1. 创建透视相机
-
语法:
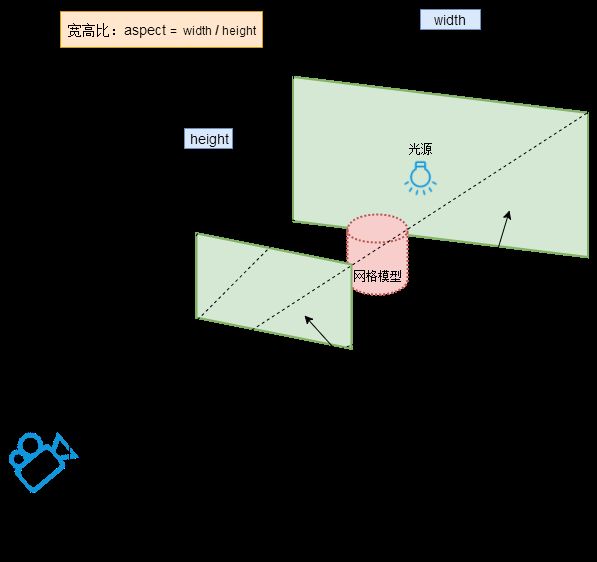
PerspectiveCamera( fov, aspect, near, far ); -
- fov:摄像机视锥体垂直视野角度
- aspect:摄像机视锥体长宽比,一般设置为Canvas画布宽高比width / height
- near:摄像机视锥体近端面
- far:摄像机视锥体远端面,far-near构成了视锥体高度方向
const camera = new THREE.PerspectiveCamera( 75, window.innerWidth / window.innerHeight, 0.1, 2000 );
scene.add( camera );const camera = new THREE.PerspectiveCamera( 75, window.innerWidth / window.innerHeight, 0.1, 2000 );
scene.add( camera );
2. 相机位置.position
- 生活中用相机拍照,你相机位置不同,拍照结果也不同,threejs中虚拟相机同样如此。
- 比如有一间房子,你拿着相机站在房间里面,看到的是房间内部,站在房子外面看到的是房子外面效果。
- 相机对象Camera具有位置属性.position,通过位置属性.position可以设置相机的位置。
// 相机在Three.js三维坐标系中的位置
// 根据需要设置相机位置具体值
camera.position.set(5, 5, 5);
// 同
camera.position.z = 5;
camera.position.x = 5;
camera.position.y = 5;// 相机在Three.js三维坐标系中的位置
// 根据需要设置相机位置具体值
camera.position.set(5, 5, 5);
// 同
camera.position.z = 5;
camera.position.x = 5;
camera.position.y = 5;
3. 创建正交相机
-
语法:
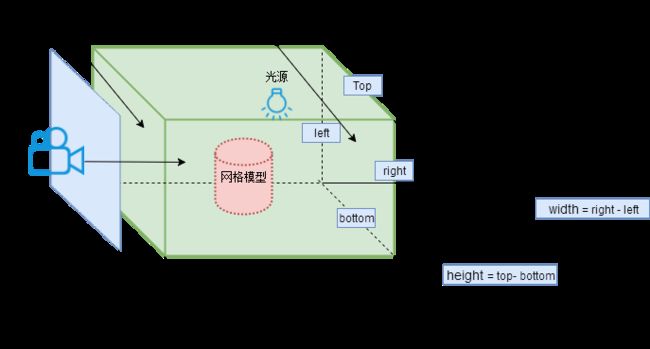
OrthographicCamera( left, right, top, bottom, near, far ) -
- left:摄像机视锥体左侧面。
- right:摄像机视锥体右侧面。
- top:摄像机视锥体上侧面。
- bottom:摄像机视锥体下侧面。
- near:摄像机视锥体近端面。表示从距离相机多远的位置开始渲染,一般情况会设置一个很小的值。 默认值0.1
- far:摄像机视锥体远端面。表示距离相机多远的位置截止渲染,如果设置的值偏小小,会有部分场景看不到。 默认值2000
const s = 5; // 假设一个范围
const k = window.innerWidth / window.innerHeight; // 视图的长宽比(canvas画布的长宽比)
const camera = new THREE.OrthographicCamera( -s*k, s*k, s , -s, 0.1,2000)
scene.add( camera );const s = 5; // 假设一个范围
const k = window.innerWidth / window.innerHeight; // 视图的长宽比(canvas画布的长宽比)
const camera = new THREE.OrthographicCamera( -s*k, s*k, s , -s, 0.1,2000)
scene.add( camera );
4. 正交投影相机和透视投影相机区别
- 一句话描述:透视投影可以模拟人眼观察世界的视觉效果,正投影相机不会。
- 从视觉差异上来看,建筑物模型加载案例,就是用透视投影相机模拟人在空中俯视地面的效果,如果使用正投影相机渲染效果就不太自然。
- 对于大部分需要模拟人眼观察效果的场景,需要使用透视投影相机,比如人在场景中漫游,或是在高处俯瞰整个园区或工厂。
- 正交相机没有透视效果,也就是不会模拟人眼观察世界的效果。在一些不需要透视的场景你可以选择使用正投影相机,比如整体预览一个中国地图的效果,或者一个2D可视化的效果。
二、几何体(路径形式)
-
缓冲类型几何体:BufferGeometry
-
- 可以理解为绝大多数几何体的本质
- 可以先简单的理解为通过定义顶点来描述几何体的外形。
- 接下来我们就通过点模型、线模型和网格模型来逐步理解缓冲模型。
1. 点模型
- 点模型就是在3d空间当中添加一个点。
- 首先创建一个缓冲几何体
const geometry = new THREE.BufferGeometry();const geometry = new THREE.BufferGeometry();
- 此时缓冲几何体,只是一个抽象的存在,没有具体的形状表示。
- 接下来使用 类型数组 创建一个顶点坐标的数组,这些顶点数据就是最终点的位置。
const vertices = new Float32Array([
  0,0,0, // 第1个点的位置
  3,0,0, // 第2个点的位置
  0,3,0, // 第3个点的位置
  0,0,3, // 第4个点的位置
  // ...    // 更多的点
])const vertices = new Float32Array([
  0,0,0, // 第1个点的位置
  3,0,0, // 第2个点的位置
  0,3,0, // 第3个点的位置
  0,0,3, // 第4个点的位置
  // ...    // 更多的点
])
- 将数组的信息转换成顶点数据属性,然后修改缓冲几何体的属性
// 通过 BufferAttribute来创建几何体的具体的顶点数据
const attribue = new THREE.BufferAttribute(vertices , 3); // 3 表示每3个数值为一组
// 设置缓冲几何体的顶点位置
geometry.attributes.position = attribue;// 通过 BufferAttribute来创建几何体的具体的顶点数据
const attribue = new THREE.BufferAttribute(vertices , 3); // 3 表示每3个数值为一组
// 设置缓冲几何体的顶点位置
geometry.attributes.position = attribue;
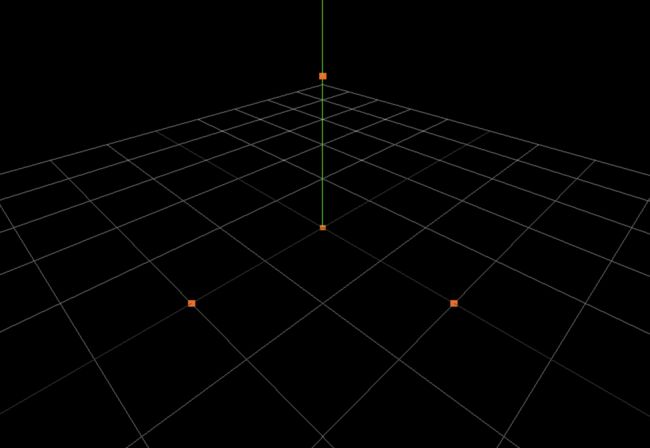
- 经过了这一步,缓冲几何体就有了具体的点的坐标属性
- 点模型也有自己的材料方法:PointsMaterial
// 点模型的材料方法
const material = new THREE.PointsMaterial({
  color:0xff6600,
  size: 0.1, //设置点的大小
})// 点模型的材料方法
const material = new THREE.PointsMaterial({
  color:0xff6600,
  size: 0.1, //设置点的大小
})
- 创建点模型的方法跟创建网格模型的方式基本是一样的,通过 THREE.Points 就可以创建点模型
// Mesh创建的是 网格模型  Points创建的就是 点模型
// 根据 点几何 和 点材料 创建 点模型
const point = new THREE.Points(geometry, material);
scene.add(point);  // 把点模型 添加到场景中// Mesh创建的是 网格模型  Points创建的就是 点模型
// 根据 点几何 和 点材料 创建 点模型
const point = new THREE.Points(geometry, material);
scene.add(point);  // 把点模型 添加到场景中
- 场景中就有了我们刚才设置的三个点
2. 线模型
- 线模型,就是在空间中设置一些连线。它的实现跟点模型有一定的联系,先有点才有线
- 创建缓冲几何体,设置顶点数据 的流程是一样的
const geometry = new THREE.BufferGeometry();

// 创建几何体的 顶点数据
const vertices = new Float32Array([
    0,0,0, // 第一个点的位置
    3,0,0,
    0,3,0,
    0,0,3
])

// 通过 BufferAttribute来创建几何体的具体的顶点数据
const attribue = new THREE.BufferAttribute(vertices , 3);
geometry.attributes.position = attribue;const geometry = new THREE.BufferGeometry();

// 创建几何体的 顶点数据
const vertices = new Float32Array([
    0,0,0, // 第一个点的位置
    3,0,0,
    0,3,0,
    0,0,3
])

// 通过 BufferAttribute来创建几何体的具体的顶点数据
const attribue = new THREE.BufferAttribute(vertices , 3);
geometry.attributes.position = attribue;
- 线模型也有自己的材料方法:LineBasicMaterial
// line模型的材料
const material = new THREE.LineBasicMaterial({
   color:0xff6600,
   linewidth:1,
   linecap: 'round',
   linejoin:  'round'
})// line模型的材料
const material = new THREE.LineBasicMaterial({
   color:0xff6600,
   linewidth:1,
   linecap: 'round',
   linejoin:  'round'
})
- 使用 Line方法来创建 线模型
const line = new THREE.Line(geometry, material); // 普通的线const line = new THREE.Line(geometry, material); // 普通的线
- 创建线模型还有其他的两个方法 LineLoop LineSegments
const line = new THREE.LineLoop(geometry, material); // 闭合的线
const line = new THREE.LineSegments(geometry, material); // 非连续的线const line = new THREE.LineLoop(geometry, material); // 闭合的线
const line = new THREE.LineSegments(geometry, material); // 非连续的线
3. 网格模型
- 经过了点模型和线模型的学习了解,我们再回来看一下我们最熟悉的 线网格模型。 我们在场景当中添加一个普通的 网格模型。
- 在网格材质的地方我们设置一个新的属性 wireframe 为 true,wireframe的配置是开启展示模型的顶点和网线数据。
网格模型的父类都是 BufferGeometry ,内置的几何体( Box Plane 等等)本质上就是threejs计算好了之后的和封装相关属性的BufferGeometry几何体。
const geometry = new THREE.BoxGeometry(1,1,1, 点数量, 点数量, 点数量);
const material = new THREE.MeshBasicMaterial({
    color: 0xff6600,
    wireframe:true, // 用线模型的模式展示mesh对应的三角形
})
const cube = new THREE.Mesh(geometry,material );
scene.add(cube);const geometry = new THREE.BoxGeometry(1,1,1, 点数量, 点数量, 点数量);
const material = new THREE.MeshBasicMaterial({
    color: 0xff6600,
    wireframe:true, // 用线模型的模式展示mesh对应的三角形
})
const cube = new THREE.Mesh(geometry,material );
scene.add(cube);
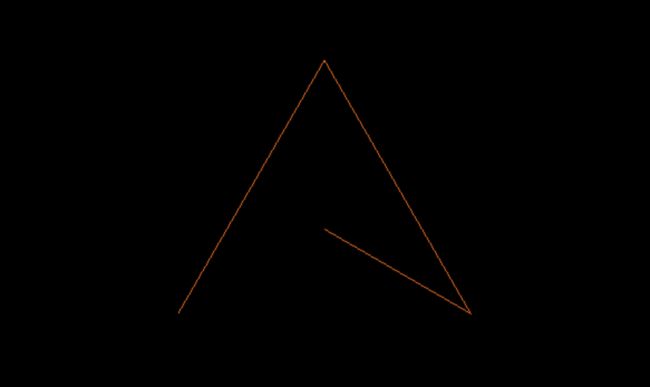
- 运行之后的效果
- 可以看到 网格几何体的表面是由多个三角形组合而成。
- 其实我们通过官方的 Geometry 的展示当中也可以看到基本所有的几何体都是由各个三角形组合而成。每个几何体基本都有一个 segments 效果的配置,这个值越大那么三角形细分的越多,就是表示就是几何体的表面越来越细节,越平滑,但是往往也会带来更大的性能的消耗。
- 所以我们在一些3d模型的下载网站,在描述一个3d模型时会说明 三角形的数量和顶点数据的数量。
- 所以不影响效果的前提下,我们尽量选择顶点数据更少的几何体。
4. 几何体的公共方法
- threejs 对于所有的 BufferGeometry 的几何体都提供了一些公共的方法。
- 缩放
geometry.scale(2,2,1);// 几何体在xyz三个方向上的缩放倍数geometry.scale(2,2,1);// 几何体在xyz三个方向上的缩放倍数
- 位移
geometry.translate(3,1,1);
// 居中
// center方法 会让几何体居中对齐我们的坐标原点
// geometry.center();geometry.translate(3,1,1);
// 居中
// center方法 会让几何体居中对齐我们的坐标原点
// geometry.center();
- 旋转
geometry.rotateX(Math.PI/4);// x轴 8分之一圈的弧度
// geometry.rotateY( Math.PI / 4 ); // y轴
// geometry.rotateZ( Math.PI / 4 ); //z轴geometry.rotateX(Math.PI/4);// x轴 8分之一圈的弧度
// geometry.rotateY( Math.PI / 4 ); // y轴
// geometry.rotateZ( Math.PI / 4 ); //z轴
三、模型和材质的公共方法
- 模型位置
model.position.x = 2;
model.position.y = 2;
model.position.z = 2;

// 等价于
// model.position.set(2, 2, 2)

// 也可以利用模型的位移实现修改位置
// model.translateX(2);
// model.translateY(2);
// model.translateZ(2);model.position.x = 2;
model.position.y = 2;
model.position.z = 2;

// 等价于
// model.position.set(2, 2, 2)

// 也可以利用模型的位移实现修改位置
// model.translateX(2);
// model.translateY(2);
// model.translateZ(2);
- 模型缩放
model.scale.x = 0.5;
model.scale.y = 2;
model.scale.z = 2;model.scale.x = 0.5;
model.scale.y = 2;
model.scale.z = 2;
- 模型旋转
// 参数为弧度
model.rotateX(Math.PI / 4);
model.rotateY(Math.PI / 4);
model.rotateZ(Math.PI / 4);
// 等价于
// model.rotation.x = Math.PI / 4;
// model.rotation.y = Math.PI / 4;
// model.rotation.z = Math.PI / 4;// 参数为弧度
model.rotateX(Math.PI / 4);
model.rotateY(Math.PI / 4);
model.rotateZ(Math.PI / 4);
// 等价于
// model.rotation.x = Math.PI / 4;
// model.rotation.y = Math.PI / 4;
// model.rotation.z = Math.PI / 4;
- 材质颜色
material.color.set('#ff0000');

// 还可以有以下方式:
// 通过设置RGB的值来设置一个指定的颜色(这里采用的rgb值不是0-255 而是百分比)
// material.color.setRGB(221, 51, 51);
// 使用我们css的样式当中的常用的颜色的表达形式
// material.color.setStyle('#DD3333');
// 如果我们希望采用的是 0-255的数值来表达 RGB的值的话我们要采用下面的写法
// material.color.set('rgb(221,51,51)');material.color.set('#ff0000');

// 还可以有以下方式:
// 通过设置RGB的值来设置一个指定的颜色(这里采用的rgb值不是0-255 而是百分比)
// material.color.setRGB(221, 51, 51);
// 使用我们css的样式当中的常用的颜色的表达形式
// material.color.setStyle('#DD3333');
// 如果我们希望采用的是 0-255的数值来表达 RGB的值的话我们要采用下面的写法
// material.color.set('rgb(221,51,51)');
- 模型身上的几何体和材质对象
// 模型
console.log(model)
// 几何体
console.log(model.geometry)
// 材质
console.log(model.material)// 模型
console.log(model)
// 几何体
console.log(model.geometry)
// 材质
console.log(model.material)
四、模型分组
- 在进行中大型的3d场景开发时,往往有很多的几何体呈现在场景当中,但是有一些几何体又是有多个几何体构成的,比如说一辆车,可以简单理解为:一个盒形几何体 + 4个轮状几何体结合而成。在大的场景中我们希望把这个 1 + 4 的组合当成一个整体。这种场景我们就需要对于我们的模型进行分组。
- 新建分组
const group = new THREE.Group();const group = new THREE.Group();
- 添加模型
const geometry = new THREE.BoxGeometry(1,1,1);
const material = new THREE.MeshBasicMaterial({
  color: 0xff6600
})

// 新建模型1
const model1 = new THREE.Mesh( geometry, material );

// 新建模型2
const model2 = new THREE.Mesh(  geometry, material );

// model2其实是沿着x轴平移了2个单位(如果有分组的话 那么其实是相对于局部坐标移动)
model2.position.x = 3;

// 添加模型
group.add(model1);
group.add(model2);
// 也可以一次添加多个
// group.add(model1, model2);const geometry = new THREE.BoxGeometry(1,1,1);
const material = new THREE.MeshBasicMaterial({
  color: 0xff6600
})

// 新建模型1
const model1 = new THREE.Mesh( geometry, material );

// 新建模型2
const model2 = new THREE.Mesh(  geometry, material );

// model2其实是沿着x轴平移了2个单位(如果有分组的话 那么其实是相对于局部坐标移动)
model2.position.x = 3;

// 添加模型
group.add(model1);
group.add(model2);
// 也可以一次添加多个
// group.add(model1, model2);
- 分组操作
// 分组本质上就多个小模型组成的一个大的模型 所以也可以调用模型对象的公共的方法
group.translateY(2);
group.translateX(2);// 分组本质上就多个小模型组成的一个大的模型 所以也可以调用模型对象的公共的方法
group.translateY(2);
group.translateX(2);
- 命名
-
- 当我们考虑使用分组意味着我们的场景当中放置的模型会越来越多,所以,如何查找指定模型,就会成为一个常见的需求
- threejs提供了
scene.getObjectByName()方法,通过传入一个模型的name值,就可以快速的得到指定的模型对象 - 所以我们一般会给我们的模型对象设置一个name属性
const geometry = new THREE.BoxGeometry(1,1,1);
const material = new THREE.MeshBasicMaterial({
  color: 0xff6600
})
const model1 = new THREE.Mesh( geometry, material);
const model2 = new THREE.Mesh( geometry, material);
model1.position.z = 2;
model2.position.z = 4;
model1.name = '1号';
model2.name = '2号';

// 创建一个分组 group
const group = new THREE.Group();
group.name = '某个组';
group.add(model1);
group.add(model2);

// 可以通过position来设置分组的位置
group.position.x = 3;

scene.add(group);

// 通过scene的children可以看到这个的场景的对象树的结构
console.log(scene.children);

// threejs当中 提供了有一个方法 来帮我们通过name属性来寻找指定的模型
const m = scene.getObjectByName('2号');
console.log('n', m)
m.rotateX( Math.PI / 4)const geometry = new THREE.BoxGeometry(1,1,1);
const material = new THREE.MeshBasicMaterial({
  color: 0xff6600
})
const model1 = new THREE.Mesh( geometry, material);
const model2 = new THREE.Mesh( geometry, material);
model1.position.z = 2;
model2.position.z = 4;
model1.name = '1号';
model2.name = '2号';

// 创建一个分组 group
const group = new THREE.Group();
group.name = '某个组';
group.add(model1);
group.add(model2);

// 可以通过position来设置分组的位置
group.position.x = 3;

scene.add(group);

// 通过scene的children可以看到这个的场景的对象树的结构
console.log(scene.children);

// threejs当中 提供了有一个方法 来帮我们通过name属性来寻找指定的模型
const m = scene.getObjectByName('2号');
console.log('n', m)
m.rotateX( Math.PI / 4)
五、网格纹理贴图
-
之前案例中我们使用的材料都是只是设置了颜色,实际开发中的3d模型呈现的却是更接近现实当中的各色各样的效果,此时就需要给模型文件使用纹理贴图的材料。
-
纹理贴图素材库
-
- https://texturelabs.org/
- https://www.transparenttextures.com/
- https://polyhaven.com/
1. 使用纹理贴图
- 创建纹理加载器
const textLoader = new THREE.TextureLoader(); // 创建纹理加载器const textLoader = new THREE.TextureLoader(); // 创建纹理加载器
- 加载一个图片来作为纹理对象
const texture = textLoader.load('../floor.jpg'); // 通过加载一个图片来得到一个纹理const texture = textLoader.load('../floor.jpg'); // 通过加载一个图片来得到一个纹理
- 创建材料
-
- 创建材料时,设置的就不是color属性,而是使用map添加上一步创建好的纹理对象
const material = new THREE.MeshBasicMaterial({
  // 使用指定的纹理对象来渲染我们的模型
  map: texture,
  side: THREE.DoubleSide
})const material = new THREE.MeshBasicMaterial({
  // 使用指定的纹理对象来渲染我们的模型
  map: texture,
  side: THREE.DoubleSide
})
-
side:THREE.DoubleSide。表示双面可见,因为默认情况下几何体之后一面是贴图可见的
- 使用采用了贴图的材料
const floor = new THREE.Mesh(geometry, material);
floor.rotateX( Math.PI /2 ); // 平放
scene.add(floor);const floor = new THREE.Mesh(geometry, material);
floor.rotateX( Math.PI /2 ); // 平放
scene.add(floor);
tips: 你可以创建其他的几何体模型来体验贴图的效果
2. 贴图阵列(平铺)
- 根据上面的代码运行的效果我们可以知道,默认情况下threejs会用一整张图去贴在材质的表面,但是有些时候我们需要的是在一个面上使用一个图片平铺展示的效果,比如说地毯瓷砖等。
- 这就需要使用到阵列来实现。
// 设置阵列模式
texture.wrapS = THREE.RepeatWrapping;
texture.wrapT = THREE.RepeatWrapping;
texture.repeat.set(5,5);//注意选择合适的阵列数量// 设置阵列模式
texture.wrapS = THREE.RepeatWrapping;
texture.wrapT = THREE.RepeatWrapping;
texture.repeat.set(5,5);//注意选择合适的阵列数量
- 设置了阵列模式,那么贴图会按照指定的大小数量平铺在我们的模型上。
3. 透明贴图
- 有些时候我们会在我们的场景当中使用写透明的贴图,比如说路牌指示,或者是标签效果等。这个时候使用plane几何体和透明图片的组合时候就会特别适合。
// 新建一个路牌
const lpgeometry = new THREE.PlaneGeometry(1,1);
const lpmaterial = new THREE.MeshBasicMaterial({
  map: textLoader.load('../assets/指示牌.png'),
  side: THREE.DoubleSide,
  transparent: true, //如果需要保持贴图的透明性  需要开启透明属性
})
const lp = new THREE.Mesh( lpgeometry ,  lpmaterial);
lp.position.y = 2;
scene.add(lp);// 新建一个路牌
const lpgeometry = new THREE.PlaneGeometry(1,1);
const lpmaterial = new THREE.MeshBasicMaterial({
  map: textLoader.load('../assets/指示牌.png'),
  side: THREE.DoubleSide,
  transparent: true, //如果需要保持贴图的透明性  需要开启透明属性
})
const lp = new THREE.Mesh( lpgeometry ,  lpmaterial);
lp.position.y = 2;
scene.add(lp);
- 特别需要注意的是:在创建材料的时,一定要记得设置,材料的透明属性的开启:
transparent: true - 否则 png 图片透明的部分就会显示为黑色。
六、加载外部的3d模型
-
我们经常在看到别人做的three.js项目中有很多的各式各样的3d模型,有车辆房子动物等
-
这些模型对于初学者来说,完全从0到1通过threejs的几何体去创建,其实是不太现实的
-
很多时候我们的3d模型都是使用 c4d 或者是 blender 这一类的3d建模设计软件去设计的
-
3d软件完成之后就可以导出对应的模型文件,而我们使用这些文件加载到我们的场景中就可以使用了
-
3d模型素材库
-
- https://sketchfab.com/
- https://polyhaven.com/
- http://gltfs.com/
- 引入gltf模型加载库 GLTFLoader.js
import { GLTFLoader } from 'three/addons/loaders/GLTFLoader.js';import { GLTFLoader } from 'three/addons/loaders/GLTFLoader.js';
- 新建一个 GLTF 加载器
const loader = new GLTFLoader(); // 创建一个gltf文件加载器const loader = new GLTFLoader(); // 创建一个gltf文件加载器
- 加载一个gltf文件 然后添加到场景当中
loader.load('../assets/sofa/scene.gltf' , function(gltf){
  const sofa = gltf.scene
  // gltf的.scene就是我们最终可以添加到 场景当中的模型
  gltf.scene.scale.x = 2;
  gltf.scene.scale.y = 2;
  gltf.scene.scale.z = 2;
  sofa.position.x = 2
  scene.add(gltf.scene)
})loader.load('../assets/sofa/scene.gltf' , function(gltf){
  const sofa = gltf.scene
  // gltf的.scene就是我们最终可以添加到 场景当中的模型
  gltf.scene.scale.x = 2;
  gltf.scene.scale.y = 2;
  gltf.scene.scale.z = 2;
  sofa.position.x = 2
  scene.add(gltf.scene)
})
-
- 在threejs当中,大小没有单位,导入模型的大小,需要通过 scale 缩放进行大小的调整。
- GLB文件的加载
-
- glb是也是我们的threejs当中常用的3d模型文件,跟gltf的一个的区别在于,glb只有一个单独的文件,没有贴图文件的额外打包。不过它的使用流程跟gltf是一样的。
// 加载外部的 glb 格式的3d模型,加载的方式跟 gltf 格式的文件是一样的
loader.load('../assets/old_soviet_chair.glb', function(res){
  const chair = res.scene;
  // 默认出现在原点,所以需要进行一定的位置的移动
  chair.position.set(-2,0,0);
  scene.add( chair);
})// 加载外部的 glb 格式的3d模型,加载的方式跟 gltf 格式的文件是一样的
loader.load('../assets/old_soviet_chair.glb', function(res){
  const chair = res.scene;
  // 默认出现在原点,所以需要进行一定的位置的移动
  chair.position.set(-2,0,0);
  scene.add( chair);
})
z = 2;
sofa.position.x = 2
scene.add(gltf.scene)
})
- - 在threejs当中,大小没有单位,导入模型的大小,需要通过 scale 缩放进行大小的调整。

1. GLB文件的加载

- - glb是也是我们的threejs当中常用的3d模型文件,跟gltf的一个的区别在于,glb只有一个单独的文件,没有贴图文件的额外打包。不过它的使用流程跟gltf是一样的。

```javascript
// 加载外部的 glb 格式的3d模型,加载的方式跟 gltf 格式的文件是一样的
loader.load('../assets/old_soviet_chair.glb', function(res){
  const chair = res.scene;
  // 默认出现在原点,所以需要进行一定的位置的移动
  chair.position.set(-2,0,0);
  scene.add( chair);
})// 加载外部的 glb 格式的3d模型,加载的方式跟 gltf 格式的文件是一样的
loader.load('../assets/old_soviet_chair.glb', function(res){
  const chair = res.scene;
  // 默认出现在原点,所以需要进行一定的位置的移动
  chair.position.set(-2,0,0);
  scene.add( chair);
})
