python调用oepnai API
目录
- apiAI官网
- 介绍([Introduction](https://platform.openai.com/docs/api-reference/introduction))
-
- 安装官方SDK
- 认证(Authentication)
-
- 申请API KEY
- 请求组织(Requesting organization)
- 发送请求
-
- 关于chat tokens
- 关于国内支付
- Chat
-
- Create chat completion
- Request body
- 给出一个Go http实现的简单的chat服务
- 总结
apiAI官网
https://openai.com/
介绍(Introduction)
安装官方SDK
可以通过官方提供的pythonSDK与openai API进行交互,或者使用社区维护的第三方库,如:sashabaranov/go-openai,发送http请求调用openai API.
官方python sdk:pip install openai
社区go三方库(目前star 5.9k)go get github.com/sashabaranov/go-openai
认证(Authentication)
这段话都可以看懂,就不翻译了
The OpenAI API uses API keys for authentication. Visit your API Keys page to retrieve the API key you’ll use in your requests.
Remember that your API key is a secret! Do not share it with others or expose it in any client-side code (browsers, apps). Production requests must be routed through your own backend server where your API key can be securely loaded from an environment variable or key management service.
All API requests should include your API key in an Authorization HTTP header as follows:
Authorization: Bearer OPENAI_API_KEY
申请API KEY
前往View API keys申请apikey:

然后点击Settings将组织ID也记录下来:

请求组织(Requesting organization)
For users who belong to multiple organizations, you can pass a header to specify which organization is used for an API request. Usage from these API requests will count against the specified organization’s subscription quota.
(对于属于多个组织的用户,您可以传递标头来指定 API 请求使用哪个组织。 这些 API 请求的使用量将计入指定组织的订阅配额。)
Example with the openai Python package:
import os
import openai
openai.organization = "YOUR_ORG_ID"
openai.api_key = os.getenv("OPENAI_API_KEY")
openai.Model.list()
发送请求
复制粘贴官网的实例:
def gpt_3dot5_turbo():
    api = "https://api.openai.com/v1/chat/completions"

    headers = {
        "Content-Type": "application/json",
        "Authorization": AUTH_VALUE
    }

    json_data = {
        "model": "gpt-3.5-turbo-16k-0613",
        "message": [{"role": "user", "content": "What is the hello in Chinese?"}],
        "temperature": 0.7
    }

    response = requests.post(url=api, headers=headers, json=json_data)
    response.encoding = "utf-8"

    print(response.status_code)
    print(response.json())
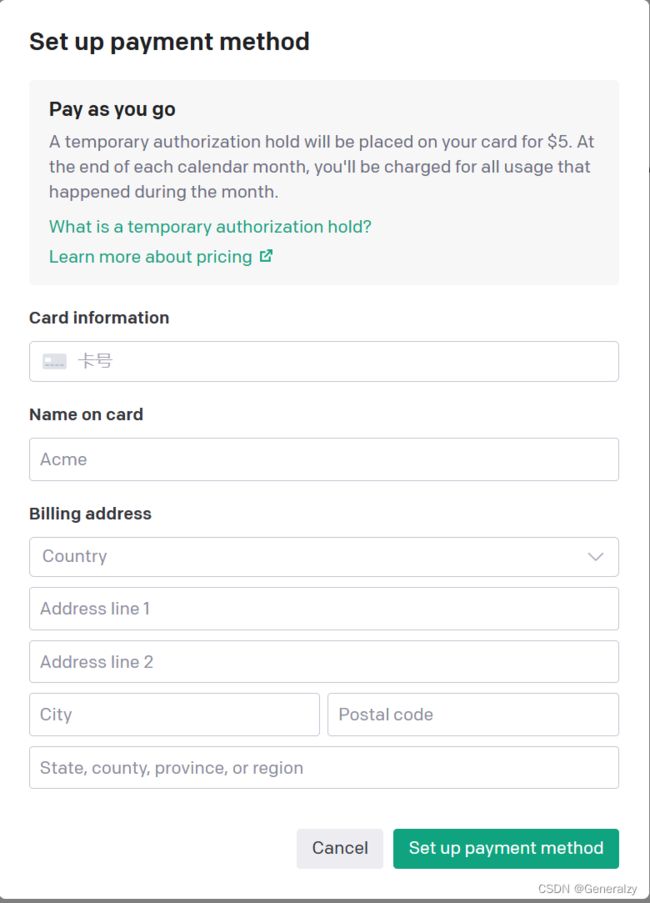
但是,OpenAI已经于2021年11月1日停止了免费试用计划,使用OpenAI的Chat API(包括ChatGPT)进行开发者调用是需要付费的。所以,直接请求上述接口会报错:You exceeded your current quota, please check your plan and billing details.
![]()
按上面代码的写法,只能回答单个问题,并且无法形成上下文,原因在于messages这个参数只有一个字典。要想形成上下文,就必须按上下文对话的顺序把对话封装成字典,而且这个字典中,key为role时,对应的取值必须是system、user和assistant!
另外,字典中每一个role的取值,对应的功能都不太一样,其中system用于在会话开始之初给定chatGPT一个指示或声明,使得后续的回答更具有个性化和专业化。user是用于给用户提问的或者说是用来给用户输入prompt的。assistant是用于输入chatGPT的回答内容。
当使用OpenAI的对话模型时,以下是系统、用户和助手角色在一个假设的旅行规划对话中的具体示例:
-
系统(System)角色的例子:
系统:欢迎来到旅行规划助手!你想要去哪个目的地旅行?
这里系统角色起始了对话,并提供了引导性的问题,以引导用户进入对话主题。 -
用户(User)角色的例子:
用户:我计划去巴黎度假,我想了解一些旅游景点和当地美食。
用户提供了自己的旅行目的地和需求,指导对话的方向。 -
助手(Assistant)角色的例子:
助手:巴黎是个美丽的城市,有很多令人惊叹的景点和美食。你可以游览埃菲尔铁塔、卢浮宫和巴黎圣母院等著名景点。当谈到美食,巴黎的法国菜和甜点非常有名,你可以尝试法式奶酪、可颂面包和马卡龙。
助手作为对话模型,理解用户的需求并提供相关信息,包括巴黎的景点和美食推荐。
在这个例子中,系统角色起始了对话,用户角色提供了自己的需求和信息,而助手角色根据用户的输入生成了有关巴黎旅行的回复。通过这样的交互,系统、用户和助手共同参与对话,实现了一个旅行规划的对话场景。
下面给出简单实现上下文的python代码来帮助理解:(可以看出,保持上下文是需要利用role来将问答重复传入的)
class Chat:
    def __init__(self,conversation_list=[]) -> None:
        # 初始化对话列表,可以加入一个key为system的字典,有助于形成更加个性化的回答
        # self.conversation_list = [{'role':'system','content':'你是一个非常友善的助手'}]

        self.conversation_list = []

    # 打印对话
    def show_conversation(self,msg_list):
        for msg in msg_list:
            if msg['role'] == 'user':
                print(f"\U0001f47b: {msg['content']}\n")
            else:
                print(f"\U0001f47D: {msg['content']}\n")

    # 提示chatgpt
    def ask(self,prompt):
    	# 添加用户问题
        self.conversation_list.append({"role":"user","content":prompt})
        # 调用模型
        response = openai.ChatCompletion.create(model="gpt-3.5-turbo",messages=self.conversation_list)
        # 获得响应并取出会话内容
        answer = response.choices[0].message['content']

        # 把chatGPT的回答也添加到对话列表中,这样下一次问问题的时候就能形成上下文了
        self.conversation_list.append({"role":"assistant","content":answer})
		# 展示上下文
        self.show_conversation(self.conversation_list)
关于chat tokens
总而言之,key=user用于提问;key=system用于设置环境或主体;key=assistant用于把之前gpt的回答写入,这样对话就有了上下文。
因此,在保持上下文的情况下问答会消耗非常多的tokens

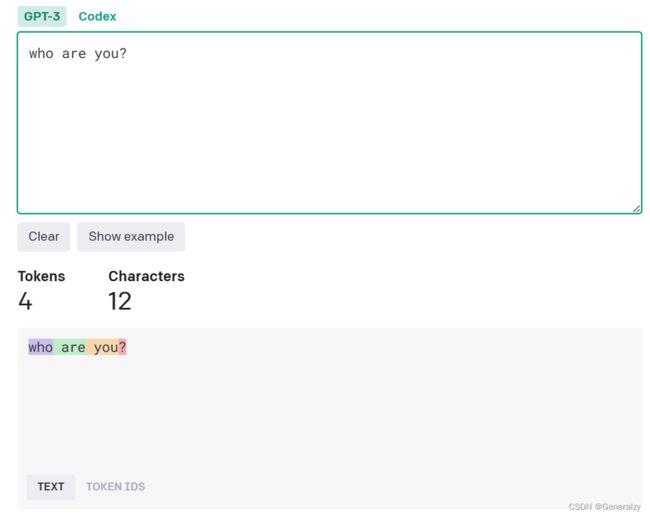
官方也提供了一个tokens计算机:https://platform.openai.com/tokenizer
官方这次的收费标准是 $0.002/1K tokens,大概 750 词。虽然1k个token看起来很多。但其实,发送一段供API响应的文本可能就会花费不少token。
基本问1个问题就要耗费100~200个token,算起来其实不少的,尤其在连续会话中,为了保持对话的连续性,必须每次都要回传历史消息,并且输入都要算 token 数算钱的,满打满算,按量付费其实也不便宜。
按照一般的经验来看,在英语中“一个 token 通常对应大约 4 个字符”,而1个汉字大致是2~2.5个token。
举一个官方的说明例子可能更直观一些:根据 OpenAI 官方文档,“ChatGPT is great!”这组单词就需要六个 token—— 它的 API 将其分解为“Chat”、“G”、“PT”、“is”、“great”和“!”。
关于国内支付
付费购买openai api的调用额度需要国外银行卡,如果有国外的同学,同事,亲戚家人等最好不过了,没有则可以使用虚拟卡(depay和onekey等)支付。
以下是我找到的一些教程:
- 国内Onekey Card快速开通ChatGPT Plus教程【亲测有效】:https://juejin.cn/post/7223343320298324029
- Depay虚拟卡绑定支付宝、美团、微信的使用场景和建议:https://juejin.cn/post/7208498140159410236
- 国内开通Chat GPT Plus保姆级教程【典藏】:https://www.chatgpt-plus.site/chatgpt-plus/
Chat
Given a list of messages comprising a conversation, the model will return a response.
Create chat completion
接口:https://api.openai.com/v1/chat/completions
方法:POST
描述:Creates a model response for the given chat conversation.
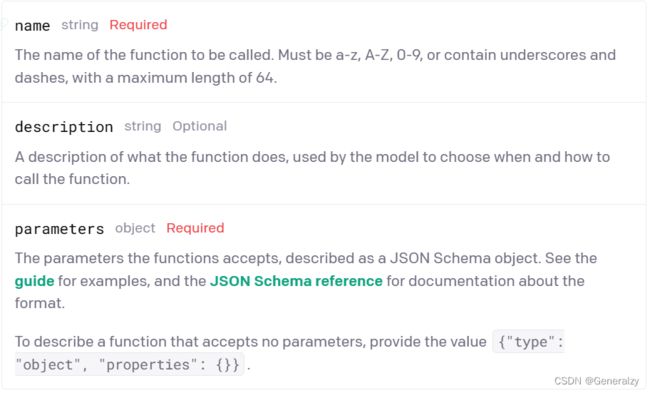
Request body
给出一个Go http实现的简单的chat服务
此处只给出view部分和consts部分的代码,
views.go
package main

import (
	"encoding/json"
	"github.com/go-resty/resty/v2"
	"github.com/sashabaranov/go-openai"
	"net/http"
	"strconv"
)

var globalClient = resty.New()

func ChatGpt(w http.ResponseWriter, r *http.Request) {
	respWriter := json.NewEncoder(w)

	// bad request
	if r.Method != http.MethodPost {
		DefaultGeneralLogger.Error(http.StatusText(http.StatusMethodNotAllowed))
		w.Header().Set("Content-Type", "application/json")
		w.WriteHeader(http.StatusMethodNotAllowed)
		_ = respWriter.Encode(map[string]any{
			"code": 1,
			"msg":  http.StatusText(http.StatusMethodNotAllowed),
		})
		return
	}

	input := r.PostFormValue("input")
	if input == "" || len(input) == 0 {
		DefaultGeneralLogger.Error("输入为空")
		w.Header().Set("Content-Type", "application/json")
		w.WriteHeader(http.StatusBadRequest)
		_ = respWriter.Encode(map[string]any{
			"code": 1,
			"msg":  "输入为空",
		})
		return
	}

	response, err := globalClient.SetProxy(Proxy).NewRequest().SetHeaders(map[string]string{
		"Content-Type":  "application/json",
		"Authorization": AuthFieldValue,
	}).SetBody(openai.ChatCompletionRequest{
		Model:       openai.GPT3Dot5Turbo0613,
		MaxTokens:   1024,
		Temperature: 0.2,
		Messages: []openai.ChatCompletionMessage{
			{Role: openai.ChatMessageRoleUser, Content: input},
		},
	}).Post(ChatApi)

	if err != nil {
		DefaultGeneralLogger.Error(err)
		w.Header().Set("Content-Type", "application/json")
		w.WriteHeader(http.StatusBadRequest)
		_ = respWriter.Encode(map[string]any{
			"code": 1,
			"msg":  http.StatusText(http.StatusBadRequest),
		})
		return
	}

	if !response.IsSuccess() {
		DefaultGeneralLogger.Error(response.Status())
		w.Header().Set("Content-Type", "application/json")
		w.WriteHeader(http.StatusBadRequest)
		_ = respWriter.Encode(map[string]any{
			"code": 1,
			"msg":  http.StatusText(http.StatusBadRequest),
		})
		return
	}

	respData := new(openai.ChatCompletionResponse)
	if err = json.Unmarshal(response.Body(), respData); err != nil {
		DefaultGeneralLogger.Error(err)
		w.Header().Set("Content-Type", "application/json")
		w.WriteHeader(http.StatusBadRequest)
		_ = respWriter.Encode(map[string]any{
			"code": 1,
			"msg":  err.Error(),
		})
		return
	}

	w.Header().Set("Content-Type", "application/json")
	w.WriteHeader(http.StatusOK)
	_ = respWriter.Encode(map[string]any{
		"code": 0,
		"msg":  http.StatusText(http.StatusOK),
		"data": respData.Choices[0].Message.Content,
	})
}

func ImageGpt(w http.ResponseWriter, r *http.Request) {
	respWriter := json.NewEncoder(w)

	// bad request
	if r.Method != http.MethodPost {
		DefaultGeneralLogger.Error(http.StatusText(http.StatusMethodNotAllowed))
		w.Header().Set("Content-Type", "application/json")
		w.WriteHeader(http.StatusMethodNotAllowed)
		_ = respWriter.Encode(map[string]any{
			"code": 1,
			"msg":  http.StatusText(http.StatusMethodNotAllowed),
		})
		return
	}

	prompt := r.PostFormValue("prompt")
	n := r.PostFormValue("n")

	if prompt == "" || len(prompt) == 0 {
		DefaultGeneralLogger.Error("prompt为空")
		w.Header().Set("Content-Type", "application/json")
		w.WriteHeader(http.StatusBadRequest)
		_ = respWriter.Encode(map[string]any{
			"code": 1,
			"msg":  "prompt为空",
		})
		return
	}
	if n == "" || len(n) == 0 {
		DefaultGeneralLogger.Error("n为空")
		w.Header().Set("Content-Type", "application/json")
		w.WriteHeader(http.StatusBadRequest)
		_ = respWriter.Encode(map[string]any{
			"code": 1,
			"msg":  "n为空",
		})
		return
	}

	intN, err := strconv.Atoi(n)
	if err != nil {
		DefaultGeneralLogger.Error(err)
		w.Header().Set("Content-Type", "application/json")
		w.WriteHeader(http.StatusBadRequest)
		_ = respWriter.Encode(map[string]any{
			"code": 1,
			"msg":  err.Error(),
		})
		return
	}

	if intN <= 0 {
		DefaultGeneralLogger.Error("n非法")
		w.Header().Set("Content-Type", "application/json")
		w.WriteHeader(http.StatusBadRequest)
		_ = respWriter.Encode(map[string]any{
			"code": 1,
			"msg":  "n非法",
		})
		return
	}

	response, err := globalClient.SetProxy(Proxy).NewRequest().SetHeaders(map[string]string{
		"Content-Type":  "application/json",
		"Authorization": AuthFieldValue,
	}).SetBody(openai.ImageRequest{
		Prompt: prompt,
		N:      intN,
		Size:   openai.CreateImageSize1024x1024,
	}).Post(ImageApi)

	if err != nil {
		DefaultGeneralLogger.Error(err)
		w.Header().Set("Content-Type", "application/json")
		w.WriteHeader(http.StatusBadRequest)
		_ = respWriter.Encode(map[string]any{
			"code": 1,
			"msg":  http.StatusText(http.StatusBadRequest),
		})
		return
	}

	if !response.IsSuccess() {
		DefaultGeneralLogger.Error(response.Status())
		w.Header().Set("Content-Type", "application/json")
		w.WriteHeader(http.StatusBadRequest)
		_ = respWriter.Encode(map[string]any{
			"code": 1,
			"msg":  http.StatusText(http.StatusBadRequest),
		})
		return
	}

	respData := new(openai.ImageResponse)
	if err = json.Unmarshal(response.Body(), respData); err != nil {
		DefaultGeneralLogger.Error(err)
		w.Header().Set("Content-Type", "application/json")
		w.WriteHeader(http.StatusBadRequest)
		_ = respWriter.Encode(map[string]any{
			"code": 1,
			"msg":  err.Error(),
		})
		return
	}

	w.Header().Set("Content-Type", "application/json")
	w.WriteHeader(http.StatusOK)
	_ = respWriter.Encode(map[string]any{
		"code": 0,
		"msg":  http.StatusText(http.StatusOK),
		"data": *respData,
	})
}
consts.go
package main

import "fmt"

// Api
const (
	ChatApi  = "https://api.openai.com/v1/chat/completions"
	ImageApi = "https://api.openai.com/v1/images/generations"
)

// Key
const (
	Organization = "Your Organization"
	ApiKey       = "Your ApiKey"
)

const AuthFieldKey = "Authorization"

var (
	AuthFieldValue = fmt.Sprintf("Bearer %s", ApiKey)
)

// 国内需要挂VPN才可以访问chatgpt
const Proxy = "http://127.0.0.1:7890"
总结
官方文档总结的十分详细,每一个功能点都给足了示例,具体参考内容还贴到了github,不存在不会使用的情况。


