k8s学习笔记-Docker篇
K8S学习笔记-Docker篇
Docker安装
Docker hello world 启动信息步骤
安装了docker后执行官方自带的hello-world镜像后,其执行步骤分析
~% docker run hello-world
Unable to find image 'hello-world:latest' locally
latest: Pulling from library/hello-world
0e03bdcc26d7: Pulling fs layer
latest: Pulling from library/hello-world
0e03bdcc26d7: Pull complete
Digest: sha256:31b9c7d48790f0d8c50ab433d9c3b7e17666d6993084c002c2ff1ca09b96391d
Status: Downloaded newer image for hello-world:latest

Hello from Docker!
This message shows that your installation appears to be working correctly.

To generate this message, Docker took the following steps:
 #第一步,docker 客户端联系了docker守护进程
 1. The Docker client contacted the Docker daemon.
 #第二步,docker 守护进程将 hello-world镜像从dockerhub上拉取下来
 2. The Docker daemon pulled the "hello-world" image from the Docker Hub.
    (amd64)
 #第三步,docker守护进程使读取的镜像创建了一个新的容器,容器运行镜像的可执行文件
 3. The Docker daemon created a new container from that image which runs the
    executable that produces the output you are currently reading.
 #第四步, Docker守护进程将输出流式传输到Docker客户端,后者将其发送到您的终端。
 4. The Docker daemon streamed that output to the Docker client, which sent it
    to your terminal.

To try something more ambitious, you can run an Ubuntu container with:
 $ docker run -it ubuntu bash

Share images, automate workflows, and more with a free Docker ID:
 https://hub.docker.com/

For more examples and ideas, visit:
 https://docs.docker.com/get-started/
Docker镜像结构

镜像的结构
${registry_name}/${repository_name}/${image_name}:${tag_name}
如 docker.io/library/alpine:3.10.1
镜像管理
搜索镜像
docker search alpine
下载镜像
下载最新版本镜像
docker pull alpine

下载指定版本的tag的镜像
docker pull alpine:3.10.3
镜像结构:registy_name/repository_name/image_name:tag_name
如: docker.io/library/alpine:3.10.1

如果在docker pull 指定版本镜像时报以下错误,说明需要登录docker,
在终端输入docker login命令,然后用用户名密码登录即可,如果没有注册,
需要在docker.io进行注册
Error response from daemon: Head https://registry-1.docker.io/v2/library/alpine/manifests/1.10.3: 	unauthorized: incorrect username or password
查看本地镜像
docker images

localhost ~ % docker images
REPOSITORY              TAG       IMAGE ID       CREATED         SIZE
alpine                  latest    e50c909a8df2   10 days ago     5.61MB
nginx                   latest    f35646e83998   3 months ago    133MB
从镜像仓库中查找镜像
登录docker.io,然后在搜索框中搜索需要查找的镜像名称,进入相应的镜像页面
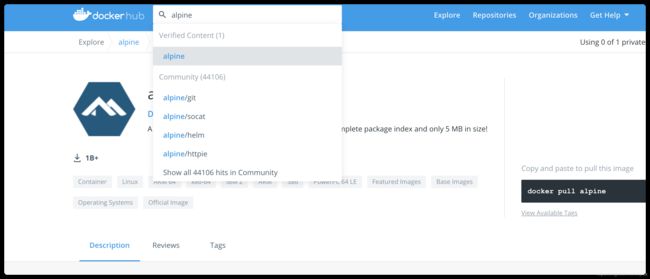
在tags目录下就能看到镜像的标签
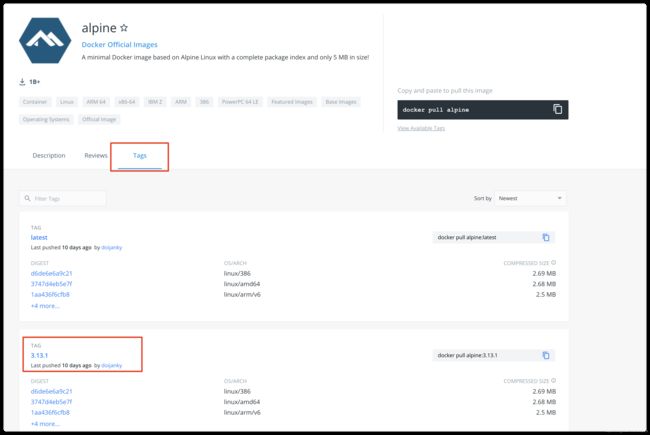
在右侧可以复制下载相应标签的docker命令

执行命令即可下载相应的标签的镜像
localhost ~ % docker pull alpine:3.13.1
3.13.1: Pulling from library/alpine
Digest: sha256:08d6ca16c60fe7490c03d10dc339d9fd8ea67c6466dea8d558526b1330a85930
Status: Downloaded newer image for alpine:3.13.1
docker.io/library/alpine:3.13.1
给镜像打标签,并推送镜像
打标签的命令格式为
docker tag 镜像id ${registry_name}/${repository_name}/${image_name}:${tag_name}
localhost ~ % docker tag e50c909a8df2 docker.io/wejack639/alpine:3.13.1
localhost ~ % docker images
REPOSITORY              TAG       IMAGE ID       CREATED         SIZE
alpine                  3.13.1    e50c909a8df2   10 days ago     5.61MB
wejack639/alpine        3.13.1    e50c909a8df2   10 days ago     5.61MB
推送镜像标签的命令为
docker push ${registry_name}/${repository_name}/${image_name}:${tag_name}
localhost ~ % docker push docker.io/wejack639/alpine:3.13.1
The push refers to repository [docker.io/wejack639/alpine]
# Mounted from  说明这个是直接挂载了docker.io的镜像仓库的镜像,因为镜像id是已有的,并没有将本地的镜像文件推到上面
1119ff37d4a9: Mounted from library/alpine
3.13.1: digest: sha256:3747d4eb5e7f0825d54c8e80452f1e245e24bd715972c919d189a62da97af2ae size: 528
然后在docker.io上就能查到自己的镜像信息了

删除镜像标签
docker rmi ${image_name}:${tag_name}
docker rmi wejack639/alpine:3.13.1
Untagged: wejack639/alpine:3.13.1
Untagged: wejack639/alpine@sha256:3747d4eb5e7f0825d54c8e80452f1e245e24bd715972c919d189a62da97af2ae
删除镜像
`docker rmi ${imageId}
localhost ~ % docker rmi e50c909a8df2
#这里的响应是因为这个镜像有多个标签在用,如果要删除则必须强制,加-f命令
Error response from daemon: conflict: unable to delete e50c909a8df2 (must be forced) - image is referenced in multiple repositories

localhost ~ % docker rmi -f e50c909a8df2
Untagged: alpine:3.13.1
Untagged: alpine:latest
Untagged: alpine@sha256:08d6ca16c60fe7490c03d10dc339d9fd8ea67c6466dea8d558526b1330a85930
Deleted: sha256:e50c909a8df2b7c8b92a6e8730e210ebe98e5082871e66edd8ef4d90838cbd25
容器的基本操作
查看本地所有的容器
docker ps -a
	CONTAINER ID   IMAGE             COMMAND                  CREATED         STATUS                       PORTS                                              NAMES
e062310c1c18   alpine:latest     "/bin/sh"                23 hours ago    Exited (0) 23 hours ago                                                         fervent_neumann
3ba9e1ebb6ff   e7d92cdc71fe      "/bin/sh"                23 hours ago    Exited (0) 23 hours ago                                                         jovial_feynman
其中image的名称,应该根据名称和镜像的结构
${registry_name}/${repository_name}/${image_name}:${tag_name}
快速反应出该镜像的地址为 docker.io/library/alpine:latest
启动容器
docker run
命令格式:docker run [OPTIONS] IMAGE [COMMAND] [ARG…]
OPTIONS:
-i:启动一个可交互容器,并持续打开标准输入
-t:使终端关联到的窗口的标准输入输出上
-d:容器放置到后台运行
-rm:退出后即删除窗口
-name:指定容器的唯一名称
IMAGE:要运行的镜像
COMMAND:启动容器时要运行的命令
交互启动容器
docker run -it alpine:latest /bin/sh
非交互启动容器
docker run --rm alpine:latest /bin/echo hello
后台启动容器
docker run -d --name sleeptest alpine:latest /bin/sleep 60

宿主机查看后台容器进程
ps aux | grep sleeptest
进入状态为UP的容器,参数为容器id
docker exec -it e31d1845bf1e /bin/sh
停止容器
docker stop containerId
重启容器
docker restart containerId
删除容器
docker rm containerId
docker rm -f containerId
容器的高级操作
docker -v
映射目录
docker -p
映射端口测试
docker -e
配置窗口环境变量,同时指定多个变量使用多个-e
# docker -p -v 测试
## 下载 nginx镜像
docker pull nginx:1.19.7

## 将面试页面保存为html文件,放到docker映射目录中
curl http://www.baidu.com >> /Users/domino/files/docker-share/nginx/html/bd.html

## 要注意的是无论是端口还是目录,都是本地的在前,容器内的在后
docker run --name my_nginx -d -p 8100:80 -v /Users/domino/files/docker-share/nginx/html:/usr/share/nginx/html nginx:1.19.7

如上面的命令执行完以后,访问localhost:8100/baidu.html ,就可以展示百度页面了

# docker -e测试
% docker run --rm -e A_OPTs=abcde -e B_OPTS=efghi alpine:3.10.3 printenv
PATH=/usr/local/sbin:/usr/local/bin:/usr/sbin:/usr/bin:/sbin:/bin
HOSTNAME=8f1f65af55b3
B_OPTS=efghi
A_OPTs=abcde
HOME=/root
容器的生命周期
- 检查本地是否存在镜像,如果不存在就从远端仓库获取
- 利用镜像启动容器
- 分配一个文件系统,并在只读的镜像层外挂载一层可读写层
- 从宿主机配置的网桥接口中桥接一个虚拟接口到容器
- 从地址池配置一个ip地址给容器
- 执行用户指定的指令
- 执行完毕后容器终止
dockerfile
Dockerfile 相关的官方文档 官方文档
dockerfile 定义
dockerfile是用于构建docker镜像的代码
- docker 可以根据dockerfile自动构建镜像
- dockerfile为文本格式,是构建镜像所需命令的清单
- 通过docker build命令可以自动创建
- 90%以上的生产docker镜像是通过dockerfile进行构建的
dockerfile的规则
- 格式
- #为注释
- 指令大小写不敏感,但是建议指令用大写,内容用小写
- Docker会按从上到下的顺序执行dockerfile中的指令
- 每个Dockerfile的第一个非注释指令必须为From
4组Dockerfile的核心指令
-
USER/WORKDIR指令
以下就是一个通过Dockerfile进行创建镜像的Dockerfile的内容 ,要注意的是文件名必须为Dockerfile
~% cat Dockerfile # 使用my_nginx:1.0.0镜像进行构建 FROM docker.io/wejack639/my_nginx:1.0.0 # 指明docker中主进程使用用户nginx运行 USER root # 跳转到 容器的这个目录下 WORKDIR /usr/share/nginx/html # -t参数是打tag的意思,后面的是tag的名称 ~% docker build . -t docker.io/wejack639/my_nginx:v1.0.0_from_dockerfile Sending build context to Docker daemon 2.048kB Step 1/3 : FROM docker.io/wejack639/my_nginx:1.0.0 ---> 36a00a4ac6fa Step 2/3 : USER nginx ---> Running in cac95510a31b Removing intermediate container cac95510a31b ---> cb3aeb9af26d Step 3/3 : WORKDIR /Users/domino/files/docker-share/nginx/html:/usr/share/nginx/html ---> Running in 6d52fb71783d Removing intermediate container 6d52fb71783d ---> be494687e403 Successfully built be494687e403 Successfully tagged wejack639/my_nginx:v1.0.0_from_dockerfile # 然后就可以看到新打的镜像了 ~% docker images REPOSITORY TAG IMAGE ID CREATED SIZE wejack639/my_nginx 1.0.0_from_dockerfile 94e75eb9f24f 16 seconds ago 57.9MB # 使用镜像启动容器后,进入容器,使用pwd命令可以看到当前所在的目录为 Dockerfile内WORKDIR指定的目录 % docker run -d 94e75eb9f24f 950045fc3b52fa77ba85ea106346b80ffaacc07d676f12338d14c9c0ad5e85f0 % docker exec -it 950045fc3b52 /bin/bash bash-4.3# pwd /usr/share/nginx/html -
ADD/EXPOSE指令
ADD命令的意思是添加文件到容器内如:下面的意思就是将当前目录的index.html文件添加到镜像的 /usr/share/nginx/html/index.html 文件位置,这里要带文件名 ADD index.html /usr/share/nginx/html/index.htmlEXPOSE命令是标明容器内服务暴露端口,只是标明,就是告诉你提供服务的进程的端口是8080,但是实际是什么并不受expose命令的影响,下面的是官方的文档里的说明,最终实际的映射用的还是-PThe EXPOSE instruction informs Docker that the container listens on the specified network ports at runtime. You can specify whether the port listens on TCP or UDP, and the default is TCP if the protocol is not specified.
EXPOSE指令通知Docker容器在运行时在指定的网络端口上进行侦听。 您可以指定端口是侦听TCP还是UDP,如果未指定协议,则默认值为TCP。
The EXPOSE instruction does not actually publish the port. It functions as a type of documentation between the person who builds the image and the person who runs the container, about which ports are intended to be published. To actually publish the port when running the container, use the -p flag on docker run to publish and map one or more ports, or the -P flag to publish all exposed ports and map them to high-order ports.
EXPOSE指令
实际上不会发布端口。 它充当构建映像的人员和运行容器的人员之间的一种文档,即有关打算发布哪些端口的信息。要在运行容器时实际发布端口,请在docker run上使用-p标志发布并映射一个或多个端口,或使用-P标志发布所有公开的端口并将其映射到高阶端口。测试代码
  # Dockerfile文件内容

  FROM docker.io/nginx:1.19.7
  ADD index.html /usr/share/nginx/html/index.html
  #这里EXPOSE我写啥都不会影响 docker运行使用的端口,可以理解只是一行注释
  EXPOSE 80

  #在Dockerfile文件所在目录执行命令
  ~% docker build . -t wejack639/my_nginx:1.19.7_add_expose
  Sending build context to Docker daemon   5.12kB
  Step 1/3 : FROM docker.io/nginx:1.19.7
   ---> 35c43ace9216
  Step 2/3 : ADD index.html /usr/share/nginx/html/index.html
   ---> 4adb37c70fe2
  Step 3/3 : EXPOSE 80
  ---> Running in 2838417b3abf
  Removing intermediate container 2838417b3abf
  ---> 192fb2dab8d5
  Successfully built 192fb2dab8d5
  Successfully tagged wejack639/my_nginx:1.19.7_add_expose

  # 查看生成的镜像
  ~% docker images
  REPOSITORY                            TAG                 IMAGE ID       CREATED              SIZE
  wejack639/my_nginx                    1.19.7_add_expose   192fb2dab8d5   About a minute ago   133MB

  # 启动镜像, -P (大写的P命令会将随机端口指向容器的内的实际端口)
  % docker run --name my_nginx_add_expose -d -P wejack639/my_nginx:1.19.7_add_expose
  0ee3a387ed1d68e81bf4df9a54d605f304ad21225acf1d69d81a50cd88f9e0b2

  # 查看启动的镜像
  % docker ps
  CONTAINER ID   IMAGE                                       COMMAND                  CREATED          STATUS          PORTS                                    NAMES
  0ee3a387ed1d   wejack639/my_nginx:1.19.7_add_expose        "/docker-entrypoint.…"   40 seconds ago   Up 39 seconds   0.0.0.0:55018->80/tcp                    my_nginx_add_expose
镜像中打了一个百度首页的源码,所以访问 localhost:55018 可以访问到容器内的页面

最开始对
EXPOSE指令的理解有误,所以做测试的时候,走了一些弯路,要注意的是EXPOSE指令只是理解为是一个注释说明一样的指令,后面配置的端口信息和实际上容器内进程运行使用的端口可能不一样 -
RUN/ENV指令
RUN指令会在构建镜像时执行RUN指令后面的命令,比如安装一些常用软件之类的
ENV指令会增加环境变量# 查看Dockerfile文件 % cat Dockerfile FROM docker.io/centos:7 # 增加 JAVA_HOME环境变量 ENV JAVA_HOME /etc/java_home # 安装openssh-server RUN yum install -y openssh-server # 构建命令执行后可以看到环境变量和安装都执行了 % docker build . -t wejack639/centos:7_run_env Sending build context to Docker daemon 2.048kB Step 1/3 : FROM docker.io/centos:7 ---> 8652b9f0cb4c Step 2/3 : ENV JAVA_HOME /etc/java_home ---> Running in a287bc8ee5fa Removing intermediate container a287bc8ee5fa ---> 6f005109136e Step 3/3 : RUN yum install -y openssh-server ---> Running in dc675a57ad25 Loaded plugins: fastestmirror, ovl Determining fastest mirrors * base: mirrors.huaweicloud.com * extras: mirrors.bfsu.edu.cn * updates: mirrors.huaweicloud.com Resolving Dependencies --> Running transaction check ---> Package openssh-server.x86_64 0:7.4p1-21.el7 will be installed # 启动镜像后 % docker run --name "mycentos_run_env" -it -d --privileged -p 20020:22 wejack639/centos:7_run_env d2d07d574545f98431f5d41e1a20a03e5f552a7bb9678060719cde7b34528f03 % docker exec -it d2d07d574545 /bin/bash # 打印环境变量 [root@d2d07d574545 /]# printenv HOSTNAME=d2d07d574545 JAVA_HOME=/etc/java_home # 查看 openssh服务 ,也已经安装了 [root@d2d07d574545 /]# rpm -qa openssh openssh-7.4p1-21.el7.x86_64 -
CMD/ENTRYPOINT指令
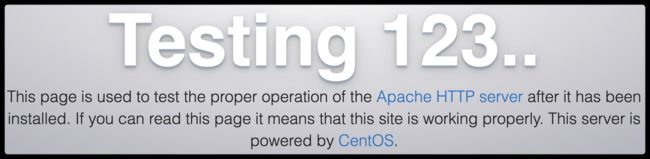
CMD启动容器以后执行的命令测试
  # Dockerfile文件内容
  ~ % cat Dockerfile
  FROM docker.io/centos:7
  # 打镜像时安装 httpd
  RUN yum install -y httpd
  # 容器启动以后启动httpd
  CMD ["httpd","-D","FOREGROUND"]

  # 使用Dockerfile 打镜像
  ~% docker build . -t wejack639/mycentos:7_cmd
  # 启动镜像,将宿主机的 25888端口与容器的80端口映射
  ~% docker run --name "mycentos_cmd" -d -p 25888:80 wejack639/mycentos:7_cmd
访问 http://localhost:25888 即可展示 httpd服务的默认页面
ENTRYPOINT指令一般容器如果没有CMD命令或在/下没有entrypoint.sh会执行ENTRYPOINT 指令下配置的文件测试
  # 首先定义 Dockerfile文件
  ~% cat Dockerfile
  # 使用nginx镜像做为基础镜像
  FROM docker.io/nginx:1.19.7
  # 添加 entrypoint.sh文件到  /目录下
  ADD entrypoint.sh /entrypoint.sh
  # 添加 测试首页
  ADD index.html /usr/share/nginx/html/index.html
  # 指定 ENTRYPONT 使用的命令文件,如果不使用命令文件,可以直接使用命令格式为 ENTRYPOINT ["executable", "param1", "param2"]
  # 参考 https://docs.docker.com/engine/reference/builder/#entrypoint
  ENTRYPOINT /entrypoint.sh


  # 本地创建entrypoint.sh文件,这里要注意给 entrypoint.sh文件添加 可执行权限
  # chmod a+x entrypoint.sh
  # nginx 执行daemon off的原因为nginx默认是以后台模式启动的,Docker未执行自定义的CMD之前,nginx的pid是1,执行到CMD之后,nginx就在后台运行,bash或sh脚本的pid变成了1。所以一旦执行完自定义CMD,nginx容器也就退出了。为了保持nginx的容器不退出,应该关闭nginx后台运行
  ~% cat entrypoint.sh
  !#/bin/bash
  touch /hello.txt
  echo "hello world" >> /hello.txt
  /usr/sbin/nginx -g "daemon off;"


  # 构建镜像
  ~% docker build . -t wejack639/my_nginx:1.19.7_entrypoint1

  # 启动容器
  ~% docker run --name "my_nginx_entrypoint1" -d -p 25888:80 wejack639/my_nginx:1.19.7_entrypoint1

  # 进入容器
  ~% docker exec -it fb4b9205a36b /bin/bash
进入容器的根目录后,可以看到 在/目录下有
entrypoint.sh文件 ,也有我在entrypoint.sh文件中执行创建的hello.txt文件