RocketMQ(五)集群RocketMQ搭建
1 什么是集群
在单机环境下,一个broker提供服务,如果出现网络等原因宕机了,那么服务就会瘫痪。
如何保证高可用呢?
可以搭建集群环境,多个broker提供服务(例如北京机房部署一个主节点,深圳机房部署一个主节点),如果每秒有2万的请求,可以让北京机房和深圳机房各承担1万请求,达成负载均衡,但是如果北京机房也宕机了,北京机房的数据就没了,显然此种集群搭建是有问题的。
因此可以在北京机房和深圳机房再部署一个从节点,这就叫做主从同步
主从节点的搭建分为下面两种模式
- master到slave消息同步方式为同步(较异步方式性能略低,消息无延迟)
- master到slave消息同步方式为异步(较同步方式性能略高,消息有延迟)
2 RocketMQ集群介绍
主节点brokerId为0,从节点brokerId大于0, brokerName相同的节点在同一集群。
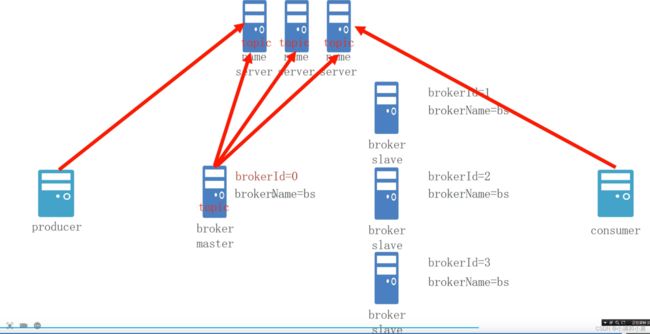
RocketMQ集群工作流程
- NameServer启动,开启监听,等待broker、 producer 与consumer连接
- broker启动,根据配置信息,连接所有的NameServer,并保持长连接,如果broker中有现存数据,NameServer将 保存topic与broker关系
- producer发信息,连接某个NameServer,并建立长连接
- producer发消息,如果topic存在,由NameServer直接分配,如果topic不存在,有NameServer创建topic与broker的关系,并分配。
- producer在broker的topic选择- - 个消息队列(从列表中选择)
- comsumer.工作流程同producer
3 2主2从搭建
首先在虚拟机配置一个静态ip为192.168.21.100的节点,下载JDK,Maven,RocketMQ,然后克隆该节点修改静态IP为192.168.21.101的节点。

3.1 配置服务器基本环境
修改hosts文件
vim /etc/hosts
添加
# nameserver
192.168.21.100 rocketmq-nameserver1
192.168.21.101 rocketmq-nameserver2
# broker
192.168.21.100 rocketmq-master1
192.168.21.100 rocketmq-slave2
192.168.21.101 rocketmq-master2
192.168.21.101 rocketmq-slave1
重启网卡
systemctl restart network
修改环境变量
vim /etc/profile
ROCKETMQ_HOME=/opt/wang/soft/rocketmq
PATH=$PATH:$ROCKETMQ_HOME/bin
export ROCKETMQ_HOME PATH
source /etc/profile
3.2 创建集群服务器的数据存储目录
在两个节点的rocketmq目录分别执行master数据存储目录的创建命令和slave数据存储目录的创建命令。
master 数据存储目录创建
 mkdir store
 mkdir store/commitlog
 mkdir store/consumequeue
 mkdir store/index
slave 数据存储目录创建
 mkdir store-slave
 mkdir store-slave/commitlog
 mkdir store-slave/consumequeue
 mkdir store-slave/index
3.3 修改RocketMQ配置文件
切换到rocketmq的conf目录,可以找到2m-2s-sync文件夹(两主两从同步),进入此文件夹。
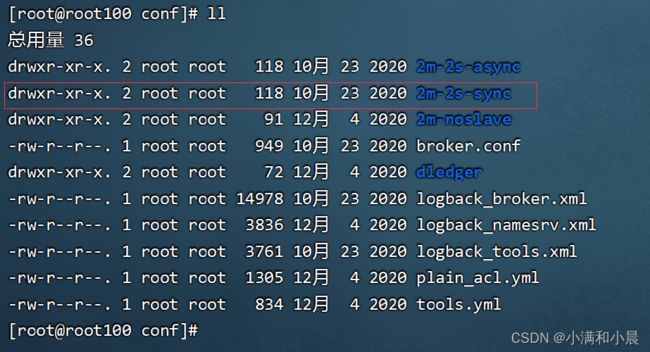
可以看到该目录下有四个配置文件,分别为a主a从,b主b从,由于100机器只是搭建a主b从,因此可以把b-m和a-s删除。

3.3.1 root100主机配置
修改broker-a.properties文件
vim broker-a.properties
删除里面的全部数据:技巧(100 + dd)
复制下面数据到里面
#所属集群名字
brokerClusterName=rocketmq-cluster
#broker名字,注意此处不同的配置文件填写的不一样
brokerName=broker-a
#0 表示 Master,>0 表示 Slave
brokerId=0
#nameServer地址,分号分割
namesrvAddr=rocketmq-nameserver1:9876;rocketmq-nameserver2:9876
#在发送消息时,自动创建服务器不存在的topic,默认创建的队列数
defaultTopicQueueNums=4
#是否允许 Broker 自动创建Topic,建议线下开启,线上关闭
autoCreateTopicEnable=true
#是否允许 Broker 自动创建订阅组,建议线下开启,线上关闭
autoCreateSubscriptionGroup=true
#Broker 对外服务的监听端口
listenPort=10911
#删除文件时间点,默认凌晨 4点
deleteWhen=04
#文件保留时间,默认 48 小时
fileReservedTime=120
#commitLog每个文件的大小默认1G
mapedFileSizeCommitLog=1073741824
#ConsumeQueue每个文件默认存30W条,根据业务情况调整
mapedFileSizeConsumeQueue=300000
#destroyMapedFileIntervalForcibly=120000
#redeleteHangedFileInterval=120000
#检测物理文件磁盘空间
diskMaxUsedSpaceRatio=88
#存储路径
storePathRootDir=/opt/wang/soft/rocketmq/store
#commitLog 存储路径
storePathCommitLog=/opt/wang/soft/rocketmq/store/commitlog
#消费队列存储路径存储路径
storePathConsumeQueue=/opt/wang/soft/rocketmq/store/consumequeue
#消息索引存储路径
storePathIndex=/opt/wang/soft/rocketmq/store/index
#checkpoint 文件存储路径
storeCheckpoint=/opt/wang/soft/rocketmq/store/checkpoint
#abort 文件存储路径
abortFile=/opt/wang/soft/rocketmq/store/abort
#限制的消息大小
maxMessageSize=65536
#flushCommitLogLeastPages=4
#flushConsumeQueueLeastPages=2
#flushCommitLogThoroughInterval=10000
#flushConsumeQueueThoroughInterval=60000
#Broker 的角色
#- ASYNC_MASTER 异步复制Master
#- SYNC_MASTER 同步双写Master
#- SLAVE
brokerRole=SYNC_MASTER
#刷盘方式
#- ASYNC_FLUSH 异步刷盘
#- SYNC_FLUSH 同步刷盘
flushDiskType=SYNC_FLUSH
#checkTransactionMessageEnable=false
#发消息线程池数量
#sendMessageThreadPoolNums=128
#拉消息线程池数量
#pullMessageThreadPoolNums=128
修改broker-b-s.properties文件
vim broker-b-s.properties
删除里面的全部数据:技巧(100 + dd)
复制下面数据到里面
#所属集群名字
brokerClusterName=rocketmq-cluster
#broker名字,注意此处不同的配置文件填写的不一样
brokerName=broker-b
#0 表示 Master,>0 表示 Slave
brokerId=1
#nameServer地址,分号分割
namesrvAddr=rocketmq-nameserver1:9876;rocketmq-nameserver2:9876
#在发送消息时,自动创建服务器不存在的topic,默认创建的队列数
defaultTopicQueueNums=4
#是否允许 Broker 自动创建Topic,建议线下开启,线上关闭
autoCreateTopicEnable=true
#是否允许 Broker 自动创建订阅组,建议线下开启,线上关闭
autoCreateSubscriptionGroup=true
#Broker 对外服务的监听端口
listenPort=11011
#删除文件时间点,默认凌晨 4点
deleteWhen=04
#文件保留时间,默认 48 小时
fileReservedTime=120
#commitLog每个文件的大小默认1G
mapedFileSizeCommitLog=1073741824
#ConsumeQueue每个文件默认存30W条,根据业务情况调整
mapedFileSizeConsumeQueue=300000
#destroyMapedFileIntervalForcibly=120000
#redeleteHangedFileInterval=120000
#检测物理文件磁盘空间
diskMaxUsedSpaceRatio=88
#存储路径
storePathRootDir=/opt/wang/soft/rocketmq/store-slave
#commitLog 存储路径
storePathCommitLog=/opt/wang/soft/rocketmq/store-slave/commitlog
#消费队列存储路径存储路径
storePathConsumeQueue=/opt/wang/soft/rocketmq/store-slave/consumequeue
#消息索引存储路径
storePathIndex=/opt/wang/soft/rocketmq/store-slave/index
#checkpoint 文件存储路径
storeCheckpoint=/opt/wang/soft/rocketmq/store-slave/checkpoint
#abort 文件存储路径
abortFile=/opt/wang/soft/rocketmq/store-slave/abort
#限制的消息大小
maxMessageSize=65536
#flushCommitLogLeastPages=4
#flushConsumeQueueLeastPages=2
#flushCommitLogThoroughInterval=10000
#flushConsumeQueueThoroughInterval=60000
#Broker 的角色
#- ASYNC_MASTER 异步复制Master
#- SYNC_MASTER 同步双写Master
#- SLAVE
brokerRole=SLAVE
#刷盘方式
#- ASYNC_FLUSH 异步刷盘
#- SYNC_FLUSH 同步刷盘
flushDiskType=ASYNC_FLUSH
#checkTransactionMessageEnable=false
#发消息线程池数量
#sendMessageThreadPoolNums=128
#拉消息线程池数量
#pullMessageThreadPoolNums=128
3.3.2 root101主机配置
修改broker-b.properties文件
#所属集群名字
brokerClusterName=rocketmq-cluster
#broker名字,注意此处不同的配置文件填写的不一样
brokerName=broker-b
#0 表示 Master,>0 表示 Slave
brokerId=1
#nameServer地址,分号分割
namesrvAddr=rocketmq-nameserver1:9876;rocketmq-nameserver2:9876
#在发送消息时,自动创建服务器不存在的topic,默认创建的队列数
defaultTopicQueueNums=4
#是否允许 Broker 自动创建Topic,建议线下开启,线上关闭
autoCreateTopicEnable=true
#是否允许 Broker 自动创建订阅组,建议线下开启,线上关闭
autoCreateSubscriptionGroup=true
#Broker 对外服务的监听端口
listenPort=11011
#删除文件时间点,默认凌晨 4点
deleteWhen=04
#文件保留时间,默认 48 小时
fileReservedTime=120
#commitLog每个文件的大小默认1G
mapedFileSizeCommitLog=1073741824
#ConsumeQueue每个文件默认存30W条,根据业务情况调整
mapedFileSizeConsumeQueue=300000
#destroyMapedFileIntervalForcibly=120000
#redeleteHangedFileInterval=120000
#检测物理文件磁盘空间
diskMaxUsedSpaceRatio=88
#存储路径
storePathRootDir=/opt/wang/soft/rocketmq/store-slave
#commitLog 存储路径
storePathCommitLog=/opt/wang/soft/rocketmq/store-slave/commitlog
#消费队列存储路径存储路径
storePathConsumeQueue=/opt/wang/soft/rocketmq/store-slave/consumequeue
#消息索引存储路径
storePathIndex=/opt/wang/soft/rocketmq/store-slave/index
#checkpoint 文件存储路径
storeCheckpoint=/opt/wang/soft/rocketmq/store-slave/checkpoint
#abort 文件存储路径
abortFile=/opt/wang/soft/rocketmq/store-slave/abort
#限制的消息大小
maxMessageSize=65536
#flushCommitLogLeastPages=4
#flushConsumeQueueLeastPages=2
#flushCommitLogThoroughInterval=10000
#flushConsumeQueueThoroughInterval=60000
#Broker 的角色
#- ASYNC_MASTER 异步复制Master
#- SYNC_MASTER 同步双写Master
#- SLAVE
brokerRole=SLAVE
#刷盘方式
#- ASYNC_FLUSH 异步刷盘
#- SYNC_FLUSH 同步刷盘
flushDiskType=ASYNC_FLUSH
#checkTransactionMessageEnable=false
#发消息线程池数量
#sendMessageThreadPoolNums=128
#拉消息线程池数量
#pullMessageThreadPoolNums=128
修改broker-a-s.properties文件
#所属集群名字
brokerClusterName=rocketmq-cluster
#broker名字,注意此处不同的配置文件填写的不一样
brokerName=broker-b
#0 表示 Master,>0 表示 Slave
brokerId=1
#nameServer地址,分号分割
namesrvAddr=rocketmq-nameserver1:9876;rocketmq-nameserver2:9876
#在发送消息时,自动创建服务器不存在的topic,默认创建的队列数
defaultTopicQueueNums=4
#是否允许 Broker 自动创建Topic,建议线下开启,线上关闭
autoCreateTopicEnable=true
#是否允许 Broker 自动创建订阅组,建议线下开启,线上关闭
autoCreateSubscriptionGroup=true
#Broker 对外服务的监听端口
listenPort=11011
#删除文件时间点,默认凌晨 4点
deleteWhen=04
#文件保留时间,默认 48 小时
fileReservedTime=120
#commitLog每个文件的大小默认1G
mapedFileSizeCommitLog=1073741824
#ConsumeQueue每个文件默认存30W条,根据业务情况调整
mapedFileSizeConsumeQueue=300000
#destroyMapedFileIntervalForcibly=120000
#redeleteHangedFileInterval=120000
#检测物理文件磁盘空间
diskMaxUsedSpaceRatio=88
#存储路径
storePathRootDir=/opt/wang/soft/rocketmq/store-slave
#commitLog 存储路径
storePathCommitLog=/opt/wang/soft/rocketmq/store-slave/commitlog
#消费队列存储路径存储路径
storePathConsumeQueue=/opt/wang/soft/rocketmq/store-slave/consumequeue
#消息索引存储路径
storePathIndex=/opt/wang/soft/rocketmq/store-slave/index
#checkpoint 文件存储路径
storeCheckpoint=/opt/wang/soft/rocketmq/store-slave/checkpoint
#abort 文件存储路径
abortFile=/opt/wang/soft/rocketmq/store-slave/abort
#限制的消息大小
maxMessageSize=65536
#flushCommitLogLeastPages=4
#flushConsumeQueueLeastPages=2
#flushCommitLogThoroughInterval=10000
#flushConsumeQueueThoroughInterval=60000
#Broker 的角色
#- ASYNC_MASTER 异步复制Master
#- SYNC_MASTER 同步双写Master
#- SLAVE
brokerRole=SLAVE
#刷盘方式
#- ASYNC_FLUSH 异步刷盘
#- SYNC_FLUSH 同步刷盘
flushDiskType=ASYNC_FLUSH
#checkTransactionMessageEnable=false
#发消息线程池数量
#sendMessageThreadPoolNums=128
#拉消息线程池数量
#pullMessageThreadPoolNums=128
3.4 启动
root100服务器上:
启动nameserver
nohup sh mqnamesrv &
启动a broker主节点
nohup sh mqbroker -c ../conf/2m-2s-sync/broker-a.properties &
启动b broker从节点
nohup sh mqbroker -c ../conf/2m-2s-sync/broker-b-s.properties &
root101服务器上:
启动nameserver
nohup sh mqnamesrv &
启动b broker主节点
nohup sh mqbroker -c ../conf/2m-2s-sync/broker-b.properties &
启动a broker从节点
nohup sh mqbroker -c ../conf/2m-2s-sync/broker-a-s.properties &
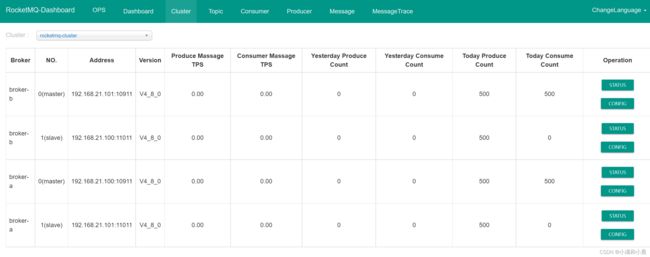
3.5 测试
上传rocketmq-dashbaoard jar包和配置文件

修改配置文件中namesrvAddr

运行:java -jar rocketmq-dashboard-1.0.0.jar
运行结果如下:
集群名:rocketmq-cluster

随便选择一个节点进行发送接受消息测试,这里选用root101
发送消息
export NAMESRV_ADDR=localhost:9876
sh tools.sh org.apache.rocketmq.example.quickstart.Producer
接收消息
sh tools.sh org.apache.rocketmq.example.quickstart.Consumer
可以看到消息生产和消费情况