大数据Sqoop借助Hive将Mysql数据导入至Hbase
目录
- 1. BulkLoad 介绍
-
- 1.1. 为什么要抽取
- 1.2. 为什么使用 BulkLoad
- 1.3 hive导入Hbase
-
- 1.3.1 创建表
- 1.3.2 导入数据至Hive表
- 2. 从 Hive 中抽取数据到 HBase
-
- 2.1. 准备数据
-
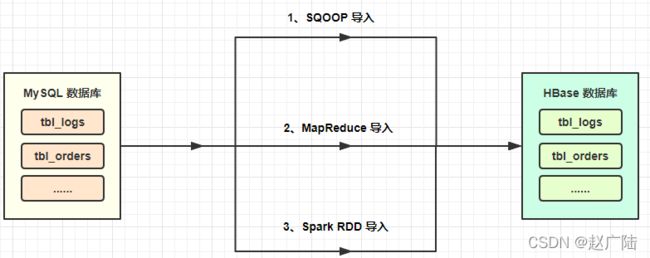
- 2.1.1. 将数据导入到 MySQL
- 2.1.2. 将数据导入到 Hive
- 2.2. 工程配置
- 2.3. Spark 任务
- 2.4. 运行任务
1. BulkLoad 介绍
- 目标
- 理解 BulkLoad 的大致原理
- 步骤
- 为什么要抽取
- 为什么使用 BulkLoad
1.1. 为什么要抽取
大数据Sqoop快速入门
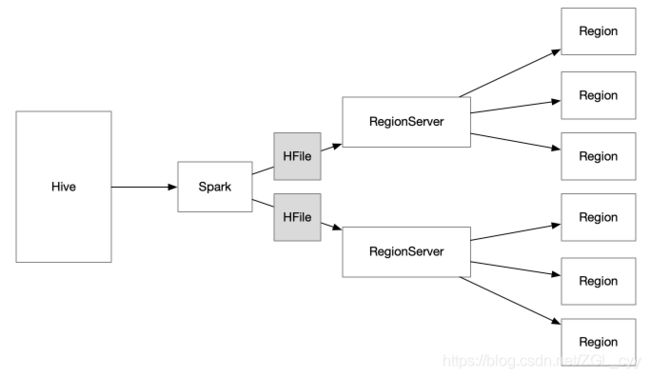
因为数据仓库是甲方自建的, 所以如果我们需要数仓中的数据, 需要申请, 申请完成后, 甲方会将对应的 Hive 表开放给我们, 所以我们需要把 Hive 表中需要的数据抽取到我们的 HBase 中, 如下
抽取方向: Hive -> HBase
1.2. 为什么使用 BulkLoad
在大量数据需要写入HBase时,通常有 put方式和bulkLoad 两种方式。
1、put方式为单条插入,在put数据时会先将数据的更新操作信息和数据信息 写入WAL ,在写入到WAL后, 数据就会被放到MemStore中 ,当MemStore满后数据就会被 flush到磁盘(即形成HFile文件) ,在这种写操作过程会涉及到flush、split、compaction等操作,容易造成节点不稳定,数据导入慢,耗费资源等问题,在海量数据的导入过程极大的消耗了系统性能,避免这些问题最好的方法就是使用BulkLoad的方式来加载数据到HBase中。

2、BulkLoader利用HBase数据按照HFile格式存储在HDFS的原理,使用MapReduce直接批量
生成HFile格式文件后,RegionServers再将HFile文件移动到相应的Region目录下。
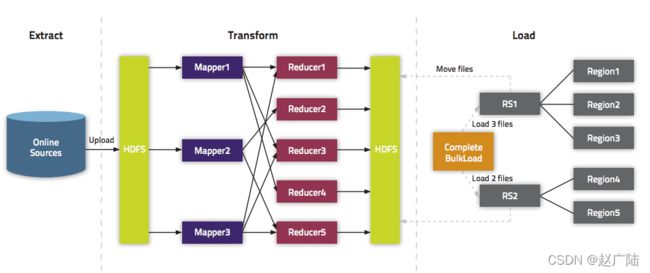
1)、Extract,异构数据源数据导入到 HDFS 之上。
2)、Transform,通过用户代码,可以是 MR 或者 Spark 任务将数据转化为 HFile。
3)、Load,HFile 通过 loadIncrementalHFiles 调用将 HFile 放置到 Region 对应的
HDFS 目录上,该过程可能涉及到文件切分。
1、不会触发WAL预写日志,当表还没有数据时进行数据导入不会产生Flush和Split。
2、减少接口调用的消耗,是一种快速写入的优化方式。
Spark读写HBase之使用Spark自带的API以及使用Bulk Load将大量数据导入HBase:
https://www.jianshu.com/p/b6c5a5ba30af
- 直接使用 HBase 的 Java 客户端, 一条一条插入 HBase 的
- 使用 BulkLoad
先说说要使用 BulkLoad 的原因
- 从 Hive 抽取数据到 HBase 是将全量的数据抽取到 HBase, 日增量大概 260 G
- 如果把这五千万条数据一条一条的插入 HBase, 会影响 HBase 的运行
- 如果把这五千万条数据一条一条的插入 HBase, 会非常的慢
为什么会非常慢呢? 因为一条数据插入 HBase 的大致步骤如下
- 查询元数据表, 得到所要插入的表的 Region 信息
- 插入到对应 Region 的 WAL 预写日志
- 插入到 Region 中的 Memstore
- 达到条件后, Memstore 把数据刷写为 HFile
- 达到条件后, 触发 Minor Compaction
- 达到条件后, 触发 Major Compaction
- 达到条件后, 分裂 Region
- 分区再平衡
而我们有 260G 的数据要插入, 触发很多次 Compaction, 会分裂 Region 几百次, 这无疑会造成 HBase 集群的不稳定, 并且, 我们插入的速度也会很慢
所以, 当一次性要插入的数据太多时, 要通过 HBase 的 BulkLoad 方式加载
- Spark 读取 Hive 的数据
- 生成 HFile
- 通过 HBase 的 BulkLoad API 把 HFile 直接交给 RegionServer
- RegionServer 切分, 直接放入对应的 Region
1.3 hive导入Hbase
将MySQL数据库中表的数据导入到Hive表中,以便加载到HBase表中。
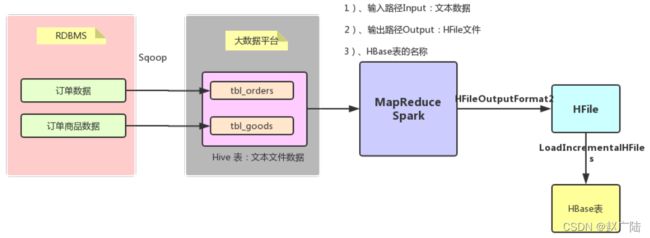
启动HiveMetastore服务和HiveServer2服务,使用beeline命令行连接,相关命令如下:
[root@bigdata-cdh01 ~]# /export/servers/hive/bin/beeline
Beeline version 1.1.0-cdh5.14.0 by Apache Hive
beeline> !connect jdbc:hive2://bigdata-cdh01.itcast.cn:10000
scan complete in 2ms
Connecting to jdbc:hive2://bigdata-cdh01.itcast.cn:10000
Enter username for jdbc:hive2://bigdata-cdh01.itcast.cn:10000: root
Enter password for jdbc:hive2://bigdata-cdh01.itcast.cn:10000: ****
Connected to: Apache Hive (version 1.1.0-cdh5.14.0)
Driver: Hive JDBC (version 1.1.0-cdh5.14.0)
Transaction isolation: TRANSACTION_REPEATABLE_READ
0: jdbc:hive2://bigdata-cdh01.itcast.cn:10000>
1.3.1 创建表
创建Hive中数据库Database:
CREATE DATABASE tags_dat;
根据MySQL数据库表在Hive数据仓库中构建相应的表:
用户信息表: tbl_users
/export/servers/sqoop/bin/sqoop create-hive-table \
--connect jdbc:mysql://bigdata-cdh01.oldlu.cn:3306/tags_dat \
--table tbl_users \
--username root \
--password 123456 \
--hive-table tags_dat.tbl_users \
--fields-terminated-by '\t' \
--lines-terminated-by '\n'
1.3.2 导入数据至Hive表
使用Sqoop将MySQL数据库表中的数据导入到Hive表中(本质就是存储在HDFS上),具体命
令如下:
用户信息表: tbl_users
/export/servers/sqoop/bin/sqoop import \
--connect jdbc:mysql://bigdata-cdh01.itcast.cn:3306/tags_dat \
--username root \
--password 123456 \
--table tbl_users \
--direct \
--hive-overwrite \
--delete-target-dir \
--fields-terminated-by '\t' \
--lines-terminated-by '\n' \
--hive-table tags_dat.tbl_users \
--hive-import \
--num-mappers 1
2. 从 Hive 中抽取数据到 HBase
-
目标
- 将 Hive 的表抽取到 HBase 中
-
步骤
- 准备数据
- 导入 MySQL
- 导入 Hive
- 建立工程
tag-data - 编写 Spark 任务
- 运行任务
- 查看结果
- 准备数据
2.1. 准备数据
2.1.1. 将数据导入到 MySQL
步骤:
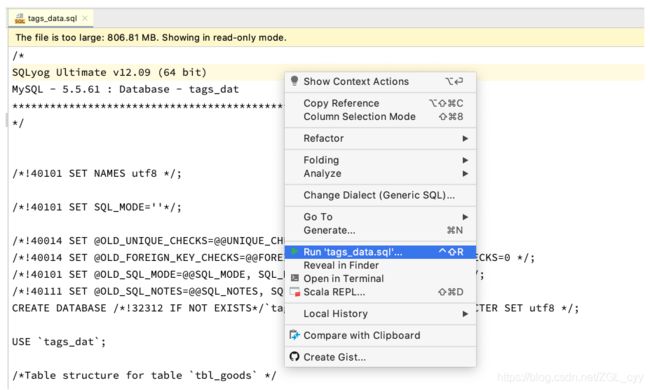
- 打开 SQL 脚本
- 运行 SQL 脚本
MySQL 密码 : itcastmysqlroot
详细解释:
- 通过 IDEA 打开脚本, 文件位置在
files/tags_data.sql
- 运行脚本
- 等待结果
2.1.2. 将数据导入到 Hive
步骤:
- 编写 Sqoop 任务脚本
- 通过 Hue 上传脚本
- 创建 Hive 数据库
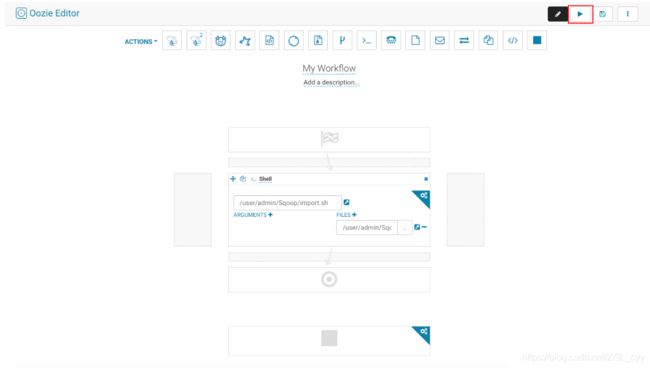
- 创建 Oozie job 执行脚本, 导入数据
详细解释:
-
编写 Sqoop 任务脚本
#!/bin/sh sqoop import \ --hive-import \ --create-hive-table \ --hive-table tags_data.tbl_goods \ --connect "jdbc:mysql://master01:3306/tags_dat" \ --username root \ --password itcastmysqlroot \ --query "SELECT * FROM tags_dat.tbl_goods WHERE \$CONDITIONS" \ --split-by id \ --direct \ --target-dir /user/admin/hive/tags_dat \ --m 2 sqoop import \ --hive-import \ --create-hive-table \ --hive-table tags_data.tbl_goods_new \ --connect "jdbc:mysql://master01:3306/tags_dat" \ --username root \ --password itcastmysqlroot \ --query "SELECT * FROM tags_dat.tbl_goods_new WHERE \$CONDITIONS" \ --split-by id \ --direct \ --target-dir /user/admin/hive/tags_dat \ --m 2 sqoop import \ --hive-import \ --create-hive-table \ --hive-table tags_data.tbl_logs \ --connect "jdbc:mysql://master01:3306/tags_dat?useUnicode=true" \ --username root \ --password itcastmysqlroot \ --query "SELECT * FROM tags_dat.tbl_logs WHERE \$CONDITIONS" \ --split-by id \ --direct \ --target-dir /user/admin/hive/tags_dat \ --m 2 sqoop import \ --hive-import \ --create-hive-table \ --hive-table tags_data.tbl_orders \ --connect "jdbc:mysql://master01:3306/tags_dat" \ --username root \ --password itcastmysqlroot \ --query "SELECT * FROM tags_dat.tbl_orders WHERE \$CONDITIONS" \ --split-by id \ --direct \ --target-dir /user/admin/hive/tags_dat \ --m 2 sqoop import \ --hive-import \ --create-hive-table \ --hive-table tags_data.tbl_users \ --connect "jdbc:mysql://master01:3306/tags_dat" \ --username root \ --password itcastmysqlroot \ --query "SELECT * FROM tags_dat.tbl_users WHERE \$CONDITIONS" \ --split-by id \ --direct \ --target-dir /user/admin/hive/tags_dat \ --m 2 -
通过 Hue 上传脚本文件
- 创建 Hive 数据库
- 创建 Oozie Job 执行脚本
- 查看执行结果
2.2. 工程配置
数据抽取:
- 导入 MySQL
- MySQL to Hive
- Hive to HBase
- 建立工程, 导入 Maven 配置
- 代码编写, 通过 Spark 读取 Hive 数据, 落地成 HFile, 通过 BulkLoad 加载到 HBase
- 提交, 运行
步骤:
- 配置 Maven
- 导入 HBase 的配置文件到
resource目录中- 配置文件在
Files/hbase_conf
- 配置文件在
从目标来看, 这个工程中需要 Spark, HBase, Hive 的相关依赖, pom.xml 如下
<dependencies>
    <dependency>
        <groupId>org.scala-langgroupId>
        <artifactId>scala-libraryartifactId>
    dependency>

    <dependency>
        <groupId>org.apache.sparkgroupId>
        <artifactId>spark-core_2.11artifactId>
    dependency>
    <dependency>
        <groupId>org.apache.sparkgroupId>
        <artifactId>spark-sql_2.11artifactId>
    dependency>
    <dependency>
        <groupId>org.apache.sparkgroupId>
        <artifactId>spark-mllib_2.11artifactId>
    dependency>
    <dependency>
        <groupId>org.apache.sparkgroupId>
        <artifactId>spark-hive_2.11artifactId>
    dependency>

    <dependency>
        <groupId>org.apache.hbasegroupId>
        <artifactId>hbase-serverartifactId>
        <exclusions>
            <exclusion>
                <artifactId>jersey-container-servlet-coreartifactId>
                <groupId>org.glassfish.jersey.containersgroupId>
            exclusion>
            <exclusion>
                <artifactId>guice-servletartifactId>
                <groupId>com.google.inject.extensionsgroupId>
            exclusion>
        exclusions>
    dependency>
    <dependency>
        <groupId>org.apache.hbasegroupId>
        <artifactId>hbase-mapreduceartifactId>
    dependency>

    <dependency>
        <groupId>mysqlgroupId>
        <artifactId>mysql-connector-javaartifactId>
    dependency>

    <dependency>
        <groupId>org.slf4jgroupId>
        <artifactId>slf4j-apiartifactId>
    dependency>
    <dependency>
        <groupId>org.slf4jgroupId>
        <artifactId>slf4j-simpleartifactId>
    dependency>
dependencies>

<build>
    <plugins>
        <plugin>
            <groupId>org.apache.maven.pluginsgroupId>
            <artifactId>maven-compiler-pluginartifactId>
        plugin>

        <plugin>
            <groupId>net.alchim31.mavengroupId>
            <artifactId>scala-maven-pluginartifactId>
        plugin>

        <plugin>
            <groupId>org.apache.maven.pluginsgroupId>
            <artifactId>maven-assembly-pluginartifactId>
        plugin>
    plugins>
build>
2.3. Spark 任务
-
步骤
- 从 Hive 中读取表数据
- 创建 HBase 和 Hadoop 的配置对象
- 将数据以 HFile 的形式写入到 HDFS 中
- 通过 HBase Client API 将数据 BulkLoad 到 HBase 对应的表中
-
注意点
- 如果希望程序要通用一些, 我们可以把 Hive 的表明和 RowKey 列的信息通过 main 方法传进来
- 要先写 HFile 再 BulkLoad 才是 BulkLoad
- Job 和 HBaseClient 的配置是模板代码, 不需要记忆
- add framework support 的时候, 加载 Scala 的 SDK 不能使用 Maven 的 SDK, 要使用自己电脑上安装的 Scala SDK
object HiveToHBase {
  val defaultCF = "default"
  val defaultNameSpace = "default"
  val tempFileDir = "/user/admin/Spark/extra_temp/"

  def main(args: Array[String]): Unit = {
    if (args.length < 3) {
      return
    }

    val sourceDBName = args(0)
    val sourceTableName = args(1)
    val rkeyField = args(2)

    val conf = HBaseConfiguration.create
    conf.set(TableOutputFormat.OUTPUT_TABLE, sourceTableName)
    conf.set("hbase.mapreduce.hfileoutputformat.table.name", sourceTableName)

    val job = Job.getInstance(conf)
    job.setMapOutputKeyClass(classOf[ImmutableBytesWritable])
    job.setMapOutputValueClass(classOf[KeyValue])

    val hfilePath = tempFileDir + sourceTableName

    hive2HFile(sourceDBName, sourceTableName, rkeyField, defaultCF, conf, hfilePath)
    bulkLoad2Table(job, hfilePath, defaultNameSpace, sourceTableName, defaultCF)
  }

  def hive2HFile(sourceDB: String, sourceTable: String, rkeyField: String, cf: String, hadoopConfig: Configuration, hfilePath: String): Unit = {
    val fs = FileSystem.get(hadoopConfig)
    if (fs.exists(new Path(hfilePath))) {
      fs.delete(new Path(hfilePath), true)
    }

    val spark = SparkSession.builder()
      .appName("bulk load from hive")
      .enableHiveSupport()
      .getOrCreate()

    spark.read
      .table(sourceDB + "." + sourceTable)
      .rdd
      .filter(row => row.getAs(rkeyField) != null)
      .flatMap(row => {
        val cfBytes = Bytes.toBytes(cf)
        val rowKeyBytes = Bytes.toBytes(row.getAs(rkeyField).toString)

        row.schema
          .sortBy(field => field.name)
          .map(field => {
            val fieldNameBytes = Bytes.toBytes(field.name)
            val valueBytes = Bytes.toBytes(row.getAs(field.name).toString)

            val kv = new KeyValue(rowKeyBytes, cfBytes, fieldNameBytes, valueBytes)
            (new ImmutableBytesWritable(rowKeyBytes), kv)
          })
      })
      .filter(item => item != null)
      .saveAsNewAPIHadoopFile(
        hfilePath,
        classOf[ImmutableBytesWritable],
        classOf[KeyValue],
        classOf[HFileOutputFormat2],
        hadoopConfig
      )
  }

  def bulkLoad2Table(job: Job, hfilePath: String, namespace: String, name: String, cf: String): Unit = {
    val connection = ConnectionFactory.createConnection(job.getConfiguration)
    val admin = connection.getAdmin

    val tableName = TableName.valueOf(Bytes.toBytes(namespace), Bytes.toBytes(name))

    if (!admin.tableExists(tableName)) {
      admin.createTable(
        TableDescriptorBuilder.newBuilder(tableName)
          .setColumnFamily(ColumnFamilyDescriptorBuilder.newBuilder(Bytes.toBytes(cf)).build())
          .build()
      )
    }

    val table = connection.getTable(tableName)
    val regionLocator = new HRegionLocator(tableName, connection.asInstanceOf[ClusterConnection])

    HFileOutputFormat2.configureIncrementalLoad(job, table, regionLocator)
    val loader = new LoadIncrementalHFiles(job.getConfiguration)
    loader.doBulkLoad(new Path(hfilePath), admin, table, regionLocator)
  }
}
2.4. 运行任务
一共有五张表需要导入
| 表 | Hive table name | RowKey field |
|---|---|---|
| 商品表 | tbl_goods | id |
| 商品表_new | tbl_goods_new | id |
| 日志表 | tbl_logs | id |
| 订单表 | tbl_orders | id |
| 用户表 | tbl_users | id |
需要五个 Oozie Job 去调度执行, 创建方式如下
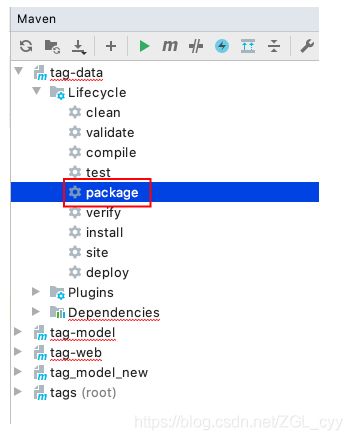
- 打包 Spark 程序
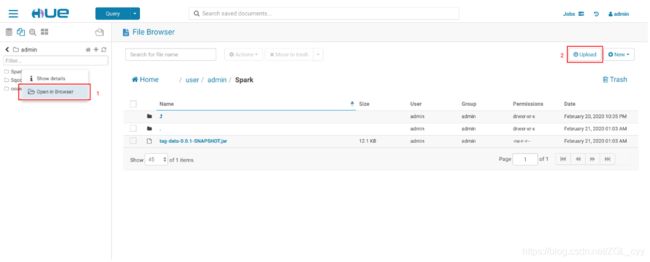
- 上传 Spark Jar 包到 HDFS
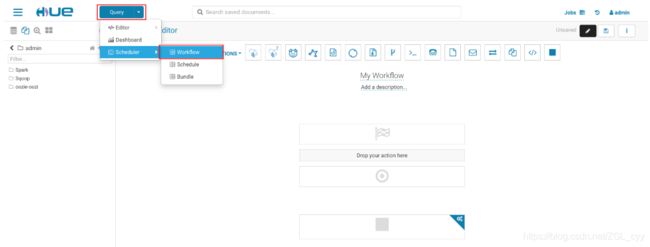
- 创建 Workflow
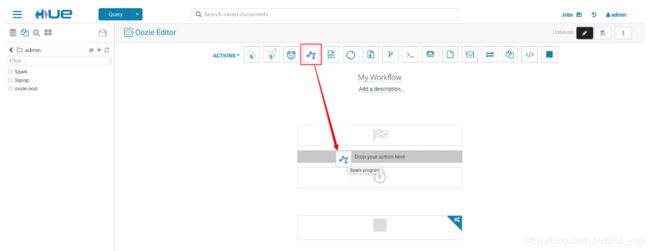
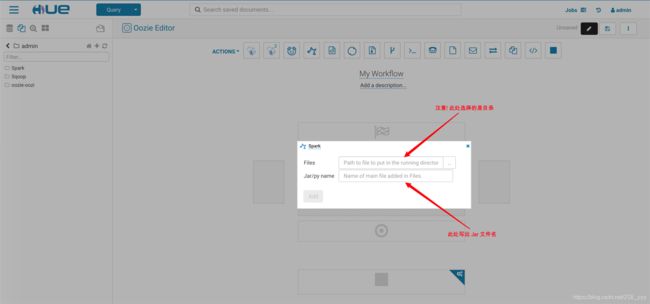
- 选择 Spark Jar 包
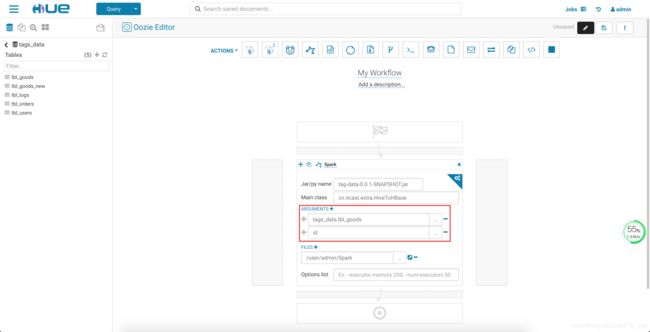
- 加入参数, 一个是要导入 HBase 的 Hive 表名, 一个是表中的 RowKey 列
- 创建 Cordinator
- Cordinator 会每天执行一次导入增量数据的任务
- 为了尽快看到效果, 可以先运行 Workflow
- 如果是导入日增量数据, 可以在 Sqoop 任务的 SQL 中过滤当日数据
详细介绍如下
- 打包 Spark 程序
- 上传 Spark Jar 包
- 创建 Workflow
- 创建 Cordinator

