antv/G6使用记录,调用save方法,对数据model进行改造,并重新渲染
antv/G6使用记录,调用save方法,对数据model进行改造,并重新渲染
主要说明在使用antv/g6时,对于画布中的节点,做某种操作(例如改变节点的颜色等),保存数据,以供一个新的画布渲染的方法
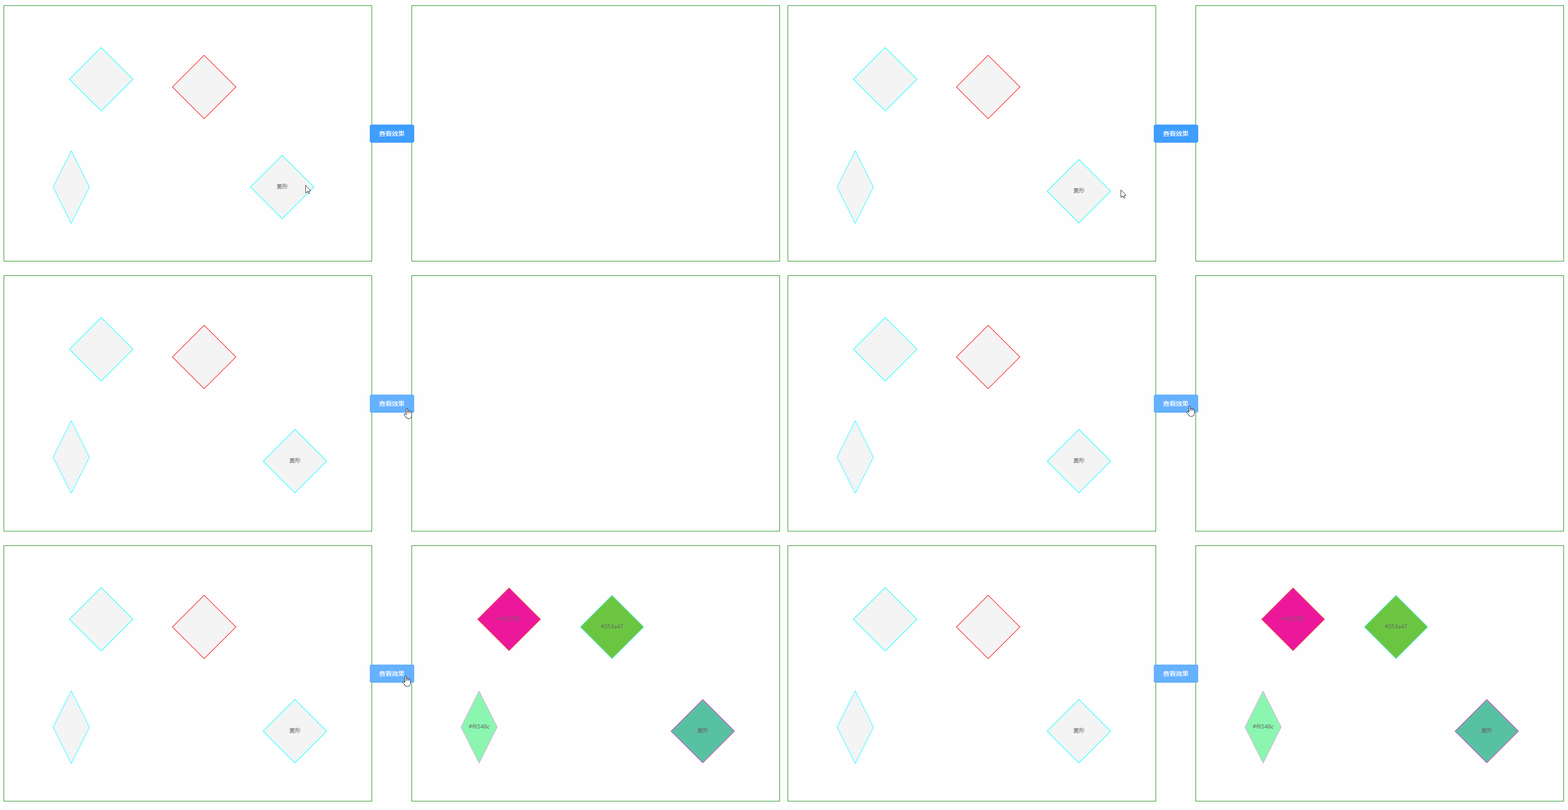
例子比较简单,不涉及太复杂的操作,先看下效果:

左侧的容器中是初始的画布,使用自定义的方式对菱形节点进行了注册(此方法为官方示例),点击按钮时将左侧的画布中的元素的数据模型进行保存,然后在右侧新创建一个graph,将保存的值稍加修改,然后进行渲染,就得到了右侧容器中的内容
场景:
- 例如点击节点时(单击或者双击),可以通过弹框的方式展示当前点击节点的属性信息,也就是节点的model,然后可以对其进行简单的修改,然后将修改后的值重新在画布中展示出来
- antv/g6官方提供的示例中,可以实现流程图,针对于流程图(初始化时从后端获取数据),当流程进行中出现了变化操作(可以看做是某一具体的流程出现问题或者是进行到下一步),就可以对已经完成的流程进行编辑,然后在将数据保存至后端。(此处只是简单举个例子,如不恰当请忽略)
旨在提供对于这种类似场景的一种解决思路,也欢迎评论告知更好的实现方式!
下面是整体的实现代码,包括自定义节点、数据的保存、修改后的渲染等
采用的是vue的组件的方式,如需查看效果,可直接复制完整代码至vue项目中进行查看,记得要对antv/g6进行安装,否则会报错。
antv/g6的安装方法
npm install --save @antv/g6
antv/g6的官方文档地址
<template>
  <div class="big_div">
    <div id="beforeChange"></div>
    <div id="afterChange"></div>
    <el-button type="primary" class="button_change" @click="changeAttr">查看效果</el-button>
  </div>
</template>

<script>
import G6 from '@antv/g6';
export default {
  name: 'changeNodeAttr',
  data () {
    return {
      currentGraph: null
    }
  },
  mounted () {
    this.initGraph()
  },
  methods: {
    initGraph () {
      let _that = this
      G6.registerNode('diamond', {
        draw (cfg, group) {
          // 如果 cfg 中定义了 style 需要同这里的属性进行融合
          const keyShape = group.addShape('path', {
            attrs: {
              path: this.getPath(cfg), // 根据配置获取路径
              stroke: cfg.color ? cfg.color : 'cyan', // 颜色应用到描边上,如果应用到填充,则使用 fill: cfg.color
              fill: cfg.fill ? cfg.fill : '#f5f5f5'
            },
            // must be assigned in G6 3.3 and later versions. it can be any value you want
            name: 'path-shape',
            // 设置 draggable 以允许响应鼠标的图拽事件
            draggable: true,
          });
          if (cfg.label) {
            // 如果有文本
            // 如果需要复杂的文本配置项,可以通过 labeCfg 传入
            // const style = (cfg.labelCfg && cfg.labelCfg.style) || {};
            // style.text = cfg.label;
            const label = group.addShape('text', {
              // attrs: style
              attrs: {
                x: 0, // 居中
                y: 0,
                textAlign: 'center',
                textBaseline: 'middle',
                text: cfg.label,
                fill: '#666',
              },
              // must be assigned in G6 3.3 and later versions. it can be any value you want
              name: 'text-shape',
              // 设置 draggable 以允许响应鼠标的图拽事件
              draggable: true,
            });
          }
          return keyShape;
        },
        // 返回菱形的路径
        getPath (cfg) {
          const size = cfg.size || [140, 140]; // 如果没有 size 时的默认大小
          const width = size[0];
          const height = size[1];
          //  / 1 \
          // 4     2
          //  \ 3 /
          const path = [
            ['M', 0, 0 - height / 2], // 上部顶点
            ['L', width / 2, 0], // 右侧顶点
            ['L', 0, height / 2], // 下部顶点
            ['L', -width / 2, 0], // 左侧顶点
            ['Z'], // 封闭
          ];
          return path;
        },
      }, 'single-node');
      let width = document.getElementById('beforeChange').scrollWidth
      let height = document.getElementById('beforeChange').scrollHeight
      const data = {
        nodes: [
          { id: 'node1', x: 150, y: 100, type: 'diamond' }, // 最简单的
          { id: 'node2', x: 148, y: 400, type: 'diamond', size: [80, 160] }, // 添加宽高
          { id: 'node3', x: 530, y: 130, color: 'red', type: 'diamond' }, // 添加颜色
          { id: 'node4', x: 550, y: 400, label: '菱形', type: 'diamond' }, // 附加文本
        ],
      };
      const graph = new G6.Graph({
        container: 'beforeChange',
        width,
        height,
        modes: {
          default: [
            'drag-canvas',
            'drag-node',
            'zoom-canvas'
          ]
        },
      });
      graph.data(data);
      graph.render();
      _that.currentGraph = graph
    },
    changeAttr () {
      let currentGraphNode = this.currentGraph.save()
      G6.registerNode('diamond_change', {
        draw (cfg, group) {
          // 如果 cfg 中定义了 style 需要同这里的属性进行融合
          const keyShape = group.addShape('path', {
            attrs: {
              path: this.getPath(cfg), // 根据配置获取路径
              stroke: cfg.color ? cfg.color : 'cyan', // 颜色应用到描边上,如果应用到填充,则使用 fill: cfg.color
              fill: cfg.fill ? cfg.fill : '#f5f5f5'
            },
            // must be assigned in G6 3.3 and later versions. it can be any value you want
            name: 'path-shape',
            // 设置 draggable 以允许响应鼠标的图拽事件
            draggable: true,
          });
          if (cfg.label) {
            // 如果有文本
            // 如果需要复杂的文本配置项,可以通过 labeCfg 传入
            // const style = (cfg.labelCfg && cfg.labelCfg.style) || {};
            // style.text = cfg.label;
            const label = group.addShape('text', {
              // attrs: style
              attrs: {
                x: 0, // 居中
                y: 0,
                textAlign: 'center',
                textBaseline: 'middle',
                text: cfg.label,
                fill: '#666',
              },
              // must be assigned in G6 3.3 and later versions. it can be any value you want
              name: 'text-shape',
              // 设置 draggable 以允许响应鼠标的图拽事件
              draggable: true,
            });
          }
          return keyShape;
        },
        // 返回菱形的路径
        getPath (cfg) {
          const size = cfg.size || [140, 140]; // 如果没有 size 时的默认大小
          const width = size[0];
          const height = size[1];
          //  / 1 \
          // 4     2
          //  \ 3 /
          const path = [
            ['M', 0, 0 - height / 2], // 上部顶点
            ['L', width / 2, 0], // 右侧顶点
            ['L', 0, height / 2], // 下部顶点
            ['L', -width / 2, 0], // 左侧顶点
            ['Z'], // 封闭
          ];
          return path;
        },
      }, 'single-node');
      let width = document.getElementById('afterChange').scrollWidth
      let height = document.getElementById('afterChange').scrollHeight
      const graph = new G6.Graph({
        container: 'afterChange',
        width,
        height,
        modes: {
          default: [
            'drag-canvas',
            'drag-node',
            'zoom-canvas'
          ]
        },
        defaultNode: {
          type: 'diamond_change'
        },
      });
      currentGraphNode.nodes.forEach(item => {
        item.color = this.getRandomColor()
        item.fill = this.getRandomColor()
        item.label = item.label ? item.label : "" + this.getRandomColor()
      })

      setTimeout(() => {
        graph.data(currentGraphNode);
        graph.render();
      }, 10)
    },
    getRandomColor () {
      var rand = Math.floor(Math.random() * 0xFFFFFF).toString(16);
      if (rand.length == 6) {
        return '#' + rand;
      } else {
        return this.getRandomColor();
      }
    }
  }
}
</script>

<style  scoped>
.big_div {
  width: 100%;
  height: 60%;
  display: flex;
  justify-content: space-around;
  align-items: center;
  margin: auto;
}
#beforeChange,
#afterChange {
  width: 45%;
  border: 1px solid green;
  height: 100%;
}
.button_change {
  position: absolute;
}
</style>
相信细心的小伙伴已经看出来,对数据进行修改时,无论初始的model中是否存在该属性,只要在节点的注册方法里对对应的属性进行了注册,就可以使用。
本篇内容就结束了,欢迎各位coder提出宝贵意见或者建议。
Tips:初识G6的时候也是一脸的懵逼,因为业务需要不能直接使用官方提供的基本节点,需要自定义的方式来实现节点,然后加各种功能,过程还是比较曲折的。也十分感谢G6的团队提供了一个好的引擎。希望G6能越来越强大,在国产图可视化打出自己的天地!!!