搭建基于Nginx+Keepalived的高可用web集群并实现监控告警
目录
- 搭建相关服务器
-
- DNS服务器配置
- WEB服务器配置
-
- 配置静态IP
- 编译安装nginx
- 负载均衡器配置
-
- lb1
- lb2
- 高可用配置
- NFS服务器配置
-
- 配置静态IP
- 安装软件包
- 新建共享目录
- web服务器挂载
- 监控服务器配置
-
- 安装node-exporter
- 编写prometheus.yml
- 安装alertmanager和钉钉插件
-
- 获取机器人webhook
- 编写alertmanager
- 设置告警文件
- 安装grafana
- 进行压力测试
搭建相关服务器
规划一下IP地址和集群架构图,关闭所有SELINUX和防火墙
# 关闭SELINUX
sed -i '/^SELINUX=/ s/enforcing/disabled/' /etc/selinux/config
# 关闭防火墙
service firewalld stop
systemctl disable firewalld
| web1 | 192.168.40.21 | 后端web |
|---|---|---|
| web2 | 192.168.40.22 | 后端web |
| web3 | 192.168.40.23 | 后端web |
| lb1 | 192.168.40.31 | 负载均衡器1 |
| lb2 | 192.168.40.32 | 负载均衡器2 |
| dns、prometheus | 192.168.40.137 | DNS服务器、监控服务器 |
| nfs | 192.168.40.138 | NFS服务器 |
DNS服务器配置
安装bind软件包
yum install bind* -y
启动named进程
[root@elk-node2 selinux]# service named start
Redirecting to /bin/systemctl start named.service
[root@elk-node2 selinux]# ps aux | grep named
named     44018  0.8  3.2 391060 60084 ?        Ssl  15:15   0:00 /usr/sbin/named -u named -c /etc/named.conf
root      44038  0.0  0.0 112824   980 pts/0    S+   15:15   0:00 grep --color=auto named
修改/etc/resolv.conf文件,添加一行,将域名服务器设置为本机
nameserver 127.0.0.1
测试。解析成功
[root@elk-node2 selinux]#  nslookup
> www.qq.com
Server:         127.0.0.1
Address:        127.0.0.1#53

Non-authoritative answer:
www.qq.com      canonical name = ins-r23tsuuf.ias.tencent-cloud.net.
Name:   ins-r23tsuuf.ias.tencent-cloud.net
Address: 121.14.77.221
Name:   ins-r23tsuuf.ias.tencent-cloud.net
Address: 121.14.77.201
Name:   ins-r23tsuuf.ias.tencent-cloud.net
Address: 240e:97c:2f:3003::77
Name:   ins-r23tsuuf.ias.tencent-cloud.net
Address: 240e:97c:2f:3003::6a
利用这台机器做域名服务器,方便其它机器能够访问,修改/etc/named.conf
listen-on port 53 { any; };
listen-on-v6 port 53 { any; };
allow-query     { any; };
重启服务
service named restart
这样其它的机器就可以利用192.168.40.137这台机器做域名解析了
WEB服务器配置
配置静态IP
进入/etc/sysconfig/network-scripts/目录
修改ifcfg-ens33文件,保证能互相通信
web1IP配置
BOOTPROTO="none"
NAME="ens33"
DEVICE="ens33"
ONBOOT="yes"
IPADDR=192.168.40.21
PREFIX=24
GATEWAY=192.168.40.2
DNS1=114.114.114.114
web2IP配置
BOOTPROTO="none"
NAME="ens33"
DEVICE="ens33"
ONBOOT="yes"
IPADDR=192.168.40.22
PREFIX=24
GATEWAY=192.168.40.2
DNS1=114.114.114.114
web3IP配置
BOOTPROTO="none"
NAME="ens33"
DEVICE="ens33"
ONBOOT="yes"
IPADDR=192.168.40.23
PREFIX=24
GATEWAY=192.168.40.2
DNS1=114.114.114.114
编译安装nginx
编译安装nginx可以看我这篇博客 Nginx的安装启动和停止
安装好之后浏览器访问成功即可。
负载均衡器配置
使用nginx做负载均衡
lb1
配置静态IP
BOOTPROTO="none"
NAME="ens33"
DEVICE="ens33"
ONBOOT="yes"
IPADDR=192.168.40.31
PREFIX=24
GATEWAY=192.168.40.2
DNS1=114.114.114.114
修改安装目录下的nginx.conf文件,添加如下
七层负载—>upstream在http块里,基于http协议进行转发
http {
   ……
    upstream lb1{ # 后端真实的IP地址,在http块里
    ip_hash; # 使用ip_hash算法或least_conn;最小连接
    # 权重 192.168.40.21 weight=5;
	server 192.168.40.21;;
    server 192.168.40.22;
    server 192.168.40.23;
    }
    server {
        listen       80;
        ……
        location / {
	    #root   html; 注释掉,因为只是做代理,不是直接访问
        #index  index.html index.htm;
 		proxy_pass http://lb1; # 代理转发
        }
四层负载—>stream块与http块同级,基于IP+端口进行转发
stream {
  upstream lb1{

  }
    server {
        listen 80; # 基于80端口转发
        proxy_pass lb1;
  }
  upstream dns_servers {
		least_conn;
		server 192.168.40.21:53;
        server 192.168.40.22:53;
        server 192.168.40.23:53;
        }
        server {
        listen 53 udp; # 基于53端口转发
        proxy_pass dns_servers;
   }
}
重新加载nginx
nginx -s reload
默认使用轮询算法,可以查看效果
lb2
配置静态IP
BOOTPROTO="none"
NAME="ens33"
DEVICE="ens33"
ONBOOT="yes"
IPADDR=192.168.40.32
PREFIX=24
GATEWAY=192.168.40.2
DNS1=114.114.114.114
修改安装目录下的nginx.conf文件,添加如下
七层负载—>upstream在http块里,基于http协议进行转发
http {
   ……
    upstream lb2{ # 后端真实的IP地址,在http块里
    ip_hash; # 使用ip_hash算法或least_conn;最小连接
    # 权重 192.168.40.21 weight=5;
	server 192.168.40.21;;
    server 192.168.40.22;
    server 192.168.40.23;
    }
    server {
        listen       80;
        ……
        location / {
	    #root   html; 注释掉,因为只是做代理,不是直接访问
        #index  index.html index.htm;
 		proxy_pass http://lb2; # 代理转发
        }
重新加载nginx
nginx -s reload
问题:后端的服务器不知道真正访问的IP地址,只知道负载均衡器的IP地址,如何解决?
参考文章
使用变量 $remote_addr 获取客户端的 IP 地址赋值给X-Real-IP 字段,然后重载一下
nginx -s reload
查看是否获取客户端真实IP
问题:四层负载和七层负载有什么区别?
参考文章
-
四层负载均衡(Layer 4 Load Balancing): 四层负载均衡是在传输层(即网络层)上进行负载均衡的一种方式。在四层负载均衡中,负载均衡设备根据源IP地址、目标IP地址、源端口号、目标端口号等信息来转发请求到相应的服务器。它基本上只关注网络连接的基本属性,并且不了解请求的内容和协议。四层负载均衡的优点是速度快、效率高,适合于处理大量网络连接的情况,例如 TCP 和 UDP 协议。但它对请求内容的理解有限,无法针对具体应用的特定需求进行定制化的转发策略。
-
七层负载均衡(Layer 7 Load Balancing): 七层负载均衡是在应用层上进行负载均衡的一种方式。在七层负载均衡中,负载均衡设备能够深入到应用层协议(如 HTTP、HTTPS)来理解请求的内容和特征,根据请求的URL、请求头、会话信息等因素来智能地转发请求。七层负载均衡可以实现更加灵活和定制化的转发策略。例如,可以根据域名、URL路径、请求头中的特定信息等来将请求分发给不同的后端服务器。这对于处理 Web 应用程序、API 服务等具有特定路由规则和需求的情况非常有用。
四层负载均衡主要基于传输层的网络连接属性进行转发,适合于高并发和大规模的网络连接场景;而七层负载均衡则在应用层上对请求进行深入理解,适合于根据请求内容和特征进行智能转发的场景。在实际应用中,根据具体的需求和应用类型,可以选择合适的负载均衡方式或结合两者来实现更好的性能和可伸缩性。
高可用配置
使用keepalived实现高可用
两台负载均衡器都安装keepalived,它们之间的通信是通过VRRP协议进行,VRRP协议介绍 参考文章
yum install keepalived
单VIP配置
进入配置文件所在目录/etc/keepalived/,编辑配置文件keepalived.conf,启动一个vrrp实例
lb1配置
vrrp_instance VI_1 {    #启动一个实例
    state MASTER	    #角色为master
    interface ens33     #网卡接口
    virtual_router_id 150#路由id
    priority 100        #优先级
    advert_int 1        #宣告信息 间隔1s
    authentication {    #认证信息
        auth_type PASS
        auth_pass 1111
    }
    virtual_ipaddress { #虚拟IP,对外提供服务
        192.168.40.51
    }
}
lb2配置
vrrp_instance VI_1 {
    state BACKUP #角色为backup
    interface ens33
    virtual_router_id 150
    priority 50  #优先级比master要低
    advert_int 1
    authentication {
        auth_type PASS
        auth_pass 1111
    }
    virtual_ipaddress {
        192.168.40.51
    }
}
启动keepalived,就可以在优先级高的那一台负载均衡器看到vip了
service keepalived start
双VIP配置
进入配置文件所在目录/etc/keepalived/,编辑配置文件keepalived.conf,启动两个vrrp对外提供服务,提高使用率
lb1配置
vrrp_instance VI_1 {    #启动一个实例
    state MASTER       #角色为master
    interface ens33     #网卡接口
    virtual_router_id 150#路由id
    priority 100        #优先级
    advert_int 1        #宣告信息
    authentication {
        auth_type PASS
        auth_pass 1111
    }
    virtual_ipaddress {
        192.168.40.51 # 对外提供的IP
    }
}
vrrp_instance VI_2 {   #启动第二个实例
    state BACKUP      #角色为backup
    interface ens33     #网卡接口
    virtual_router_id 160#路由id
    priority 50         #优先级
    advert_int 1        #宣告信息
    authentication {
        auth_type PASS
        auth_pass 1111
    }
    virtual_ipaddress {
        192.168.40.52 # 对外提供的IP
    }
}
lb2配置
vrrp_instance VI_1 {
    state BACKUP  #角色为backup
    interface ens33
    virtual_router_id 150
    priority 50
    advert_int 1
    authentication {
        auth_type PASS
        auth_pass 1111
    }
    virtual_ipaddress {
        192.168.40.51
    }
}
vrrp_instance VI_2 {
    state MASTER  #角色为master
    interface ens33
    virtual_router_id 160
    priority 100
    advert_int 1
    authentication {
        auth_type PASS
        auth_pass 1111
    }
    virtual_ipaddress {
        192.168.40.52
    }
}
重新启动keepalived,就可以在两台负载均衡器都看到vip了
service keepalived start
编写脚本check_nginx.sh,监控Nginx是否运行,如果Nginx挂了,那么keepalived开启没有意义,占用资源,需要及时调整主备状态
#!/bin/bash
if [[ $(netstat -anplut| grep nginx|wc -l) -eq 1 ]];then
        exit 0
else
        exit 1
        # 关闭keepalived
        service keepalived stop
fi
授予权限
chmod +x check_nginx.sh
脚本没有执行成功,查看/var/log/messages日志出现了问题,原来是脚本名字和括号之间没有空格……
加入脚本后的lb1配置
! Configuration File for keepalived

global_defs {
   notification_email {
     [email protected]
     [email protected]
     [email protected]
   }
   notification_email_from [email protected]
   smtp_server 192.168.200.1
   smtp_connect_timeout 30
   router_id LVS_DEVEL
   vrrp_skip_check_adv_addr
  #vrrp_strict
   vrrp_garp_interval 0
   vrrp_gna_interval 0
}
vrrp_script chk_nginx {
script "/etc/keepalived/check_nginx.sh" # 外部脚本执行位置,使用绝对路径
interval 1
weight -60 # 修改后权重的优先值要小于backup
}

vrrp_instance VI_1 {    #启动一个实例
    state MASTER
    interface ens33     #网卡接口
    virtual_router_id 150#路由id
    priority 100        #优先级
    advert_int 1        #宣告信息
    authentication {
        auth_type PASS
        auth_pass 1111
    }
    virtual_ipaddress {
        192.168.40.51
    }
track_script { # 脚本名要有空格
chk_nginx # 调用脚本
}

}

vrrp_instance VI_2 {    #启动一个实例
    state BACKUP
    interface ens33     #网卡接口
    virtual_router_id 170#路由id
    priority 50         #优先级
    advert_int 1        #宣告信息
    authentication {
        auth_type PASS
        auth_pass 1111
    }
    virtual_ipaddress {
        192.168.40.52
    }
}
lb2的配置同lb1,只要将脚本执行的代码放置lb2的master部分即可
进行nginx测试,发现双vip能够在nginx关闭的状态同时关闭keepalived并进行vip漂移
notify的用法(也可以实现keepalived关闭的效果) 参考文章
notify的用法:
  notify_master:当前节点成为master时,通知脚本执行任务(一般用于启动某服务,比如nginx,haproxy等)
  notify_backup:当前节点成为backup时,通知脚本执行任务(一般用于关闭某服务,比如nginx,haproxy等)
  notify_fault:当前节点出现故障,执行的任务;
  例:当成为master时启动haproxy,当成为backup时关闭haproxy
  notify_master "/etc/keepalived/start_haproxy.sh start"
  notify_backup "/etc/keepalived/start_haproxy.sh stop"
问题:什么是脑裂现象,可能出现的原因有哪些?
脑裂现象指的是主备服务器之间的通信故障,导致两个节点同时认为自己是主节点而发生竞争的情况,原因如下
- 网络分区:在使用keepalived的集群中,如果网络发生分区,导致主节点与备份节点之间的通信中断,可能会导致脑裂现象的发生。
- 虚拟路由id不一致:虚拟路由id用于唯一标识主备节点,如果虚拟路由ID设置不一致,不同节点之间将产生冲突,可能导致节点同时宣布自己是活跃节点,从而引发脑裂现象。
- 认证密码不一样:当认证密码不一致时,节点之间的通信将受阻,可能导致节点无法正常进行状态同步和故障切换,从而引发脑裂现象的发生。
- 节点运行状态不同步:当主节点和备份节点之间的状态同步过程中出现错误或延迟,导致节点状态不一致,可能会引发脑裂现象。
- 信号丢失:keepalived使用心跳机制检测节点状态,如果由于网络延迟或其他原因导致心跳信号丢失,可能会误判节点状态,从而引发脑裂现象。
问题:keepalived的三个进程?
- Keepalived 主进程:负责加载并解析 Keepalived 配置文件,创建和管理 VRRP 实例,并监控实例状态。它还处理与其他 Keepalived 进程之间的通信。
- Keepalived VRRP 进程:这是负责实现虚拟路由冗余协议功能的进程。每个启动的 VRRP 实例都会有一个对应的 VRRP 进程。它负责定期发送 VRRP 通告消息,监听其他节点发送的通告消息,并根据配置的优先级进行故障转移。
- Keepalived Check Script 进程:这个进程用于执行用户定义的健康检查脚本。通过此进程,可以执行自定义的脚本来检测服务器的健康状态,并根据脚本的返回结果来更改 VRRP 实例的状态或触发故障转移。
NFS服务器配置
使用nfs,让后端服务器到nfs服务器里获取数据,将nfs的服务器挂载到web服务器上,保证数据一致性。
配置静态IP
BOOTPROTO="none"
IPADDR=192.168.40.138
GATEWAY=192.168.40.2
DNS2=114.114.114.114
NAME="ens33"
DEVICE="ens33"
ONBOOT="yes"
安装软件包
yum -y install rpcbind nfs-utils
# 启动rpc服务
[root@nfs ~]# service rpcbind start
Redirecting to /bin/systemctl start rpcbind.service
[root@nfs ~]# systemctl enable rpcbind
# 启动nfs服务
[root@nfs ~]# service nfs-server start
Redirecting to /bin/systemctl start nfs-server.service
[root@nfs ~]# systemctl enable nfs-server
新建共享目录
新建/data/share/,自己写一个index.html查看效果
mkdir -p /data/share/
编辑配置文件vim /etc/exports
/data/share/ 192.168.40.0/24(rw,no_root_squash,all_squash,sync)
其中:
/data/share/:共享文件目录192.168.40.0/24:表示接受来自以192.168.40.0开头的IP地址范围的请求。(rw):指定允许对目录进行读写操作。no_root_squash:指定不对root用户进行权限限制。它意味着在客户端上以root用户身份访问时,在服务器上也将以root用户身份进行访问。all_squash:指定将所有用户映射为匿名用户。它意味着在客户端上以任何用户身份访问时,在服务器上都将以匿名用户身份进行访问。sync:指定文件系统同步方式。sync表示在写入操作完成之前,将数据同步到磁盘上。保障数据的一致性和可靠性,但可能会对性能产生影响。
重新加载nfs,让配置文件生效
systemctl reload nfs
exportfs -rv
web服务器挂载
3台web服务器只需要安装rpcbind服务即可,无需安装nfs或开启nfs服务。
yum install rpcbind -y
web服务器端查看nfs服务器共享目录
[root@web1 ~]# showmount -e 192.168.40.138
Export list for 192.168.40.138:
/data/share 192.168.40.0/24
[root@web2 ~]# showmount -e 192.168.40.138
Export list for 192.168.40.138:
/data/share 192.168.40.0/24
[root@web3 ~]# showmount -e 192.168.40.138
Export list for 192.168.40.138:
/data/share 192.168.40.0/24
进行挂载,挂载到Nginx网页目录下
[root@web1 ~]# mount 192.168.40.138:/data/share /usr/local/shengxia/html
[root@web2 ~]# mount 192.168.40.138:/data/share /usr/local/shengxia/html
[root@web3 ~]# mount 192.168.40.138:/data/share /usr/local/shengxia/html
设置开机自动挂载nfs文件系统
vim /etc/rc.local
# 将这行直接接入/etc/rc.local文件末尾
mount -t nfs 192.168.40.138:/data/share /usr/local/shengxia/html
同时给/etc/rc.d/rc.local可执行权限
chmod /etc/rc.d/rc.local
监控服务器配置
下载prometheus和exporter进行监控,安装可以看我这篇博客
Prometheus、Grafana、cAdvisor的介绍、安装和使用
安装node-exporter
prometheus安装好之后,在每个服务器都安装node-exporter,监控服务器状态 下载
除了本机192.168.40.137以外,所有的服务器都下载,演示一个案例。其他服务器相同操作
解压文件
[root@web1 exporter]# ls
node_exporter-1.5.0.linux-amd64.tar.gz
[root@web1 exporter]# tar xf node_exporter-1.5.0.linux-amd64.tar.gz
[root@web1 exporter]# ls
node_exporter-1.5.0.linux-amd64  node_exporter-1.5.0.linux-amd64.tar.gz
新建目录
[root@web1 exporter]# mkdir -p /node_exporter
复制node_exporter下的文件到指定的目录
[root@web1 exporter]# cp node_exporter-1.5.0.linux-amd64/* /node_exporter
在/root/.bashrc文件下修改PATH环境变量,将这行加到文件末尾,刷新一下
PATH=/node_exporter/:$PATH
source /root/.bashrc
放到后台启动运行
[root@web1 exporter]# nohup node_exporter --web.listen-address 192.168.40.21:8899 &
出现这个页面即成功
编写prometheus.yml
scrape_configs:
  # The job name is added as a label `job=` to any timeseries scraped from this config.
  - job_name: "prometheus"

    # metrics_path defaults to '/metrics'
    # scheme defaults to 'http'.

    static_configs:
      - targets: ["192.168.40.137:9090"]
  - job_name: "nfs"
    static_configs:
      - targets: ["192.168.40.138:8899"]
  - job_name: "lb1"
    static_configs:
      - targets: ["192.168.40.31:8899"]
  - job_name: "lb2"
    static_configs:
      - targets: ["192.168.40.32:8899"]
  - job_name: "web1"
    static_configs:
      - targets: ["192.168.40.21:8899"]
  - job_name: "web2"
    static_configs:
      - targets: ["192.168.40.22:8899"]
  - job_name: "web3"
    static_configs:
      - targets: ["192.168.40.23:8899"]
重新启动prometheus
[root@dns-prom prometheus]# service prometheus restart
看到这个页面就表示监控成功了
安装alertmanager和钉钉插件
下载
[root@dns-prom prometheus]# wget https://github.com/prometheus/alertmanager/releases/download/v0.25.0/alertmanager-0.25.0.linux-amd64.tar.gz
[root@dns-prom prometheus]# wget https://github.com/timonwong/prometheus-webhook-dingtalk/releases/download/v1.4.0/prometheus-webhook-dingtalk-1.4.0.linux-amd64.tar.gz
解压
[root@dns-prom prometheus]# tar xf alertmanager-0.23.0-rc.0.linux-amd64.tar.gz
[root@dns-prom prometheus]# mv alertmanager-0.23.0-rc.0.linux-amd64 alertmanager
[root@dns-prom prometheus]# tar xf prometheus-webhook-dingtalk-1.4.0.linux-amd64.tar.gz
[root@dns-prom prometheus]# mv prometheus-webhook-dingtalk-1.4.0.linux-amd64 prometheus-webhook-dingtalk
获取机器人webhook
获取允许访问的IP,使用curl ifconfig.me可以获得
[root@dns-prom alertmanager]# curl ifconfig.me
222.244.215.17
修改钉钉告警模板
#位置:/lianxi/prometheus/prometheus-webhook-dingtalk/contrib/templates/legacy/template.tmpl
[root@dns-prom legacy]# cat template.tmpl
{{ define "ding.link.title" }}{{ template "legacy.title" . }}{{ end }}
{{ define "ding.link.content" }}
{{ if gt (len .Alerts.Firing) 0 -}}
告警列表:
{{ template "__text_alert_list" .Alerts.Firing }}
{{- end }}
{{ if gt (len .Alerts.Resolved) 0 -}}
恢复列表:
{{ template "__text_resolve_list" .Alerts.Resolved }}
{{- end }}
{{- end }}
修改cofig,yml文件,添加机器人的webhook的token,指定模板文件
[root@dns-prom prometheus-webhook-dingtalk]# cat config.yml
templates:
  - /lianxi/prometheus/prometheus-webhook-dingtalk/contrib/templates/legacy/template.tmpl # 模板路径

targets:
  webhook2:
    url: https://oapi.dingtalk.com/robot/send?access_token=你自己的token
将prometheus-webhook-dingtalk注册成服务
[root@dns-prom system]# pwd
/usr/lib/systemd/system
[root@dns-prom system]# cat webhook-dingtalk
[Unit]
Description=prometheus-webhook-dingtalk
Documentation=https://github.com/timonwong/prometheus-webhook-dingtalk
After=network.target

[Service]
ExecStart=/lianxi/prometheus/prometheus-webhook-dingtalk/prometheus-webhook-dingtalk  --config.file=/lianxi/prometheus/prometheus-webhook-dingtalk/config.yml
Restart=on-failure

[Install]
WantedBy=multi-user.target
加载服务
[root@dns-prom system]# systemctl daemon-reload
启动服务
[root@dns-prom system]# service webhook-dingtalk start
Redirecting to /bin/systemctl start webhook-dingtalk.service
编写alertmanager
修改alertmanager.yml文件
global:
  resolve_timeout: 5m

route: # 告警路由配置,定义如何处理和发送告警
  receiver: webhook
  group_wait: 30s
  group_interval: 1m
  repeat_interval: 4h
  group_by: [alertname]
  routes:
  - receiver: webhook
    group_wait: 10s

receivers: # 告警接收者配置,定义如何处理和发送告警
- name: webhook
  webhook_configs:
   ### 注意注意,我在dingtalk的配置文件里用的是webhook2,要对上
  - url: http://192.168.40.137:8060/dingtalk/webhook2/send  # 告警 Webhook URL
    send_resolved: true # 是否发送已解决的告警。如果设置为 true,则在告警解决时发送通知
将alertmanager注册成服务
[Unit]
Description=alertmanager
Documentation=https://prometheus.io/
After=network.target

[Service]
ExecStart=/lianxi/prometheus/alertmanager/alertmanager --config.file=/lianxi/prometheus/alertmanager/alertmanager.yml
Restart=on-failure

[Install]
WantedBy=multi-user.target
加载服务
[root@dns-prom system]# systemctl daemon-reload
查看
设置告警文件
在prometheus目录下新建一个rules.yml文件的告警规则
[root@dns-prom prometheus]# pwd
/lianxi/prometheus/prometheus
[root@dns-prom prometheus]# cat rules.yml
groups:
  - name: host_monitoring
    rules:
      - alert: 内存报警
        expr: netdata_system_ram_MiB_average{chart="system.ram",dimension="free",family="ram"} < 800
        for: 2m
        labels:
          team: node
        annotations:
          Alert_type: 内存报警
          Server: '{{$labels.instance}}'
          explain: "内存使用量超过90%,目前剩余量为:{{ $value }}M"
      - alert: CPU报警
        expr: netdata_system_cpu_percentage_average{chart="system.cpu",dimension="idle",family="cpu"} < 20
        for: 2m
        labels:
          team: node
        annotations:
          Alert_type: CPU报警
          Server: '{{$labels.instance}}'
          explain: "CPU使用量超过80%,目前剩余量为:{{ $value }}"
      - alert: 磁盘报警
        expr: netdata_disk_space_GiB_average{chart="disk_space._",dimension="avail",family="/"} < 4
        for: 2m
        labels:
          team: node
        annotations:
          Alert_type: 磁盘报警
          Server: '{{$labels.instance}}'
          explain: "磁盘使用量超过90%,目前剩余量为:{{ $value }}G"
      - alert: 服务告警
        expr: up == 0
        for: 2m
        labels:
          team: node
        annotations:
          Alert_type: 服务报警
          Server: '{{$labels.instance}}'
          explain: "netdata服务已关闭"
修改prometheus.yml文件,与alertmanager进行关联
alerting:
  alertmanagers:
    - static_configs:
        - targets: ["192.168.40.137:9093"]

# Load rules once and periodically evaluate them according to the global 'evaluation_interval'.
rule_files:
  - "/lianxi/prometheus/prometheus/rules.yml" # 告警模板路径
  # - "first_rules.yml"
  # - "second_rules.yml"
重启prometheus服务
[root@dns-prom prometheus]# service prometheus restart
可以看到监控数据了
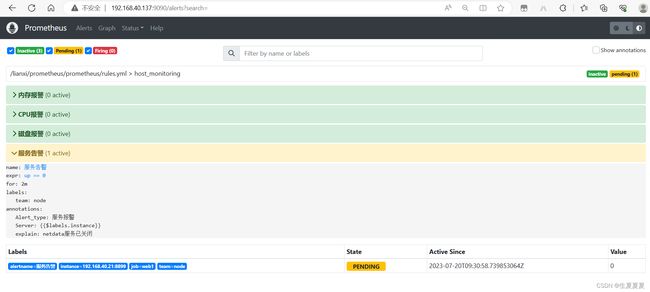
模拟服务器宕机,关闭web1,提示告警
钉钉收到告警
安装grafana
从Grafana官网下载Grafana软件包,并按照官方文档进行安装
root@dns-prom grafana]# yum install -y https://dl.grafana.com/enterprise/release/grafana-enterprise-9.5.1-1.x86_64.rpm
启动grafana
[root@dns-prom grafana]# service grafana-server restart
Restarting grafana-server (via systemctl):                 [  确定  ]
具体的操作过程可以看这篇文档 Prometheus、Grafana、cAdvisor的介绍、安装和使用
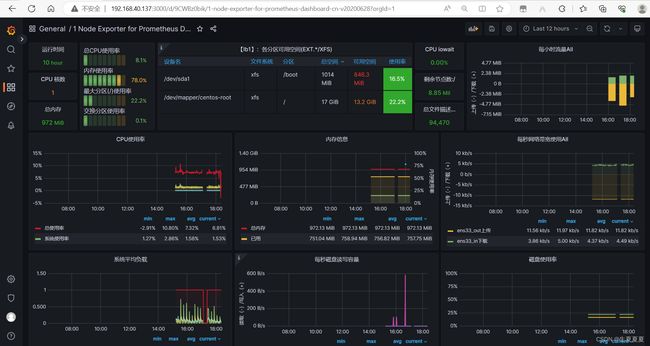
选择一个好的模板就可以进行出图展示啦
进行压力测试
安装ab软件,模拟请求
yum install ab -y
不断模拟请求,了解集群并发数。


