Spring Boot实践一
一、Spring Boot简介
Spring Boot是一个基于Spring框架的快速开发应用程序的工具。它提供了一种快速、方便的方式来创建基于Spring的应用程序,而无需繁琐的配置。Spring Boot通过自动配置和约定大于配置的方式,使得开发者可以更加专注于业务逻辑的实现,而不是配置文件的编写。
Spring Boot提供了许多功能,包括:
- 自动配置:Spring Boot会根据应用程序的依赖关系自动配置应用程序。
- 嵌入式Web服务器:Spring Boot内置了Tomcat、Jetty和Undertow等Web服务器,可以轻松地创建Web应用程序。
- 简化的依赖管理:Spring Boot可以自动管理应用程序的依赖关系,避免了版本冲突和依赖管理的烦恼。
- 简化的配置:Spring Boot提供了一种简单的方式来配置应用程序,可以通过属性文件、YAML文件或命令行参数来配置应用程序。
- 健康检查:Spring Boot提供了健康检查功能,可以检查应用程序的状态,包括数据库连接、磁盘空间等。
总之,Spring Boot是一个非常强大的微服务框架,可以帮助开发者快速构建高质量的应用程序。
二、使用Spring Initializr创建 Spring Boot 项目
使用Spring Initializr可以快速创建一个Spring Boot项目,省去了手动配置的繁琐过程,让开发更加高效。共有两种创建方式。
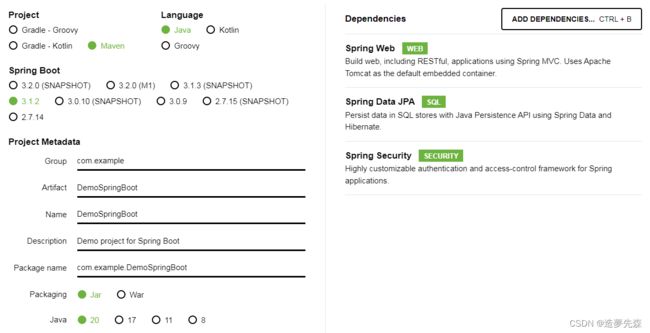
方式1:使用Spring Initializr页面创建
地址:https://start.spring.io/
通过上面配置便完成了基础项目的创建。左侧选择 “Maven” 作为构建工具;右侧在 “Dependencies” 中选择需要的依赖项,例如 “Spring Web”、 “Spring Data JPA”、 “Spring Security” 等等。
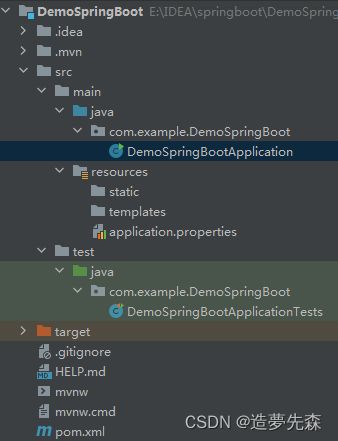
- src/main/java下的程序入口:DemoSpringBootApplication
- src/main/resources下的配置文件:application.properties
- src/test/下的测试入口:DemoSpringBootApplicationTests
在Spring Boot工程中,还有一个pom.xml文件,是Maven项目的核心配置文件,用于管理项目的依赖和构建配置。打开pom.xml,可以看到Spring Boot项目的依赖。当pom.xml文件中的依赖或配置出现问题时,会显示为红色字体,表示存在错误或警告,需要先解决。常见的红色字体包括:
- 缺少依赖:如果项目中使用的某个依赖没有在pom.xml文件中声明或版本号不正确,编辑器会提示缺少依赖的错误信息。
- 依赖冲突:如果项目中使用的多个依赖包含相同的类或方法,会导致依赖冲突。编辑器会提示冲突的错误信息。
- 语法错误:如果pom.xml文件中存在语法错误,例如标签未闭合或属性值不正确,编辑器会提示语法错误的信息。
- 版本不兼容:如果项目中使用的依赖版本与Spring Boot版本不兼容,会导致编译或运行时出现错误。编辑器会提示版本不兼容的警告信息
正常如下所示,主要有四个部分:
- 项目元数据:创建时候输入的Project Metadata部分,也就是Maven项目的基本元素,包括:
、 、 、 、
<?xml version="1.0" encoding="UTF-8"?>
<project xmlns="http://maven.apache.org/POM/4.0.0" xmlns:xsi="http://www.w3.org/2001/XMLSchema-instance"
         xsi:schemaLocation="http://maven.apache.org/POM/4.0.0 https://maven.apache.org/xsd/maven-4.0.0.xsd">
    <modelVersion>4.0.0</modelVersion>
    <parent>
        <groupId>org.springframework.boot</groupId>
        <artifactId>spring-boot-starter-parent</artifactId>
        <version>3.1.2</version>
        <relativePath/> <!-- lookup parent from repository -->
    </parent>
    <groupId>com.example</groupId>
    <artifactId>DemoSpringBoot</artifactId>
    <version>0.0.1-SNAPSHOT</version>
    <name>DemoSpringBoot</name>
    <description>DemoSpringBoot</description>
    <properties>
        <java.version>20</java.version>
    </properties>
    <dependencies>
        <dependency>
            <groupId>org.springframework.boot</groupId>
            <artifactId>spring-boot-starter-web</artifactId>
        </dependency>

        <dependency>
            <groupId>org.springframework.boot</groupId>
            <artifactId>spring-boot-starter-test</artifactId>
            <scope>test</scope>
        </dependency>
    </dependencies>

    <build>
        <plugins>
            <plugin>
                <groupId>org.springframework.boot</groupId>
                <artifactId>spring-boot-maven-plugin</artifactId>
            </plugin>
        </plugins>
    </build>

</project>
方式2:使用IntelliJ IDEA中的Spring Initializr创建
打开 IntelliJ IDEA,选择 “Create New Project”,在弹出的向导中选择 “Spring Initializr”,选择 “Maven” 或 “Gradle” 作为构建工具

选择 Spring Boot 版本,并在 “Dependencies” 中选择需要的依赖项,例如 “Spring Web”、 “Spring Data JPA”、 “Spring Security” 等等。最后,点击 “Create” 完成创建项目。

当在IntelliJ中点击“Run”时,可以看到如下回显,运行成功:

问题记录
当在IntelliJ中点击“Run”时,可能会碰到一些问题:
1,如果弹出“Edit Configuration”窗口
意味着需要配置运行环境,点击“Edit Configuration”窗口中的“+”按钮,选择Application,并配置程序参数、环境变量等。
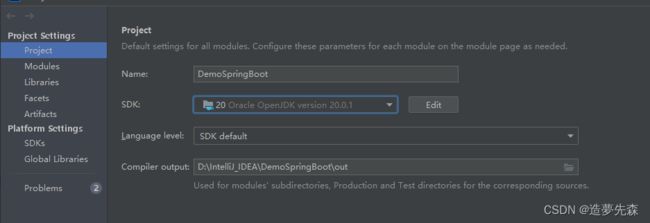
首先要查看JDK是否正常添加:选择File -> Project Structure,选择SDKs选项卡,点击“+”按钮添加JDK
如果还不行,也有可能是如下问题2相同的原因导致:
2,提示错误:找不到或无法加载主类
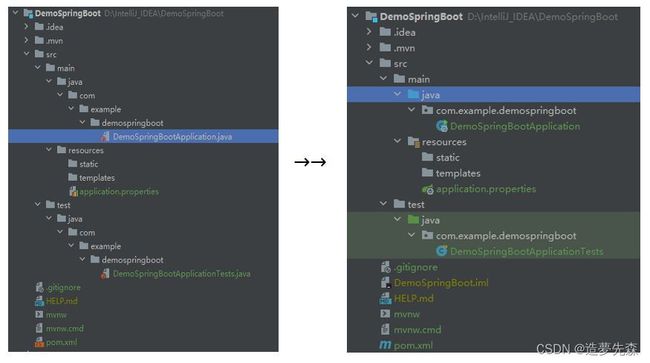
可能是由于导入多模块项目,IDEA未能识别出主类,无法启动Springboot项目。通过Import Module解决:
(1)File -> Project Structure -> Modules -> Import Module,然后选定模块所在的目录

(2)import module时,选择maven类型

(3)添加完成后,左侧目录显示发生变化:
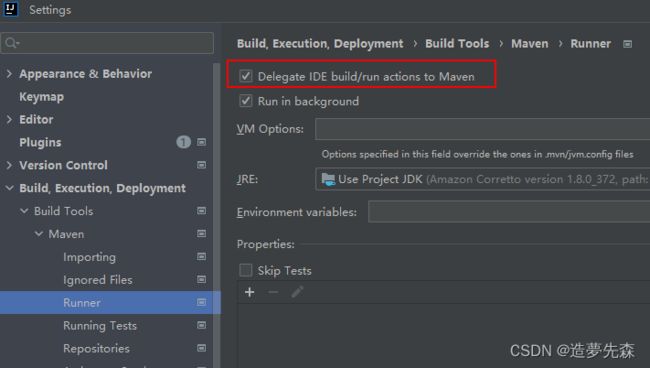
3,提示java:程序包org.springframework.boot不存在
可以在IDEA需要在Setting里将 Delegate IDE build/run actions to Maven勾选上。这个选项是将IDE构建/运行操作委托给Maven。spring boot工程建议开启这个,减少未知编译问题。
三、HTTP接口实现
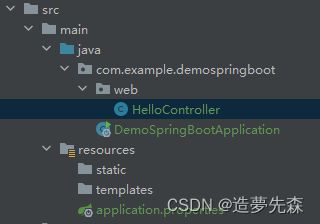
创建一个名为HelloController的Java类,目录结构及实现如下:
package com.example.demospringboot.web;

import org.springframework.web.bind.annotation.RestController;
import org.springframework.web.bind.annotation.RequestMapping;

@RestController
public class HelloController {
     @RequestMapping("/hello")
    public String index() {
        return "Hello World !";
    }

}
这个类使用了Spring MVC注解@RestController和@RequestMapping,它将处理来自根路径的HTTP GET请求,并返回一个字符串“Hello World !”。
启动主程序,访问http://localhost:8080/hello,可以看到页面返回:Hello World !
说明:
当你使用Spring Boot运行应用程序并访问http://localhost:8080时,页面实际上是由应用程序动态生成的,而不是从本地文件系统中读取的。
Spring Boot应用程序通常包含一个或多个控制器类,这些类使用Spring MVC框架来处理HTTP请求并生成响应。控制器类中的方法通常使用模板引擎(如Thymeleaf、Freemarker或JSP)来生成HTML页面,这些页面可以包含动态内容,如从数据库中检索的数据或从外部API获取的数据。
Spring MVC是一种基于Java的Web框架,它是Spring Framework的一部分。它提供了一种模型-视图-控制器(MVC)架构,用于构建Web应用程序。Spring MVC的核心是DispatcherServlet,它充当前端控制器,负责接收HTTP请求并将其分派给适当的处理程序。Spring MVC还提供了许多其他功能,例如数据绑定、表单处理、验证、国际化和文件上传等。它还支持多种视图技术,例如JSP、Thymeleaf、Freemarker和Velocity等。Spring MVC是一个非常流行的Web框架,被广泛用于构建企业级Web应用程序。
参考:
https://blog.didispace.com/spring-boot-learning-21-1-1/
https://blog.csdn.net/qq943686211/article/details/119973931
https://blog.csdn.net/weixin_45977659/article/details/126664571
