java设计模式详解
java设计模式详解
- 0.设计模式的七大原则
-
- 1.单一职责原则
- 2.接口隔离原则
- 3.依赖倒转原则
- 4.里氏替换原则
- 5.开闭原则
- 6.迪米特法则
- 7.合成复用原则
- 1.单例模式
-
- 1.饿汉式(静态常量)
- 2.饿汉式(静态代码块)
- 3.懒汉式(线程不安全)
- 4.懒汉式(同步方法)
- 5.懒汉式(同步代码块)
- 6.懒汉式(双重检查)
- 7.懒汉式(静态内部类)
- 8.饿汉式(枚举)
- 9.JDK源码 Rumtime 使用单例模式
- 2.工厂模式
-
- 1.简单工厂模式
- 2.工厂方法模式
- 3.抽象工厂模式
- 4.JDK Calendar
- 5.工厂模式小结
- 3.原型模式
-
- 1.克隆羊问题
- 2.原型模式的介绍
- 4.原型模式代码示例
- 5.深拷贝与浅拷贝
- 6.原型模式注意事项
- 4.建造者模式
-
- 1.盖房项目实际需求
- 2.建造者模式基本介绍
- 3.建造者模式的四个角色
- 4.建造者模式解决盖房问题
- 5.JDK StringBuilder
- 5.适配器模式
-
- 1. 适配器模式基本介绍
- 2.插孔与插头的冲突
- 6.SpringMVC 源码
- 7.适配器模式的注意事项
- 6.享元模式
-
- 1.展示网站项目需求
- 2.传统方案解决网站展现项目
- 3.享元模式基本介绍
- 4.享元模式的原理类图
- 5.内部状态和外部状态
- 6.享元模式解决网站展现项目
- 7.JDK Interger 源码分析
- 8.享元模式的注意事项
- 7.门面模式
-
- 1.门面模式介绍
- 2.一键操作
- 3.门面模式的优缺点
- 8.组合模式
-
- 1.组合模式基本介绍
- 2.组合模式的原理类图
- 3.组合模式解决的问题
- 4.文件系统
- 5.组合模式的注意事项
- 9.装饰者模式
-
- 1.装饰者模式定义
- 2.为小妹妹化妆
- 3.JDK IO流使用的装饰者设计模式
- 10.代理模式
-
- 1.代理模式的基本介绍
- 2.静态代码模式
- 3.动态代理模式
- 4.Cglib 代理模式
- 5.代理模式(Proxy)的变体
- 11.桥接模式
-
- 1. 桥接模式(Bridge)-原理类图
- 2.尺子和画笔的关系
- 3. 桥接模式的注意事项
- 4.桥接模式应用场景
- 12.模板方法
-
- 1.模板方法模式基本介绍
- 2. 模板方法模式原理类图
- 3.动物的生活规律
- 4. Spring 框架中的模板方法模式
- 5 . 模板方法模式的注意事项
- 13.迭代器模式
-
- 1.迭代器模式基本介绍
- 2.迭代器模式的原理类图
- 3.行车记录仪
- 4.迭代器模式的注意事项
- 14.责任链模式
-
- 1.责任链模式介绍
- 2.职责链模式的原理类图
- 3.小王的报销流程
- 4.职责链模式的注意事项和细节
- 15.策略模式
-
- 1.策略模式基本介绍
- 2.策略模式的原理类图
- 3.用策略模式完成万能的use接口处理
- 4.策略模式的注意事项和细节
- 17.备忘录模式
-
- 1.备忘录模式基本介绍
- 2.备忘录模式原理类图
- 3.帮作家找回误删除的文档
- 4.备忘录模式的注意事项和细节
- 19.命令模式
-
- 1.命令模式介绍
- 2.命令模式原理类图
- 3.闪烁的灯光
- 4.命令模式注意事项
- 20.访问者模式
-
- 1.访问者模式基本介绍
- 2.访问者模式基本介绍
- 3.超市购物
- 4.访问者模式的注意事项
- 21.观察者模式
-
- 1.观察者模式简介
- 2.观察者模式结构图
- 3.商店老板与顾客
- 22.解释器模式
-
- 1.解释器模式基本原理介绍
- 2.解释器类图描述
- 3.简易计算器
- 4.解释器模式的注意事项和细节
- 23.状态模式
-
- 1.状态模式基本介绍
- 2.状态模式原理类图
- 3.交通灯管理
- 4.状态模式注意事项和细节
- 24.中介模式
-
- 1.中介模式介绍
- 2.多人抽象聊天室
- 3.中介模式 VS 观察者模式
0.设计模式的七大原则
通过本文章,你可以了解到常用的设计模式,本文的设计模式都是通过java语言进行讲解的,这也是我个人的一个学习笔记,设计模式以及数据结构和算法可能实际开发中用不到,但是这是程序员的基本功,这也就是你看框架源代码的时候头晕,看不懂,不知道别人到底写的什么玩意儿。那么你该静下心来好好学习基础知识了,记住一句话,罗马不少一天建成的,万丈高楼平地其,一切都以基础为准,框架层出不穷,但是万变不离其宗,都是以我们的核心基础知识来的。学完设计模式,你对写代码的一个水平会有一个很好的提升。
设计模式的目的
编写软件过程中,程序员面临着来自 耦合性,内聚性以及可维护性,可扩展性,重用性,灵活性 等多方面的挑战, 设计模式是为了让程序(软件),具有如下更好的特性
设计模式在软件中哪里?
面向对象(oo)=>功能模块[设计模式+算法(数据结构)]=>框架[使用到多种设计模式]=> 架构 [服务器集群]
- 代码重用性 (即:相同功能的代码,不用多次编写)
- 可读性 (即:编程规范性,便于其他程序员的阅读和理解)
- 可扩展性 (即:当需要增加新的功能时,非常的方便,称为可维护)
- 可靠性 (即:当我们增加新的功能后,对原来的功能没有影响)
- 使程序呈现高内聚, 低耦合的特性(程序内部紧凑,模块之间依赖性小)
设计模式原则,其实就是程序员在编程时,应当遵守的原则, 也是各种设计模式的基础(即: 设计模式为什么这样设计的依据)
设计模式常用的七大原则有:
- 单一职责原则
- 接口隔离原则
- 依赖倒转(倒置)原则
- 里氏替换原则
- 开闭原则
- 迪米特法则
- 合成复用原则
1.单一职责原则
对类来说的,即一个类应该只负责一项职责。如类A负责两个不同职责:职责1,职责2。当职责1需求变更而改变A时,可能造成职责2执行错误, 所以需要将类A的粒度分解为A1, A2
就比如说我们的javaWeb开发的到层,一个UserDao就对用户表增删改查,一个OrderDao就对我们的订单表增删改查,如果UserDao和OrderDao的功能都放到一个类只能,那么就可能会出现,UserDao出现错误导致OrderDao也不能用。所以我们就需要使用单一职责,让一个类做一个事情,降低代码的耦合度,使其代码之间的依赖性不少那么强。
单一职责案例
错误案例1:这的逻辑是不对的,造成代码的逻辑混乱
/** 单一职责
 * @author compass
 * @version 1.0
 * @date 2021-07-04 0:34
 */
public class SingleResponsibility1  {
    public static void main(String[] args) {
        Vehicle vehicle = new Vehicle();
        vehicle.run("摩托车");
        vehicle.run("汽车");
        vehicle.run("飞机");
    }
}

/**
 * 交通工具类Vehicle
 * 1. 这种方式违反了单一职责
 * 2.解决的方案非常简单,根据不同的交通工具分解未不同的类 提供run方法
 */
class Vehicle{

    public void run(String vehicle){
        System.out.println(vehicle+"在公路上运行");
    }

}
解决思路:将业务进行拆分,就是根据不同的业务,构建出不同的类,让不同的类去做不同的事情,让他们互不影响。
正确案例2:但是这样做改动很大,即将类进行分解,同时会修改客户端,接下来我们看第三种改进的方式。
/** 单一职责(正确示范)
 * @author compass
 * @version 1.0
 * @date 2021-07-04 0:34
 */
public class SingleResponsibility2  {
    public static void main(String[] args) {

        RoadVehicle roadVehicle = new RoadVehicle();
        roadVehicle.run("汽车");

        WaterVehicle waterVehicle = new WaterVehicle();
        waterVehicle.run("轮船");

        AirVehicle airVehicle = new AirVehicle();
        airVehicle.run("飞机");

    }
}

/**
 * 公路类
 */
class RoadVehicle{

    public void run(String vehicle){
        System.out.println(vehicle+"在公路上运行");
    }

}

/**
 * 天空类
 */
class AirVehicle{

    public void run(String vehicle){
        System.out.println(vehicle+"在天空中运行");
    }

}
/**
 * 天空类
 */
class WaterVehicle{

    public void run(String vehicle){
        System.out.println(vehicle+"在水中运行");
    }

}
改进方案3:直接修改Vehicle类,改动的代码比较少
/** 单一职责(错误示范)
 * @author compass
 * @version 1.0
 * @date 2021-07-04 0:34
 */
public class SingleResponsibility3  {
    public static void main(String[] args) {
        Vehicle3 vehicle = new Vehicle3();
        vehicle.runARoad("汽车");
        vehicle.runAir("飞机");
        vehicle.runWater("轮船");
    }
}

/**
 * 交通工具类Vehicle3
 * 1. 这种方式虽然违反了单一职责,但是在方法级别上并没有违法单一职责,仍然遵守我们的单一职责
 * 2.在业务量很小的时候,可以这样,但是业务量很多,而且不同类型很多,那就不太建议了
 */
class Vehicle3{

    public void runAir(String vehicle){
        System.out.println(vehicle+"在天上运行");
    }
    public void runWater(String vehicle){
        System.out.println(vehicle+"在水里运行");
    }

    public void runARoad(String vehicle){
        System.out.println(vehicle+"在公路上运行");
    }


}
-
单一职责原则的注意事项和原则
- 降低类的复杂度,一个类只负责一项职责
- 提高类的可读性,可维护性
- 降低变更引起的风险
- 通常情况下, 我们应当遵守单一职责原则,只有逻辑足够简单,才可以在代码级违反单一职责原则;只有类中方法数量足够少,可以在方法级别保持单一职责原则
2.接口隔离原则
基本介绍:客户端不应该依赖它不需要的接口,即一个类对另一个类的依赖应该建立在最小的接口上
举例说明
案例1:
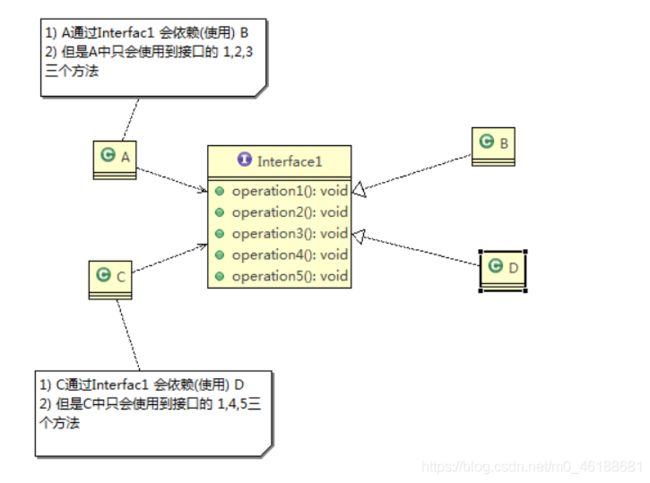
- 类A通过接口Interface1依赖类B,类C通过接口Interface1依赖类D,如果接口Interface1对于类A和类C来说不是最小接口,那么类B和类D必须去实现他们不需要的方法。
- 按隔离原则应当这样处理:将接口Interface1拆分为独立的几个接口,类A和类C分别与他们需要的接口建立依赖关系。也就是采用接口隔离原则
代码实现:
** 接口隔离原则(错误示范)
 * @author compass
 * @version 1.0
 * @date 2021-07-04 11:35
 */
public class Segregation1 {

}

/**
 *  接口
 */
interface Interface1{
    void operation1();
    void operation2();
    void operation3();
    void operation4();
    void operation5();

}

/**
 *  实现interface1接口 并且实现其中的五个方法
 */
class B1 implements Interface1{

    @Override
    public void operation1() {
        System.out.println("B1 中实现了operation1");
    }

    @Override
    public void operation2() {
        System.out.println("B1 中实现了operation2");
    }

    @Override
    public void operation3() {
        System.out.println("B1 中实现了operation3");
    }

    @Override
    public void operation4() {
        System.out.println("B1 中实现了operation4");
    }

    @Override
    public void operation5() {
        System.out.println("B1 中实现了operation5");
    }
}
/**
 *  实现interface1接口 并且实现其中的五个方法
 */
class D1 implements Interface1{

    @Override
    public void operation1() {
        System.out.println("D1 中实现了operation1");
    }

    @Override
    public void operation2() {
        System.out.println("D2 中实现了operation2");
    }

    @Override
    public void operation3() {
        System.out.println("D3 中实现了operation3");
    }

    @Override
    public void operation4() {
        System.out.println("D4 中实现了operation4");
    }

    @Override
    public void operation5() {
        System.out.println("D5 中实现了operation5");
    }
}
/**
 *  A类通过接口 Interface1 依赖使用B类 但是只会使用到 1,2,3,方法
 */
class A1{
    public void depend1(Interface1 i){
        i.operation1();

    }

    public void depend2(Interface1 i){
        i.operation2();

    }
    public void depend3(Interface1 i){
        i.operation3();

    }
}


/**
 *  C类通过接口 Interface1 依赖使用D类 但是只会使用到 1,4,2,方法
 */
class C1{
    public void depend1(Interface1 i){
        i.operation1();

    }

    public void depend4(Interface1 i){
        i.operation4();

    }
    public void depend5(Interface1 i){
        i.operation5();

    }
}
案例2:
分析传统方法的问题,使用接口隔离原则改进程序结构
- 类A通过接口Interface1依赖类B,类C通过接口Interface1依赖类D,如果接口Interface1对于类A和类C来说不是最小接口,那么类B和类D必须去实现他们不需要的方法
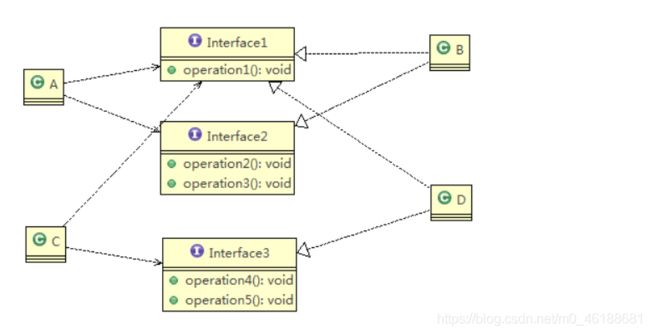
- 将接口Interface1拆分为独立的几个接口,类A和类C分别与他们需要的接口建立依赖关系。也就是采用接口隔离原则
- 接口Interface1中出现的方法,根据实际情况拆分为三个接口
代码实现:
/** 接口隔离原则(正确示范)
 * @author compass
 * @version 1.0
 * @date 2021-07-04 11:35
 */
public class Segregation2 {

    public static void main(String[] args) {


        A a = new A();
        a.depend1(new B()); // A类通过接口去依赖B类
        a.depend2(new B());
        a.depend3(new B());

        C c = new C();

        c.depend1(new D()); // C类通过接口去依赖(使用)D类
        c.depend4(new D());
        c.depend5(new D());

    }

}

// 接口1
interface Interface1 {
    void operation1();
}

// 接口2
interface Interface2 {
    void operation2();
    void operation3();
}

// 接口3
interface Interface3 {
    void operation4();
    void operation5();
}

class B implements Interface1, Interface2 {
    public void operation1() {
        System.out.println("B 实现了 operation1");
    }

    public void operation2() {
        System.out.println("B 实现了 operation2");
    }

    public void operation3() {
        System.out.println("B 实现了 operation3");
    }

}

class D implements Interface1, Interface3 {
    public void operation1() {
        System.out.println("D 实现了 operation1");
    }

    public void operation4() {
        System.out.println("D 实现了 operation4");
    }

    public void operation5() {
        System.out.println("D 实现了 operation5");
    }
}

class A { // A 类通过接口Interface1,Interface2 依赖(使用) B类,但是只会用到1,2,3方法
    public void depend1(Interface1 i) {
        i.operation1();
    }

    public void depend2(Interface2 i) {
        i.operation2();
    }

    public void depend3(Interface2 i) {
        i.operation3();
    }
}

class C { // C 类通过接口Interface1,Interface3 依赖(使用) D类,但是只会用到1,4,5方法
    public void depend1(Interface1 i) {
        i.operation1();
    }

    public void depend4(Interface3 i) {
        i.operation4();
    }

    public void depend5(Interface3 i) {
        i.operation5();
    }
}
3.依赖倒转原则
依赖倒转原则(Dependence Inversion Principle)是指:
- 高层模块不应该依赖低层模块,二者都应该依赖其抽象
- 抽象不应该依赖细节,细节应该依赖抽象
- 依赖倒转(倒置)的中心思想是面向接口编程
- 依赖倒转原则是基于这样的设计理念:相对于细节的多变性,抽象的东西要稳定的多。以抽象为基础搭建的架构比以细节为基础的架构要稳定的多。在java中,抽象指的是接口或抽象类,细节就是具体的实现类
- 使用接口或抽象类的目的是制定好规范,而不涉及任何具体的操作,把展现细节的任务交给他们的实现类去完成
案例1:
未遵循依赖倒置原则,Person 类与 Email 类耦合,如果我们还想获取其他消息,比如微信、短信、QQ 等、则需要添加相应的实现方法
/** 接口依赖倒置原则
 * @author compass
 * @version 1.0
 * @date 2021-07-04 13:37
 */
public class DependencyInversion {
    public static void main(String[] args) {
        Person person = new Person();
        person.receive(new Email());
    }
}
class Email {
    public String getInfo() {
        return "电子邮件信息: hello,world";
    }
}

//完成Person接收消息的功能
//方式1分析
//1. 简单,比较容易想到
//2. 如果我们获取的对象是 微信,短信等等,则新增类,同时Peron也要增加相应的接收方法
//3. 解决思路:引入一个抽象的接口IReceiver, 表示接收者, 这样Person类与接口IReceiver发生依赖
//   因为Email, WeiXin 等等属于接收的范围,他们各自实现IReceiver 接口就ok, 这样我们就符号依赖倒转原则
class Person {
    public void receive(Email email) {
        System.out.println(email.getInfo());
    }
}
案例2:
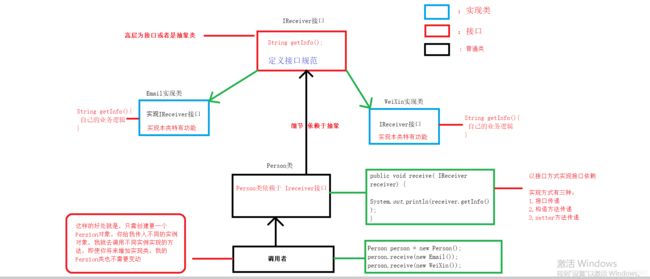
引入一个抽象的接口 IReceiver,表示接收者(Email、微信、短信、QQ 等),接受者分别实现 IReceiver 接口中的方法,实现各自接收消息的逻辑,Person 类与 IReceiver 接口发生依赖,达到接收消息的功能
/** 接口依赖倒置原则
 * @author compass
 * @version 1.0
 * @date 2021-07-04 13:37
 */
public class DependencyInversion2 {
    public static void main(String[] args) {
        Person2 person2 = new Person2();
        person2.receive(new Email2());
        person2.receive(new WeiXin());
    }
}

interface IReceiver{
    public String getInfo();
}

class Email2 implements IReceiver {
    public String getInfo() {
        return "电子邮件信息: hello,world";
    }
}
//增加微信
class WeiXin implements IReceiver {
    public String getInfo() {
        return "微信信息: hello,ok";
    }
}


class Person2 {
    public void receive( IReceiver receiver) {
        System.out.println(receiver.getInfo());
    }
}
依赖关系传递的三种方式和应用案例:
1、接口传递
public class DependencyPass {

	public static void main(String[] args) {
		// 通过接口传递
		ChangHong changHong = new ChangHong();
		OpenAndClose openAndClose = new OpenAndClose();
		openAndClose.open(changHong);
	}

}

// 方式1: 通过接口传递实现依赖
// 开关的接口
interface IOpenAndClose {
	public void open(ITV tv); // 抽象方法,接收接口
}

// ITV接口
interface ITV {
	public void play();
}

// 长虹电视:实现 ITV 接口
class ChangHong implements ITV {
	@Override
	public void play() {
		System.out.println("长虹电视机,打开");
	}
}

// 设备播放类:实现 IOpenAndClose 接口,调用接口 IITV 的 play() 方法实现播放功能(通过接口注入)
class OpenAndClose implements IOpenAndClose {
	public void open(ITV tv) {
		tv.play();
	}
}
2、构造方法传递
public class DependencyPass {

	public static void main(String[] args) {
		// 通过构造器进行依赖传递
         ChangHong changHong = new ChangHong();
		OpenAndClose openAndClose = new OpenAndClose(changHong);
		openAndClose.open();
	}

}

// 方式2: 通过构造方法依赖传递
interface IOpenAndClose {
	public void open(); // 抽象方法
}

interface ITV { // ITV接口
	public void play();
}

// 长虹电视:实现 ITV 接口
class ChangHong implements ITV {
	@Override
	public void play() {
		System.out.println("长虹电视机,打开");
	}
}

class OpenAndClose implements IOpenAndClose {
	public ITV tv; // 成员变量

	public OpenAndClose(ITV tv) { // 通过构造器注入实现了 ITV 接口的对象
		this.tv = tv;
	}

	public void open() {
		this.tv.play();
	}
}
3、setter 方式传递
public class DependencyPass {

	public static void main(String[] args) {
		// 通过setter方法进行依赖传递
         ChangHong changHong = new ChangHong();
		OpenAndClose openAndClose = new OpenAndClose();
		openAndClose.setTv(changHong);
		openAndClose.open();
	}

}

// 方式3 , 通过setter方法传递
interface IOpenAndClose {
	public void open(); // 抽象方法
	public void setTv(ITV tv); // 通过 setter 方法注入
}

interface ITV { // ITV接口
	public void play();
}

// 长虹电视:实现 ITV 接口
class ChangHong implements ITV {
	@Override
	public void play() {
		System.out.println("长虹电视机,打开");
	}
}

class OpenAndClose implements IOpenAndClose {
	private ITV tv;

	// 通过 setYv() 方法注入实现了 ITV 接口的对象实例
	public void setTv(ITV tv) {
		this.tv = tv;
	}

	public void open() {
		this.tv.play();
	}
}
思路图解:
总结:无论通过什么方法,目的都是要将实现了接口的具体实现类注入到调用者类中
- 低层模块尽量都要有抽象类或接口,或者两者都有,程序稳定性更好
- 变量的声明类型尽量是抽象类或接口,这样我们的变量引用和实际对象间,就存在一个缓冲层,利于程序扩展和优化
- 继承时遵循里氏替换原则
自己想的案例:学了某个东西之后,最好自己去把这个思想,应用到具体的案例中,无论对错,首先你要试着去尝试应用,这样才不至于纸上谈兵,理解也更加透彻。
这是我根据这思想,自己想出来的具体案例:
4.里氏替换原则
1.OO中的继承性的思考和说明
-
继承包含这样一层含义:父类中凡是已经实现好的方法, 实际上是在设定规范和契约,虽然它不强制要求所有的子类必须遵循这些契约,但是如果子类对这些已经实现的方法任意修改,就会对整个继承体系造成破坏。
-
继承在给程序设计带来便利的同时,也带来了弊端。比如使用继承会给程序带来侵入性,程序的可移植性降低,增加对象间的耦合性,如果一个类被其他的类所继承,则当这个类需要修改时,必须考虑到所有的子类,并且父类修改后,所有涉及到子类的功能都有可能产生故障
-
问题提出:在编程中,如何正确的使用继承? => 里氏替换原则
2.里氏替换原则的基本介绍
- 里氏替换原则(Liskov Substitution Principle)在1988年,由麻省理工学院的以为姓里的女士提出的。
- 如果对每个类型为T1的对象o1,都有类型为T2的对象o2,使得以T1定义的所有程序P在所有的对象o1都代换成o2时,程序P的行为没有发生变化,那么类型T2是类型T1的子类型。换句话说,所有引用基类的地方必须能透明地使用其子类的对象。
- 在使用继承时,遵循里氏替换原则,在子类中尽量不要重写父类的方法
里氏替换原则告诉我们,继承实际上让两个类耦合性增强了, 在适当的情况下,可以通过聚合,组合,依赖 来解决问题
我们也可以通过提升的方法,来尽量满足里氏替换原则,假设现在有两个类,A 类和 B 类,如果 B 类继承 A 类,需要重写 A 类中的某些方法,那么,我们在 A 类 和 B 类之上,再抽取出一个更加通用的父类 CommonSuper,让 A 类和 B 类同时去继承CommonSuper,这样 B 类就无须重写 A 类中的某些方法,达到基类的引用对子类对象透明的效果
案例1:
/**
 * @author compass
 * @version 1.0
 * @date 2021-07-04 16:23
 */
@Deprecated
public class Liskov {

    public static void main(String[] args) {
        A a = new A();
        System.out.println("11-3=" + a.function1(11, 3));
        System.out.println("1-8=" + a.function1(1, 8));

        System.out.println("-----------------------");
        B b = new B();
        System.out.println("11-3=" + b.function1(11, 3));// 这里本意是求出11-3,结果变成了11+3
        System.out.println("1-8=" + b.function1(1, 8));// 这里本意是求出1-8,结果变成了1+8
        System.out.println("11+3+9=" + b.sum(11, 3));
    }

}

// A类
class A {
    // 返回两个数的差
    public int function1(int num1, int num2) {
        return num1 - num2;
    }
}

// B类继承了A
// 增加了一个新功能:完成两个数相加,然后和9求和
class B extends A {
    // 这里,重写了A类的方法, 可能是无意识
    public int function1(int a, int b) {
        return a + b;
    }

    public int sum(int a, int b) {
        return function1(a, b) + 9;
    }
}
原因分析与解决方法
-
我们发现原来运行正常的相减功能发生了错误。原因就是类B无意中重写了父类的方法,造成原有功能出现错误。在实际编程中,我们常常会通过重写父类的方法完成新的功能,这样写起来虽然简单,但整个继承体系的复用性会比较差。特别是运行多态比较频繁的时候
-
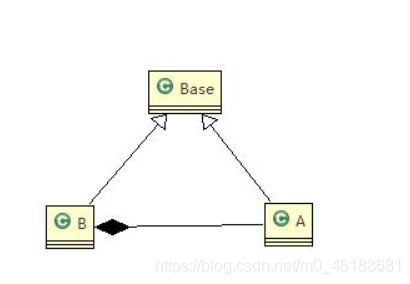
通用的做法是:原来的父类和子类都继承一个更通俗的基类,原有的继承关系去掉,
采用依赖,聚合,组合等关系代替 -
将类 B 的级别提升至与类 A 平级,他们有一个共同的父类 Base,这样就不会出现类 B 重写类 A 中方法的问题,此时基类的引用能够透明地使用子类的对象
/**
 * @author compass
 * @version 1.0
 * @date 2021-07-04 16:29
 */
public class Liskov2 {
    public static void main(String[] args) {

        A2 a = new A2();
        System.out.println("11-3=" + a.func1(11, 3));
        System.out.println("1-8=" + a.func1(1, 8));

        System.out.println("-----------------------");
        B2 b = new B2();

        // 因为B类不再继承A类,因此调用者,不会再func1是求减法
        // 调用完成的功能就会很明确
        System.out.println("11+3=" + b.func1(11, 3));// 这里本意是求出11+3
        System.out.println("1+8=" + b.func1(1, 8));// 这里本意是求出1+8
        System.out.println("11+3+9=" + b.func2(11, 3));

        // 使用组合仍然可以使用到A类相关方法
        System.out.println("11-3=" + b.func3(11, 3));// 这里本意是求出11-3

    }

}

//创建一个更加基础的基类
class Base {
    // 把更加基础的方法和成员写到Base类
}

// A类
class A2 extends Base {
    // 返回两个数的差
    public int func1(int num1, int num2) {
        return num1 - num2;
    }
}

// B类继承了A
// 增加了一个新功能:完成两个数相加,然后和9求和
class B2 extends Base {
    // 如果B需要使用A类的方法,使用组合关系
    private A2 a = new A2();

    // 这里虽然方法名是 fun1(),但由于类 B 集成于类 Base,已和类 A 无关
    public int func1(int a, int b) {
        return a + b;
    }

    public int func2(int a, int b) {
        return func1(a, b) + 9;
    }

    // 我们仍然想使用A的方法
    public int func3(int a, int b) {
        return this.a.func1(a, b);
    }
}
5.开闭原则
开闭原则的基本介绍
- 开闭原则(Open Closed Principle) 是编程中最基础、最重要的设计原则
- 一个软件实体如类,模块和函数应该对
扩展开放(对提供方),对修改关闭(对使用方)。 用抽象构建框架,用实现扩展细节。 - 当软件需要变化时,尽量通过扩展软件实体的行为来实现变化,而不是通过修改已有的代码来实现变化。
- 编程中遵循其它原则,以及使用设计模式的目的就是遵循开闭原则。
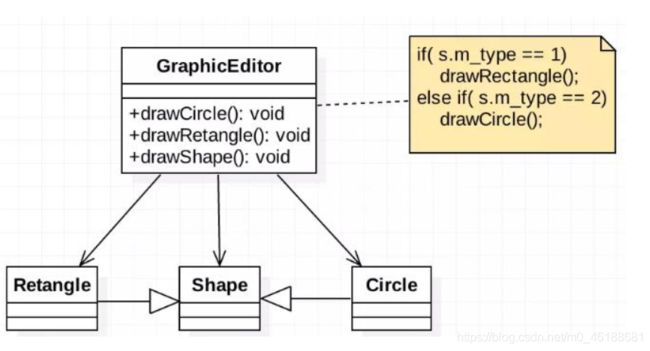
案例1:未遵循开闭原则,导致新增一个图形类时,需要在【使用方 GraphicEditor】中添加很多代码
/** 开闭原则(错误案例)
 * @author compass
 * @version 1.0
 * @date 2021-07-04 19:18
 */
public class OcpTest1 {

    public static void main(String[] args) {
        // 使用看看存在的问题
        GraphicEditor1 graphicEditor = new GraphicEditor1();
        graphicEditor.drawShape(new Rectangle1());
        graphicEditor.drawShape(new Circle1());
        graphicEditor.drawShape(new Triangle1());
    }

}
//这是一个用于绘图的类 [使用方,需使用图形绘图]
class GraphicEditor1 {
    // 接收Shape对象,然后根据type,来绘制不同的图形
    public void drawShape(Shape1 s) {
        if (s.m_type == 1)
            drawRectangle(s);
        else if (s.m_type == 2)
            drawCircle(s);
        else if (s.m_type == 3)
            drawTriangle(s);
    }

    // 绘制矩形
    public void drawRectangle(Shape1 r) {
        System.out.println(" 绘制矩形 ");
    }

    // 绘制圆形
    public void drawCircle(Shape1 r) {
        System.out.println(" 绘制圆形 ");
    }

    // 绘制三角形
    public void drawTriangle(Shape1 r) {
        System.out.println(" 绘制三角形 ");
    }
}

//Shape类,基类
class Shape1 {
    int m_type;
}

// 具体的图形为提供方,提供具体的绘图流程
class Rectangle1 extends Shape1 {
    Rectangle1() {
        super.m_type = 1;
    }
}

class Circle1 extends Shape1 {
    public Circle1() {
        super.m_type = 2;
    }
}

//新增画三角形
class Triangle1 extends Shape1 {
    Triangle1() {
        super.m_type = 3;
    }
}
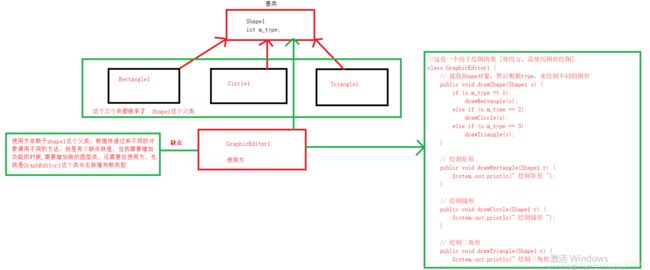
优缺点分析
- 优点是比较好理解,简单易操作。
- 缺点是违反了设计模式的ocp原则,即对扩展开放(提供方),对修改关闭(使用方)。即当我们给类增加新功能的时候,尽量不修改代码,或者尽可能少修改代码。
- 比如我们这时要新增加一个图形种类:三角形,我们需要做大量的修改, 修改的地方较多
改进思路分析:
- 把创建Shape2类做成抽象类,并提供一个抽象的draw方法,让子类去实现即可
- 这样我们有新的图形种类时,只需要让新的图形类继承Shape2,并实现draw方法即可,使用方的代码就不需要修 -> 满足了开闭原则
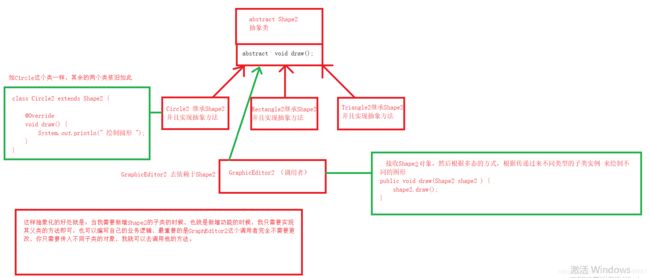
案例2:
/** 开闭原则(正确案例案例)
 * @author compass
 * @version 1.0
 * @date 2021-07-04 19:18
 */
public class OcpTest2 {

    public static void main(String[] args) {
        // 使用看看存在的问题
        GraphicEditor2 graphicEditor = new GraphicEditor2();
        graphicEditor.draw(new Rectangle2());
        graphicEditor.draw(new Circle2());
        graphicEditor.draw(new Triangle2());
    }

}


//Shape类,基类
abstract  class   Shape2 {
    abstract  void draw();
}
//这是一个用于绘图的类 [使用方,需使用图形绘图]
class GraphicEditor2   {


    // 接收Shape对象,然后根据多态的方式,根据传递过来不同类型的子类实例 来绘制不同的图形
    public void draw(Shape2 shape2 ) {
        shape2.draw();
    }
}

 class Circle2 extends Shape2 {

     @Override
     void draw() {
         System.out.println(" 绘制圆形 ");
     }
 }

class Rectangle2 extends Shape2 {

    @Override
    void draw() {
        System.out.println(" 绘制矩形 ");
    }
}

class Triangle2 extends Shape2 {

    @Override
    void draw() {
        System.out.println(" 绘制三角形 ");
    }
}
开闭原则的核心点:一个类中的模块和函数应该对扩展开放(对提供方),对修改关闭(对使用方)。 用抽象构建框架,用实现扩展细节。
6.迪米特法则
迪米特法则的基本介绍:
一个对象应该对其他对象保持最少的了解- 类与类关系越密切,耦合度越大
- 迪米特法则(Demeter Principle)又叫最少知道原则,即一个类对自己依赖的类知道的越少越好。也就是说,对于被依赖的类不管多么复杂,都尽量将逻辑封装在类的内部。对外除了提供的public 方法,不对外泄露任何信息
- 迪米特法则还有个更简单的定义:
只与直接的朋友通信 - 直接的朋友:每个对象都会与其他对象有耦合关系,只要两个对象之间有耦合关系,
我们就说这两个对象之间是朋友关系。耦合的方式很多,依赖,关联,组合,聚合等。其中,我们称出现成员变量,方法参数,方法返回值中的类为直接的朋友,而出现在局部变量中的类不是直接的朋友。也就是说,陌生的类最好不要以局部变量的形式出现在类的内部。
案例1:
-
应用实例:有一个学校, 下属有各个学院和总部, 现要求打印出学校总部员工ID和学院员工的id
-
CollegeEmployee1 类不是 SchoolManager1 类的直接朋友,而是一个陌生类,这样的设计违背了迪米特法则
**
 * 迪米特法则(错误示例)
 */
public class Demeter {

    public static void main(String[] args) {
        // 创建了一个 SchoolManager 对象
        SchoolManager schoolManager = new SchoolManager();
        // 输出学院的员工id 和 学校总部的员工信息
        schoolManager.printAllEmployee(new CollegeManager());
    }

}

//学校总部员工类
class Employee {
    private String id;

    public void setId(String id) {
        this.id = id;
    }

    public String getId() {
        return id;
    }
}

//学院的员工类
class CollegeEmployee {
    private String id;

    public void setId(String id) {
        this.id = id;
    }

    public String getId() {
        return id;
    }
}

//管理学院员工的管理类
class CollegeManager {
    // 返回学院的所有员工
    public List<CollegeEmployee> getAllEmployee() {
        List<CollegeEmployee> list = new ArrayList<CollegeEmployee>();
        for (int i = 0; i < 10; i++) { // 这里我们增加了10个员工到 list
            CollegeEmployee emp = new CollegeEmployee();
            emp.setId("学院员工id= " + i);
            list.add(emp);
        }
        return list;
    }
}

//学校管理类
//分析 SchoolManager 类的直接朋友类有哪些 Employee、CollegeManager
//CollegeEmployee 不是 直接朋友 而是一个陌生类,这样违背了 迪米特法则
class SchoolManager {
    // 返回学校总部的员工
    public List<Employee> getAllEmployee() {
        List<Employee> list = new ArrayList<Employee>();

        for (int i = 0; i < 5; i++) { // 这里我们增加了5个员工到 list
            Employee emp = new Employee();
            emp.setId("学校总部员工id= " + i);
            list.add(emp);
        }
        return list;
    }

    // 该方法完成输出学校总部和学院员工信息(id)
    void printAllEmployee(CollegeManager sub) {

        // 分析问题
        // 1. 这里的 CollegeEmployee 不是 SchoolManager的直接朋友
        // 2. CollegeEmployee 是以局部变量方式出现在 SchoolManager
        // 3. 违反了 迪米特法则

        // 获取到学院员工
        List<CollegeEmployee> list1 = sub.getAllEmployee();
        System.out.println("------------学院员工------------");
        for (CollegeEmployee e : list1) {
            System.out.println(e.getId());
        }
        // 获取到学校总部员工
        List<Employee> list2 = this.getAllEmployee();
        System.out.println("------------学校总部员工------------");
        for (Employee e : list2) {
            System.out.println(e.getId());
        }
    }
}
案例2:
- 前面设计的问题在于SchoolManager1中, CollegeEmployee1类并不是SchoolManage1r类的直接朋友
- 按照迪米特法则,应该避免类中出现这样非直接朋友关系的耦合,我们将输出学院员工的方法封装到CollegeManager1,这样在SchoolManager1中就不会出现CollegeEmployee1类了
- 按照迪米特法则的意思就是:SchoolManager1对输出学院员工知道得越少越好,所以我们就直接将该逻辑封装到CollegeManage1r中
/**
 * 迪米特法则(正确示例)
 */
public class Demeter1 {

    public static void main(String[] args) {
        System.out.println("~~~使用迪米特法则的改进~~~");
        // 创建了一个 SchoolManager 对象
        SchoolManager1 schoolManager = new SchoolManager1();
        // 输出学院的员工id 和 学校总部的员工信息
        schoolManager.printAllEmployee(new CollegeManager1());
    }

}

//学校总部员工类
class Employee1 {
    private String id;

    public void setId(String id) {
        this.id = id;
    }

    public String getId() {
        return id;
    }
}

//学院的员工类
class CollegeEmployee1 {
    private String id;

    public void setId(String id) {
        this.id = id;
    }

    public String getId() {
        return id;
    }
}

//管理学院员工的管理类
class CollegeManager1 {
    // 返回学院的所有员工
    public List<CollegeEmployee1> getAllEmployee() {
        List<CollegeEmployee1> list = new ArrayList<CollegeEmployee1>();
        for (int i = 0; i < 10; i++) { // 这里我们增加了10个员工到 list
            CollegeEmployee1 emp = new CollegeEmployee1();
            emp.setId("学院员工id= " + i);
            list.add(emp);
        }
        return list;
    }

    // 输出学院员工的信息
    public void printEmployee() {
        // 获取到学院员工
        List<CollegeEmployee1> list1 = getAllEmployee();
        System.out.println("------------学院员工------------");
        for (CollegeEmployee1 e : list1) {
            System.out.println(e.getId());
        }
    }
}

//学校管理类
class SchoolManager1 {
    // 返回学校总部的员工
    public List<Employee1> getAllEmployee() {
        List<Employee1> list = new ArrayList<Employee1>();

        for (int i = 0; i < 5; i++) { // 这里我们增加了5个员工到 list
            Employee1 emp = new Employee1();
            emp.setId("学校总部员工id= " + i);
            list.add(emp);
        }
        return list;
    }

    // 该方法完成输出学校总部和学院员工信息(id)
    void printAllEmployee(CollegeManager1 sub) {

        // 分析问题
        // 1. 将输出学院的员工方法,封装到CollegeManager
        sub.printEmployee();

        // 获取到学校总部员工
        List<Employee1> list2 = this.getAllEmployee();
        System.out.println("------------学校总部员工------------");
        for (Employee1 e : list2) {
            System.out.println(e.getId());
        }
    }
}
7.合成复用原则
原则是尽量使用合成/聚合的方式,而不是使用继承

设计原则核心思想
- 找出应用中可能需要变化之处, 把它们独立出来, 不要和那些不需要变化的代码混在一起。
- 针对接口编程, 而不是针对实现编程。
- 为了交互对象之间的松耦合设计而努力
1.单例模式
设计模式的层次
- 第 1 层: 刚开始学编程不久, 听说过什么是设计模式
- 第 2 层: 有很长时间的编程经验, 自己写了很多代码, 其中用到了设计模式, 但是自己却不知道
- 第 3 层: 学习过了设计模式, 发现自己已经在使用了, 并且发现了一些新的模式挺好用的
- 第 4 层: 阅读了很多别人写的源码和框架, 在其中看到别人设计模式, 并且能够领会设计模式的精妙和带来的好处。
- 第 5 层: 代码写着写着, 自己都没有意识到使用了设计模式, 并且熟练的写了出来。
设计模式介绍
- 设计模式是程序员在面对同类软件工程设计问题所总结出来的有用的经验, 模式不是代码, 而是某类问题的通用解决方案, 设计模式(Design pattern) 代表了最佳的实践。 这些解决方案是众多软件开发人员经过相当长的一段时间的试验和错误总结出来的。
- 设计模式的本质提高 软件的维护性, 通用性和扩展性, 并降低软件的复杂度。
《设计模式》是经典的书, 作者是 Erich Gamma、 Richard Helm、 Ralph Johnson 和 John Vlissides Design(俗称 “四人组 GOF” )
设计模式并不局限于某种语言, java, php, c++ 都有设计模式。
设计模式类型
设计模式分为三种类型 : 共 23 种
- 创建型模式: 单例模式、 抽象工厂模式、 原型模式、 建造者模式、 工厂模式。
- 结构型模式: 适配器模式、 桥接模式、 装饰模式、 组合模式、 外观模式、 享元模式、 代理模式。
- 行为型模式: 模版方法模式、 命令模式、 访问者模式、 迭代器模式、 观察者模式、 中介者模式、 备忘录模式、解释器模式(Interpreter 模式) 、 状态模式、 策略模式、 职责链模式(责任链模式)。
单例设计模式介绍
- 所谓类的单例设计模式, 就是采取一定的方法保证在整个的软件系统中, 对某个类只能存在一个对象实例,并且该类只提供一个取得其对象实例的方法(静态方法)。
- 比如 Hibernate 的 SessionFactory, 它充当数据存储源的代理, 并负责创建 Session 对象。SessionFactory 并不是轻量级的, 一般情况下, 一个项目通常只需要一个 SessionFactory 就够,这是就会使用到单例模式。
单例模式有八种方式:
- 饿汉式(静态常量)
- 饿汉式(静态代码块)
- 懒汉式(线程不安全)
- 懒汉式(线程安全, 同步方法)
- 懒汉式(线程安全, 同步代码块)
- 双重检查
- 静态内部类
- 枚举
1.饿汉式(静态常量)
饿汉式(静态常量)的具体实现步骤
- 构造器私有化 (防止 new)
- 类的内部创建对象
- 向外暴露一个静态的公共方法: getInstance()
代码实现
/** 单例模式1:静态常量方式实现
 * @author compass
 * @version 1.0
 * @date 2021-07-06 2:31
 */
public class SingletonTest01 {
    public static void main(String[] args) {
        Single instance1 = Single.getInstance();
        Single instance2 = Single.getInstance();
        System.out.println(instance1==instance1);
        System.out.println("instance1="+instance1);
        System.out.println("instance2="+instance2);

    }
}

class Single{

    // 私有化构造方法 不让外部new对象
    private Single(){

    }
    // 在类加载的时候就完成对象的创建 不让外部访问,提供一个公用的方法让外部进行访问 保证拿到的都是同一个对象
    private  static  final Single single =new Single();

    // 提供静态的构造方法,在外部访问对象
    public static Single getInstance(){
        return single;
    }

}
单例模式静态常量方式实现的优缺点说明:
- 优点: 这种写法比较简单, 就是在类装载的时候就完成实例化。 避免了线程同步问题。
- 缺点: 在类装载的时候就完成实例化, 没有达到 Lazy Loading 的效果。 如果从始至终从未使用过这个实例, 则会造成内存的浪费
- 这种方式基于 Classloder 机制避免了多线程的同步问题, 不过, instance 在类装载时就实例化, 在单例模式中大多数都是调用 getInstance() 方法获取单例对象, 但是导致类装载的原因有很多种, 因此不能确定有其他的方式(或者其他的静态方法) 导致类装载, 这时候初始化单例对象,就没有达到 lazy loading 的效果
- 结论: 这种单例模式可用, 可能造成内存浪费
2.饿汉式(静态代码块)
饿汉式(静态代码块)的具体实现步骤
- 构造器私有化,外部不能 new
- 在本类内部的静态代码块中,创建单例对象
- 提供一个公有的静态方法,返回实例对象
代码实现
/** 单例模式2:静态代码块的方式去实现
 * @author compass
 * @version 1.0
 * @date 2021-07-06 2:31
 */
public class SingletonTest01 {
    public static void main(String[] args) {
        Single instance1 = Single.getInstance();
        Single instance2 = Single.getInstance();
        System.out.println(instance1==instance1);
        System.out.println("instance1="+instance1);
        System.out.println("instance2="+instance2);

    }
}

class Single{

    private  static  final Single single ;

    // 在类加载的时候就完成对象的创建 不让外部访问,提供一个公用的方法让外部进行访问 保证拿到的都是同一个对象
    static {
        single =new Single();
    }

    // 私有化构造方法 不让外部new对象
    private Single(){


    }

    // 提供静态的构造方法,在外部访问对象
    public static Single getInstance(){
        return single;
    }

}
- 这种方式和上面的方式其实类似,只不过将类实例化的过程放在了静态代码块中,也是在类装载的时候,就执行静态代码块中的代码,初始化类的实例。优缺点和上面是一样的。
- 结论: 这种单例模式可用,但是可能造成内存浪费
3.懒汉式(线程不安全)
- 构造器私有化,外部不能 new
- 在本类内部的 getInstance() 静态方法中,判断单例对象是否为空
- 如果为空,则创建单例对象并返回
- 如果不为空,则直接返回此对象
代码实现
/** 单例模式3:懒汉式(线程不安全)
 * @author compass
 * @version 1.0
 * @date 2021-07-06 2:31
 */
public class SingletonTest01 {
    public static void main(String[] args) {
        Single instance1 = Single.getInstance();
        Single instance2 = Single.getInstance();
        System.out.println(instance1==instance1);
        System.out.println("instance1="+instance1);
        System.out.println("instance2="+instance2);

    }
}

class Single{

    private  static   Single single ;


    // 私有化构造方法 不让外部new对象
    private Single(){


    }

    // 提供静态的构造方法,在外部访问对象
    public static Single getInstance(){
        if (single==null){
            single=new Single();
        }
        return single;
    }

}
懒汉式(线程不安全)的优缺点说明
- 起到了 Lazy Loading 的效果, 但是只能在单线程下使用。
- 如果在多线程下, 一个线程进入了 if (singleton == null) 判断语句块, 还未来得及往下执行, 另一个线程也通过了这个判断语句, 这时便会产生多个实例。 所以在多线程环境下不可使用这种方式
- 结论: 在实际开发中, 不要使用这种方式
4.懒汉式(同步方法)
- 构造器私有化,外部不能 new
- 在本类内部的 getInstance() 静态同步方法中,判断单例对象是否为空
- 如果为空,则创建单例对象并返回
- 如果不为空,则直接返回此对象
代码实现
/** 单例模式4:懒汉式(同步方法 线程安全)
 * @author compass
 * @version 1.0
 * @date 2021-07-06 2:31
 */
public class SingletonTest01 {
    public static void main(String[] args) {
        Single instance1 = Single.getInstance();
        Single instance2 = Single.getInstance();
        System.out.println(instance1==instance1);
        System.out.println("instance1="+instance1);
        System.out.println("instance2="+instance2);

    }
}

class Single{

    private  static   Single single ;


    // 私有化构造方法 不让外部new对象
    private Single(){


    }

    // 提供静态的构造方法,在外部访问对象 多线程环境下线程是安全了 但是效率比较低,因为每个线程进来都需要进行排队执行
    public static synchronized Single getInstance(){
        if (single==null){
            single=new Single();
        }
        return single;
    }

}
懒汉式(同步方法)的优缺点说明
- 解决了线程安全问题
- 效率太低了, 每个线程在想获得类的实例时候, 执行 getInstance() 方法都要进行同步。 而其实这个方法只执行一次实例化代码就够了, 后面的想获得该类实例, 直接 return 就行了。 方法进行同步效率太低
- 结论: 在实际开发中, 不推荐使用这种方式
5.懒汉式(同步代码块)
- 构造器私有化,外部不能 new
- 在本类内部的 getInstance() 静态方法中,先判断对象是否为空
- 如果为空,则加锁创建单例对象,并返回
- 如果不为空,则直接返回此对象
/** 单例模式:懒汉式(同步代码块 线程不安全)
 * @author compass
 * @version 1.0
 * @date 2021-07-06 2:31
 */
public class SingletonTest01 {
    public static void main(String[] args) {

        Singleton instance1 = Singleton.getInstance();
        Singleton instance2 = Singleton.getInstance();
        System.out.println(instance1==instance1);
        System.out.println("instance1="+instance1.hashCode());
        System.out.println("instance2="+instance2.hashCode());

    }
}

class Singleton{

    private static Singleton singleton;

    public static Singleton getInstance(){

        if (singleton==null){
            synchronized(Singleton.class){
                singleton=new Singleton();
            }
        }

        return singleton;
    }

}
懒汉式(同步代码块)的优缺点说明
- 这种方式,本意是想对第四种实现方式的改进,因为前面同步方法效率太低,改为同步产生实例化的的代码块
- 但是这种同步并不能起到线程同步的作用。跟第3种实现方式遇到的情形一致,假如一个线程进入了 if (singleton == null) 判断语句块,还未来得及往下执行,另一个线程也通过了这个判断语句,这时便会产生多个实例
- 结论:在实际开发中, 不能使用这种方式
6.懒汉式(双重检查)
-
构造器私有化,外部不能 new
在本类内部的 getInstance() 静态方法中,先判断对象是否为空 -
如果为空,则先加锁,再判断此单例对象是否为空,如果还为空,才创建对象
-
如果不为空,则直接返回此对象
-
注意:单例变量需要使用 volatile 关键字进行修饰,保证内存可见性,以及防止指令重排序
代码实现:
/** 单例模式5:懒汉式(双重检查 线程安全)
 * @author compass
 * @version 1.0
 * @date 2021-07-06 2:31
 */
public class SingletonTest01 {
    public static void main(String[] args) {
        Single instance1 = Single.getInstance();
        Single instance2 = Single.getInstance();
        System.out.println(instance1==instance1);
        System.out.println("instance1="+instance1);
        System.out.println("instance2="+instance2);

    }
}

class Single{

    private  static  volatile  Single single ;

    // 私有化构造方法 不让外部new对象
    private Single(){


    }

    // 提供静态的构造方法,在外部访问对象
    public static  Single getInstance(){
        if (single==null){
            // 解决多线程下安全问题
            synchronized(Single.class){
                if (single==null){
                    single=new Single();
                }
            }

        }
        return single;
    }

}
懒汉式(双重检查)的优缺点说明
- Double-Check 概念是多线程开发中常使用到的, 如代码中所示, 我们进行了两次 if (singleton = = null) 检查, 这样就可以保证线程安全了
- 这样, 实例化代码只用执行一次, 后面再次访问时, 判断 if (singleton == null), 直接 return 实例化对象, 也避免的反复进行方法同步
- 线程安全; 延迟加载; 效率较高
- 结论: 在实际开发中, 推荐使用这种单例设计模式
7.懒汉式(静态内部类)
- 构造器私有化,外部不能 new
- 在本类内部新增一个静态内部类,封装一个单例对象,用于实现单例模式
- 静态内部类的实现方式本质是利用类加载的同步机制,保证单例对象的线程安全,并且该方式能保证该单例对象的懒加载机制,因为只有用到静态内部类时,才会加载该静态内部类以及单例对象
- 在本类内部提供一个静态方法 getInstance() 用于返回静态内部类中的单例对象
代码实现:
/** 单例模式6:懒汉式(静态内部类 线程安全)
 * @author compass
 * @version 1.0
 * @date 2021-07-06 2:31
 */
public class SingletonTest01 {
    public static void main(String[] args) {
        Singleton instance1 = Singleton.getInstance();
        Singleton instance2 = Singleton.getInstance();
        System.out.println(instance1==instance1);
        System.out.println("instance1="+instance1);
        System.out.println("instance2="+instance2);

    }
}

// 静态内部类完成, 推荐使用
class Singleton {
    //构造器私有化
    private Singleton() {}

    //写一个静态内部类,该类中有一个静态属性 Singleton
    private static class SingletonInstance {
        private static final Singleton INSTANCE = new Singleton();
    }

    //提供一个静态的公有方法,直接返回SingletonInstance.INSTANCE
    public static Singleton getInstance() {
        return SingletonInstance.INSTANCE;
    }
}
懒汉式(静态内部类)的优缺点说明
- 这种方式采用了类装载的机制来保证初始化实例时只有一个线程(外部类被使用的使用是不会导致内部类产生类装载机制,只有内部类被使用的时候才会发送类装载机制,而类装载的时候是线程安全的)。
- 静态内部类方式在
Singleton类被装载时并不会立即实例化,而是在需要实例化时,调用getInstance()方法,才会装载SingletonInstance类,从而完成Singleton的实例化。 - 类的静态属性只会在第一次加载类的时候初始化,所以在这里, JVM帮助我们保证了线程的安全性,在类进行初始化时,别的线程是无法进入的。
- 优点:避免了线程不安全,利用静态内部类特点实现延迟加载,效率高。
- 结论:推荐使用。
8.饿汉式(枚举)
通过枚举类实现单例模式
代码实现:
在这里插入代码片
饿汉式(枚举)的优缺点说明
- 这借助JDK1.5中添加的枚举来实现单例模式。不仅能避免多线程同步问题,而且还能防止反序列化重新创建新的对象。
- 这种方式是Effective Java作者Josh Bloch提倡的方式。如果用枚举去实现一个单例,属于饿汉模式。
- 结论:推荐使用
9.JDK源码 Rumtime 使用单例模式
JDK源码:
public class Runtime {
    private static Runtime currentRuntime = new Runtime();

    /**
     * Returns the runtime object associated with the current Java application.
     * Most of the methods of class Runtime are instance
     * methods and must be invoked with respect to the current runtime object.
     *
     * @return  the Runtime object associated with the current
     *          Java application.
     */
    public static Runtime getRuntime() {
        return currentRuntime;
    }

    /** Don't let anyone else instantiate this class */
    private Runtime() {}
单例模式注意事项
- 单例模式保证了系统内存中该类只存在一个对象,节省了系统资源,对于一些需要频繁创建销毁的对象,使用单例模式可以提高系统性能
- 当想实例化一个单例类的时候,必须要记住使用相应的获取对象的方法,而不是使用 new
- 单例模式使用的场景:需要频繁的进行创建和销毁的对象、创建对象时耗时过多或耗费资源过多(即: 重量级对象),但又经常用到的对象、工具类对象、频繁访问数据库或文件的对象(比如数据源、 session 工厂等)
2.工厂模式
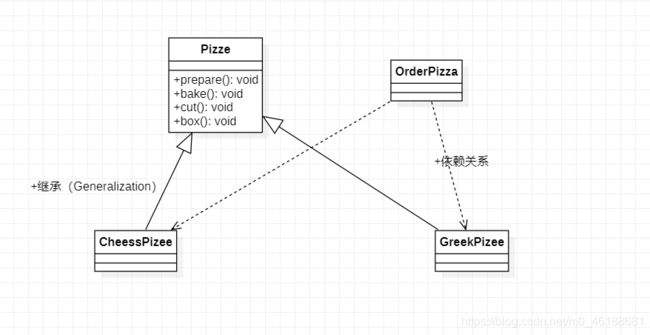
1.简单工厂模式
简单工厂模式的实际需求
看一个披萨的项目:要便于披萨种类的扩展,要便于维护
- 披萨的种类很多(比如 GreekPizz、CheesePizz 等)
- 披萨的制作有 prepare、bake、cut、box
- 完成披萨店订购功能
Pizza:抽象父类
/** 将Pizza 做成抽象类
 * @author compass
 * @version 1.0
 * @date 2021-07-06 14:51
 */
public abstract class Pizza {
    protected  String name;

    // 准备披萨 因为不太的披萨会有不同的原材料 所以做成抽象方法
    public abstract void prepare();

    public void bake(){
        System.out.println("开始烘烤");
    }

    public void cut(){
        System.out.println("开始切割");
    }

    public void box(){
        System.out.println("开始包装");
    }

    public String getName() {
        return name;
    }

    public void setName(String name) {
        this.name = name;
    }
}
CheesePizza:奶酪披萨
/** 奶酪披萨
 * @author compass
 * @version 1.0
 * @date 2021-07-06 14:54
 */
public class CheesePizza extends Pizza {
    @Override
    public void prepare() {
        System.out.println("选用奶酪披萨原材料");
    }

    @Override
    public void bake() {
       super.bake();
    }

    @Override
    public void cut() {
     super.cut();
    }

    @Override
    public void box() {
      super.box();
    }


}
GreekPizza:希腊披萨
/** 希腊披萨
 * @author compass
 * @version 1.0
 * @date 2021-07-06 14:55
 */
public class GreekPizza  extends Pizza{
    @Override
    public void prepare() {
        System.out.println("选用希腊披萨原材料");
    }

    @Override
    public void bake() {
      super.bake();
    }

    @Override
    public void cut() {
       super.cut();
    }

    @Override
    public void box() {
      super.cut();
    }
}
OrderPizza:表示披萨商店,可以根据用户需要的披萨类型,制作相应的披萨
/**  披萨商店
 * @author compass
 * @version 1.0
 * @date 2021-07-06 14:57
 */
public class OrderPizza {


    /**
    * 根据传递的class类型决定做什么类型的披萨
    * @param pizzaClazz
    * @author compass
    * @date 2022/10/4 14:04
    * @since 1.0.0
    **/
    public  OrderPizza(Class<?> pizzaClazz ){
        Pizza pizza;
        if (pizzaClazz==null){
            throw new RuntimeException("pizzaClazz不能为空");
        }
        try {
             pizza = (Pizza)pizzaClazz.newInstance();
        } catch (InstantiationException | IllegalAccessException e) {
            e.printStackTrace();
            throw new RuntimeException("pizza创建失败");
        }
        // 此时披萨商店获取到了对应的披萨工厂,开始制作披萨
        pizza.prepare();
        pizza.bake();
        pizza.cut();
        pizza.box();
    }

}
PizzaStore:相当于客户端,发出订购披萨的请求
/** 客户端 发出订购任务
 * @author compass
 * @version 1.0
 * @date 2021-07-06 15:12
 */
public class PizzaStore {

    public static void main(String[] args) {
        OrderPizza orderPizza = new OrderPizza();
    }
}
·传统方式的优缺点分析:
·
- 优点是比较好理解,简单易操作。
- 缺点是违反了设计模式的
ocp原则,即对扩展开放(提供方),对修改关闭(使用方)。即当我们给类增加新功能的时候,尽量不修改代码,或者尽可能少修改代码. - 比如我们这时要新增加一个Pizza的种类(Pepper披萨),我们需要在使用方 OderPizza 中添加新的判断条件,违反开闭原则
改进思路
- 分析: 如果说新增 Pizza 需要修改代码,这可以接受, 但是如果我们在其它的地方也有创建 Pizza 的代码,就意味着,有很多处的代码都需要修改,而且这些创建 Pizza 的代码全都是冗余代码。
- 思路: 把创建Pizza对象封装到一个类中,这样我们有新的Pizza种类时,只需要修改该类就可, 其它有创建到Pizza对象的代码就不需要修改了 --> 简单工厂模式
改进后的简单工厂模式;
Pizza, CheesePizza, GreekPizza:代码不变
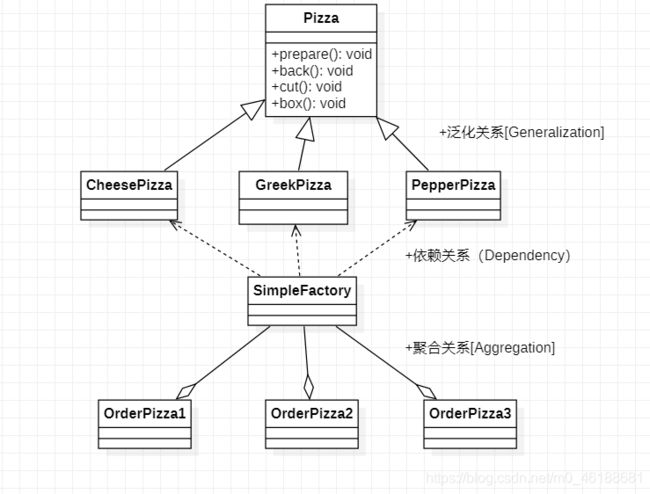
SimpleFactory:工厂类,根据用户输入,制作相应的 Pizza,此时 SimpleFactory 为提供方
/**
 * @author compass
 * @version 1.0
 * @date 2021-07-06 16:28
 */
public class SimpleFactory {

    // 根据orderType 返回对应的Pizza 对象
    public Pizza createPizza(String orderType) {
        Pizza pizza = null;
        System.out.println("使用简单工厂模式");
        if (orderType.equals("greek")) {
            pizza = new GreekPizza();
            pizza.setName("希腊披萨");
        } else if (orderType.equals("cheese")) {
            pizza = new CheesePizza();
            pizza.setName("奶酪披萨");
        }
        return pizza;
    }


}
OrderPizza :表示披萨商店,可以根据用户的输入,制作相应的披萨
/**  披萨商店
 * @author compass
 * @version 1.0
 * @date 2021-07-06 14:57
 */
public class OrderPizza {

    // 定义一个简单工厂对象
    SimpleFactory simpleFactory;
    Pizza pizza = null;

    // 构造器
    public OrderPizza(SimpleFactory simpleFactory) {
        setFactory(simpleFactory);
    }

    public void setFactory(SimpleFactory simpleFactory) {
        String orderType = ""; // 用户输入的
        this.simpleFactory = simpleFactory; // 设置简单工厂对象
        do {
            orderType = getType();
            pizza = this.simpleFactory.createPizza(orderType);
            // 输出pizza
            if (pizza != null) { // 订购成功
                pizza.prepare();
                pizza.bake();
                pizza.cut();
                pizza.box();
                System.out.println();
            } else {
                System.out.println("订购披萨失败");
                break;
            }
        } while (true);
    }

    // 写一个方法,可以获取客户希望订购的披萨种类
    private String getType() {
        try {
            BufferedReader br = new BufferedReader(new InputStreamReader(System.in));
            System.out.println("请输入需要订购的种类:");
            return br.readLine();
        } catch (IOException e) {
            e.printStackTrace();
            return "";
        }
    }

}
PizzaStore : 客户端 发出订购任务
/** 客户端 发出订购任务
 * @author compass
 * @version 1.0
 * @date 2021-07-06 15:12
 */
public class PizzaStore {

    public static void main(String[] args) {
        OrderPizza orderPizza = new OrderPizza(new SimpleFactory());
    }
}
两者做比较:

还有一种静态简单工厂模式:也就是将 createPizza(String orderType)方法改为静态的即可,其他的地方做相应的修改即可
2.工厂方法模式
工厂方法模式的实际需求
看一个新的需求
披萨项目新的需求: 客户在点披萨时, 可以点不同口味的披萨, 比如北京的奶酪 pizza、 北京的胡椒 pizza 或者是伦敦的奶酪 pizza、 伦敦的胡椒 pizza。
思路一:简单工厂模式
-
使用简单工厂模式, 创建不同的简单工厂类, 比如 BJPizzaSimpleFactory、LDPizzaSimpleFactory 等等。
-
从当前这个案例来说, 也是可以的, 但是考虑到项目的规模, 以及软件的可维护性、 可扩展性并不是特别好,因为过多的工厂类会导致整个项目类膨胀
路二:使用工厂方法模式
工厂方法模式介绍
- 工厂方法模式设计方案: 将披萨项目的实例化功能抽象成抽象方法, 在不同的口味点餐子类中具体实现。
- 工厂方法模式: 定义了一个创建对象的抽象方法, 由子类决定要实例化的类。 工厂方法模式将对象的实例化推迟到子类
工厂方法模式应用案例
项目需求:披萨项目新的需求: 客户在点披萨时, 可以点不同口味的披萨, 比如 北京的奶酪 pizza、 北京的胡椒 pizza 或者是伦敦的奶酪 pizza、 伦敦的胡椒 pizza

Pizza:抽象父类,和之前的定义一样
/** 将Pizza 做成抽象类
 * @author compass
 * @version 1.0
 * @date 2021-07-06 14:51
 */
public abstract class Pizza {
    protected  String name;

    // 准备披萨 因为不太的披萨会有不同的原材料 所以做成抽象方法
    public abstract void prepare();

    public void bake(){
        System.out.println(name+":开始烘烤");
    }

    public void cut(){
        System.out.println(name+":开始切割");
    }

    public void box(){
        System.out.println(name+":开始包装");
    }

    public String getName() {
        return name;
    }

    public void setName(String name) {
        this.name = name;
    }
}
BJCheesePizza:北京的奶酪披萨
/**
 * @author compass
 * @version 1.0
 * @date 2021-07-06 14:55
 */
public class BJCheesePizza extends Pizza {
    @Override
    public void prepare() {
        setName("北京的奶酪pizza");
        System.out.println("北京的奶酪pizza 准备原材料");
    }


}
BJPepperPizza:北京的胡椒披萨
/**
 * @author compass
 * @version 1.0
 * @date 2021-07-06 14:54
 */
public class BJPepperPizza extends Pizza {
    @Override
    public void prepare() {
        setName("北京的胡椒pizza");
        System.out.println("北京的胡椒pizza 准备原材料");
    }


}
LDCheesePizza:伦敦的奶酪披萨
/**
 * @author compass
 * @version 1.0
 * @date 2021-07-06 14:54
 */
public class LDCheesePizza extends Pizza {
    @Override
    public void prepare() {
        setName("伦敦的奶酪pizza");
        System.out.println("伦敦的奶酪pizza 准备原材料");
    }

}
LDPepperPizza:伦敦的胡椒披萨
/**
 * @author compass
 * @version 1.0
 * @date 2021-07-06 14:55
 */
public class LDPepperPizza extends Pizza {
    @Override
    public void prepare() {
        setName("伦敦的胡椒pizza");
        System.out.println("伦敦的胡椒pizza 准备原材料");
    }


}
OrderPizza:含有抽象方法的工厂父类,其抽象方法待子类去实现
import java.util.HashMap;

/**  披萨商店
 * @author compass
 * @version 1.0
 * @date 2021-07-06 14:57
 */
public abstract class OrderPizza {

    // 定义一个抽象方法,createPizza , 让各个工厂子类自己实现
    abstract Pizza createPizza(Class<?> pizzaClazz );

    /**
    * 默认实现创建披萨的方式
    * @param pizzaClazz
    * @return compass.token.pocket.com.service.demo.Pizza
    * @author compass
    * @date 2022/10/4 14:22
    * @since 1.0.0
    **/
    public Pizza createDefaultPizza(Class<?> pizzaClazz ){
        Pizza pizza;
        if (pizzaClazz==null){
            throw new RuntimeException("pizzaClazz不能为空");
        }
        try {
            pizza = (Pizza)pizzaClazz.newInstance();
        } catch (InstantiationException | IllegalAccessException e) {
            e.printStackTrace();
            throw new RuntimeException("pizza创建失败");
        }
        // 此时披萨商店获取到了对应的披萨工厂,开始制作披萨
        pizza.prepare();
        pizza.bake();
        pizza.cut();
        pizza.box();
        return pizza;
    }

    /**
    * 创建指定类型的工厂
    * @param OrderFactoryClazz  工厂类型
    * @param pizzaClazz  披萨类型
    * @return compass.token.pocket.com.service.demo.OrderPizza
    * @author compass
    * @date 2022/10/4 14:28
    * @since 1.0.0
    **/
    public static Pizza getPizza(Class<?> OrderFactoryClazz,Class<?> pizzaClazz){
        HashMap<Class<?>, OrderPizza> map = new HashMap<>();
        map.put(BJOrderFactory.class,new BJOrderFactory());
        map.put(LDOrderFactory.class,new LDOrderFactory());
         return  map.get(OrderFactoryClazz).createDefaultPizza(pizzaClazz);
    }


}
- BJOrderFactory:北京披萨的生产工厂
/**
 * @author compass
 * @version 1.0
 * @date 2021-07-06 17:57
 */
public class BJOrderFactory  extends OrderPizza{


    /**
     * 根据传递的class类型决定做什么类型的披萨
     * @param pizzaClazz
     * @author compass
     * @date 2022/10/4 14:04
     * @since 1.0.0
     **/
    public Pizza  createPizza(Class<?> pizzaClazz ){
       return null;
    }

    @Override
    public Pizza createDefaultPizza(Class<?> pizzaClazz) {
        return super.createDefaultPizza(pizzaClazz);
    }
}
- LDOrderFactory:伦敦披萨的生产工厂
/**
 * @author compass
 * @version 1.0
 * @date 2021-07-06 17:57
 */
public class LDOrderFactory   extends OrderPizza{

    /**
     * 根据传递的class类型决定做什么类型的披萨
     * @param pizzaClazz
     * @author compass
     * @date 2022/10/4 14:04
     * @since 1.0.0
     **/
    public Pizza  createPizza(Class<?> pizzaClazz ){
      return null;
    }

    @Override
    public Pizza createDefaultPizza(Class<?> pizzaClazz) {
        return super.createDefaultPizza(pizzaClazz);
    }

}
- PizzaStore:相当于客户端,发出订购披萨的请求
/**
 * @author compass
 * @date 2022-10-04
 * @since 1.0
 **/
public class PizzaStore {
    public static void main(String[] args) {
        // 调用者只需要告诉我,你需要那个工厂,需要制作披萨的口味类型是什么即可
        Pizza pizza = OrderPizza.getPizza(BJOrderFactory.class, BJPepperPizza.class);
        System.out.println(pizza);
    }
}
3.抽象工厂模式
抽象工厂模式的基本介绍
- 抽象工厂模式: 定义了一个 interface 用于创建相关或有依赖关系的对象簇, 而无需指明具体的类
- 抽象工厂模式可以将简单工厂模式和工厂方法模式进行整合。
- 从设计层面看, 抽象工厂模式就是对简单工厂模式的改进(或者称为进一步的抽象)。
- 将工厂抽象成两层, AbsFactory(抽象工厂) 和 具体实现的工厂子类。 程序员可以根据创建对象类型使用对应的工厂子类。 这样将单个的简单工厂类变成了工厂簇, 更利于代码的维护和扩展。
抽象工厂模式的案例

使用抽象工厂模式来完成披萨项目
代码实现
Pizza抽象父类以及Pizza 的子类和上面一样
AbsFactory:工厂抽象层,定义制造 Bean 的抽象方法
/**
 * 抽象工厂接口,定义创建披萨的方法,具体实现由具体工厂实现,不创建具体产品
 * @author compass
 * @date 2022-10-04
 * @since 1.0
 **/
public  interface AbsPizzaFactory {


    /**
    * 定义创建披萨的抽象方法,由具体工厂去实现(提供默认实现)
    * @param pizzaClazz 需要创建的披萨类型
    * @return compass.token.pocket.com.service.demo.Pizza
    * @author compass
    * @date 2022/10/4 14:48
    * @since 1.0.0
    **/
   default Pizza createPizza(Class<?> pizzaClazz){
       Pizza pizza;
       if (pizzaClazz==null){
           throw new RuntimeException("pizzaClazz不能为空");
       }
       try {
           pizza = (Pizza)pizzaClazz.newInstance();
       } catch (InstantiationException | IllegalAccessException e) {
           e.printStackTrace();
           throw new RuntimeException("pizza创建失败");
       }
       // 此时披萨商店获取到了对应的披萨工厂,开始制作披萨
       pizza.prepare();
       pizza.bake();
       pizza.cut();
       pizza.box();
       return pizza;
   }
}
BJFactory:北京工厂子类(提供方),负责制造北京各种口味的 Pizza
/**
 * 北京工厂子类(提供方),负责制造北京各种口味的 Pizza
 * @author compass
 * @date 2022-10-04
 * @since 1.0
 **/
public class BJFactory  implements AbsPizzaFactory{
    private BJFactory(){}

    private  static  volatile  AbsPizzaFactory single ;

    // 提供静态的构造方法,在外部访问对象
    public static  AbsPizzaFactory getInstance(){
        if (single==null){
            // 解决多线程下安全问题
            synchronized(BJFactory.class){
                if (single==null){
                    single=new BJFactory();
                }
            }

        }
        return single;
    }

}
LDFactory:伦敦工厂子类(提供方),负责制造伦敦各种口味的 Pizza
/**
 * 伦敦工厂子类(提供方),负责制造伦敦各种口味的 Pizza
 * @author compass
 * @date 2022-10-04
 * @since 1.0
 **/
public class LDFactory  implements AbsPizzaFactory {

    private LDFactory(){}

    private  static  volatile  AbsPizzaFactory single ;

    // 提供静态的构造方法,在外部访问对象
    public static  AbsPizzaFactory getInstance(){
        if (single==null){
            // 解决多线程下安全问题
            synchronized(LDFactory.class){
                if (single==null){
                    single=new LDFactory();
                }
            }

        }
        return single;
    }
}
OrderPizza:使用方,负责消费 Pizza
import java.util.HashMap;

/**  披萨商店
 * @author compass
 * @version 1.0
 * @date 2021-07-06 14:57
 */
public abstract class OrderPizza {

    /**
    * 创建指定类型工厂,使用指定类型工厂创建出指定类型的pizza
    * @param OrderFactoryClazz  工厂类型
    * @param pizzaClazz  披萨类型
    * @return compass.token.pocket.com.service.demo.OrderPizza
    * @author compass
    * @date 2022/10/4 14:28
    * @since 1.0.0
    **/
    public static Pizza getPizza(Class<?> OrderFactoryClazz,Class<?> pizzaClazz){
        HashMap<Class<?>, AbsPizzaFactory> map = new HashMap<>();
        map.put(BJFactory.class, LDFactory.getInstance());
        map.put(LDFactory.class, LDFactory.getInstance());
        Pizza pizza = map.get(OrderFactoryClazz).createPizza(pizzaClazz);
        map.clear();
        return pizza;
    }

}
PizzaStore:客户端,发出订购披萨的请求
public class PizzaStore {
    public static void main(String[] args) {
        Pizza pizza = OrderPizza.getPizza(BJFactory.class, BJPepperPizza.class);
        System.out.println(pizza);
    }
}
抽象工厂模式总结
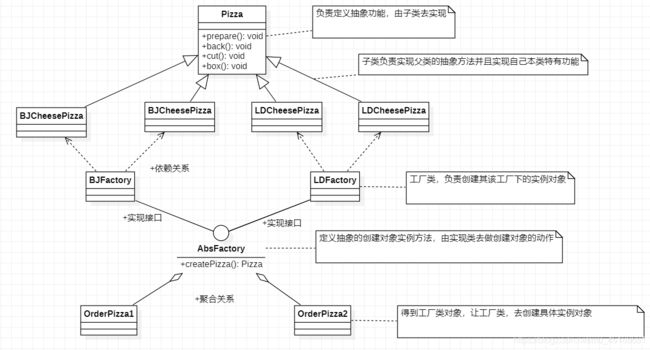
- AbsFactory 仍然是简单工厂(简单工厂模式),但是工厂方法的具体实现需下沉到各个工厂子类(工厂方法模式),所以说抽象工厂模式可以将简单工厂模式和工厂方法模式进行整合。
- 抽象工厂模式分为两层:抽象层和实现层。AbsFactory 作为工厂抽象层,只对工厂规范进行定义,其具体的实现交由工厂子类
- 简单工厂模式很难满足对多种不同类型的 Bean 进行创建,所以我们使用抽象工厂模式,定义一个工厂抽象层,但具体实现需下沉到各个工厂子类
4.JDK Calendar
JDK Calendar 中使用到了简单工厂模式
/**
 * @author compass
 * @version 1.0
 * @date 2021-07-06 22:14
 */
public class Test {


        public static void main(String[] args) {

            // getInstance 是 Calendar 静态方法
            Calendar cal = Calendar.getInstance();
            // 注意月份下标从0开始,所以取月份要+1
            System.out.println("年:" + cal.get(Calendar.YEAR));
            System.out.println("月:" + (cal.get(Calendar.MONTH) + 1));
            System.out.println("日:" + cal.get(Calendar.DAY_OF_MONTH));
            System.out.println("时:" + cal.get(Calendar.HOUR_OF_DAY));
            System.out.println("分:" + cal.get(Calendar.MINUTE));
            System.out.println("秒:" + cal.get(Calendar.SECOND));


    }

}
Calendar.getInstance() 方法的实现
/**
 * Gets a calendar using the default time zone and locale. The
 * Calendar returned is based on the current time
 * in the default time zone with the default
 * {@link Locale.Category#FORMAT FORMAT} locale.
 *
 * @return a Calendar.
 */
public static Calendar getInstance()
{
    return createCalendar(TimeZone.getDefault(), Locale.getDefault(Locale.Category.FORMAT));
}
createCalendar() 方法的实现:如果 provider == null,就会根据 caltype 的值,来创建具体的工厂子类对象
private static Calendar createCalendar(TimeZone zone,
                                       Locale aLocale)
{
    CalendarProvider provider =
        LocaleProviderAdapter.getAdapter(CalendarProvider.class, aLocale)
                             .getCalendarProvider();
    if (provider != null) {
        try {
            return provider.getInstance(zone, aLocale);
        } catch (IllegalArgumentException iae) {
            // fall back to the default instantiation
        }
    }

    Calendar cal = null;

    if (aLocale.hasExtensions()) {
        String caltype = aLocale.getUnicodeLocaleType("ca");
        if (caltype != null) {
            switch (caltype) {
            case "buddhist":
            cal = new BuddhistCalendar(zone, aLocale);
                break;
            case "japanese":
                cal = new JapaneseImperialCalendar(zone, aLocale);
                break;
            case "gregory":
                cal = new GregorianCalendar(zone, aLocale);
                break;
            }
        }
    }
    if (cal == null) {
        // If no known calendar type is explicitly specified,
        // perform the traditional way to create a Calendar:
        // create a BuddhistCalendar for th_TH locale,
        // a JapaneseImperialCalendar for ja_JP_JP locale, or
        // a GregorianCalendar for any other locales.
        // NOTE: The language, country and variant strings are interned.
        if (aLocale.getLanguage() == "th" && aLocale.getCountry() == "TH") {
            cal = new BuddhistCalendar(zone, aLocale);
        } else if (aLocale.getVariant() == "JP" && aLocale.getLanguage() == "ja"
                   && aLocale.getCountry() == "JP") {
            cal = new JapaneseImperialCalendar(zone, aLocale);
        } else {
            cal = new GregorianCalendar(zone, aLocale);
        }
    }
    return cal;
}
5.工厂模式小结
工厂模式的意义:将实例化对象的代码提取出来,放到一个类中统一管理和维护,达到和主项目的依赖关系的解耦。从而提高项目的扩展和维护性。
三种工厂模式
简单工厂模式
工厂方法模式
抽象工厂模式
设计模式的依赖抽象原则
- 创建对象实例时,不要直接 new 这个类,而是把这个new 类的动作放在一个工厂的方法中,并返回。有的书上说,变量不要直接持有具体类的引用。这样做的好处是:我们依赖的是一个抽象层(缓冲层),如果之后有什么变动,修改工厂类中的代码即可
- 不要让类继承具体类,而是继承抽象类或者是实现interface(接口)
不要覆盖基类中已经实现的方法
关于工厂模式,我之前也有一篇博客,这个老师讲的感觉创建对象的方式不太灵活,还需要改动代码,我这个,不需要改动任何代码,只需要你将需要创建的对象的类型传入即可,灵活性更强,是基于java的反射机制和泛型写的。
一句话: 不要面向具体编程,需要面向抽象编程,这样扩展性强,使用对象不要直接new,而是在中间加一层,让工厂类去代替你做new对象的这个动作,如果你手动去new,将来你的代码改动会比较大,变量不要直接持有具体类的引用
地址:java工厂模式
3.原型模式
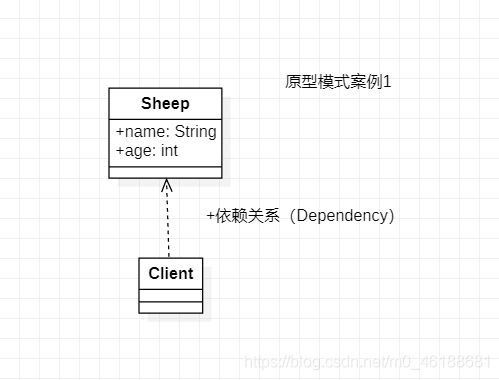
1.克隆羊问题
克隆羊问题描述
现在有一只羊tom, 姓名为: tom,年龄为: 20, 颜色为:白色,请编写程序创建和tom羊属性完全相同的10只羊
传统模式解决克隆羊问题
 代码实现:
代码实现:
Sheep:绵羊类
/** 原型模式: 创建一个绵羊对象 然后克隆该对象10个
 * @author compass
 * @version 1.0
 * @date 2021-07-06 23:28
 */
public class Sheep {

    private int age;
    private String name;
    private String color;

    public Sheep(int age, String name,String color) {
        this.age = age;
        this.name = name;
        this.color=color;
    }


    public Sheep() {
    }


    public int getAge() {
        return age;
    }

    public void setAge(int age) {
        this.age = age;
    }

    public String getName() {
        return name;
    }

    public void setName(String name) {
        this.name = name;
    }

    public String getColor() {
        return color;
    }

    public void setColor(String color) {
        this.color = color;
    }

    @Override
    public String toString() {
        return "Sheep{" +
                "age=" + age +
                ", name='" + name + '\'' +
                ", color='" + color + '\'' +
                '}';
    }


}
Client:客户端(调用者)
/**
 * @author compass
 * @version 1.0
 * @date 2021-07-06 23:29
 */
public class Client  {
    public static void main(String[] args) {
        Sheep sheep1 = new Sheep(20,"tom","white");
        // 克隆出10个对象当如到ArrayList集合中
        ArrayList<Object> arrayList = new ArrayList<>(10);
        for (int i =0;i<9;i++){
            arrayList.add(new Sheep(20,"tom","white"));
        }
        arrayList.add(sheep1);

        arrayList.forEach(System.out::println);

    }
}
传统的方式的优缺点
- 优点是比较好理解,简单易操作
- 在创建新的对象时, 总是需要重新获取原始对象的属性,如果创建的对象比较复杂时,效率较低
- 总是需要重新初始化对象,而不是动态地获得对象运行时的状态,不够灵活
改进思路
Java中Object类是所有类的根类, Object类提供了一个clone()方法,该方法可以将一个Java对象复制一份,但是需要实现clone的Java类必须要实现一个接口Cloneable,该接口表示该类能够复制且具有复制的能力 --> 原型模式
2.原型模式的介绍
- 原型模式(Prototype模式)是指:用原型实例指定创建对象的种类,并且通过拷贝这些原型, 创建新的对象
- 原型模式是一种创建型设计模式,允许一个对象在创建另外一个可定制的对象,无需知道如何创建的细节
- 工作原理是:通过将一个原型对象传给那个要发动创建的对象,这个要发动创建的对象通过请求原型对象拷贝它们自己来实施创建,即 对象.clone()
- 形象的理解:
就是传入一个对象,复制一份新的这个对象出来
Prototype :原型类,在该类中声明一个克隆自己的接口
ConcretePrototype :具体的原型类,实现一个克隆自己的操作
Client :让一个原型对象克隆自己,从而创建一个新的对象(属性一样)
4.原型模式代码示例
原型模式解决克隆羊问题的应用实例:使用原型模式改进传统方式,让程序具有更高的效率和扩展性
Sheep :绵羊实体
/** 原型模式: 实现Cloneable接口 让本类的实例对象可克隆
 * @author compass
 * @version 1.0
 * @date 2021-07-06 23:28
 */
public class Sheep implements Cloneable {

    private int age;
    private String name;
    private String color;

    public Sheep(int age, String name,String color) {
        this.age = age;
        this.name = name;
        this.color=color;
    }

    // 重写克隆方法 返回的是一个新的对象
    @Override
    protected Object clone()   {
        Sheep sheep=null;
        try {
             sheep =(Sheep) super.clone();
        } catch (CloneNotSupportedException e) {
            System.out.println( e.getMessage());
        }
        return sheep;
    }

    public Sheep() {

    }


    public int getAge() {
        return age;
    }

    public void setAge(int age) {
        this.age = age;
    }

    public String getName() {
        return name;
    }

    public void setName(String name) {
        this.name = name;
    }

    public String getColor() {
        return color;
    }

    public void setColor(String color) {
        this.color = color;
    }

    @Override
    public String toString() {
        return "Sheep{" +
                "age=" + age +
                ", name='" + name + '\'' +
                ", color='" + color + '\'' +
                '}';
    }


}
Client : 客户端(调用者)
/**
 * @author compass
 * @version 1.0
 * @date 2021-07-06 23:29
 */
public class Client  {
    public static void main(String[] args) {
        Sheep sheep1 = new Sheep(20,"tom","white");
        Sheep sheep2 = (Sheep)sheep1.clone();
        Sheep sheep3 = (Sheep)sheep1.clone();
        System.out.println(sheep1==sheep2);
        System.out.println("sheep1 hashCode="+sheep1.hashCode());
        System.out.println("sheep2 hashCode="+sheep2.hashCode());
        System.out.println("sheep3 hashCode="+sheep3.hashCode());


    }
}
5.深拷贝与浅拷贝
浅拷贝的介绍
对于数据类型是基本数据类型的成员变量,浅拷贝会直接进行值传递,也就是将该属性值复制一份给新的对象- 对于数据类型是引用数据类型的成员变量,比如说成员变量是某个数组、某个类的对象等,那么浅拷贝会进行引用传递,也就是只是将该成员变量的引用值(内存地址)复制一份给新的对象。因为实际上两个对象的该成员变量都指向同一个实例。在这种情况下,在一个对象中修改该成员变量会影响到另一个对象的该成员变量值
前面我们克隆羊就是浅拷贝,浅拷贝是使用默认的clone()方法来实现:sheep = (Sheep) super.clone();
深拷贝基本介绍
- 复制对象的所有基本数据类型的成员变量值
- 为所有引用数据类型的成员变量申请存储空间,并复制每个引用数据类型成员变量所引用的对象,直到该对象可达的所有对象。也就是说,对象进行深拷贝要对整个对象进行拷贝
- 深拷贝实现方式 1:重写clone方法来实现深拷贝
- 深拷贝实现方式 2:通过对象序列化实现深拷贝(推荐)
DeepCloneableTarget:
import java.io.*;

/**
 * @author compass
 * @version 1.0
 * @date 2021-07-06 23:29
 */
public class DeepProtoType implements Serializable, Cloneable {

    private static final long serialVersionUID = -9181359624793979485L;
    // String 属性
    private String name;
    private DeepCloneableTarget deepCloneableTarget;

    public DeepProtoType(String name, DeepCloneableTarget deepCloneableTarget) {
        this.name = name;
        this.deepCloneableTarget = deepCloneableTarget;
    }

    public DeepProtoType() {
        super();
    }

    // 深拷贝 - 方式 1 使用clone 方法
    @Override
    protected DeepProtoType clone() throws CloneNotSupportedException {
        Object deep = null;

        // 这里完成对基本数据类型(属性)和String的克隆
        deep = super.clone();
        DeepProtoType deepProtoType = (DeepProtoType) deep;
        // 对引用类型的属性,进行单独处理
        deepProtoType.deepCloneableTarget = deepCloneableTarget.clone();

        return deepProtoType;
    }

    // 深拷贝 - 方式2 通过对象的序列化实现 (推荐)
    public DeepProtoType deepClone() {
        // 创建流对象
        ByteArrayOutputStream bos = null;
        ObjectOutputStream oos = null;
        ByteArrayInputStream bis = null;
        ObjectInputStream ois = null;

        try {
            // 序列化
            bos = new ByteArrayOutputStream();
            oos = new ObjectOutputStream(bos);
            oos.writeObject(this); // 当前这个对象以对象流的方式输出

            // 反序列化
            bis = new ByteArrayInputStream(bos.toByteArray());
            ois = new ObjectInputStream(bis);
            DeepProtoType copyObj = (DeepProtoType) ois.readObject(); // 从流中读入对象

            return copyObj;
        } catch (Exception e) {

            e.printStackTrace();
            return null;
        } finally {
            // 关闭流
            try {
                if (bos!=null){
                    bos.close();

                }
                if (oos!=null){
                    oos.close();

                }
                if (bis!=null){
                    bis.close();

                }
                if (ois!=null){
                    ois.close();

                }
            } catch (Exception e2) {
                System.out.println(e2.getMessage());
            }
        }
    }


    public String getName() {
        return name;
    }

    public void setName(String name) {
        this.name = name;
    }

    public DeepCloneableTarget getDeepCloneableTarget() {
        return deepCloneableTarget;
    }

    public void setDeepCloneableTarget(DeepCloneableTarget deepCloneableTarget) {
        this.deepCloneableTarget = deepCloneableTarget;
    }

    @Override
    public String toString() {
        return "DeepProtoType{" +
                "name='" + name + '\'' +
                ", deepCloneableTarget=" + deepCloneableTarget +
                '}';
    }
}
DeepProtoType :
/**
 * @author compass
 * @version 1.0
 * @date 2021-07-06 23:29
 */
public class DeepProtoType implements Serializable, Cloneable {

    public String name; // String 属性
    public DeepCloneableTarget deepCloneableTarget;// 引用类型

    public DeepProtoType() {
        super();
    }

    // 深拷贝 - 方式 1 使用clone 方法
    @Override
    protected Object clone() throws CloneNotSupportedException {
        Object deep = null;

        // 这里完成对基本数据类型(属性)和String的克隆
        deep = super.clone();
        DeepProtoType deepProtoType = (DeepProtoType) deep;
        // 对引用类型的属性,进行单独处理
        deepProtoType.deepCloneableTarget = (DeepCloneableTarget) deepCloneableTarget.clone();

        return deepProtoType;
    }

    // 深拷贝 - 方式2 通过对象的序列化实现 (推荐)
    public Object deepClone() {
        // 创建流对象
        ByteArrayOutputStream bos = null;
        ObjectOutputStream oos = null;
        ByteArrayInputStream bis = null;
        ObjectInputStream ois = null;

        try {
            // 序列化
            bos = new ByteArrayOutputStream();
            oos = new ObjectOutputStream(bos);
            oos.writeObject(this); // 当前这个对象以对象流的方式输出

            // 反序列化
            bis = new ByteArrayInputStream(bos.toByteArray());
            ois = new ObjectInputStream(bis);
            DeepProtoType copyObj = (DeepProtoType) ois.readObject(); // 从流中读入对象

            return copyObj;
        } catch (Exception e) {

            e.printStackTrace();
            return null;
        } finally {
            // 关闭流
            try {
                bos.close();
                oos.close();
                bis.close();
                ois.close();
            } catch (Exception e2) {
                System.out.println(e2.getMessage());
            }
        }
    }

}
6.原型模式注意事项
原型模式的注意事项和细节
- 创建新的对象比较复杂时,可以利用原型模式简化对象的创建过程,同时也能够提高效率
- 不用重新初始化对象,可以动态地获得对象运行时的状态
- 如果原始对象发生变化(增加或者减少属性),其它克隆对象的也会发生相应的变化,无需修改代码
- 在实现深克隆的时候可能需要比较复杂的代码,其实使用序列化机制实现克隆的代码也不难
- 缺点:需要为每一个类配备一个克隆方法,这对全新的类来说不是很难,但对已有的类进行改造时,需要修改其源代码,违背了ocp 原则
4.建造者模式
1.盖房项目实际需求
- 需要建房子:这一过程为打桩、 砌墙、封顶
- 房子有各种各样的,比如普通房,高楼,别墅,各种房子的过程虽然一样,但是各自实现的细节不同

代码实现:
AbstractHouse:房子的抽象父类,指定建造房子的规范,以及建造房子的具体流程
/** 建造者模式 :传统方式
 * @author compass
 * @version 1.0
 * @date 2021-07-07 11:13
 */
public abstract class AbstractHouse {
    /**
     * 打地基
     */
   public abstract void buildBasic();

    /**
     * 砌墙
     */
    public abstract void buildWalls();

    /**
     * 封顶
     */
    public abstract void  roofed();

    public void build(){
        buildBasic();
        buildWalls();
        roofed();
    }
}
CommonHouse:普通房子,继承 AbstractHouse 类,实现了建造房子中各个步骤的具体细节
/**
 * @author compass
 * @version 1.0
 * @date 2021-07-07 11:16
 */
public class CommonHouse extends AbstractHouse {
    /**
     * 打地基
     */
    @Override
    public void buildBasic() {
        System.out.println("普通房顶打地基");
    }

    /**
     * 砌墙
     */
    @Override
    public  void buildWalls() {
        System.out.println("普通房顶打地基");
    }

    /**
     * 封顶
     */
    @Override
    public  void roofed() {
        System.out.println("普通房顶打封顶");
    }
}
HighBuilding:高楼大厦,继承 AbstractHouse 类,实现了建造房子中各个步骤的具体细节
/**
 * @author compass
 * @version 1.0
 * @date 2021-07-07 11:26
 */
public class HighHouse extends  AbstractHouse{
    /**
     * 打地基
     */
    @Override
    public void buildBasic() {
        System.out.println("高级房子打地基");
    }

    /**
     * 砌墙
     */
    @Override
    public void buildWalls() {
        System.out.println("高级房子砌墙");
    }

    /**
     * 封顶
     */
    @Override
    public void roofed() {
        System.out.println("高级房子封顶");
    }
}
传统方式优缺点分析
- 优点是比较好理解,简单易操作。
- 设计的程序结构,过于简单,没有设计缓存层对象,程序的扩展和维护不好,也就是说,这种设计方案,把产品(即:房子) 和创建产品的过程(即:建房子流程) 封装在一起,代码耦合性增强了。
- 解决方案:将产品和产品建造过程解耦 --> 建造者模式
2.建造者模式基本介绍
- 建造者模式(Builder Pattern) 又叫生成器模式,是一种对象构建模式。它可以将复杂对象的建造过程抽象出来(抽象类别),使这个抽象过程的不同实现方法可以构造出不同表现(属性)的对象。
- 建造者模式是一步一步创建一个复杂的对象,它允许用户只通过指定复杂对象的类型和内容就可以构建它们,用户不需要知道内部的具体构建细节。
- 实际应用场景:建造房子、组装车辆
3.建造者模式的四个角色
Product(产品角色): 一个具体的产品对象Builder(抽象建造者): 创建一个Product对象的抽象接口(或抽象类),抽象建造者主要负责规范建造的流程,不关心具体的建造细节
3.ConcreteBuilder(具体建造者): 实现接口,构建和装配各个部件,具体建造者负责实现具体的建造细节Director(指挥者): 构建一个使用Builder接口的具体实现类的对象。它主要是用于创建一个复杂的对象。它主要有两个作用,一是:隔离了客户与对象的生产过程,二是:负责控制产品对象的生产过程
建造者模式UML类图
Product(产品类):一个具体的产品Builder(抽象建造者):Builder 中组合了一个 Product 实例ConcreteBuilder(具体建造者):实现了 Builder 中的抽象方法Director(指挥者):将 Builder 的具体实现类聚合到 Director 中,在 Director 中调用具体的 Builder 完成具体产品的制造
4.建造者模式解决盖房问题
案例需求
需要建房子:这一过程为打桩、 砌墙、封顶。不管是普通房子也好,别墅也好都需要经历这些过程, 下面我们使用建造者模式(Builder Pattern)来完成

代码实现
House:产品类
package compass.token.pocket.com.service.demo;


/** 建造者模式
 * @author compass
 * @version 1.0
 * @date 2021-07-07 15:17
 */
public class House {
    private String base;
    private String wall;
    private String roofed;

    public House(String base, String wall, String roofed) {
        this.base = base;
        this.wall = wall;
        this.roofed = roofed;
    }

    public House() {
    }

    public String getBase() {
        return base;
    }

    public void setBase(String base) {
        this.base = base;
    }

    public String getWall() {
        return wall;
    }

    public void setWall(String wall) {
        this.wall = wall;
    }

    public String getRoofed() {
        return roofed;
    }

    public void setRoofed(String roofed) {
        this.roofed = roofed;
    }

    @Override
    public String toString() {
        return "House{" +
                "base='" + base + '\'' +
                ", wall='" + wall + '\'' +
                ", roofed='" + roofed + '\'' +
                '}';
    }
}
HouseBuilder:抽象建造者,规定制造房子的规范,并提供 buildHouse() 方法返回制造好的房子(产品)
package compass.token.pocket.com.service.demo;
/**
 * @author compass
 * @version 1.0
 * @date 2021-07-07 15:30
 */
public class HighBuilding extends HouseBuilder {
    /**
     * 打地基
     */
    @Override
    public void buildBasic(String basic) {
        super.build().setBase(basic);
        System.out.println("高楼房子打地基");
    }

    /**
     * 砌墙
     */
    @Override
    public void buildWall(String wall) {
        super.build().setWall(wall);
        System.out.println("高楼房子砌墙");
    }

    /**
     * 封顶
     */
    @Override
    public void roofed(String fed) {
        super.build().setRoofed(fed);
        System.out.println("高楼房子封顶");
    }


}
CommonHouse:具体建造者,负责建造普通房子,重写父类 HouseBuilder 中的抽象方法来指定普通房子的建造细节
package compass.token.pocket.com.service.demo;


/**
 * @author compass
 * @version 1.0
 * @date 2021-07-07 15:21
 */
public class CommonHouse extends HouseBuilder {

    /**
     * 打地基
     */
    @Override
    public void buildBasic() {
        super.build().setBase("普通地基");
        System.out.println("普通房子打地基");
    }

    /**
     * 砌墙
     */
    @Override
    public void buildWall() {
        super.build().setWall("普通墙");
        System.out.println("普通房子砌墙");
    }

    /**
     * 封顶
     */
    @Override
    public void roofed( ) {
        super.build().setRoofed("普通封顶");
        System.out.println("普通房子封顶");
    }
}
HighBuilding:具体建造者,负责建造高楼大厦,重写父类 HouseBuilder 中的抽象方法来指定高楼大厦的建造细节
package compass.token.pocket.com.service.demo;
/**
 * @author compass
 * @version 1.0
 * @date 2021-07-07 15:30
 */
public class HighBuilding extends HouseBuilder {
    /**
     * 打地基
     */
    @Override
    public void buildBasic() {
        super.build().setBase("高楼地基");
        System.out.println("高楼房子打地基");
    }

    /**
     * 砌墙
     */
    @Override
    public void buildWall() {
        super.build().setWall("高楼墙");
        System.out.println("高楼房子砌墙");
    }

    /**
     * 封顶
     */
    @Override
    public void roofed( ) {
        super.build().setRoofed("高楼封顶");
        System.out.println("高楼房子封顶");
    }


}
HouseDirector:指挥者,指挥具体的 Builder 对象制造产品,可指定制造产品的流程
package compass.token.pocket.com.service.demo;

/**
 * @author compass
 * @version 1.0
 * @date 2021-07-07 15:18
 */
public abstract class HouseBuilder {

    private static final House house = new House();

    /**
     * 打地基
     */
    public abstract void buildBasic();

    /**
     * 砌墙
     */
    public abstract void buildWall();

    /**
     * 封顶
     */
    public abstract void roofed();

    /**
     * 将House 构建好之后就返回
     *
     * @return
     */
    public House build() {
        return house;
    }

    /**
     * 根据传入指定的构建者实现实现 完成构建
     * @param buildTypeClazz 需要使用的的构建者实现类型
     * @return compass.token.pocket.com.service.demo.House
     * @author compass
     * @date 2022/10/4 19:03
     * @since 1.0.0
     **/
    public static final House buildUtil(Class<?> buildTypeClazz) {
        HouseBuilder newInstance = null;
        try {
            newInstance = (HouseBuilder) buildTypeClazz.newInstance();
        } catch (InstantiationException | IllegalAccessException e) {
            e.printStackTrace();
        }
        HouseDirector director = new HouseDirector(newInstance);
        return director.construct();
    }


}
Client:客户端,发出建造房子的命令
/**
 * @author compass
 * @date 2022-10-04
 * @since 1.0
 **/
public class Main {
    public static void main(String[] args)  {
        House house = HouseBuilder.buildUtil(CommonHouse.class);
        System.out.println(house);
    }
}
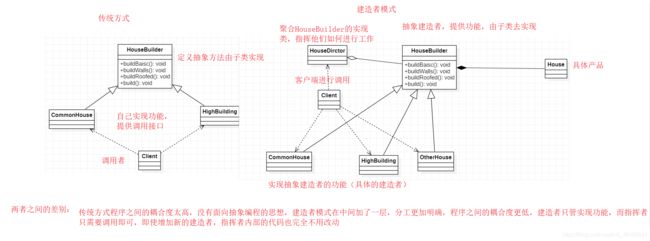
总结
-
Housebuilder是抽象建造者,提供需要实现的功能,并且组合了产品House -
CommonHouse和HighHouse继承自HouseBuilder,并且实现父类的方法
-
HouseDirector中聚合了Housebuilder,也就是说只要是Housebuilder的子类,他都可以进行指挥调用。 -
Client只需要去调用HouseDirector(传入具体的建造者,让指挥者去调用建造者即可)
5.JDK StringBuilder
StringBuilder 的 append() 方法:调用父类AbstractStringBuilder 的 append() 方法
AbstractStringBuilder 的 append() 方法是由Appendable接口定义的规范
Appendable 接口:定义了 append() 方法的规范,相当于是一个抽象的建造者
源码中建造者模式角色分析
- Appendable 接口定义了多个 append() 方法(抽象方法),即
Appendable 为抽象建造者,定义了制造产品的抽象方法(规范),抽象定义了 append方法能做的事情
public interface Appendable {


    Appendable append(CharSequence csq) throws IOException;


    Appendable append(CharSequence csq, int start, int end) throws IOException;

    Appendable append(char c) throws IOException;
}
- AbstractStringBuilder 实现了 Appendable 接口方法,这里的 AbstractStringBuilder 已经是
建造者,只是不能实例化
abstract class AbstractStringBuilder implements Appendable, CharSequence {
    /**
     * The value is used for character storage.
     */
    char[] value;

    /**
     * The count is the number of characters used.
     */
    int count;

    /**
     * This no-arg constructor is necessary for serialization of subclasses.
     */
    AbstractStringBuilder() {
    }

    /**
     * Creates an AbstractStringBuilder of the specified capacity.
     */
    AbstractStringBuilder(int capacity) {
        value = new char[capacity];
    }

    /**
     * Returns the length (character count).
     *
     * @return  the length of the sequence of characters currently
     *          represented by this object
     */
    @Override
    public int length() {
        return count;
    }


    public AbstractStringBuilder append(Object obj) {
        return append(String.valueOf(obj));
    }

    public AbstractStringBuilder append(String str) {
        if (str == null)
            return appendNull();
        int len = str.length();
        ensureCapacityInternal(count + len);
        str.getChars(0, len, value, count);
        count += len;
        return this;
    }

    // Documentation in subclasses because of synchro difference
    public AbstractStringBuilder append(StringBuffer sb) {
        if (sb == null)
            return appendNull();
        int len = sb.length();
        ensureCapacityInternal(count + len);
        sb.getChars(0, len, value, count);
        count += len;
        return this;
    }

    /**
     * @since 1.8
     */
    AbstractStringBuilder append(AbstractStringBuilder asb) {
        if (asb == null)
            return appendNull();
        int len = asb.length();
        ensureCapacityInternal(count + len);
        asb.getChars(0, len, value, count);
        count += len;
        return this;
    }

    // Documentation in subclasses because of synchro difference
    @Override
    public AbstractStringBuilder append(CharSequence s) {
        if (s == null)
            return appendNull();
        if (s instanceof String)
            return this.append((String)s);
        if (s instanceof AbstractStringBuilder)
            return this.append((AbstractStringBuilder)s);

        return this.append(s, 0, s.length());
    }

    private AbstractStringBuilder appendNull() {
        int c = count;
        ensureCapacityInternal(c + 4);
        final char[] value = this.value;
        value[c++] = 'n';
        value[c++] = 'u';
        value[c++] = 'l';
        value[c++] = 'l';
        count = c;
        return this;
    }


    public AbstractStringBuilder append(char[] str) {
        int len = str.length;
        ensureCapacityInternal(count + len);
        System.arraycopy(str, 0, value, count, len);
        count += len;
        return this;
    }


    public AbstractStringBuilder append(boolean b) {
        if (b) {
            ensureCapacityInternal(count + 4);
            value[count++] = 't';
            value[count++] = 'r';
            value[count++] = 'u';
            value[count++] = 'e';
        } else {
            ensureCapacityInternal(count + 5);
            value[count++] = 'f';
            value[count++] = 'a';
            value[count++] = 'l';
            value[count++] = 's';
            value[count++] = 'e';
        }
        return this;
    }


    @Override
    public AbstractStringBuilder append(char c) {
        ensureCapacityInternal(count + 1);
        value[count++] = c;
        return this;
    }


    public AbstractStringBuilder append(int i) {
        if (i == Integer.MIN_VALUE) {
            append("-2147483648");
            return this;
        }
        int appendedLength = (i < 0) ? Integer.stringSize(-i) + 1
                                     : Integer.stringSize(i);
        int spaceNeeded = count + appendedLength;
        ensureCapacityInternal(spaceNeeded);
        Integer.getChars(i, spaceNeeded, value);
        count = spaceNeeded;
        return this;
    }


    public AbstractStringBuilder append(long l) {
        if (l == Long.MIN_VALUE) {
            append("-9223372036854775808");
            return this;
        }
        int appendedLength = (l < 0) ? Long.stringSize(-l) + 1
                                     : Long.stringSize(l);
        int spaceNeeded = count + appendedLength;
        ensureCapacityInternal(spaceNeeded);
        Long.getChars(l, spaceNeeded, value);
        count = spaceNeeded;
        return this;
    }


    public AbstractStringBuilder append(float f) {
        FloatingDecimal.appendTo(f,this);
        return this;
    }


    public AbstractStringBuilder append(double d) {
        FloatingDecimal.appendTo(d,this);
        return this;
    }


}
- StringBuilder 既充当了
指挥者角色,同时充当了具体的建造者, 因为建造方法的实现是由 AbstractStringBuilder 完成,而 StringBuilder 继承了AbstractStringBuilder
public final class StringBuilder
    extends AbstractStringBuilder
    implements java.io.Serializable, CharSequence
{

   @Override
    public StringBuilder append(Object obj) {
        return append(String.valueOf(obj));
    }

    @Override
    public StringBuilder append(String str) {
        super.append(str);
        return this;
    }


    public StringBuilder append(StringBuffer sb) {
        super.append(sb);
        return this;
    }

    @Override
    public StringBuilder append(CharSequence s) {
        super.append(s);
        return this;
    }


    @Override
    public StringBuilder append(CharSequence s, int start, int end) {
        super.append(s, start, end);
        return this;
    }

    @Override
    public StringBuilder append(char[] str) {
        super.append(str);
        return this;
    }


}
- 建造者模式的注意事项和细节
- 客户端(使用程序)不必知道产品内部组成的细节,将产品本身与产品的创建过程解耦,使得相同的创建过程可以创建不同的产品对象
- 每一个具体建造者都相对独立,而与其他的具体建造者无关,因此可以很方便地替换具体建造者或增加新的具体建造者, 用户使用不同的具体建造者即可得到不同的产品对象
- 可以更加精细地控制产品的创建过程 。将复杂产品的创建步骤分解在不同的方法中,使得创建过程更加清晰,也更方便使用程序来控制创建过程
增加新的具体建造者无须修改原有类库的代码,指挥者类针对抽象建造者类编程,系统扩展方便,符合 “开闭原则” - 建造者模式所创建的产品一般具有较多的共同点,其组成部分相似,如果产品之间的差异性很大,则不适合使用建造者模式,因此其使用范围受到一定的限制
如果产品的内部变化复杂,可能会导致需要定义很多具体建造者类来实现这种变化,导致系统变得很庞大, 因此在这种情况下,要考虑是否选择建造者模式
抽象工厂模式 和 建造者模式的区别
- 抽象工厂模式实现对产品家族的创建,一个产品家族是这样的一系列产品:具有不同分类维度的产品组合,采用抽象工厂模式不需要关心构建过程,只关心什么产品由什么工厂生产即可
- 而建造者模式则是要求按照指定的蓝图建造产品,它的主要目的是通过组装零配件而产生一个新产品,可以这样理解:建造者模式制造产品需要有一个具体的流程,对于不同产品整体流程相差不大,但是每个流程的实现细节较大
5.适配器模式
1. 适配器模式基本介绍
- 适配器模式(Adapter Pattern)将某个类的接口转换成客户端期望的另一个接口表示,主的目的是兼容性,让原本因接口不匹配不能一起工作的两个类可以协同工作。
- 适配器的别名为包装器(Wrapper),适配器模式属于结构型模式
主要分为三类:类适配器模式、对象适配器模式、接口适配器模式
适配器模式工作原理:
- 适配器模式:将一个类的接口转换成另一种接口,让原本接口不兼容的类可以兼容
从用户的角度看不到被适配者,用户与被适配者是解耦的 - 用户调用适配器转化出来的目标接口方法, 适配器再调用被适配者的相关接口方法
- 用户收到反馈结果,感觉只是和目标接口交互, 如图
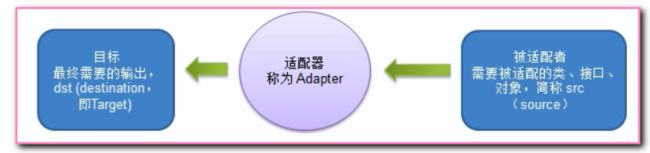
2.插孔与插头的冲突
在生活中,有的插头是三项的,而插座却是两坐的。比如我们新买一台电视机,电源插头是两相的,不巧的是墙上的插座确实三相的,这时让电视机无法通电使用,我们来看下如何使用适配器模式解决这个问题。
三相插孔接口:
/**
 * @author compass
 * @date 2022-10-04
 * @since 1.0
 **/
public interface TriplePin {

    /**
     * 三相插孔接口
     * @param liveLine 火线
     * @param nullLine 零线
     * @param earthLine 地线
     * @return void
     * @author compass
     * @date 2022/10/4 19:48
     * @since 1.0.0
     **/
    void electrify(int liveLine, int nullLine, int earthLine);
}
两相插孔接口:
/**
 * @author compass
 * @date 2022-10-04
 * @since 1.0
 **/
public interface DualPin {

    /**
     * 两相插孔接口
     * @param liveLine 火线
     * @param nullLine 零线
     * @return void
     * @author compass
     * @date 2022/10/4 19:48
     * @since 1.0.0
     **/
    void electrify(int liveLine, int nullLine);
}
电视机类:
/**
 * @author compass
 * @date 2022-10-04
 * @since 1.0
 **/
public class Tv implements DualPin {
    @Override
    public void electrify(int liveLine, int nullLine) {
        System.out.println(String.format("火线:%d,零线:%d",liveLine,nullLine));
        System.out.println("电视开机");
    }
}
客户端直接使用:
/**
 * @author compass
 * @date 2022-10-04
 * @since 1.0
 **/
public class Main {
    public static void main(String[] args)  {
     // 会报错 ,类型不匹配
     TriplePin tv = new Tv();

    }
}
我们可以创建一个适配器类来解决这个问题,让适配器去适配。
适配器类:
/**
 * @author compass
 * @date 2022-10-04
 * @since 1.0
 **/
public class Adapter implements TriplePin {

    // 创建适配器时把需要适配的插座传递进来即可
    public Adapter(DualPin dualpin) {
        this.dualpin = dualpin;
    }

    private  DualPin  dualpin;
    @Override
    public void electrify(int liveLine, int nullLine, int earthLine) {
        // 调用被适配的的两插通电方法,忽略掉第三个参数即可
        dualpin.electrify(liveLine, nullLine);
    }
}
现在我们再来调用就没有任何问题了
/**
 * @author compass
 * @date 2022-10-04
 * @since 1.0
 **/
public class Main {
    public static void main(String[] args)  {
        DualPin tv = new Tv();
        Adapter adapter = new Adapter(tv);
        adapter.electrify(1,0,-1);

    }
}
上面这种方法是对象适配器,我们还可以使用类适配器,为特定的实现类进行适配
TV专属适配器:
/**
 * @author compass
 * @date 2022-10-04
 * @since 1.0
 **/
public class TvAdapter extends Tv implements TriplePin {
    @Override
    public void electrify(int liveLine, int nullLine, int earthLine) {
        super.electrify(liveLine, nullLine);
    }
}
客户端调用:
/**
 * @author compass
 * @date 2022-10-04
 * @since 1.0
 **/
public class Main {
    public static void main(String[] args)  {
        // 使用tv专属适配器
        TvAdapter adapter = new TvAdapter();
        adapter.electrify(1,0,-1);

    }
}
6.SpringMVC 源码
SpringMVC中的HandlerAdapter,就使用了适配器模式,SpringMVC处理请求的流程回顾:
- 首先用户请求到达前端控制器 dispatcherServlet 的 doDispatch() 方法
- 在 doDispatch() 中,通过 HandlerMapping 找到用户请求的 Handler(处理器)
- 通过 Handler 执行目标方法,获得本次访问结果:ModelAndView 对象
- 接着调用 InternalResourceViewResolve 对返回的 ModelAndView 对象进行解析,找到指定的资源
- 目标资源(JSP 页面或者 JSON 字符串)最终都会以 JSON 字符串的形式返回给 Tomcat
- Tomcat 将字符串 以 HTTP 协议的方式返回给浏览器
springMVC源码模拟:
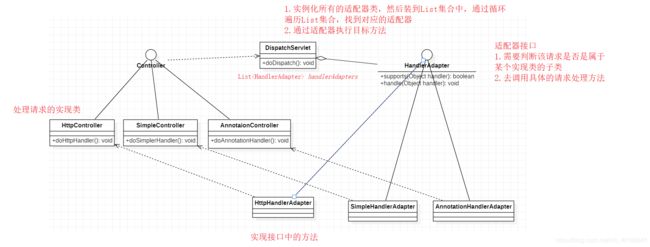
Controller:接口及其实现类
/**
 * @author compass
 * @version 1.0
 * @date 2021-07-07 21:40
 */
//多种Controller实现
public interface Controller {

}

class HttpController implements Controller {
    public void doHttpHandler() {
        System.out.println("http...");
    }
}

class SimpleController implements Controller {
    public void doSimplerHandler() {
        System.out.println("simple...");
    }
}

class AnnotationController implements Controller {
    public void doAnnotationHandler() {
        System.out.println("annotation...");
    }
}
HandlerAdapter:接口及其实现类
/**
 * @author compass
 * @version 1.0
 * @date 2021-07-07 21:40
 */
//定义一个Adapter接口
public interface HandlerAdapter {
    // 当前 HandlerAdapter 对象是否支持 handler(判断 handler 的类型是否为具体的子类类型)
    public boolean supports(Object handler);

    // 执行目标方法(将 handler 对象强转后,调用对应的方法)
    public void handle(Object handler);
}

// 多种适配器类
class SimpleHandlerAdapter implements HandlerAdapter {

    public void handle(Object handler) {
        ((SimpleController) handler).doSimplerHandler();
    }

    public boolean supports(Object handler) {
        return (handler instanceof SimpleController);
    }

}

class HttpHandlerAdapter implements HandlerAdapter {

    public void handle(Object handler) {
        ((HttpController) handler).doHttpHandler();
    }

    public boolean supports(Object handler) {
        return (handler instanceof HttpController);
    }

}

class AnnotationHandlerAdapter implements HandlerAdapter {

    public void handle(Object handler) {
        ((AnnotationController) handler).doAnnotationHandler();
    }

    public boolean supports(Object handler) {
        return (handler instanceof AnnotationController);
    }

}
- DispatchServlet:模拟 doDispatch() 方法中获取适配器的流程
/**
 * @author compass
 * @version 1.0
 * @date 2021-07-07 21:41
 */
public class DispatchServlet {

    public static void main(String[] args) {
        // http...
        new DispatchServlet().doDispatch();
    }


    public static List<HandlerAdapter> handlerAdapters = new ArrayList<HandlerAdapter>();

    // 组合了多个 HandlerAdapter 的实现类
    public DispatchServlet() {
        handlerAdapters.add(new AnnotationHandlerAdapter());
        handlerAdapters.add(new HttpHandlerAdapter());
        handlerAdapters.add(new SimpleHandlerAdapter());
    }

    public void doDispatch() {

        // 此处模拟SpringMVC从request取handler的对象,
        // 适配器可以获取到希望的Controller
        HttpController controller = new HttpController();

        // AnnotationController controller = new AnnotationController();
        // SimpleController controller = new SimpleController();

        // 得到对应适配器
        HandlerAdapter adapter = getHandler(controller);
        // 通过适配器执行对应的controller对应方法
        adapter.handle(controller);

    }

    public HandlerAdapter getHandler(Controller controller) {
        // 遍历:根据得到的controller(handler), 返回对应适配器
        for (HandlerAdapter adapter : this.handlerAdapters) {
            if (adapter.supports(controller)) {
                return adapter;
            }
        }
        return null;
    }


}
- 使用 HandlerAdapter 的原因分析:
- 可以看到处理器的类型不同,有多种实现方式,那么调用方式就不是确定的,如果需要直接调用
- Controller方法,需要调用的时候就得不断是使用if else来进行判断是哪一种子类然后执行。那么如果后面要扩展Controller,就得修改原来的代码,这样违背了OCP 原则
7.适配器模式的注意事项
适配器模式的注意事项和细节
三种命名方式,是根据src是以怎样的形式给到Adapter(在Adapter里的形式)来命名的。
-
类适配器:以类给到,在Adapter里,就是将src当做类,继承 -
对象适配器:以对象给到,在Adapter里,将src作为一个对象,持有 -
接口适配器:以接口给到,在Adapter里,将src作为一个接口,实现 -
Adapter模式最大的作用还是将原本不兼容的接口融合在一起工作,相当于是个中转封装站
实际开发中,实现起来不拘泥于我们讲解的三种经典形式
6.享元模式
1.展示网站项目需求
小型的外包项目,给客户A做一个产品展示网站, 客户A的朋友感觉效果不错,也希望做这样产品展示网站,但是要求都有些不同:
- 有客户要求以新闻的形式发布
- 客户人要求以博客的形式发布
- 有客户希望以微信公众号的形式发布
2.传统方案解决网站展现项目
方案描述
-
直接复制粘贴一份,然后根据客户不同要求,进行定制修改
-
给每个网站租用一个空间
-
方案设计示意图

问题分析:传统方案解决网站展现项目 -
需要的网站结构相似度很高,而且都不是高访问量网站,如果分成多个虚拟空间来处理,相当于一个相同网站的实例对象很多,造成服务器的资源浪费
-
解决思路:整合到一个网站中,共享其相关的代码和数据,对于硬盘、内存、 CPU、数据库空间等服务器资源都可以达成共享,减少服务器资源
-
对于代码来说, 由于是一份实例,维护和扩展都更加容易
-
上面的解决思路就可以使用享元模式来解决
3.享元模式基本介绍
- 享元模式(Flyweight Pattern) 也叫蝇量模式:运用共享技术有效地支持大量细粒度的对象
- 常用于系统底层开发,解决系统的性能问题。像数据库连接池,里面都是创建好的连接对象,在这些连接对象中有我们需要的则直接拿来用,避免重新创建, 如果没有我们需要的,则创建一个
- 享元模式能够解决重复对象的内存浪费的问题,当系统中有大量相似对象,需要缓冲池时。 不需总是创建新对象,可以从缓冲池里拿。这样可以降低系统内存,同时提高效率
- 享元模式经典的应用场景就是池技术了,String`常量池、数据库连接池、缓冲池等等都是享元模式的应用,享元模式是池技术的重要实现方式
4.享元模式的原理类图
FlyWeight是抽象的享元角色,他是产品的抽象类,定义了对象的外部状态和内部状态(后面介绍) 的接口规范(接口)或默认实现(抽象类)ConcreteFlyWeight是具体的享元角色,是具体的产品类,实现抽象角色定义相关业务方法UnsharedConcreteFlyWeight是不可共享的角色,一般不会出现在享元工厂中FlyWeightFactory是享元工厂类,用于构建池的容器,提供从池中获取对象的相关方法
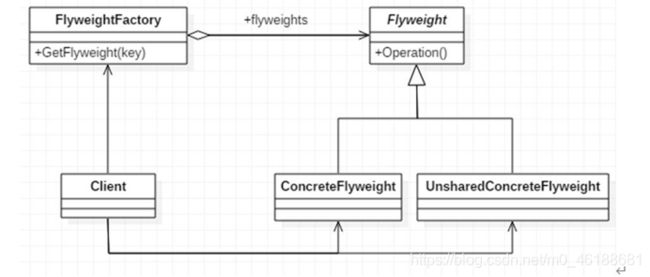
5.内部状态和外部状态
比如围棋、五子棋、跳棋,它们都有大量的棋子对象,围棋和五子棋只有黑白两色,跳棋颜色多一点,所以棋子颜色就是棋子的内部状态;而各个棋子之间的差别就是位置的不同,当我们落子后,落子颜色是定的,但位置是变化的,所以棋子坐标就是棋子的外部状态
- 享元模式提出了两个要求:细粒度和共享对象。这里就涉及到内部状态和外部状态了,即将对象的信息分为两个部分: 内部状态和外部状态
- 内部状态指对象共享出来的信息,存储在享元对象内部且不会随环境的改变而改变
- 外部状态指对象得以依赖的一个标记,是随环境改变而改变的、不可共享的状态
举个例子:围棋理论上有361个空位可以放棋子,每盘棋都有可能有两三百个棋子对象产生,因为内存空间有限,一台服务器很难支持更多的玩家玩围棋游戏,如果用享元模式来处理棋子,那么棋子对象就可以减少到只有两个实例,这样就很好的解决了对象的开销问题
6.享元模式解决网站展现项目
使用享元模式完成, 前面提出的网站外包问题
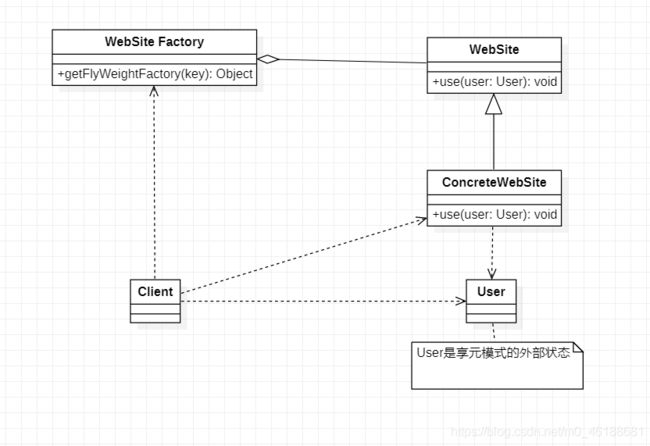
代码实现
WebSite:产品的抽象类,定义了产品对象的内部和外部状态的规范,即前面所说的 FlyWeight
public abstract class WebSite {

	public abstract void use(User user);// 抽象方法

}
ConcreteWebSite:具体的产品类,继承了 WebSite 抽象类,实现了具体的业务方法,即前面所说的 ConcreteFlyWeight
//具体网站
public class ConcreteWebSite extends WebSite {

	// 共享的部分,内部状态
	private String type = ""; // 网站发布的形式(类型)

	// 构造器
	public ConcreteWebSite(String type) {
		this.type = type;
	}

	@Override
	public void use(User user) {
		System.out.println("网站的发布形式为:" + type + " 在使用中 .. 使用者是" + user.getName());
	}

}
WebSiteFactory:产品工厂类,生产具体的产品(WebSite 对象),并构建产品池,即前面所说的 FlyWeightFactory
// 网站工厂类,根据需要返回压一个网站
public class WebSiteFactory {

	// 集合, 充当池的作用
	private HashMap<String, ConcreteWebSite> pool = new HashMap<>();

	// 根据网站的类型,返回一个网站, 如果没有就创建一个网站,并放入到池中,并返回
	public WebSite getWebSiteCategory(String type) {
		if (!pool.containsKey(type)) {
			// 就创建一个网站,并放入到池中
			pool.put(type, new ConcreteWebSite(type));
		}

		return (WebSite) pool.get(type);
	}

	// 获取网站分类的总数 (池中有多少个网站类型)
	public int getWebSiteCount() {
		return pool.size();
	}

}
User:实体类
public class User {

	private String name;

	public User(String name) {
		super();
		this.name = name;
	}

	public String getName() {
		return name;
	}

	public void setName(String name) {
		this.name = name;
	}

}
Client:客户端
public class Client {

	public static void main(String[] args) {

		// 创建一个工厂类
		WebSiteFactory factory = new WebSiteFactory();

		// 客户要一个以新闻形式发布的网站
		WebSite webSite1 = factory.getWebSiteCategory("新闻");
		webSite1.use(new User("tom"));

		// 客户要一个以博客形式发布的网站
		WebSite webSite2 = factory.getWebSiteCategory("博客");
		webSite2.use(new User("jack"));

		// 客户要一个以博客形式发布的网站
		WebSite webSite3 = factory.getWebSiteCategory("博客");
		webSite3.use(new User("smith"));

		// 客户要一个以博客形式发布的网站
		WebSite webSite4 = factory.getWebSiteCategory("博客");
		webSite4.use(new User("king"));

		System.out.println("网站的分类个数=" + factory.getWebSiteCount());

	}

}
总结
-
利用享元模式,我们能够把外部状态(User)和内部状态(type)分开,对于共享的部分,我们共用即可
-
比如网站类型(type)不同时,我们才会创建对应的网站实例,再将其放入对象池中,如果网站类型(type)相同,我们直接共享即可(享元)
-
博客类型相同可以共用,但是我们可以通过传入 User 形参,让不同的使用者,访问同一份博客
7.JDK Interger 源码分析
public class FlyWeightTest {

	public static void main(String[] args) {

		// 如果 Integer.valueOf(x) x 在 -128 --- 127 直接,就是使用享元模式返回,如果不在该范围类,则仍然 new

		// 小结:
		// 1. 在valueOf 方法中,先判断值是否在 IntegerCache 中,如果不在,就创建新的Integer(new), 否则,就直接从 缓存池返回
		// 2. valueOf 方法,就使用到享元模式
		// 3. 如果使用valueOf 方法得到一个Integer 实例,范围在 -128 - 127 ,执行速度比 new 快

		Integer x = Integer.valueOf(127); // 得到 x实例,类型 Integer
		Integer y = new Integer(127); // 得到 y 实例,类型 Integer
		Integer z = Integer.valueOf(127);// ..
		Integer w = new Integer(127);

		System.out.println(x.equals(y)); // 大小,true
		System.out.println(x == y); // false
		System.out.println(x == z); // true
		System.out.println(w == x); // false
		System.out.println(w == y); // false

		Integer x1 = Integer.valueOf(200);
		Integer x2 = Integer.valueOf(200);
		System.out.println("x1==x2=" + (x1 == x2)); // false

	}

}
1.Integer.valueOf()方法:该方法使用享元模式,如果数字范围在 [IntegerCache.low, IntegerCache.high] 之间,则直接返回缓存池中的对象,否则使用 new 的方式创建
public static Integer valueOf(int i) {
    if (i >= IntegerCache.low && i <= IntegerCache.high)
        return IntegerCache.cache[i + (-IntegerCache.low)];
    return new Integer(i);
}
IntegerCache用于为 [-128, 127] 数值的缓存池,事先就已经将 cache[] 缓存池创建好了
private static class IntegerCache {
    static final int low = -128;
    static final int high;
    static final Integer cache[];

    static {
        // high value may be configured by property
        int h = 127;
        String integerCacheHighPropValue =
            sun.misc.VM.getSavedProperty("java.lang.Integer.IntegerCache.high");
        if (integerCacheHighPropValue != null) {
            try {
                int i = parseInt(integerCacheHighPropValue);
                i = Math.max(i, 127);
                // Maximum array size is Integer.MAX_VALUE
                h = Math.min(i, Integer.MAX_VALUE - (-low) -1);
            } catch( NumberFormatException nfe) {
                // If the property cannot be parsed into an int, ignore it.
            }
        }
        high = h;

        cache = new Integer[(high - low) + 1];
        int j = low;
        for(int k = 0; k < cache.length; k++)
            cache[k] = new Integer(j++);

        // range [-128, 127] must be interned (JLS7 5.1.7)
        assert IntegerCache.high >= 127;
    }

    private IntegerCache() {}
}
8.享元模式的注意事项
- 在享元模式这样理解,
“享”就表示共享,“元”表示对象 - 系统中有大量对象, 这些对象
消耗大量内存, 并且对象的状态大部分可以外部化时,我们就可以考虑选用享元模式 - 用
唯一标识码判断,如果在内存中有,则返回这个唯一标识码所标识的对象,经常用HashMap存储共享对象 - 享元模式大大减少了对象的创建,降低了程序内存的占用,提高效率
- 享元模式提高了系统的复杂度。需要分离出内部状态和外部状态,而外部状态具有固化特性,不应该随着内部状态的改变而改变,这是我们使用享元模式需要注意的地方
- 使用享元模式时,
注意划分内部状态和外部状态,并且需要有一个工厂类加以控制。 - 享元模式经典的应用场景是需要缓冲池的场景,比如 String 常量池、 数据库连接池
7.门面模式
1.门面模式介绍
门面模式(Facade Pattern)又叫外观模式,提供了一个统一的接口,用来访问子系统中的一群接口。其主要特征是定义了一个高层接口,让子系统更容易使用,属于结构性模式
原文: Provide a unified interface to a set of interfaces in a subsystem.Facade defines a higher-level interface that makes the subsystem easier to use.
解释:要求一个子系统的外部与其内部的通信必须通过一个同一的对象进行。门面模式提供一个高层次的接口,使得子系统更易于使用
在我们日常的编码工作中,我们都在有意无意地大量使用门面模式,但凡只要高层模块需要调度多个子系统(2 个以上类对象),我们都会自觉地创建一个新类封装这些子系统,提供精简接口,让高层模块可以更加容易间接调用这些子系统的功能。尤其是现阶段各种第三方 SDK,各种开源类库,很大概率都会使用门面模式。尤其是你觉得调用越方便的,门面模式使用的一般更多

门面模式的应用场景
1、子系统越来越复杂,增加门面模式提供简单接口
2、构建多层系统结构,利用门面对象作为每层的入口,简化层间调用
2.一键操作
为了更好的理解门面模式,我们先来看一个例子,在早期的相机使用起来非常的麻烦,拍照前总是需要根据场景情况设置一大堆参数,如对焦,调节闪光灯,调光圈等,非专业人士,根本拍不出很好的效果,而现在出现了一种傻瓜式相机,用户再也不需要调试那些复杂的参数,也能拍出比较好的效果,比如现在的智能手机,能智能的设置一些参数,就拍出比较理想的效果。
对焦:
/**
 * @author compass
 * @date 2022-10-04
 * @since 1.0
 **/
public class Focusing {

    /**
     * 对焦
     * @return void
     * @author compass
     * @date 2022/10/5 11:20
     * @since 1.0.0
     **/
    public void focus() {
        System.out.println("对焦");
    }

}
调节闪光:
/**
 * @author compass
 * @date 2022-10-04
 * @since 1.0
 **/
public class Flash {

    /**
     * 调节闪光
     * @return void
     * @author compass
     * @date 2022/10/5 11:21
     * @since 1.0.0
     **/
    public void flashController() {
        System.out.println("调节闪光");
    }
}
调节光圈:
/**
 * @author compass
 * @date 2022-10-05
 * @since 1.0
 **/
public class Aperture {
    public void controllerAperture() {
        /**
         *调节光圈
         * @return void
         * @author compass
         * @date 2022/10/5 11:22
         * @since 1.0.0
         **/
        System.out.println("调节光圈");
    }
}
开始拍照:
/**
 * @author compass
 * @date 2022-10-05
 * @since 1.0
 **/
public class Photograph {
    /**
     * 开始拍照
     * @return void
     * @author compass
     * @date 2022/10/5 11:24
     * @since 1.0.0
     **/
    public void photo() {
        System.out.println("开始拍照");
    }
}
门面模式类:
/**
 * @author compass
 * @date 2022-10-05
 * @since 1.0
 **/
public class Facade {

    /**
     * 门面模式方法,把所有操作都封装到一起,让客户端只调用该方法即可
     *
     * @return void
     * @author compass
     * @date 2022/10/5 11:28
     * @since 1.0.0
     **/
    public void startPhoto() {
        // 对焦
        Focusing focusing = new Focusing();
        focusing.focus();

        // 调节闪光
        Flash flash = new Flash();
        flash.flashController();

        // 调节光圈
        Aperture aperture = new Aperture();
        aperture.controllerAperture();

        // 以上参数设置好 开始拍照
        Photograph photograph = new Photograph();
        photograph.photo();
    }
}
Client调用:
/**
 * @author compass
 * @date 2022-10-04
 * @since 1.0
 **/
public class Client {
    public static void main(String[] args)  {
        Facade facade = new Facade();
        facade.startPhoto();
    }
}
3.门面模式的优缺点
优点:
1、简化了调用过程,无需深入了解子系统,以防给子系统带来风险
2、减少系统依赖、松散耦合
3、更好地划分访问层次,提高了安全性
4、遵循迪米特法则,即最少知道原则
缺点:
1、当增加子系统和扩展子系统行为时,可能容易带来未知风险
2、不符合开闭原则
3、某些情况下可能违背单一职责原则
8.组合模式
1.组合模式基本介绍
- 组合模式(Composite Pattern),又叫部分整体模式,它创建了对象组的树形结构,将对象组合成树状结构以表示“整体-部分”的层次关系。
- 组合模式依据树形结构来组合对象,用来表示部分以及整体层次。
- 这种类型的设计模式属于结构型模式。
- 组合模式使得用户对单个对象和组合对象的访问具有一致性, 即:组合能让客户以一致的方式处理个别对象以及组合对象
2.组合模式的原理类图
- Component:这是组合模式中对象声明接口,在适当情况下,实现所有类共有的接口默认行为,用于访问和管理 Component 子部件,Component 可以是抽象类或者接口
- Leaf:在组合模式中表示叶子节点(没有子节点)
- Composite:在组合模式中表示非叶子节点,用于存储子部件,继承(或实现) Component,实现子部件的相关操作,比如添加、删除操作等,相当于其下一层 Component 子部件的管理者
3.组合模式解决的问题
组合模式解决这样的问题,当我们的要处理的对象可以生成一颗树形结构,而我们要对树上的节点和叶子进行操作时,它能够提供一致的方式,而不用考虑它是节点还是叶子

4.文件系统
通过观察我们可以发现文件结构其实就像是一个树结构,有文件和目录组成,文件不可以继续添加子文件,但是目录可以添加子文件或目录,我们就以类似于树结构的文件系统的目录结构为例。
抽象节点类:
/**
 * 节点类
 *
 * @author compass
 * @date 2022-10-05
 * @since 1.0
 **/
public abstract class Node {
    /**
     * 节点名称
     **/
    protected String nodeName;
    /**
     * 节点类型
     **/
    protected String nodeType;

    /**
     * 添加子节点
     *
     * @param node 节点对象
     * @return void
     * @author compass
     * @date 2022/10/5 12:04
     * @since 1.0.0
     **/
    public abstract void addChild(Node node);

    public Node(String nodeName, String nodeType) {
        this.nodeName = nodeName;
        this.nodeType = nodeType;
    }

    /**
     * 展示节点
     * @param space 空格数量
     * @return void
     * @author compass
     * @date 2022/10/5 12:11
     * @since 1.0.0
     **/
    protected void tree(int space) {
        for (int i = 0; i < space; i++) {
            // 先循环输出空格
            System.out.print(" ");
        }
        // 最后输出自己的名字
        System.out.println(nodeName);
    }
    /**
     * 默认从0列开始展示
     * @return void
     * @author compass
     * @date 2022/10/5 12:11
     * @since 1.0.0
     **/
    protected void tree() {
      this.tree(0);
    }
}
文件类:
/**
 * 文件类
 * @author compass
 * @date 2022-10-05
 * @since 1.0
 **/
public class File extends Node{

    /**
     * 调用父类构造方法初始一个文件节点
     **/
    public File(String nodeName) {
        super(nodeName, "file");
    }

    @Override
    public void addChild(Node node) {
        throw  new RuntimeException("文件节点不能有子节点");
    }

    @Override
    protected void tree(int space) {
        super.tree(space);
    }
}
目录类:
/**
 * 文件夹类
 * @author compass
 * @date 2022-10-05
 * @since 1.0
 **/
public class Folder  extends Node{
    /**
     * 用于存放子节点
     **/
    public List<Node> childNodeList = new ArrayList<>();

    /**
     * 调用父类构造方法初始一个文件夹节点
     **/
    public Folder(String nodeName) {
        super(nodeName, "dir");
    }

    @Override
    public void addChild(Node node) {
        if (node==null){
            throw  new RuntimeException("node不能为null");
        }
        childNodeList.add(node);
    }

    @Override
    protected void tree(int space) {
        super.tree(space);
        // 在循环子节点前 空格要加1
        space++;
        for (Node node : childNodeList) {
            node.tree(space);
        }
    }
}
客户端使用:
/**
 * @author compass
 * @date 2022-10-05
 * @since 1.0
 **/
public class Client {
    public static void main(String[] args) {
        Folder d = new Folder("D盘");

        Folder word = new Folder("文档");
        File resume = new File("简历.doc");
        File projectInfo = new File("项目介绍.doc");

        Folder music = new Folder("音乐");
        File balloon = new File("告白气球.mp3");
        File paddy = new File("稻香.mp3");

        d.addChild(word);
        d.addChild(music);

        word.addChild(resume);
        word.addChild(projectInfo);

        music.addChild(balloon);
        music.addChild(paddy);

        d.tree();

    }
}
5.组合模式的注意事项
组合模式的注意事项和细节
- 简化客户端操作。 客户端只需要面对一致的对象而不用考虑整体部分或者节点叶子的问题
- 具有较强的扩展性。 当我们要更改组合对象时, 我们只需要调整内部的层次关系, 客户端不用做出任何改动
- 方便创建出复杂的层次结构。 客户端不用理会组合里面的组成细节, 容易添加节点或者叶子从而创建出复杂的树形结构
- 需要遍历组织机构, 或者处理的对象具有树形结构时, 非常适合使用组合模式
- 要求较高的抽象性, 如果节点和叶子有很多差异性的话, 比如很多方法和属性都不一样, 不适合使用组合模式
9.装饰者模式
1.装饰者模式定义
-
装饰者模式:动态的将新功能附加到对象上。在对象功能扩展方面,它比继承更有弹性,装饰者模式也体现了开闭原则(ocp)
-
这里提到的动态的将新功能附加到对象和ocp原则,在后面的应用实例上会以代码的形式体现
装饰者模式(Decorator)原理
-
装饰者模式就像打包一个快递
- 主体: 比如陶瓷、衣服 ,即 Component,被装饰者
- 包装:比如报纸填充、塑料泡沫、纸板、木板,即 Decorator,装饰者
-
Component 主体类:比如类似前面的 Drink -
ConcreteComponent:具体的主体,比如前面的各个单品咖啡 -
Decorator:装饰者,比如各调料,装饰者里面聚合了一个 Component 的具体实现类 -
在如图的Component与ConcreteComponent之间,如果实现类 ConcreteComponent 有很多,还可以设计一个缓冲层,将共有的部分提取出来,抽象出一个缓冲层
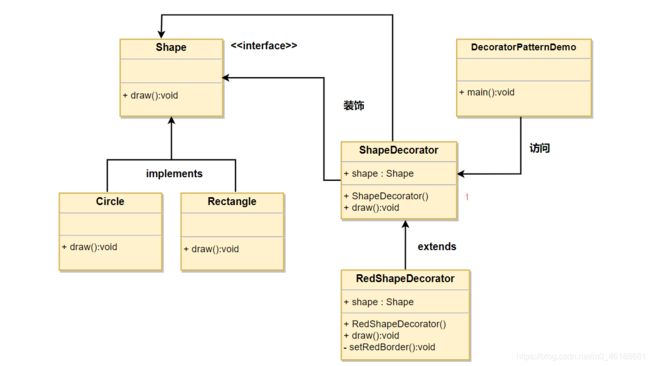
2.为小妹妹化妆
我们都知道现在的女生比较喜欢爱美,这是必然的,素颜的很少,出门前得打点粉底,涂点口红,其实这就是装饰者模式的一种体现,妹妹既可以选择素颜出门,也可以选择稍作打版再出门,那么我们就为妹妹设计一个装饰者模式,让妹妹实现化妆自由。
展示者:
/**
 * @author compass
 * @date 2022-10-05
 * @since 1.0
 **/
public interface Showable {
    /**
     * 展示行为
     * @return void
     * @author compass
     * @date 2022/10/5 12:59
     * @since 1.0.0
     **/
    void show();
}
女生类:
/**
 * @author compass
 * @date 2022-10-05
 * @since 1.0
 **/
public class Girl implements Showable {

    @Override
    public void show() {
        System.out.print("妹妹的素颜");
    }
}
抽象装饰器:
/**
 * @author compass
 * @date 2022-10-05
 * @since 1.0
 **/
public abstract class Decorator implements Showable {

    private Showable showable;

    public Decorator(Showable showable) {
        this.showable = showable;
    }

    @Override
    public void show() {
        // 直接调用不加任何装饰,巧妙之处在于如果子类传递了具体实现,就调用子类具体实现的行为
        showable.show();
    }
}
粉底类:
/**
 * @author compass
 * @date 2022-10-05
 * @since 1.0
 **/
public class FoundationMakeup extends Decorator {

    // 调用父类构造注入
    public FoundationMakeup(Showable showable) {
        super(showable);
    }

    @Override
    public void show() {
        System.out.print("打粉底【");
        super.show();
        System.out.print("】");

    }
}
口红类:
/**
 * @author compass
 * @date 2022-10-05
 * @since 1.0
 **/
public class Lipstick extends Decorator {

    // 调用父类构造注入
    public Lipstick(Showable showable) {
        super(showable);
    }

    @Override
    public void show() {
        System.out.print("涂口红【");
        super.show();
        System.out.print("】");

    }
}
客户端类:
/**
 * @author compass
 * @date 2022-10-05
 * @since 1.0
 **/
public class Client {
    public static void main(String[] args) {
        Lipstick lipstick = new Lipstick(new FoundationMakeup(new Girl()));
        lipstick.show();

    }
}
3.JDK IO流使用的装饰者设计模式
InputStream是(被)装饰者的抽象父类,类似我们前面讲的 Drink
2.FileInputStream是InputStream子类,为具体的被装饰者,类似我们前面的 DeCaf,LongBlackFilterInputStream是InputStream子类,为装饰者的抽象父类,类似我们前面 的Decorator装饰者DataInputStream是FilterInputStream子类,为具体的装饰者,类似前面的 Milk,Soy 等FilterInputStream类中有protected volatile InputStream in;代码,即其中含有被装饰者- 分析得出在jdk 的io体系中,就是使用
装饰者模式

10.代理模式
1.代理模式的基本介绍
- 代理模式:为一个对象提供一个替身,以控制对这个对象的访问。 即通过代理对象访问目标对象。
- 代理对象的好处是:可以在目标对象实现的基础上,增强额外的功能操作,即扩展目标对象的功能。
- 被代理的对象可以是远程对象、 创建开销大的对象或需要安全控制的对象
- 代理模式有不同的形式,主要有三种:静态代理、 动态代理 (JDK代理、接口代理)和 Cglib代理 (可以在内存动态的创建对象,而不需要实现接口, 他是属于动态代理的范畴) 。

2.静态代码模式
静态代理在使用时,需要定义接口或者父类,被代理对象(即目标对象)与代理对象一起实现相同的接口或者是继承相同父类
具体要求
- 定义一个接口:
ITeacherDao - 目标对象
TeacherDAO实现接口ITeacherDAO - 使用静态代理方式,就需要在代理对象
TeacherDAOProxy中也实现ITeacherDAO - 特别提醒:代理对象与目标对象要实现相同的接口,然后通过调用相同的方法来调用目标对象的方法
URML类图:
代码实现:
ITeacherDao:定义功能的接口
/**
 * @author compass
 * @version 1.0
 * @date 2021-07-27 19:36
 */
public interface ITeacher {

    /**
     * 授课接口
     */
    void teach();
}
TeacherDAO:接口的实现类
/** 代理对象,静态代理
 * @author compass
 * @version 1.0
 * @date 2021-07-27 19:37
 */
public class TeacherDao implements ITeacher {


    /**
     * 授课接口
     */
    @Override
    public void teach() {
        System.out.println("老师正在授课");
    }
}
TeacherDAOProxy:代理对象
/**
 * @author compass
 * @version 1.0
 * @date 2021-07-27 19:38
 */
public class TeacherDAOProxy implements ITeacher{

    private ITeacher target;
    /**
     * 授课接口
     */
    @Override
    public void teach() {
        System.out.println("代理开始");
        target.teach();
        System.out.println("代理结束");
    }

    public TeacherDAOProxy(ITeacher target) {
        this.target = target;
    }
}
Client:调用者
/**
 * @author compass
 * @version 1.0
 * @date 2021-07-27 19:37
 */
public class Client {
    public static void main(String[] args) {

        // 创建具体的对象
        TeacherDao teacherDao = new TeacherDao();
        // 将对象传递给代理对象,让代理去调用具体的方法,好处就是可以在调用具体方法前后进行其余的功能扩展
        TeacherDAOProxy proxy = new TeacherDAOProxy(teacherDao);
        // 代理对象调用具体的方法
        proxy.teach();
    }
}
静态代理优缺点
- 优点:在不修改目标对象的功能前提下,能通过代理对象对目标功能扩展
- 缺点:因为代理对象需要与目标对象实现一样的接口,所以会有很多代理类
一旦接口增加方法,目标对象与代理对象都要维护
3.动态代理模式
动态代理模式的基本介绍
- 代理对象不需要实现接口, 但是目标对象要实现接口, 否则不能用动态代理
- 代理对象的生成, 是利用JDK的API,动态的在内存中构建代理对象
- 动态代理也叫做:
JDK代理、 接口代理
-
JDK中生成代理对象的API
-
代理类所在包:
java.lang.reflect.Proxy -
JDK实现代理只需要使用
newProxyInstance方法,但是该方法需要接收三个参数,完整的写法是: -
static Object
newProxyInstance(ClassLoader loader, Class[] interfaces, InvocationHandler h)
动态代理应用实例
将前面的静态代理改进成动态代理模式(即:JDK代理模式)
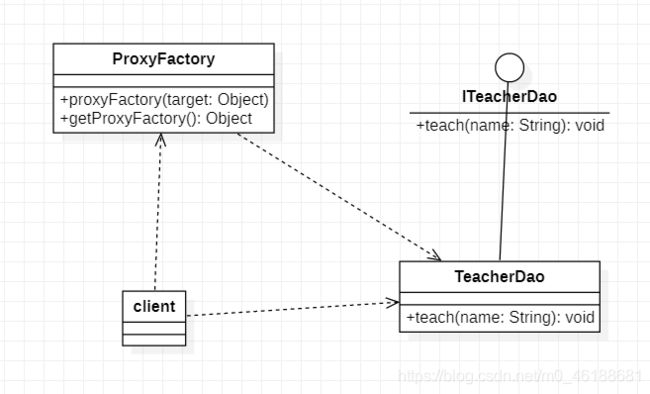
代码实现:
Client:调用者的客户端
/** jdk:动态代理
 * @author compass
 * @version 1.0
 * @date 2021-07-27 19:56
 */
public class Client {

    public static void main(String[] args) {
        // 创建目标对象
        ITeacher target = new TeacherDao();
        // 创建代理对象 此处不会去执行目标方法,而是我们的代理对象去调用目标方法的时候才会真正的去调用目标方法
        ITeacher proxyInstance = (ITeacher)new ProxyFactory(target).getProxyFactory();
        System.out.println(proxyInstance.getClass());
        // 让代理对象去调用具体的方法
        String result = proxyInstance.teach("小明");

        System.out.println("方法执行完后的返回值:"+result);

    }
}
ITeacher:功能接口
/**
 * @author compass
 * @version 1.0
 * @date 2021-07-27 19:56
 */
public interface ITeacher {
    /**
     * 授课方法
     */
    String  teach(String name);
}
TeacherDao:功能接口的实现类
/**
 * @author compass
 * @version 1.0
 * @date 2021-07-27 19:57
 */
public class TeacherDao  implements ITeacher{
    /**
     * 授课方法
     */
    @Override
    public String teach(String name) {
        System.out.println(name+":老师正在授课中...");
        return "very nice";
    }
}
ProxyFactory:动态代理对象
/**
 * @author compass
 * @version 1.0
 * @date 2021-07-27 19:57
 */
public class ProxyFactory {
    // 被代理的目标对象
    private Object target;

    // 在创建代理对象的时候对目标对象进行初始化
    public ProxyFactory(Object target) {
        this.target = target;
    }

    // 为目标对象生成代理对象
    public Object getProxyFactory(){
        /**
         *  loader:指定目标对象使用的类加载器,获取加载方法固定
         *  interface: 目标对象实现的接口类型,使用泛型方法确认类型
         *  invocationHandler:情处理,执行目标对象的方法时,会触发事情处理器方法, 会把当前执行的目标对象方法作为参数传入
         */
        return Proxy.newProxyInstance(target.getClass().getClassLoader(), target.getClass().getInterfaces(), new InvocationHandler() {
            @Override
            public Object invoke(Object proxy, Method method, Object[] args) throws Throwable {
                System.out.println("jdk代理对象开始");
                // 通过反射机制调用目标对象的方法
                Object resultValue = method.invoke(target,args);
                System.out.println("jdk代理对象结束");
                return resultValue;
            }
        });
    }
}
4.Cglib 代理模式
Cglib代理模式的基本介绍
- 静态代理和
JDK代理模式都要求目标对象是实现一个接口,但是有时候目标对象只是一个单独的对象,并没有实现任何的接口,这个时候可使用目标对象子类来实现代理,这就是Cglib代理 Cglib代理也叫作子类代理,它是在内存中构建一个子类对象从而实现对目标对象功能扩展,有些书也将Cglib代理归属到动态代理- Cglib是一个强大的高性能的代码生成包,它可以在运行期扩展java类与实现java接口,它广泛的被许多
AOP的框架使用,例如Spring AOP,实现方法拦截- 在AOP编程中如何选择代理模式:
- 目标对象需要实现接口,
用JDK代理 - 目标对象不需要实现接口,
用Cglib代理
- 目标对象需要实现接口,
- 在AOP编程中如何选择代理模式:
- Cglib包的底层是通过使用
字节码处理框架ASM来转换字节码并生成新的类
Cglib代理模式实现步骤
-
需要引入cglib的jar文件

-
在内存中动态构建子类, 注意代理的类不能为final,否则报错java.lang.IllegalArgumentException
-
目标对象的方法如果为final 或 static,那么就不会被拦截,即不会执行目标对象额外的业务方法
Cglib代理模式应用实例
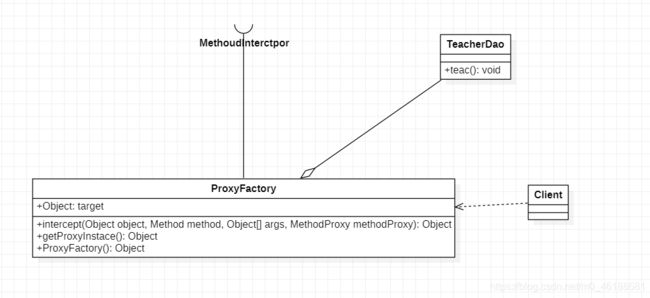
TeacherDao:被代理类
/**
 * @author compass
 * @version 1.0
 * @date 2021-07-27 22:26
 */
public class TeacherDao {

    public String teach() {
        System.out.println(" 老师授课中  , 我是cglib代理,不需要实现接口 ");
        return "hello";
    }

}
ProxyFactory:代理工厂类
/**
 * @author compass
 * @version 1.0
 * @date 2021-07-27 22:26
 */
public class ProxyFactory implements MethodInterceptor {

    // 维护一个目标对象
    private Object target;

    // 构造器,传入一个被代理的对象
    public ProxyFactory(Object target) {
        this.target = target;
    }

    // 返回一个代理对象: 是 target 对象的代理对象
    public Object getProxyInstance() {
        // 1. 创建一个工具类
        Enhancer enhancer = new Enhancer();
        // 2. 设置父类
        enhancer.setSuperclass(target.getClass());
        // 3. 设置回调函数
        enhancer.setCallback(this);
        // 4. 创建子类对象,即代理对象
        return enhancer.create();
    }

    // 重写 intercept 方法,会调用目标对象的方法
    @Override
    public Object intercept(Object arg0, Method method, Object[] args, MethodProxy arg3) throws Throwable {
        System.out.println("Cglib代理模式 ~~ 开始");
        Object returnVal = method.invoke(target, args);
        System.out.println("Cglib代理模式 ~~ 提交");
        return returnVal;
    }

}
Client:客户端
/** cglib:代理模式,不需要实现接口,被代理的对象可以直接是一个单独类,采用拦截的方式,创建一个子类去调用
 * @author compass
 * @version 1.0
 * @date 2021-07-27 22:26
 */
public class Client {

    public static void main(String[] args) {
        // 创建目标对象
        TeacherDao target = new TeacherDao();

        // 获取到代理对象,并且将目标对象传递给代理对象
        TeacherDao proxyInstance = (TeacherDao) new ProxyFactory(target).getProxyInstance();

        // 执行代理对象的方法,触发intercept 方法,从而实现 对目标对象的调用
        String res = proxyInstance.teach();
        System.out.println("res=" + res);
    }

}
5.代理模式(Proxy)的变体
-
防火墙代理:内网通过代理穿透防火墙,实现对公网的访问
-
缓存代理:比如:当请求图片文件等资源时,先到缓存代理去取,如果取到资源则ok,如果取不到资源,再到公网或者数据库取,然后缓存
-
远程代理远程对象的本地代表,通过它可以把远程对象当本地对象来调用。远程代理通过网络和真正的远程对象沟通信息
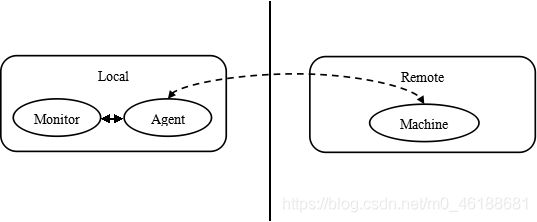
11.桥接模式
1. 桥接模式(Bridge)-原理类图
Client:桥接模式的调用者Abstraction:抽象类,Abstraction 中维护了一个 Implementor 实现类的实例(聚合关系),Abstraction 充当桥接类RefinedAbstraction:Abstraction 的具体实现类Implementor:定义行为的接口ConcreteImplementor:Implementor 的具体实现类
从 UML 图: 这里的抽象类和接口是聚合的关系, 其实也是调用和被调用关系,抽象在 Abstraction 这一块,行为实现在 Implementor 这一块

2.尺子和画笔的关系
举个例子:比如说我们需要画项目结构图,需要尺子和笔进行来绘画,尺子呢有不同类型的,有正方形的,三角形的,圆形的,笔呢也有很多颜色,有白色,黑色,我们可以使用桥接模式把他们组合到一起进行使用。
尺子接口:
/**
 * @author compass
 * @date 2022-10-05
 * @since 1.0
 **/
public interface Ruler {

    /**
     * 规定尺子的走向行为
     *
     * @return void
     * @author compass
     * @date 2022/10/5 14:22
     * @since 1.0.0
     **/
    String regularize();
}
三角形尺子:
/**
 * @author compass
 * @date 2022-10-05
 * @since 1.0
 **/
public class TriangleRuler implements Ruler {
    @Override
    public String regularize() {
        // 输出三角形
        return "△";
    }
}
正方形尺子:
/**
 * @author compass
 * @date 2022-10-05
 * @since 1.0
 **/
public class SquareRuler implements Ruler {
    @Override
    public String regularize() {
        // 输出正方形
        return  "□";
    }
}
圆形尺子:
/**
 * @author compass
 * @date 2022-10-05
 * @since 1.0
 **/
public class CircleRuler implements Ruler {
    @Override
    public String regularize() {
        // 输出圆形
        return  "○";
    }
}
画笔类:
/**
 * @author compass
 * @date 2022-10-05
 * @since 1.0
 **/
public abstract class Pen  {
    // 将尺子组合进来
    protected Ruler ruler;

    public Pen(Ruler ruler) {
        this.ruler = ruler;
    }
    // 笔画画的抽象方法
    public abstract void draw();
}
黑色画笔:
/**
 * @author compass
 * @date 2022-10-05
 * @since 1.0
 **/
public class BlackPen extends Pen {

    public BlackPen(Ruler ruler) {
        super(ruler);
    }

    @Override
    public void draw() {
        String regularize = super.ruler.regularize();
        System.out.println("黑色笔画【"+regularize+"】");
    }
}
白色画笔:
/**
 * @author compass
 * @date 2022-10-05
 * @since 1.0
 **/
public class WhitePen extends Pen {

    public WhitePen(Ruler ruler) {
        super(ruler);
    }

    @Override
    public void draw() {
        String regularize = super.ruler.regularize();
        System.out.println("黑色笔画【"+regularize+"】");
    }
}
客户端调用:
/**
 * @author compass
 * @date 2022-10-05
 * @since 1.0
 **/
public class Client {
    public static void main(String[] args) {

        new WhitePen(new CircleRuler()).draw();
        new WhitePen(new SquareRuler()).draw();
        new WhitePen(new TriangleRuler()).draw();
    }
}
3. 桥接模式的注意事项
实现了抽象和实现部分的分离, 从而极大的提供了系统的灵活性, 让抽象部分和实现部分独立开来, 这有助于系统进行分层设计, 从而产生更好的结构化系统。
- 对于系统的高层部分, 只需要知道抽象部分和实现部分的接口就可以了, 其它的部分由具体业务来完成。
- 桥接模式替代多层继承方案, 可以减少子类的个数, 降低系统的管理和维护成本
- 桥接模式的引入增加了系统的理解和设计难度, 由于聚合关联关系建立在抽象层, 要求开发者针对抽象进行设计和编程
- 桥接模式要求正确识别出系统中两个独立变化的维度(抽象和实现), 因此其使用范围有一定的局限性, 即需要有这样的应用场景
4.桥接模式应用场景
对于那些不希望使用继承或因为多层次继承导致系统类的个数急剧增加的系统, 桥接模式尤为适用
- JDBC 驱动程序
- 银行转账系统
- 转账分类(抽象层):网上转账, 柜台转账, AMT 转账
- 转账用户类型(行为实现): 普通用户, 银卡用户, 金卡用户
- 消息管理
- 消息类型(抽象层): 即时消息, 延时消息
- 消息分类(行为实现): 手机短信, 邮件消息, QQ 消息
12.模板方法
1.模板方法模式基本介绍
-
模板方法模式(
Template Method Pattern) , 又叫模板模式(Template Pattern), 在一个抽象类公开定义了执行它的方法的模板,它的子类可以按需要重写方法实现, 但调用将以抽象类中定义的方式进行 -
简单说, 模板方法模式定义一个操作中的算法(流程)的骨架, 而将一些步骤延迟到子类中, 使得子类可以不改变一个算法的结构, 就可以重定义该算法的某些特定步骤
模板方法设计模式属于行为型模式
2. 模板方法模式原理类图
AbstractClass 为抽象类, 类中实现了template()模板方法, 该方法定义了算法的骨架, 具体子类需要去实现抽象方法 operation 2,3,4ConcreteClass实现抽象方法 operation 2,3,4`以完成算法中特定子类的步骤
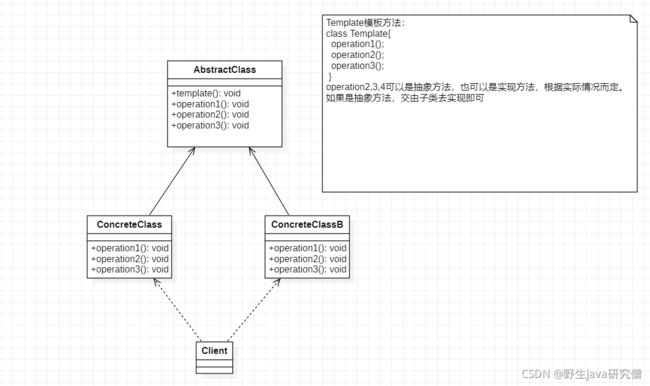
3.动物的生活规律
我们人类其实也是动物,和启动动物一样,我们都具有相同的行为,我们可以把这些共同的行为抽象为一个模板,然后由具体的子类去实现这个行为。
生活行为接口:
/**
 * @author compass
 * @date 2022-10-05
 * @since 1.0
 **/
public abstract class Live {

    /**
     * 生活方法 只管调用该方法就可以完成具体的生活方式,
     * 此处代码完全不用改动,控制权交给子类
     *
     * @return void
     * @author compass
     * @date 2022/10/5 14:40
     * @since 1.0.0
     **/
   public void live(){
       eat();
       exercise();
   }

   /**
   * 吃食物的方法,具体吃什么?怎么吃交给子类去实现
   * @return void
   * @author compass
   * @date 2022/10/5 14:42
   * @since 1.0.0
   **/
   protected abstract void eat();

    /**
     * 运动的方法。具体怎么运动交给子类实现
     * @return void
     * @author compass
     * @date 2022/10/5 14:42
     * @since 1.0.0
     **/
    protected abstract void exercise();
}
人类:
/**
 * @author compass
 * @date 2022-10-05
 * @since 1.0
 **/
public class Person extends Live {
    @Override
    protected void eat() {
        System.out.println("人类在吃米饭");
    }

    @Override
    protected void exercise() {
        System.out.println("人类在跑步");
    }
}
猫类:
/**
 * @author compass
 * @date 2022-10-05
 * @since 1.0
 **/
public class Cat extends Live {
    @Override
    protected void eat() {
        System.out.println("猫咪吃小鱼干");
    }

    @Override
    protected void exercise() {
        System.out.println("猫咪在抓老鼠");

    }
}
客户端调用:
/**
 * @author compass
 * @date 2022-10-05
 * @since 1.0
 **/
public class Client {
    public static void main(String[] args) {
        Live person = new Person();
        person.live();

        Live cat = new Cat();
        cat.live();
    }
}
4. Spring 框架中的模板方法模式
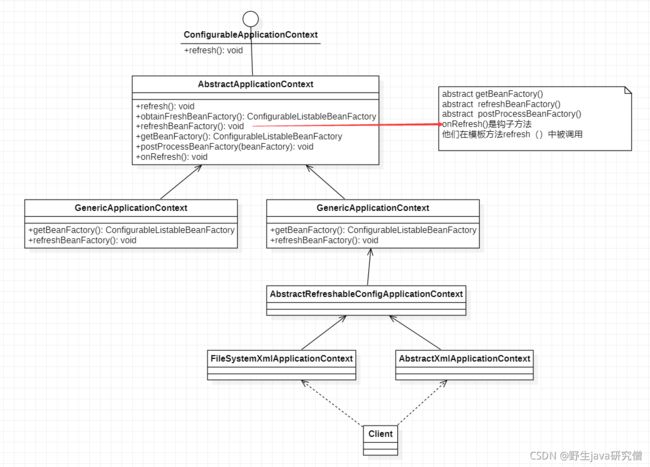
5 . 模板方法模式的注意事项
模板方法模式的注意事项和细节
- 基本思想是:将算法的具体实现流程编写在抽象父类中,某些具体的方法实现由子类重写。 需要修改算法时, 只要修改父类的模板方法或者已经实现的某些步骤流程, 子类就会继承这些修改
- 实现了最大化代码复用。 父类的模板方法和已实现的某些步骤会被子类继承而直接使用。
- 既统一了算法, 也提供了很大的灵活性。 父类的模板方法确保了算法的结构保持不变, 同时由子类提供部分步骤的实现。
- 该模式的不足之处: 每一个不同的具体实现都需要一个子类实现, 导致类的个数增加, 使得系统更加庞大
- 一般模板方法都加上
final关键字, 防止子类重写模板方法 - 模板方法模式使用场景: 当要完成在某个过程, 该过程要执行一系列步骤 , 这一系列的步骤基本相同, 但其个别步骤在实现时 可能不同, 通常考虑用模板方法模式来处理
13.迭代器模式
1.迭代器模式基本介绍
- 迭代器模式(Iterator Pattern) 是常用的设计模式,属于行为型模式
- 如果我们的集合元素是用不同的方式实现的, 有数组,还有java的集合类,或者还有其他方式,当客户端要遍历这些集合元素的时候就要使用多种遍历方式,而且还会暴露元素的内部结构,可以考虑使用迭代器模式解决。
- 迭代器模式,提供一种遍历集合元素的统一接口,用一致的方法遍历集合元素,对于使用者来说,不需要知道集合对象的底层表示,即: 不暴露集合的内部结构
2.迭代器模式的原理类图
- Iterator :迭代器接口,由 JDK 提供,该接口定义了三个用于遍历集合(数组)的方法:hasNext()、next()、remove()
- ConcreteIterator:具体的迭代器类,实现具体的迭代逻辑
- Aggregate:一个统一的聚合接口,将客户端和具体的 Aggregate 实现类解耦
- ConcreteAggreage :具体的聚合实现类,该类持有对象集合(Element),并提供一个方法,返回一个迭代器, 该迭代器可以正确遍历集合
- Client:客户端,通过 Iterator 和 Aggregate 依赖其对应的子类

3.行车记录仪
比如我们需要记录行车记录仪中的记录,然后进行查看,这就是可以使用迭代器模式进行查看,假设我们设置最多最多只能查看最近的10条记录,超过10条就行进行覆盖操作。
行车记录仪类:
import java.util.Iterator;

/**
 * @author compass
 * @date 2022-10-05
 * @since 1.0
 **/
public class DrivingRecorder implements Iterable<String> {

    // 当前记录索引位置
    private int index;

    // 假设只能存放10条记录

    private String[] records = new String[10];


    /**
     * 添加行车记录
     *
     * @param record 记录
     * @return void
     * @author compass
     * @date 2022/10/5 15:26
     * @since 1.0.0
     **/
    public void append(String record) {
        if (index == 9) {
            index = 0;
        } else {
            index++;
        }
        records[index] = record;
    }


    @Override
    public Iterator<String> iterator() {
        return new Itr();
    }

    // 迭代器实现
    private class Itr  implements Iterator {
        int cursor = index;
        int loopCount = 0;

        @Override
        public boolean hasNext() {
            return loopCount<records.length;
        }

        @Override
        public Object next() {
            int i = cursor;
            if (cursor == 0){
                cursor = records.length-1;
            }else {
                cursor--;
            }
            loopCount++;
            return records[i];
        }
    }
}
客户端使用:
/**
 * @author compass
 * @date 2022-10-05
 * @since 1.0
 **/
public class Client {
    public static void main(String[] args) {
        DrivingRecorder recorder = new DrivingRecorder();
        for (int i = 0; i < 12; i++) {
            recorder.append(String.format("第%d条行车记录",i));
        }
        // 获取迭代器
        Iterator<String> iterator = recorder.iterator();

        // 使用while的形式
        while (iterator.hasNext()){
            String item = iterator.next();
            System.out.println(item);
        }

        System.out.println("---------------------");

        // 使用增强for
        for (String item : recorder) {
            System.out.println(item);
        }
    }
}
4.迭代器模式的注意事项
- 迭代器模式的注意事项和细节
优点
- 提供一个统一的方法遍历对象,客户不用再考虑聚合的类型,使用一种方法就可以遍历对象了。
- 隐藏了聚合的内部结构,客户端要遍历聚合的时候只能取到迭代器,而不会知道聚合的具体组成。
- 提供了一种设计思想,就是一个类应该只有一个引起变化的原因(叫做单一责任原则)。在聚合类中,我们把迭代器分开,就是要把管理对象集合和遍历对象集合的责任分开,这样一来集合改变的话,只影响到聚合对象。而如果遍历方式改变的话,只影响到了迭代器。
- 当要展示一组相似对象,或者遍历一组相同对象时使用,适合使用迭代器模式
缺点
每个聚合对象都要一个迭代器,会生成多个迭代器不好管理类
14.责任链模式
1.责任链模式介绍
- 职责链模式(Chain of Responsibility Pattern),又叫责任链模式, 为请求创建了一个接收者对象的链。这种模式对请求的发送者和接收者进行解耦
- 职责链模式通常每个接收者都包含对另一个接收者的引用。如果一个对象不能处理该请求, 那么它会把相同的请求传给下一个接收者,依此类推
- 责任链模式使多个对象都有机会处理请求,从而避免请求的发送者和接收者之间的耦合关
系。将这个对象连成一条链,并沿着这条链传递该请求,直到有一个对象处理它为 - 这种类型的设计模式属于行为型模式

2.职责链模式的原理类图
- Handler:抽象的处理者,定义了一个处理请求的接口,同时该类中聚合了另外一个 Handler 对象
- ConcreteHandlerA 、ConcreteHandlerB 是具体的处理者,处理它自己负责的请求, 可以访问它的后继者(即下一个处理者),如果可以处理当前请求, 则处理, 否则就将该请求交个后继者去处理, 从而形成一个职责链
- Request :含义很多属性, 表示一个请求

3.小王的报销流程
最近小王啊出差,需要向公司报销出差费用。但是他们公司的报销有一个规则,就是1000元一下由财务报销,2000元以下项目经理报销。超过2000元以上必须有董事长进行报销。搞的这个审批流程很麻烦,他必须得清除这个报销流程,不然的话就会导致他先去财务报销,被驳回,然后他再去找项目经理,然后再驳回,最后找到董事长,如果运气好一次就行,如果运气不好,有不熟悉规则,那么就得被驳回好几次。我们现在就失业责任链模式进行榜小王进行改善,让他只提交一次申请,不用管这个审批流程,由责任链帮他找到对应的审批人。
抽象审批人:
/**
 * @author compass
 * @date 2022-10-06
 * @since 1.0
 **/
public abstract class Approver {
    // 抽象审批人姓名
    protected String approveName;
    // 下一位审批人
    protected Approver nextApprover;

    public Approver(String approveName) {
        this.approveName = approveName;
    }

    public Approver setApprover(Approver approver) {
        this.nextApprover = approver;
        return this.nextApprover;
    }

    /**
     * 抽象审批方法
     * @param amount 需要审批的金额
     * @return void
     * @author compass
     * @date 2022/10/6 17:36
     * @since 1.0.0
     **/
    public abstract void approver(int amount);
}
财务专员:
/**
 * @author compass
 * @date 2022-10-06
 * @since 1.0
 **/
public class Staff extends Approver {

    public Staff(String approveName) {
        super(approveName);
    }

    @Override
    public void approver(int amount) {
        if (amount<=1000){
            System.out.println(String.format("审批通过,金额[%d],审核人[财务]:%s",amount,approveName));
        }else {
            System.out.println(String.format("无权审批,金额[%d],审核人[财务]:%s",amount,approveName));
            this.nextApprover.approver(amount);
        }
    }
}
项目经理:
/**
 * @author compass
 * @date 2022-10-06
 * @since 1.0
 **/
public class ProjectManager extends Approver {

    public ProjectManager(String approveName) {
        super(approveName);
    }

    @Override
    public void approver(int amount) {
        if (amount<=2000){
            System.out.println(String.format("审批通过,金额[%d],审核人[项目经理]:%s",amount,approveName));
        }else {
            System.out.println(String.format("无权审批,金额[%d],审核人[项目经理]:%s",amount,approveName));
            this.nextApprover.approver(amount);
        }
    }
}
董事长:
/**
 * @author compass
 * @date 2022-10-06
 * @since 1.0
 **/
public class President extends Approver {

    public President(String approveName) {
        super(approveName);
    }

    @Override
    public void approver(int amount) {
        if (amount<=3000){
            System.out.println(String.format("审批通过,金额[%d],审核人[董事长]:%s",amount,approveName));
        }else {
            System.out.println(String.format("无权审批,金额[%d],审核人[董事长]:%s",amount,approveName));
            this.nextApprover.approver(amount);
        }
    }
}
小王去申请:
/**
 * @author compass
 * @date 2022-10-05
 * @since 1.0
 **/
public class Client {
    public static void main(String[] args) {
        Approver approver = new Staff("张飞");
        approver.setApprover(new ProjectManager("关羽")).setApprover(new President("刘备"));

        // 1000以内找财务
        approver.approver(1000);

        // 2000以内找项目经理
        approver.approver(2000);

        // 3000以内找董事长
        approver.approver(3000);

    }
}
4.职责链模式的注意事项和细节
- 将请求和处理分开,实现解耦,提高系统的灵活性
- 简化了对象,使对象不需要知道链的结构
- 性能会受到影响,特别是在链比较长的时候,因此需控制链中最大节点数量,一般通过在Handler中设置一个最大节点数量,在setNext()方法中判断是否已经超过阀值,超过则不允许该链建立,避免出现超长链将会无意识地破坏系统性能
- 调试不方便。采用了类似递归的方式,调试时逻辑可能比较复杂
- 最佳应用场景: 有多个对象可以处理同一个请求时,比如:多级请求、请假、加薪等审批流程、 Java Web中Tomcat对Encoding的处理、拦截器
15.策略模式
1.策略模式基本介绍
- 策略模式(Strategy Pattern)中,定义算法族(策略簇),分别封装起来,让他们之间可以互相替换,此模式让算法的变化独立于使用算法的客户
- 这算法体现了几个设计原则:
第一、把变化的代码从不变的代码中分离出来;
第二、针对接口编程而不是具体类(定义了策略接口);
第三、多用组合(或聚合),少用继承(客户通过组合方式使用策略)
2.策略模式的原理类图
从图中可以看到, 客户 context 有成员变量 strategy 或者其他的策略接口,至于需要使用到哪个策略, 我们可以在构造器中指定
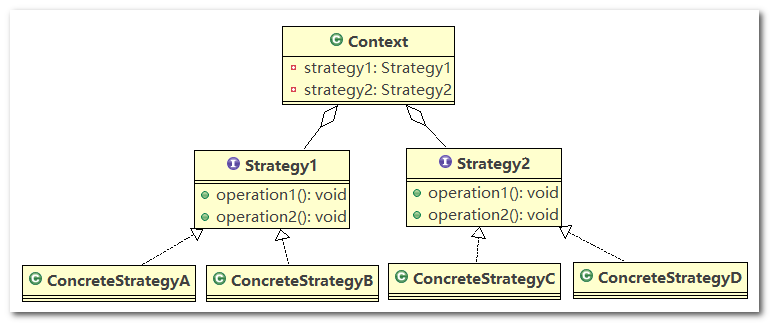
3.用策略模式完成万能的use接口处理
我们知道电脑的use接口,是功能特别强大的,,可以插入鼠标,键盘,u盘等设备,主要是他对外暴露的都是同一个接口,使用者只需要插入即可完成对应的功能。
USB接口:
/**
 * @author compass
 * @date 2022-10-06
 * @since 1.0
 **/
public interface USB {

    /**
     * 抽象读取行为
     *
     * @return java.lang.String
     * @author compass
     * @date 2022/10/6 18:13
     * @since 1.0.0
     **/
    String read();
}
鼠标类:
/**
 * @author compass
 * @date 2022-10-06
 * @since 1.0
 **/
public class Mouse implements USB {
    @Override
    public String read() {
        System.out.println("鼠标数据");
        return "鼠标数据";
    }
}
键盘类:
/**
 * @author compass
 * @date 2022-10-06
 * @since 1.0
 **/
public class KeyBoard implements USB {
    @Override
    public String read() {
        System.out.println("键盘指令数据");
        return "键盘指令数据";
    }
}
摄像头类:
/**
 * @author compass
 * @date 2022-10-06
 * @since 1.0
 **/
public class Camera implements USB {
    @Override
    public String read() {
        System.out.println("摄像头数据");
        return "摄像头数据";
    }
}
计算机类:
/**
 * @author compass
 * @date 2022-10-06
 * @since 1.0
 **/
public class Computer {
    // 电脑主机上的USB接口
    private  USB usb;

    public void setUsb(USB usb){
        this.usb = usb;
    }

    public String computer(){
        return  usb.read();
    }
}
客户端使用:
/**
 * @author compass
 * @date 2022-10-05
 * @since 1.0
 **/
public class Client {
    public static void main(String[] args) {
        Computer computer = new Computer();

        computer.setUsb(new KeyBoard());
        computer.computer();

        computer.setUsb(new Mouse());
        computer.computer();

        computer.setUsb(new Camera());
        computer.computer();
    }
}
4.策略模式的注意事项和细节
- 策略模式的关键是: 分析项目中变化部分与不变部分
- 策略模式的核心思想是:多用组合(聚合),少用继承;用行为类组合,而不是行为的继承,这样更有弹性
- 体现了“对修改关闭,对扩展开放”原则,客户端增加行为不用修改原有代码,只要添加一种策略(或者行为)即可, 避免了使用多重判断语句(if…else if…else)
- 提供了可以替换继承关系的办法: 策略模式将算法封装在独立的Strategy类中使得你可以独立于其Context改变它,使它易于切换、易于理解、易于扩展
- 需要注意的是:每添加一个策略就要增加一个类,当策略过多时,会导致类数目庞大
17.备忘录模式
1.备忘录模式基本介绍
- 备忘录模式(Memento Pattern) 在不破坏封装性的前提下,捕获一个对象的内部状态,并在该对象之外保存这个状态。这样以后就可将该对象恢复到原先保存的状态
- 可以这里理解备忘录模式:现实生活中的备忘录是用来记录某些要去做的事情,或者是记录已经达成的共同意见的事情,以防忘记了。
- 而在软件层面,备忘录模式有着相同的含义,备忘录对象主要用来记录一个对象的某种状态,或者某些数据,当要做回退时,可以从备忘录对象里获取原来的数据进行恢复操作
- 备忘录模式属于行为型模式
2.备忘录模式原理类图

- Originator :对象(需要保存状态的对象)
- Memento :备忘录对象,负责保存好记录, 即 Originator 内部状态
- Caretaker:守护者对象,负责保存多个备忘录对象, 使用集合管理, 提高效率
说明:如果希望保存多个 Originator 对象的不同时间的状态,只需要使用 HashMap
3.帮作家找回误删除的文档
有一位作家平时在写作,然后一不小心去喝水的时候,被调皮的小猫咪按下了del键,把一些内容删除掉,这写作可是靠灵感的啊,这回头在写可能就没那么好的效果了,而且也比较耗时。一般的编辑器都有ctrl+z回退的效果,我们就使用这个状态模式,把作家的每次写入记录都给保存,起来,即使作家不小心删除,或者断电都能找回他的文章,如果要避免断电内容丢失的话,最好的结果就是每隔一段时间把内存中的记录写到磁盘,这才是万无一失的。这里我们只保存到内存。
文档类:
/**
 * @author compass
 * @date 2022-10-06
 * @since 1.0
 **/
public class Document {

    // 标题
    private String title;

    // 内容
    private String content;

    public Document(String title) {
        this.title = title;
        // 内容默认为空
        this.content = "";
    }

    /**
     * 创建历史记录
     *
     * @return compass.token.pocket.com.service.demo.History
     * @author compass
     * @date 2022/10/6 20:32
     * @since 1.0.0
     **/
    public History createHistory() {
        return new History(content);
    }
    /**
     * 恢复历史记录
     *
     * @return compass.token.pocket.com.service.demo.History
     * @author compass
     * @date 2022/10/6 20:32
     * @since 1.0.0
     **/
    public void  restoreHistory(History history){
        this.content = history.getContent();

    }

    public String getTitle() {
        return title;
    }

    public void setTitle(String title) {
        this.title = title;
    }

    public String getContent() {
        return content;
    }

    public void setContent(String content) {
        this.content = content;
    }
}
编辑器类:
import java.util.ArrayList;
import java.util.List;

/**
 * @author compass
 * @date 2022-10-06
 * @since 1.0
 **/
public class Editor {

    private Document document;

    private List<History> historyList;

    private int historyPosition = -1;

    public Editor(Document document) {
        System.out.println(">>>打开文档:" + document.getTitle());
        this.document = document;
        // 初始化历史记录容器
        historyList = new ArrayList<>();
        // 载入文档后保存一份
        backup();
        // 显示内容
        show();
    }

    // 显示内容
    private void show() {
        System.out.println(">>>文档开始");
        System.out.println(document.getContent());
        System.out.println(">>>文档结束");
    }

    // 备份
    private void backup() {
        historyList.add(document.createHistory());
        historyPosition++;
    }
    // 撤销操作
    public void undo(){
        System.out.println(">>>撤销操作");
        if (historyPosition ==0){
            System.out.println("已经到最原始记录,不能再撤销");
            return;
        }

        historyPosition--;
        History history = historyList.get(historyPosition);
        // 取出历史记录并且恢复到编辑器中
        document.restoreHistory(history);
        show();
    }

    // 添加内容
    public void append(String text) {
        System.out.println(">>>插入操作");
        document.setContent(document.getContent() + "\n" + text);
        // 保存一份显示内容
        backup();
        // 显示内容
        show();
    }

    // 删除操作
    public void delete() {
        System.out.println(">>>删除操作");
        document.setContent("");
        // 删除后保存一份历史记录
        backup();
        // 显示内容
        show();
    }

    // 保存操作
    public void save() {
        System.out.println(">>>保存到磁盘");
    }
}
历史记录类:
/**
 * @author compass
 * @date 2022-10-06
 * @since 1.0
 **/
public class History {

    private String content;

    public String getContent() {
        return content;
    }

    public void setContent(String content) {
        this.content = content;
    }

    public History(String content) {
        this.content = content;
    }
}
客户端:
/**
 * @author compass
 * @date 2022-10-06
 * @since 1.0
 **/
public class Client {
    public static void main(String[] args) {
        Editor editor = new Editor(new Document("AI的觉醒"));

        editor.append("第一章混沌初开");

        editor.append("正文20000字");

        editor.append("第二章混沌初开");

        editor.append("正文10000字");

        editor.delete();

        editor.undo();

    }
}
4.备忘录模式的注意事项和细节
- 给用户提供了一种可以恢复状态的机制,可以使用户能够比较方便地回到某个历史的状态
- 实现了信息的封装,使得用户不需要关心状态的保存细节
- 如果类的成员变量过多,势必会占用比较大的资源,而且每一次保存都会消耗一定的内存,这个需要注意
- 为了节约内存,备忘录模式可以和原型模式配合使用
19.命令模式
1.命令模式介绍
- 命令模式(Command Pattern): 在软件设计中, 我们经常需要向某些对象发送请求, 但是并不知道请求的接收者是谁, 也不知道被请求的操作是哪个,我们只需在程序运行时指定具体的请求接收者即可, 此时可以使用命令模式来进行设计
- 命令模式使得请求发送者与请求接收者消除彼此之间的耦合, 让对象之间的调用关系更加灵活, 实现解耦
- 在命令模式中, 会将一个请求封装为一个对象, 以便使用不同参数来表示不同的请求(即命令), 同时命令模式也支持可撤销的操作
- 通俗易懂的理解: 将军发布命令, 士兵去执行。 其中有几个角色: 将军(命令发布者) 、 士兵(命令的具体执行者) 、 命令(连接将军和士兵)
- Invoker 是调用者(将军) , Receiver 是被调用者(士兵) , MyCommand 是命令, 实现了 Command 接口, 持有接收对象
2.命令模式原理类图
- Invoker:是调用者角色,里面聚合了一个 Command 实现类的对象
Command:是命令角色, 用于定义接口规范,需要执行的所有命令都在这里, 可以是接口或抽象类 - Receiver:接收者角色, 知道如何实施和执行一个请求相关的操作
- ConcreteCommand:具体的命令角色,实现(或继承) Command,将一个接收者对象与一个动作绑定, 调用接受者相应的操作
- 将 Command 的具体实现类与 Invoker 聚合,将 Receiver 与 Command 的具体实现类聚合,从而将 Invoker(命令调用者)和
Receiver(命令执行者)解耦
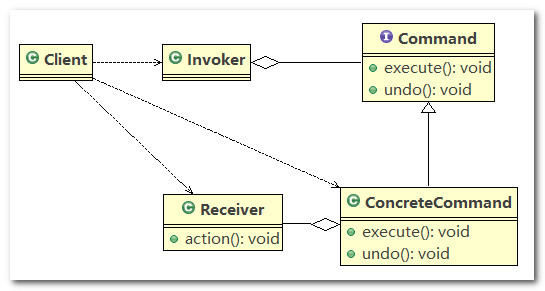
3.闪烁的灯光
比如我们要进行开灯和关灯,其实就是2个指令,我们可以用命令模式来实现,指定2个指令,开和关即可,如果我们想灯是闪烁效果,我们还可以新增一种闪烁命令。
灯泡类:
/**
 * @author compass
 * @date 2022-10-06
 * @since 1.0
 **/
public class Blub {
    public void on(){
        System.out.println("开灯");
    }
    public void off(){
        System.out.println("关灯");
    }
}
命令接口:
/**
 * @author compass
 * @date 2022-10-06
 * @since 1.0
 **/
public interface Command {

    // 执行命令
    void exe();
    // 撤销命令
    void unexce();
}
开命令类:
/**
 * @author compass
 * @date 2022-10-06
 * @since 1.0
 **/
public class Open implements Command {

    private Blub blub;

    public Open(Blub blub) {
        this.blub = blub;
    }

    @Override
    public void exe() {
        blub.on();
    }

    @Override
    public void unexce() {
        blub.off();
    }
}
关命令类:
/**
 * @author compass
 * @date 2022-10-06
 * @since 1.0
 **/
public class Close implements Command {

    private Blub blub;

    public Close(Blub blub) {
        this.blub = blub;
    }

    @Override
    public void exe() {
        blub.off();
    }

    @Override
    public void unexce() {
        blub.on();
    }
}
闪烁命令类:
/**
 * @author compass
 * @date 2022-10-06
 * @since 1.0
 **/
public class FlashCommand implements Command {
    private Blub blub;

    // 闪烁命令运行状态
    private volatile boolean neonRun;

    public FlashCommand(Blub blub) {
        this.blub = blub;
    }

    @Override
    public synchronized void exe() {
        // 非命令运行时才启动闪烁线程
        if (!neonRun) {
            neonRun = true;

            System.out.println("闪烁命令开始");
            new Thread(() -> {

                while (neonRun) {

                    try {
                        blub.off();
                        Thread.sleep(500);
                        blub.on();
                        Thread.sleep(500);
                    } catch (InterruptedException e) {
                        e.printStackTrace();
                    }

                }
            }).start();
        }
    }

    @Override
    public void unexce() {
        neonRun = false;
        System.out.println("霓虹灯任务结束");

    }
}
开关类:
/**
 * @author compass
 * @date 2022-10-06
 * @since 1.0
 **/
public class Switcher {
    private Command command;

    public Switcher(Command command) {
        this.command = command;
    }

    public void setCommand(Command command) {
        this.command = command;
    }
    public void buttonPush(){
        System.out.println("按下按钮");
        command.exe();
    }
    public void buttonPop(){
        System.out.println("弹起按钮");
        command.unexce();
    }
}
客户端调用:
/**
 * @author compass
 * @date 2022-10-06
 * @since 1.0
 **/
public class Client {
    public static void main(String[] args) throws InterruptedException {
        Blub blub = new Blub();
        FlashCommand flashCommand = new FlashCommand(blub);

        Switcher switcher = new Switcher(flashCommand);

        switcher.buttonPush();
        Thread.sleep(3000);
        switcher.buttonPop();

    }
}
4.命令模式注意事项
将发起请求的对象与执行请求的对象解耦。发起请求的对象是调用者,调用者只要调用命令对象的execute()方法就可以让接收者工作,而不必知道具体的接收者对象是谁、是如何实现的,命令对象会负责让接收者执行请求的动作, 也就是说: ”请求发起者”和“请求执行者”之间的解耦是通过命令对象实现的,命令对象起到了纽带桥梁的作用
容易设计一个命令队列。只要把命令对象放到列队,就可以多线程的执行命令容易实现对请求的撤销和重做
命令模式不足:可能导致某些系统有过多的具体命令类, 增加了系统的复杂度, 这点在在使用的时候要注意
空命令也是一种设计模式,它为我们省去了判空的操作。在上面的实例中,如果没有用空命令,我们每按下一个按键都要判空,这给我们编码带来一定的麻烦
命令模式经典的应用场景:界面的一个按钮都是一条命令、 模拟CMD(DOS命令)订单的撤销/恢复、触发-反馈机制
20.访问者模式
1.访问者模式基本介绍
- 访问者模式(Visitor Pattern) :封装一些作用于某种数据结构的各元素的操作,它可以在不改变数据结构的前提下定义作用于这些元素的新的操作
- 访问者模式主要将数据结构与数据操作分离,解决数据结构和操作耦合性问题
- 访问者模式的基本工作原理是:在被访问的类里面加一个对外提供接待访问者的接口
- 访问者模式主要应用场景是: 需要对一个对象结构中的对象进行很多不同操作(这些操作彼此没有关联),同时需要避免让这些操作污染这些对象的类,可以选用访问者模式解决
2.访问者模式基本介绍
Visitor 是抽象访问者,定义访问者的行为规范
ConcreteVisitor :是一个具体的访问者,继承(或实现) Visitor,实现 Visitor 中定义的每个方法,实现具体的行为逻辑
Element 定义一个accept 方法,用于接收一个访问者对象(Visitor 的具体实现类)
ConcreteElement 为具体元素, 实现了 Element 接口中 accept 方法
ObjectStructure 能枚举它里面所包含的元素(Element), 可以提供一个高层的接口,目的是允许访问者访问指定的元素
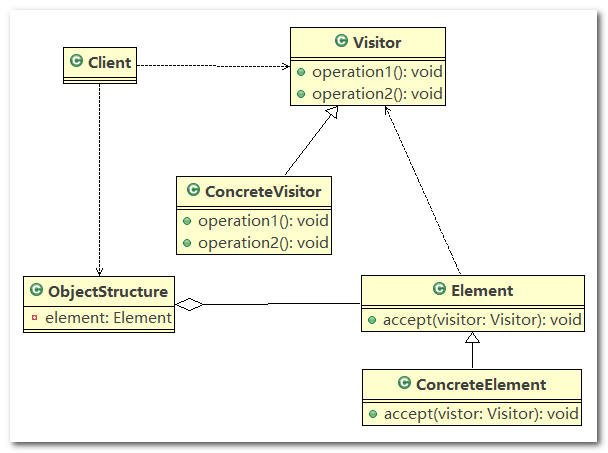
3.超市购物
超市有不同类型的商品,商品的计价方式也不同,有的是原价,有的会打折,无论价格计算方式有多么复杂,最终都是由收银员进行统一处理。
商品抽象类:
import java.time.LocalDate;

/**
 * @author compass
 * @date 2022-10-08
 * @since 1.0
 **/
public class Product {
    private String name;
    private LocalDate productDate;
    private float price;

    public Product(String name, LocalDate productDate, float price) {
        this.name = name;
        this.productDate = productDate;
        this.price = price;
    }

    public String getName() {
        return name;
    }

    public void setName(String name) {
        this.name = name;
    }

    public LocalDate getProductDate() {
        return productDate;
    }

    public void setProductDate(LocalDate productDate) {
        this.productDate = productDate;
    }

    public float getPrice() {
        return price;
    }

    public void setPrice(float price) {
        this.price = price;
    }
}
水果类:
import java.time.LocalDate;

/**
 * @author compass
 * @date 2022-10-08
 * @since 1.0
 **/
public class Fruit extends Product implements AcceptTable{

    public Fruit(String name, LocalDate productDate, float price) {
        super(name, productDate, price);
    }

    @Override
    public void accept(Vistor vistor) {
        vistor.visit(this);
    }
}
酒水类:
import java.time.LocalDate;

/**
 * @author compass
 * @date 2022-10-08
 * @since 1.0
 **/
public class Wine extends Product implements AcceptTable{

    public Wine(String name, LocalDate productDate, float price) {
        super(name, productDate, price);
    }
    @Override
    public void accept(Vistor vistor) {
        vistor.visit(this);
    }
}
糖果类:
/**
 * @author compass
 * @date 2022-10-08
 * @since 1.0
 **/
public class Candy  extends Product implements AcceptTable{

    public Candy(String name, LocalDate productDate, float price) {
        super(name, productDate, price);
    }

    @Override
    public void accept(Vistor vistor) {
        vistor.visit(this);
    }
}
访问者接口:
/**
 * @author compass
 * @date 2022-10-08
 * @since 1.0
 **/
public interface Vistor {

    // 重载糖果方法
    float visit(Candy candy);

    // 重载酒水方法
    float visit(Wine wine);

    // 重载水果方法
    float visit(Fruit fruit);
}
折扣计价访问者:
import java.time.LocalDate;

/**
 * @author compass
 * @date 2022-10-08
 * @since 1.0
 **/
public class DiscountVisitor implements Vistor {

    // 结算日期
    private LocalDate billDate;

    public DiscountVisitor(LocalDate billDate) {
        System.out.println(String.format("结算日期:%s", billDate.toString()));
        this.billDate = billDate;
    }

    @Override
    public float visit(Candy candy) {
        float rate = 0;
        long days = billDate.toEpochDay() - candy.getProductDate().toEpochDay();
        if (days > 180) {
            System.out.println(String.format("%s超过半年请勿食用",candy.getName()));

        } else {
            rate = 0.9f;
        }
        float discountPrice = candy.getPrice() * rate;
        System.out.println(String.format("糖果[%s]打折后的价格是:%f", candy.getName(), discountPrice));
        return discountPrice;
    }

    @Override
    public float visit(Wine wine) {
        System.out.println(String.format("酒[%s]无折扣", wine.getName()));
        return wine.getPrice();

    }

    @Override
    public float visit(Fruit fruit) {
        float rate = 0;
        long days = billDate.toEpochDay() - fruit.getProductDate().toEpochDay();
        if (days > 7) {
            System.out.println(String.format("%s超过7天请勿食用",fruit.getName()));
        } else if (days > 3) {
            rate = 0.5f;
        } else {
            rate = 1f;
        }
        float discountPrice = fruit.getPrice() * rate;
        System.out.println(String.format("水果[%s]打折后的价格是:%f", fruit.getName(), discountPrice));
        return discountPrice;
    }
}
接待者接口:
/**
 * @author compass
 * @date 2022-10-08
 * @since 1.0
 **/
public interface AcceptTable {
    // 主动接待访问者
    void  accept( Vistor vistor);
}
客户端使用:
import java.time.LocalDate;
import java.util.Arrays;
import java.util.List;

/**
 * @author compass
 * @date 2022-10-08
 * @since 1.0
 **/
public class Client {
    public static void main(String[] args) {
        Candy candy = new Candy("大白兔奶糖", LocalDate.of(2019, 10, 11), 20.f);
        Fruit fruit = new Fruit("飞天茅台", LocalDate.of(2019, 10, 11), 50.f);
        Wine wine = new Wine("精品香蕉", LocalDate.of(2019, 10, 11), 60.f);
        DiscountVisitor visitor = new DiscountVisitor(LocalDate.of(2020, 1, 1));
        List<? extends AcceptTable> products = Arrays.asList(candy, fruit, wine);
        for (AcceptTable product : products) {
            product.accept(visitor);
        }
    }
}
4.访问者模式的注意事项
- 访问者模式符合单一职责原则、让程序具有优秀的扩展性、灵活性非常高
- 访问者模式可以对功能进行统一,可以做报表、 UI、拦截器与过滤器,适用于数据结构相对稳定的系统
- 因此,如果一个系统有比较稳定的数据结构,又有经常变化的功能需求,那么访问者模式就是比较合适的
21.观察者模式
1.观察者模式简介
观察者模式(又被称为发布-订阅(Publish/Subscribe)模式,属于行为型模式的一种,它定义了一种一对多的依赖关系,让多个观察者对象同时监听某一个主题对象。这个主题对象在状态变化时,会通知所有的观察者对象,使他们能够自动更新自己。
2.观察者模式结构图
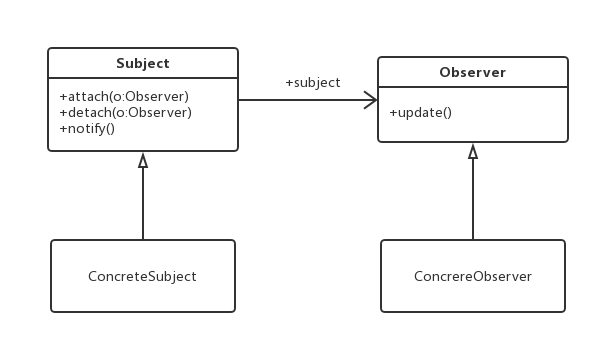
在观察者模式中有如下角色:
- Subject:抽象主题(抽象被观察者),抽象主题角色把所有观察者对象保存在一个集合里,每个主题都可以有任意数量的观察者,抽象主题提供一个接口,可以增加和删除观察者对象。
- ConcreteSubject:具体主题(具体被观察者),该角色将有关状态存入具体观察者对象,在具体主题的内部状态发生改变时,给所有注册过的观察者发送通知。
- Observer:抽象观察者,是观察者者的抽象类,它定义了一个更新接口,使得在得到主题更改通知时更新自己。
- ConcrereObserver:具体观察者,实现抽象观察者定义的更新接口,以便在得到主题更改通知时更新自身的状态。
3.商店老板与顾客
商店老板进货了,很多顾客需要进行购买,老板还没进货的时候,顾客就来问,一直问,很多顾客都来问老板,这样老板就非常的麻烦,老板觉得麻烦,顾客也觉得麻烦,那怎么办?不能反客为主么?让老板来通知所有顾客,让顾客关注他的微信公众号,然后,一旦进货,就给所有人推送到货的消息,这样顾客就知道货到了,直接来店里购买,老板也只需要通知一次就行。
商店类:
/**
 * @author compass
 * @date 2022-10-08
 * @since 1.0
 **/
public class Phone extends Buyer {

    public Phone(String name) {
        super(name);
    }

    @Override
    public void inform(String product) {
        if (product.contains("手机")){
            System.out.println(String.format("购买:%s",product));
        }
    }
}
抽象买家类:
/**
 * @author compass
 * @date 2022-10-08
 * @since 1.0
 **/
public  abstract class Buyer {
    private String name;

    public Buyer(String name) {
        this.name = name;
    }

    // 消息推送
    public abstract void inform(String product);
}
手机买家类:
/**
 * @author compass
 * @date 2022-10-08
 * @since 1.0
 **/
public class Phone extends Buyer {

    public Phone(String name) {
        super(name);
    }

    @Override
    public void inform(String product) {
        if (product.contains("手机")){
            System.out.println(String.format("购买:%s",product));
        }
    }
}
电脑买家类:
/**
 * @author compass
 * @date 2022-10-08
 * @since 1.0
 **/
public class computer extends Buyer {

    public computer(String name) {
        super(name);
    }

    @Override
    public void inform(String product) {
        if (product.contains("电脑")){
            System.out.println(String.format("购买:%s",product));
        }
    }
}
客户端调用:
/**
 * @author compass
 * @date 2022-10-08
 * @since 1.0
 **/
public class Client {
    public static void main(String[] args) {
        computer computer = new computer("电脑买家");
        Phone phone = new Phone("手机买家");

        Shop shop = new Shop();

        shop.register(computer);
        shop.register(phone);

        shop.setProduct("小米笔记本电脑");
        shop.setProduct("三星手机");


    }
}
22.解释器模式
1.解释器模式基本原理介绍
解释器模式
- 在编译原理中, 一个算术表达式通过词法分析器形成词法单元,而后这些词法单元再通过语法分析器构建语法分析树,最终形成一颗抽象的语法分析树。这里的词法分析器和语法分析器都可以看做是解释器
- 解释器模式(Interpreter Pattern):是指给定一个语言(表达式), 我们编程人员需要定义语句的文法的一种表示,并定义一个解释器, 使用该解释器来解释语言中的句子(表达式)
应用场景
- 应用可以将一个需要解释执行的语言中的句子表示为一个抽象语法树
- 一些重复出现的问题可以用一种简单的语言来表达
- 一个简单语法需要解释的场景
- 这样的例子还有,比如编译器、 运算表达式计算、正则表达式、 机器人等
2.解释器类图描述
解释器模式的原理类图
- Context:是环境角色,含有解释器之外的全局信息
- AbstractExpression:抽象表达式, 声明一个抽象的解释操作,这个方法为抽象语法树中所有的节点所共享
- TerminalExpression:为终结符表达式,实现与文法中的终结符相关的解释操作
- NonTermialExpression:为非终结符表达式,为文法中的非终结符实现解释操作
- 说明: 输入 Context 和 TerminalExpression 信息通过 Client 输入即可
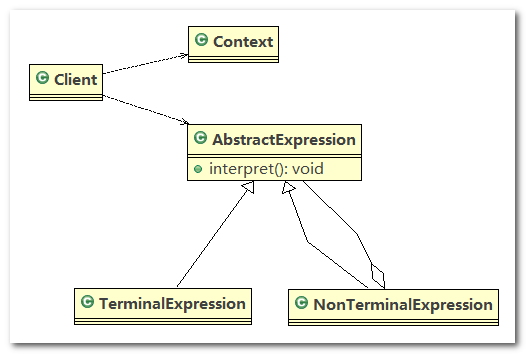
3.简易计算器
解释器的抽象父类:
import java.util.HashMap;

/**
 * @author compass
 * @date 2022-10-08
 * @since 1.0
 **/

public abstract class Expression {
    // a + b - c
    // 解释公式和数值, key 就是公式(表达式)中的参数[a,b,c], value就是就是具体值
    // HashMap {a=10, b=20}
    public abstract int interpreter(HashMap<String, Integer> var);
}
变量的解释器:
import java.util.HashMap;

/**
 * @author compass
 * @date 2022-10-08
 * @since 1.0
 **/
public class VarExpression extends Expression {

    private String key; // key=a,key=b,key=c

    public VarExpression(String key) {
        this.key = key;
    }

    // var 就是{a=10, b=20}
    // interpreter 根据 变量名称,返回对应值
    @Override
    public int interpreter(HashMap<String, Integer> var) {
        return var.get(this.key);
    }
}
抽象运算符解释器:
import java.util.HashMap;

/**
 * 抽象运算符号解析器 这里,每个运算符号,都只和自己左右两个数字有关系,
 * 但左右两个数字有可能也是一个解析的结果,无论何种类型,都是Expression类的实现类
 * @author compass
 * @date 2022/10/8 16:36
 * @since 1.0.0
 **/
public abstract class SymbolExpression extends Expression {

    protected Expression left;
    protected Expression right;

    public SymbolExpression(Expression left, Expression right) {
        this.left = left;
        this.right = right;
    }

    // 因为 SymbolExpression 是让其子类来实现,因此 interpreter 是一个默认实现
    @Override
    public int interpreter(HashMap<String, Integer> var) {
        return 0;
    }
}
加法运算符的解释器:
import java.util.HashMap;

/**
 * @author compass
 * @date 2022-10-08
 * @since 1.0
 **/
public class AddExpression extends SymbolExpression {

    public AddExpression(Expression left, Expression right) {
        super(left, right);
    }

    // 处理相加
    // var 仍然是 {a=10,b=20}..
    // 一会我们debug 源码,就ok
    public int interpreter(HashMap<String, Integer> var) {
        // left.interpreter(var) : 返回 left 表达式对应的值 a = 10
        // right.interpreter(var): 返回right 表达式对应值 b = 20
        return left.interpreter(var) + right.interpreter(var);
    }
}
减法运算符的解释器:
import java.util.HashMap;
import java.util.Stack;

/**
 * @author compass
 * @date 2022-10-08
 * @since 1.0
 **/
public class Calculator {

    // 定义表达式
    private Expression expression;

    // 构造函数传参,并解析
    public Calculator(String expStr) { // expStr = a+b
        // 安排运算先后顺序
        Stack<Expression> stack = new Stack<>();
        // 表达式拆分成字符数组
        char[] charArray = expStr.toCharArray();// [a, +, b]

        Expression left = null;
        Expression right = null;
        // 遍历我们的字符数组, 即遍历 [a, +, b]
        // 针对不同的情况,做处理
        for (int i = 0; i < charArray.length; i++) {
            switch (charArray[i]) {
                case '+': //
                    left = stack.pop();// 从stack取出left => "a"
                    right = new VarExpression(String.valueOf(charArray[++i]));// 取出右表达式 "b"
                    stack.push(new AddExpression(left, right));// 然后根据得到left 和 right 构建 AddExpresson加入stack
                    break;
                case '-': //
                    left = stack.pop();
                    right = new VarExpression(String.valueOf(charArray[++i]));
                    stack.push(new SubExpression(left, right));
                    break;
                default:
                    // 如果是一个 Var 就创建一个 VarExpression 对象,并push到 stack
                    stack.push(new VarExpression(String.valueOf(charArray[i])));
                    break;
            }
        }
        // 当遍历完整个 charArray 数组后,stack 就得到最后Expression
        this.expression = stack.pop();
    }

    public int run(HashMap<String, Integer> var) {
        // 最后将表达式a+b和 var = {a=10,b=20}
        // 然后传递给expression的interpreter进行解释执行
        return this.expression.interpreter(var);
    }
}
客户端调用:
import java.io.BufferedReader;
import java.io.IOException;
import java.io.InputStreamReader;
import java.util.HashMap;

/**
 * @author compass
 * @date 2022-10-08
 * @since 1.0
 **/
public class Client {
    public static void main(String[] args) throws IOException {
        String expStr = getExpStr(); // a+b
        HashMap<String, Integer> var = getValue(expStr);// var {a=10, b=20}
        Calculator calculator = new Calculator(expStr);
        System.out.println("运算结果:" + expStr + "=" + calculator.run(var));
    }

    // 获得表达式
    public static String getExpStr() throws IOException {
        System.out.print("请输入表达式:");
        return (new BufferedReader(new InputStreamReader(System.in))).readLine();
    }

    // 获得值映射
    public static HashMap<String, Integer> getValue(String expStr) throws IOException {
        HashMap<String, Integer> map = new HashMap<>();

        for (char ch : expStr.toCharArray()) {
            if (ch != '+' && ch != '-') {
                if (!map.containsKey(String.valueOf(ch))) {
                    System.out.print("请输入" + String.valueOf(ch) + "的值:");
                    String in = (new BufferedReader(new InputStreamReader(System.in))).readLine();
                    map.put(String.valueOf(ch), Integer.valueOf(in));
                }
            }
        }

        return map;
    }

}
4.解释器模式的注意事项和细节
- 当有一个语言需要解释执行, 可将该语言中的句子表示为一个抽象语法树, 就可以考虑使用解释器模式, 让程序具有良好的扩展性
- 应用场景: 编译器、 运算表达式计算、 正则表达式、 机器人等
- 使用解释器可能带来的问题: 解释器模式会引起类膨胀、 解释器模式采用递归调用方法, 将会导致调试非常复杂、 效率可能降低
23.状态模式
1.状态模式基本介绍
状态模式(State Pattern):它主要用来解决对象在多种状态转换时,需要对外输出不同的行为的问题。状态和行为是一一对应的,状态之间可以相互转换
当一个对象的内在状态改变时,允许改变其行为,这个对象看起来像是改变了其类
2.状态模式原理类图
Context 类为上下文对象,用于维护State实例,这个实例定义当前状态
State 是抽象的状态角色,定义一个接口封装与Context 的一个特定接口相关行为
ConcreteState 具体的状态角色,每个子类实现一个与Context 的一个状态相关行为,
3.交通灯管理
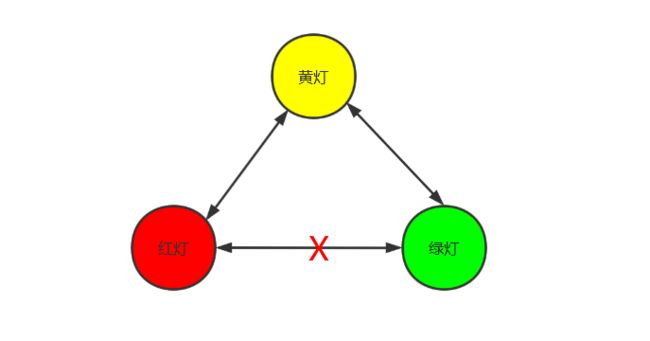
交通灯的状态切换其实就是一个状态的不断改变,他不像是简单的开和关2个状态,而是多个状态之前的切换,而且切换一定要正确,不然容易造成严重的事故,我们来看下如何使用状态模式完成交通灯的一个切换。
状态接口:
/**
 * @author compass
 * @date 2022-10-06
 * @since 1.0
 **/
public interface State {
    /**
     * 切换到绿灯
     *
     * @return void
     * @author compass
     * @date 2022/10/6 19:53
     * @since 1.0.0
     **/
    void switchToGreen(TrafficLight trafficLight);

    /**
     * 切换到黄灯
     *
     * @return void
     * @author compass
     * @date 2022/10/6 19:53
     * @since 1.0.0
     **/
    void  switchToYellow(TrafficLight trafficLight);

    /**
     * 切换到红灯
     *
     * @return void
     * @author compass
     * @date 2022/10/6 19:53
     * @since 1.0.0
     **/
    void  switchToRed(TrafficLight trafficLight);
}
红灯状态:
/**
 * @author compass
 * @date 2022-10-06
 * @since 1.0
 **/
public class Red implements State {
    @Override
    public void switchToGreen(TrafficLight trafficLight) {
        System.out.println("红灯不能切换为绿灯");
    }

    @Override
    public void switchToYellow(TrafficLight trafficLight) {
        trafficLight.setState(new Yellow());
        System.out.println("黄灯亮起5秒");
    }

    @Override
    public void switchToRed(TrafficLight trafficLight) {
        System.out.println("已经是红灯状态不能再切换");

    }
}
黄灯状态:
/**
 * @author compass
 * @date 2022-10-06
 * @since 1.0
 **/
public class Yellow implements State {
    @Override
    public void switchToGreen(TrafficLight trafficLight) {
        trafficLight.setState(new Green());
        System.out.println("绿灯亮起60秒");
    }

    @Override
    public void switchToYellow(TrafficLight trafficLight) {
        System.out.println("已经是黄灯状态不能再切换");
    }

    @Override
    public void switchToRed(TrafficLight trafficLight) {
        trafficLight.setState(new Red());
        System.out.println("红灯亮起60秒");

    }
}
绿灯状态:
/**
 * @author compass
 * @date 2022-10-06
 * @since 1.0
 **/
public class Green implements State {
    @Override
    public void switchToGreen(TrafficLight trafficLight) {
        System.out.println("已经是绿灯不能再切换");
    }

    @Override
    public void switchToYellow(TrafficLight trafficLight) {
        trafficLight.setState(new Yellow());
        System.out.println("黄灯亮起5秒");
    }

    @Override
    public void switchToRed(TrafficLight trafficLight) {
        System.out.println("绿灯不能切换为黄灯");

    }
}
交通管理类:
/**
 * @author compass
 * @date 2022-10-06
 * @since 1.0
 **/
public class TrafficLight {

    // 默认是红灯状态
    private State state = new Red();

    public void setState(State state) {
        this.state = state;
    }

    // 切换为通行状态
    public void switchToGreen( ) {
        state.switchToGreen(this);
    }

    // 切换为警告状态
    public void switchToYellow() {
        state.switchToYellow(this);
    }

    // 切换为禁行状态
    public void switchToRed() {
        state.switchToRed(this);
    }
}
客户端调用:
/**
 * @author compass
 * @date 2022-10-06
 * @since 1.0
 **/
public class Client {
    public static void main(String[] args) {
        TrafficLight trafficLight = new TrafficLight();

        trafficLight.switchToYellow();

        trafficLight.switchToGreen();

        trafficLight.switchToYellow();

        trafficLight.switchToRed();
    }
}
4.状态模式注意事项和细节
状态模式的注意事项和细节
优点
- 状态模式将每个状态的行为封装到对应的一个类中,所以代码有很强的可读性
- 方便维护。因为将容易产生问题的if-else语句删除了,如果把每个状态的行为都放到一个类中,每次调用方法时都要判断当前是什么状态,不但会产出很多if-else语句,而且容易出错
- 符合“开闭原则”,容易增删对象的状态
缺点
会产生很多类,每个状态都要一个对应的类,当状态过多时会产生很多类,加大维护难度
应用场景
当一个事件或者对象有很多种状态,状态之间会相互转换,对不同的状态要求有不同的行为的时候,可以考虑使用状态模式
24.中介模式
1.中介模式介绍
中介模式定义了一个单独的(中介)对象,来封装一组对象之间的交互。将这组对象之间的交互委派给与中介对象交互,来避免对象之间的直接交互。
中介模式各个角色描述如下:
Mediator(中介) 共事者之间通信的中介平台接口,定义共事者到通通信标准,如连接注册方法与发送消息方法等。
ConcreteMediator(中介实现)可以有很多种实现,持有共事者对象的列表,并实现中介定义的通信方法。
Colleague(共事者),ConcreteColleague(共事者实现),共事者可以有很多种共事者实现,共事者持有中介对象的引用,以使其在发生消息时可以调用中介。
众所周知对象间显示相互引用越多,意味着依赖性越强,同时独立性也就越弱,不利于代码的扩展和维护,中介模式可以很好的解决这个问题,他能讲多方协助的工作交给中间平台去完成,解除了你中有我,我中有你的一个弊端,让各个模块更加的松散,独立,最终增强系统的一个可用性。
2.多人抽象聊天室
抽象聊天室:
import java.util.ArrayList;
import java.util.List;

/**
 * @author compass
 * @date 2022-10-06
 * @since 1.0
 **/
public abstract class ChatRoom {

    protected String name;

    protected List<User> users = new ArrayList<>();

    public  ChatRoom(String name){
        this.name = name;
    }

    // 注册用户到聊天室
    protected  void  register(User user){
        this.users.add(user);
    }

    // 将用户从聊天室中移除
    protected  void deregister(User user){
        users.remove(user);
    }

    // 发送消息
    protected  abstract  void  sendMessage(User from,User to,String message);
    // 消息加工
    protected  abstract  String  processMessage(User from,User to,String message);
}
公共聊天室:
/**
 * @author compass
 * @date 2022-10-06
 * @since 1.0
 **/
public class PublicChatRoom extends ChatRoom {

    public PublicChatRoom(String name) {
        super(name);
    }

    @Override
    protected void register(User user) {
        super.register(user);
        System.out.println(String.format("系统消息:欢迎[%s]",user.getName()));
    }

    @Override
    protected void sendMessage(User from, User to, String message) {
        // 如果接收者为空,发送给所有人
        if (Objects.isNull(to)){
            users.forEach(user -> user.listen(from,null,message));
            return;
        }
        // 否则发送给所有人
        users.stream().filter(user -> user.equals(to) || user.equals(from))
                .forEach(user -> user.listen(from, to, message));
    }

    @Override
    protected String processMessage(User from, User to, String message) {
        String  toName = "所有人";
        if (!Objects.isNull(to)){
            toName = to.getName();
        }
        return from.getName()+"对"+toName+"说"+message;
    }
}
单独聊天室:
/**
 * @author compass
 * @date 2022-10-06
 * @since 1.0
 **/
public class PrivateChatRoom extends ChatRoom {
    public PrivateChatRoom(String name) {
        super(name);
    }


    @Override
    protected void register(User user) {
        if (users.size()>2){
            System.out.println("系统消息:聊天室已满");
            return;
        }
        super.register(user);
        System.out.println(String.format("欢迎%s加入2人聊天室:%s",user.getName(),name));
    }

    @Override
    protected void sendMessage(User from, User to, String message) {
     users.forEach(user -> user.listen(from, to, message));
    }

    @Override
    protected String processMessage(User from, User to, String message) {
        return String.format("%s说%s",from.getName(),message);
    }

    @Override
    protected void deregister(User user) {
        super.deregister(user);
        System.out.println(String.format("系统消息:%s离开聊天室",user.getName()));
    }


}
用户对象:
import java.util.Objects;

/**
 * @author compass
 * @date 2022-10-06
 * @since 1.0
 **/
public class User {
    private String name;

    protected ChatRoom chatRoom;


    protected void login(ChatRoom chatRoom){
        chatRoom.register(this);
        this.chatRoom = chatRoom;
    }
    protected void loginOut(ChatRoom chatRoom){
        chatRoom.deregister(this);
        this.chatRoom = null;
        System.out.println(String.format("%s退出聊天室",name));
    }
    protected  User(String name)   {
        this.name = name;
    }

    protected void talk(User to, String message){
        if (Objects.isNull(to)){
            System.out.println(String.format("%s的对话框,您还没登录",name));
            return;
        }
        chatRoom.sendMessage(this,to,message);
    }

    public void listen(User from,User to, String message){
        System.out.println(String.format("%s的对话框",name));
        // 调用聊天室加工消息
        System.out.println(chatRoom.processMessage(from,to,message));

    }

    public String getName() {
        return name;
    }

    public void setName(String name) {
        this.name = name;
    }

    public ChatRoom getChatRoom() {
        return chatRoom;
    }

    public void setChatRoom(ChatRoom chatRoom) {
        this.chatRoom = chatRoom;
    }
}
客户端使用:
/**
 * @author compass
 * @date 2022-10-06
 * @since 1.0
 **/
public class Client {
    public static void main(String[] args) {

        PublicChatRoom chatRoom = new PublicChatRoom("设计模式");

        User admin = new User("admin");
        User root = new User("root");

        admin.login(chatRoom);
        root.login(chatRoom);

        chatRoom.sendMessage(admin,null,"大家好我是admin");

        chatRoom.sendMessage(admin,root,"你好root");

        admin.loginOut(chatRoom);
        root.loginOut(chatRoom);
    }
}
3.中介模式 VS 观察者模式
观察者模式有多种实现方式。虽然经典的实现方式没法彻底解耦观察者和被观察者,观察者需要注册到被观察者中,被观察者状态更新需要调用观察者的 update() 方法。但是,在跨进程的实现方式中,我们可以利用消息队列实现彻底解耦,观察者和被观察者都只需要跟消息队列交互,观察者完全不知道被观察者的存在,被观察者也完全不知道观察者的存在。
中介模式也是为了解耦对象之间的交互,所有的参与者都只与中介进行交互。而观察者模式中的消息队列,就有点类似中介模式中的“中介”,观察者模式的中观察者和被观察者,就有点类似中介模式中的“参与者”。那么,中介模式和观察者模式的区别在哪里呢?什么时候选择使用中介模式?什么时候选择使用观察者模式呢?
在观察者模式中,尽管一个参与者既可以是观察者,同时也可以是被观察者,但是,大部分情况下,交互关系往往都是单向的,一个参与者要么是观察者,要么是被观察者,不会兼具两种身份。也就是说,在观察者模式的应用场景中,参与者之间的交互关系比较有条理。
而中介模式正好相反,多个交互类,观察者同时是被观察者。只有当参与者之间的交互关系错综复杂,维护成本很高的时候,我们才考虑使用中介模式。毕竟,中介模式的应用会带来一定的副作用,它有可能会产生大而复杂的上帝类。除此之外,如果一个参与者状态的改变,其他参与者执行的操作有一定先后顺序的要求,这个时候,中介模式就可以利用中介类,通过先后调用不同参与者的方法,来实现顺序的控制,而观察者模式是无法实现这样的顺序要求的。
中介模式的设计思想跟中间层很像,通过引入中介这个中间层,将一组对象之间的交互关系(或者依赖关系)从多对多(网状关系)转换为一对多(星状关系)。原来一个对象要跟 n 个对象交互,现在只需要跟一个中介对象交互,从而最小化对象之间的交互关系,降低了代码的复杂度,提高了代码的可读性和可维护性。