SpringBoot集成 Swagger
Spring Boot 集成 Swagger 在线接口文档
1、Swagger 简介
1.1 解决的问题
随着互联网技术的发展,现在的网站架构基本都由原来的后端渲染,变成了前后端分离的形态,而且前端技术和后端技术在各自的道路上越走越远。前端和后端的唯一联系变成了 API 接口,所以 API 文档变成了前后端开
发人员联系的纽带,变得越来越重要。
那么问题来了,随着代码的不断更新,开发人员在开发新的接口或者更新旧的接口后,由于开发任务的繁重,往往文档很难持续跟着更新,Swagger 就是用来解决该问题的一款重要的工具,对使用接口的人来说,开发人员不需要给他们提供文档,只要告诉一个 Swagger 地址,即可展示在线的 API 接口文档,除此之外,调用接口的人员还可以在线测试接口数据,同样地,开发人员在开发接口时,同样也可以利用 Swagger 在线接口文档测试接口数据,这给开发人员提供了便利。
1.2 Swagger 官方
打开 Swagger 官网为 https://swagger.io/
主要掌握在 Spring Boot 中如何导入 Swagger 工具来展现项目中的接口文档。
2、Swagger 的 maven 依赖
使用 Swagger 工具,必须要导入 maven 依赖
<dependency>
    <groupId>io.springfoxgroupId>
    <artifactId>springfox-boot-starterartifactId>
dependency>
<dependency>
    <groupId>io.springfoxgroupId>
    <artifactId>swagger-bootstrap-uiartifactId>
dependency>
3、Swagger 配置
使用 Swagger 需要进行配置,Spring Boot 中对 Swagger 的配置非常方便,新建一个配置类,Swagger 的配置类上除了添加必要的@Configuration 注解外,还需要添加@EnableOpenApi 注解。
@EnableOpenApi
@Configuration
public class Swagger3Config {
    @Bean
    public Docket createRestApi() {
        return new Docket(DocumentationType.OAS_30) // 使用 Swagger3.0 版本
            // 是否关闭在线文档,生产环境关闭
            .enable(true)
             // 指定构建 api 文档的详细信息的方法
            .apiInfo(apiInfo())
// 指定要生成 api 接口的包路径,这里把 action 作为包路径,生成 controller 中的所有接口
            .apis(RequestHandlerSelectors.basePackage("com.ma.action"))
            .select()
            //只 有 在 方 法接口上添加了 ApiOperation 注解
            .apis(RequestHandlerSelectors.withMethodAnnotation(ApiOperation.class))
            .paths(PathSelectors.any()).build().globalResponses(HttpMethod.GET,
getGlobalResponseMessage())
            .globalResponses(HttpMethod.POST, getGlobalResponseMessage());
    }
}
// 生成摘要信息
private ApiInfo apiInfo() {
    return new ApiInfoBuilder().title("接口文档") //设置页面标题
    .description("说明信息") 设置接口描述
    .contact(new Contact("yangyang", "http://baidu.com", "[email protected]")) //设置联系方式
    .version("1.0") //设置版本
    .build(); //构建
}
在该配置类中已经使用注释详细解释了每个方法的作用了。到此已经配置好 Swagger 了。现在可以测试一下
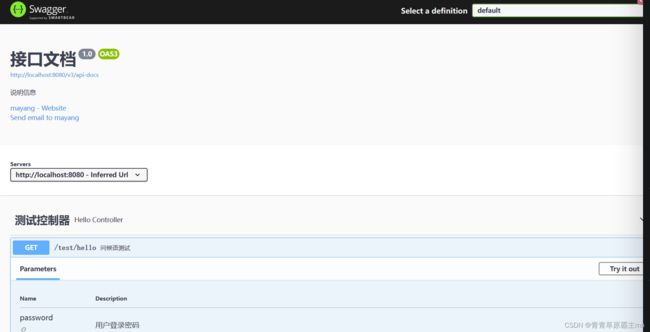
配置有没有生效,启动项目,在浏览器中输入 http://localhost:8080/test/swagger-ui/,即可看到 swagger 的
接口页面,说明 Swagger 集成成功。
对照 Swagger 配置文件中的配置,可以很明确的知道配置类中每个方法的作用。这样就很容易理解和掌握Swagger 中的配置了,也可以看出,其实 Swagger 配置很简单。
有可能在配置 Swagger 时关不掉,是因为浏览器缓存引起的,清空一下浏览器缓存即可解决问题。
相关配置
spring.mvc.pathmatch.matching-strategy=ANT_PATH_MATCHER
4、Swagger 的使用
已经配置好了 Swagger,并且也启动测试了一下,功能正常,下面可以开始使用 Swagger,重点要掌握 Swagger中常用的注解,分别在实体类上、Controller 类上以及 Controller 中的方法上,最后查看 Swagger 如何在页面上呈现在线接口文档的,并且结合 Controller 中的方法在接口中测试一下数据。
4.1 实体类注解
定义 User 实体类,这里主要介绍 Swagger 中的@ApiModel 和@ApiModelProperty 注解。
@ApiModel(value = "用户实体类")
public class User {
    @ApiModelProperty(value = "用户唯一标识")
    private Long id;
    @ApiModelProperty(value = "用户姓名")
    private String username;
    @ApiModelProperty(value = "用户密码")
    private String password;
    // 省略 set 和 get 方法
}
其中@ApiModel 注解用于实体类,表示对类进行说明,用于参数用实体类接收。
@ApiModelProperty 注解用于类中属性,表示对 model 属性的说明或者数据操作更改。
4.2 Controller 类中相关注解
@RestController
@RequestMapping("/swagger")
@Api(value = "Swagger2 在线接口文档")
public class TestController {
    @GetMapping("/get/{id}")
    @ApiOperation(value = "根据用户唯一标识获取用户信息")
    public JsonResult<User> getUserInfo(@PathVariable @ApiParam(value = "用户唯一标识") Long id) {
        // 模拟数据库中根据 id 获取 User 信息
        User user = new User(id, "小灰灰", "123456");
        return new JsonResult(user);
    }
}
1、@Api 注解用于类上,表示标识这个类是 swagger 的资源。
2、@ApiOperation 注解用于方法,表示一个 http 请求的操作。
3、@ApiParam 注解用于参数上,用来标明参数信息。
在浏览器中可以看出 Swagger 页面对该接口的信息展示的非常全面,每个注解的作用以及展示的地方注意对应位置,通过页面即可知道该接口的所有信息,那么直接在线测试一下该接口返回的信息,输入 id 为 1,看一下返回数据。
可以看出,直接在页面返回了 json 格式的数据,开发人员可以直接使用该在线接口来测试数据的正确与否,非常方便。
@PostMapping("/insert")
@ApiOperation(value = "添加用户信息")
public JsonResult<Void> insertUser(@RequestBody @ApiParam(value = "用户信息") User user) {
    // 处理添加逻辑
    return new JsonResult<>();
}
重启项目,然后在浏览器中输入 localhost:8080/swagger-ui.html 看效果
5、总结
主要详细分析 Swagger 的优点以及 Spring Boot 集成 Swagger,包括配置,涉及到了实体类和接口类以及如何使用。最后通过页面测试,可以体验 Swagger 的强大之处,基本上是每个项目组中必备的工具之一,所以要掌握该工具的使用。
完整代码实现
1、pom.xml文件:
<project xmlns="http://maven.apache.org/POM/4.0.0" xmlns:xsi="http://www.w3.org/2001/XMLSchema-instance"
         xsi:schemaLocation="http://maven.apache.org/POM/4.0.0 https://maven.apache.org/xsd/maven-4.0.0.xsd">
    <modelVersion>4.0.0modelVersion>
    <groupId>com.magroupId>
    <artifactId>swaggerartifactId>
    <version>0.0.1-SNAPSHOTversion>
    <name>swaggername>
    <description>Demo project for Spring Bootdescription>
    <properties>
        <java.version>1.8java.version>
        <project.build.sourceEncoding>UTF-8project.build.sourceEncoding>
        <project.reporting.outputEncoding>UTF-8project.reporting.outputEncoding>
        <spring-boot.version>2.6.13spring-boot.version>
    properties>
    <dependencies>
        <dependency>
            <groupId>org.springframework.bootgroupId>
            <artifactId>spring-boot-starter-webartifactId>
        dependency>
        <dependency>
            <groupId>tk.mybatisgroupId>
            <artifactId>mapper-spring-boot-starterartifactId>
            <version>4.2.2version>
        dependency>
        <dependency>
            <groupId>org.projectlombokgroupId>
            <artifactId>lombokartifactId>
            <scope>providedscope>
        dependency>
        <dependency>
            <groupId>org.springframework.bootgroupId>
            <artifactId>spring-boot-starter-testartifactId>
            <scope>testscope>
        dependency>


        <dependency>
            <groupId>io.springfoxgroupId>
            <artifactId>springfox-boot-starterartifactId>
            <version>3.0.0version>
        dependency>
        <dependency>
            <groupId>com.github.xiaoymingroupId>
            <artifactId>swagger-bootstrap-uiartifactId>
            <version>1.9.6version>
        dependency>

    dependencies>
    <dependencyManagement>
        <dependencies>
            <dependency>
                <groupId>org.springframework.bootgroupId>
                <artifactId>spring-boot-dependenciesartifactId>
                <version>${spring-boot.version}version>
                <type>pomtype>
                <scope>importscope>
            dependency>
        dependencies>
    dependencyManagement>

    <build>
        <plugins>
            <plugin>
                <groupId>org.apache.maven.pluginsgroupId>
                <artifactId>maven-compiler-pluginartifactId>
                <version>3.8.1version>
                <configuration>
                    <source>1.8source>
                    <target>1.8target>
                    <encoding>UTF-8encoding>
                configuration>
            plugin>
            <plugin>
                <groupId>org.springframework.bootgroupId>
                <artifactId>spring-boot-maven-pluginartifactId>
                <version>${spring-boot.version}version>
                <configuration>
                    <mainClass>com.ma.SwaggerApplicationmainClass>
                    <skip>trueskip>
                configuration>
                <executions>
                    <execution>
                        <id>repackageid>
                        <goals>
                            <goal>repackagegoal>
                        goals>
                    execution>
                executions>
            plugin>
        plugins>
    build>

project>
2、application.properties文件
# 应用服务 WEB 访问端口
server.port=8080

# swagger相关的一个路径匹配规则的配置,如果不进行配置则无法访问到swagger的页面
spring.mvc.pathmatch.matching-strategy=ANT_PATH_MATCHER
3、SwaggerApplication文件:
package com.ma;

import org.springframework.boot.SpringApplication;
import org.springframework.boot.autoconfigure.SpringBootApplication;
import org.springframework.boot.autoconfigure.jdbc.DataSourceAutoConfiguration;

@SpringBootApplication(exclude = DataSourceAutoConfiguration.class)
public class SwaggerApplication {
    public static void main(String[] args) {
        SpringApplication.run(SwaggerApplication.class, args);
    }
}
4、创建一个action的包在包内创建HelloController.java文件:
package com.ma.action;

import com.ma.domain.JsonResult;
import io.swagger.annotations.*;
import org.springframework.web.bind.annotation.GetMapping;
import org.springframework.web.bind.annotation.RequestMapping;
import org.springframework.web.bind.annotation.RequestParam;
import org.springframework.web.bind.annotation.RestController;

@Api(tags="测试控制器")
@RestController
@RequestMapping("/test")
public class HelloController {
    @ApiOperation("问候语测试")
    @GetMapping("/hello")
    @ApiImplicitParams({
            @ApiImplicitParam(dataType = "string",name = "username",value = "用户登录账号",required = true),
            @ApiImplicitParam(dataType = "string",name = "password",value = "用户登录密码",required = false,defaultValue = "666666")
    })
    public JsonResult hello(@ApiParam("用户名称") @RequestParam(value="username",required =true) String name){
        String res = "hello" + name + "!";
        return JsonResult.success("处理完毕",res);
    }
}
5、创建一个conf的包在包内创建Swagger3Config.java文件:
package com.ma.conf;

import io.swagger.models.HttpMethod;
import org.springframework.context.annotation.Bean;
import org.springframework.context.annotation.Configuration;
import springfox.documentation.builders.ApiInfoBuilder;
import springfox.documentation.builders.PathSelectors;
import springfox.documentation.builders.RequestHandlerSelectors;
import springfox.documentation.oas.annotations.EnableOpenApi;
import springfox.documentation.service.ApiInfo;
import springfox.documentation.service.Contact;
import springfox.documentation.spi.DocumentationType;
import springfox.documentation.spring.web.plugins.Docket;
@EnableOpenApi
@Configuration
public class Swagger3Config {
    /**
     * 创建API应用
     * apiInfo() 增加API相关信息
     * 通过select()函数返回一个ApiSelectorBuilder实例,用来控制哪些接口暴露给Swagger来展现,
     * 本例采用指定扫描的包路径来定义指定要建立API的目录。
     * swagger测试地址:http://localhost:8080/swagger-ui/index.html#/
     * @return
     */
    @Bean
    public Docket createRestApi() {
        return new Docket(DocumentationType.OAS_30) // 使用Swagger3.0版本
                .enable(true)// 是否关闭在线文档,生产环境关闭
                .apiInfo(apiInfo())  // 指定构建api文档的详细信息的方法
                .select()  // 指定要生成api接口的包路径,这里把action作为包路径,生成controller中的所有接口
                .apis(RequestHandlerSelectors.basePackage("com.ma.action"))
//                .apis(RequestHandlerSelectors.withMethodAnnotation(ApiOperation.class))方法接口上添加了ApiOperation注解
                .paths(PathSelectors.any()).build()
                //针对应用的全局响应消息配置
//                .globalResponses(HttpMethod.GET, getGlobalResponseMessage())
//                .globalResponses(HttpMethod.POST, getGlobalResponseMessage())
                ;
    }
    /**
     * 创建该API的基本信息(这些基本信息会展现在文档页面中)
     * 访问地址:http://项目实际地址/swagger-ui.html
     * @return
     */
    private ApiInfo apiInfo() {
        return new ApiInfoBuilder()
                .title("接口文档") //设置页面标题
                .description("说明信息")  //设置接口描述
                .contact(new Contact("mayang", "http://baidu.com", "[email protected]")) //设置联系方式
                .version("1.0") //设置版本
                .build();  //构建
    }
}
6、创建一个domain的包在包内创建JsonResult.java文件:
package com.ma.domain;

import io.swagger.annotations.ApiModel;
import io.swagger.annotations.ApiModelProperty;
import lombok.Data;

import java.io.Serializable;

@Data
@ApiModel("针对前端的响应数据格式规范")
public class JsonResult implements Serializable {
    @ApiModelProperty("是否处理成功,布尔类型数据")
    private Boolean success;
    @ApiModelProperty("响应消息信息,字符串类型")
    private String message;
    @ApiModelProperty("响应数据,对象类型")
    private Object data;

    public static JsonResult success(String message, Object data) {
        JsonResult res=new JsonResult();
        res.setMessage(message);
        res.setSuccess(true);
        res.setData(data);
        return res;
    }
}
