How to use the Arduino-ESP32 Library as an ESP-IDF Component
Related Documentation
- arduino-esp32 SDK
- ESP-IDF SDK
- ESP-IDF Environment Setup Guide
- Arduino Environment Setup Guide
- Arduino as an ESP-IDF component
Prepare Environment
Currently, the latest Master version of the arduino-esp32 SDK requires the usage of ESP-IDF SDK environment version v4.4.
- ESP-IDF Compilation Environment
-
If you are using the Windows environment, setting up the ESP-IDF SDK compilation environment is straightforward. You only need to use the offline version of the “ESP-IDF Windows Installer” to install the required ESP-IDF SDK version.
For detailed instructions, you can refer to the guide titled “Set up the ESP-IDF SDK compilation environment + Visual Studio Code software programming environment” Additionally, you may find a video tutorial “Setting Up ESP-IDF Development Environment (Windows) Using One-Click Installation Tool” helpful.
-
If you are using the Ubuntu environment, please refer to the “Standard Setup of Toolchain for Linux” documentation for instructions. You can also refer to the “How to set up the software development environment ESP-IDF for ESP32-S3” guide.
-
Next, we will demonstrate how to use the arduino-esp32 library as an ESP-IDF SDK component on a Windows environment. This includes:
- Using the arduino-esp32 library as a component in the project
- Using the arduino-esp32 library as a component in the ESP-IDF SDK libraries
1、 Using the arduino-esp32 library as a component in the project:
- Create a custom project
- Create a component folder for the current project
- Clone the arduino-esp32 library as a component for the current project
- Make modifications to the project file names
- Make modifications to the project configuration options
- Compile and flash the current project for testing
1.1 Creating a custom project:
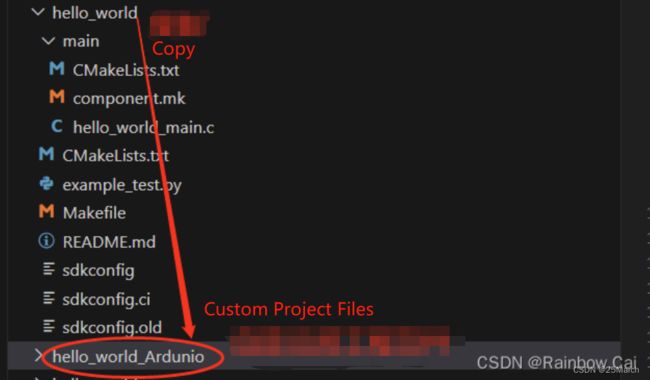
You can based on the ESP-IDF SDK to copy a project for testing. For example, copy the hello-world project. and rename the project name as hello-world_Arduino.
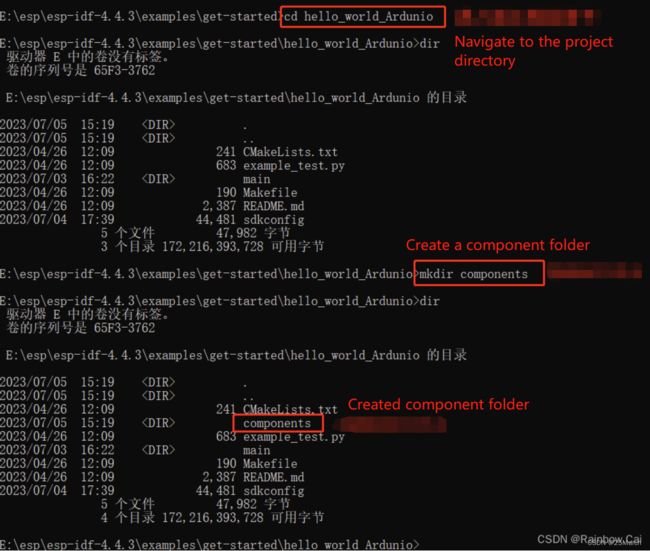
1.2 Create a component folder for the current project
You can use the following command to create a component folder for the current project:
cd hello-world_Arduino
mkdir components
1.3 Clone the arduino-esp32 library as a component for the current project
- Goto the
componentsdirectory, running the following commands to clone the arduino-esp32 library into the components directory
cd components

git clone https://github.com/espressif/arduino-esp32.git
- After completing the cloning of the arduino-esp32 SDK, goto the “arduino-esp32” directory, and running the following command to clone the submodules of the arduino-esp32 library.
cd arduino-esp32

git submodule update --init --recursive

After completing the above steps, the project structure will be as follows:
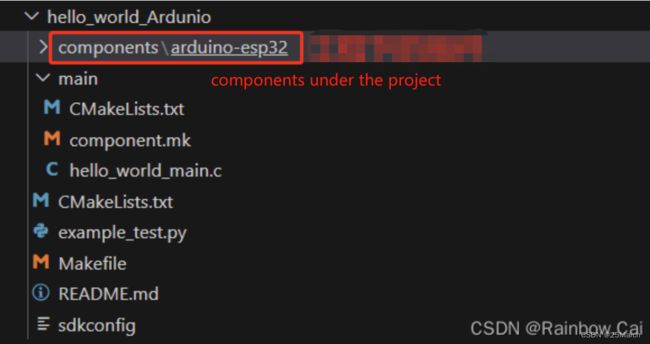
1.4 Make modifications to the project file names
We will use Arduino’s setup() and loop() functions within the hello-world_Arduino project to demonstrate.
-
In the “hello-world_Arduino” project directory, rename the file “main.c” to “main.cpp” . As follows:
-
In the
mainfolder within the project directory, open the fileCMakeLists.txtand change the name of the filemain.ctomain.cpp. As follows:
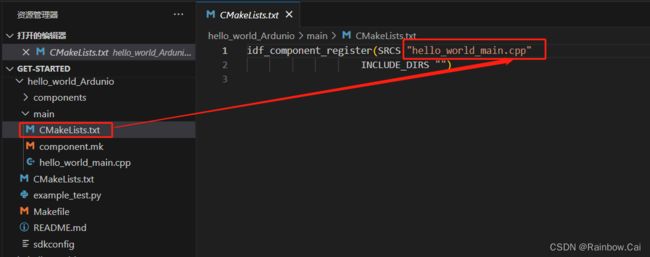
-
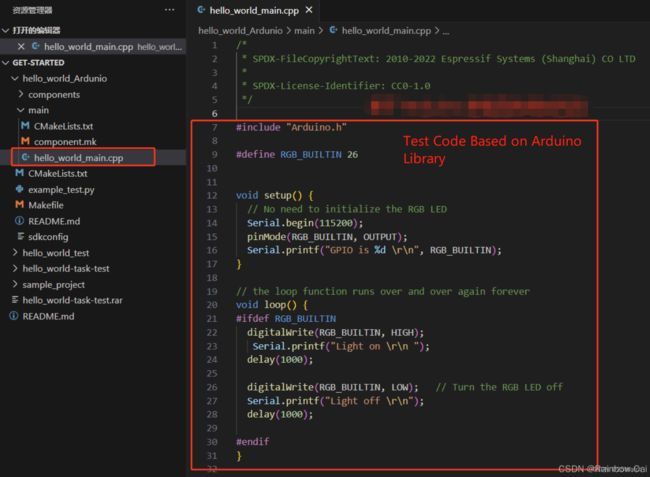
In the
hello-world_Arduinoproject, you can write test code based on the Arduino library in thehello_world_main.cppfile as follows:
#include "Arduino.h"

#define RGB_BUILTIN 26

void setup() {
  // No need to initialize the RGB LED
  Serial.begin(115200);
  pinMode(RGB_BUILTIN, OUTPUT);
  Serial.printf("GPIO is %d \r\n", RGB_BUILTIN);
}

// the loop function runs over and over again forever
void loop() {
#ifdef RGB_BUILTIN
  digitalWrite(RGB_BUILTIN, HIGH);
   Serial.printf("Light on \r\n ");
  delay(1000);

  digitalWrite(RGB_BUILTIN, LOW);   // Turn the RGB LED off
  Serial.printf("Light off \r\n");
  delay(1000);

#endif
}
1.5 Make modifications to the project configuration options
-
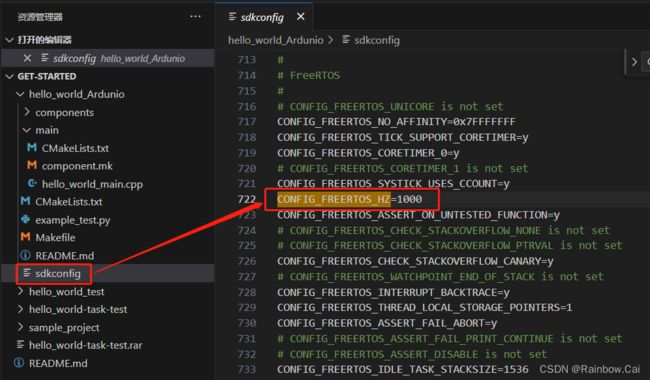
Modify the
CONFIG_FREERTOS_HZconfiguration in thesdkconfigfile to1000. The default value is100. -
In the project directory, run the command
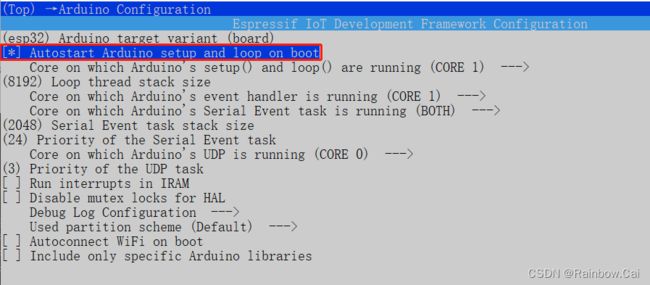
idf.py menuconfigto enter the project configuration options interface. Enable theAutostart Arduino setup and loop on bootconfiguration option.idf.py menuconfig → Arduino Configuration [*] Autostart Arduino setup and loop on boot
1.6 Compile and flash the current project for testing
-
In the current project directory, run the following command to compile the project:
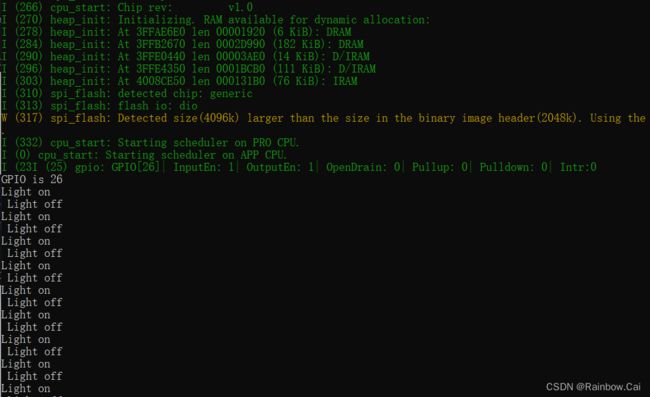
idf.py buildAfter the firmware compilation is completed, the following log will be printed, indicating the compiled firmware and its corresponding download address.
-
In the current project directory, run the following command to download the firmware and print the firmware running logs.
idf.py -p COM4 flash monitor
2、Using the Arduino-ESP32 Library as an ESP-IDF Component
- Create the
components-Arduinofolder in theesp-idfSDK directory- Clone the arduino-esp32 SDK into the
components-Arduinofolder- In the
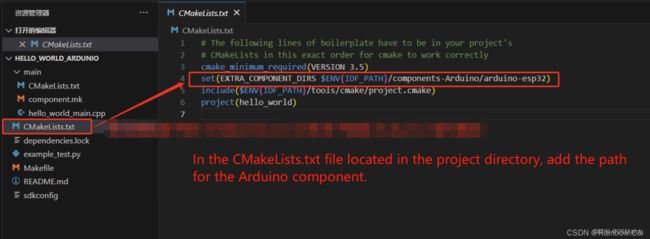
CMakeLists.txtfile located in the project directory, add the path to the arduino-esp32 component
2.1 Open the esp-idf CMD environment and create the components-Arduino folder in the esp-idf SDK directory
mkdir components-Arduino
2.2 Clone the arduino-esp32 SDK into the components-Arduino folder
cd components-Arduino

git clone https://github.com/espressif/arduino-esp32.git

cd arduino-esp32

git submodule update --init --recursive
2.3 In the CMakeLists.txt file located in the project directory, add the path to the arduino-esp32 component
To include the arduino-esp32 library as a component based on the esp-idf SDK directory, add the path to the arduino-esp32 component in the CMakeLists.txt file of the project directory, as follows:
set(EXTRA_COMPONENT_DIRS $ENV{IDF_PATH}/components-Arduino/arduino-esp32)
Other steps are exactly the same as Step 1.
【Note】
- If you need to switch the chip environment, please running the following command in the project directory:
idf.py set-target esp32s3
- If you need to use
app_main()fromESP-IDFto run the code and callArduinolibrary API functions, the project file must be namedmain.cpp. In addition, you need to disable theAutostart Arduino setup and loop on bootconfiguration option and defineapp_main()usingextern "C" void app_main(), as shown in the example test code below:
#include "Arduino.h"
#include
- The
setup()function in Arduino is called only once withinapp_main()and does not require thewhile(!Serial){}loop.- The
loop()function in Arduino, when used withinapp_main(), must be implemented withwhile(true){}orwhile(1){}to create an infinite loop.
