工作纪实_22-搭建分布式项目时使用spring-session替代token
z分布式微服务`解决方案
分布式环境下,用户登录后的状态信息,一般有两种解决方案:
1.Token
步骤:
- 使用公钥、私钥对token进行相应的解密和加密操作,再通过网关层将用户信息通过
header传递到各个服务,客户端服务接收到请求时候,解析header即可
2.服务之间的feign远程调用,通过网关层传递的请求中的header信息,解析出用户信息的同时,利用fein将用户信息透传到其他服务
2.分布式Session
单体服务下,session可以很好的帮助我们解决用户身份的会话状态问题,因为此刻我们只有一个web服务器,但是分布式环境下,跨服务器的session是无法共享单一服务器的session。对此,除去token,通常的解决方案大致有以下三种:
- 容器扩展: 基于
tomcat的tomcat-redis-session-manager,基于jetty的jetty-session-redis - 自己实现会话管理根据类(
session和cookie管理),在需要使用会话的时候都从自己的工具类中获取,后台存储可以考虑使用redis来实现 - 使用框架的会话管理工具:即本文中的
spring session,基于spring框架,利用spring-data-redis连接池,替换servlet的会话管理,实现脱离容器而不用改变代码
spring-session
1. 简介
简而言之,spring Session 提供了 一套API 和实现,用于管理用户的 Session 信息,基于此概念,其具有如下特性:
Session持久化在外部存储介质中,通过配置自行切换(redis,mongo)- 控制
sessionid如何在客户端和服务器之间进行交换,便于编写Restful API(从HTTP头信息中获取sessionid,而不必再依赖于cookie)- 非
Web请求的处理代码中,能够访问session数据- 支持每个浏览器上使用多个
session
2.模块
Spring-session具体提供了如下四个模块:
Spring Session Core、Spring Session Data Redis、Spring Session JDBC 、Spring Session Hazelcast
3.关键接口、类
实现session管理器的时候,有两个必须要解决的核心问题:
-
如何(利用外部存储介质)构建集群环境下高可用的
session?Spring Session定义了一组标准的接口,可以通过实现这些接口简介访问底层的数据存储-
org.springframework.session.Session定义
session的基本功能:设置、移除接口,(不关心实现具体介质) -
org.springframework.session.ExpiringSessionsession接口的扩展、提供判断session是否过期(典型实现类:RedisSession) -
org.springframework.session.SessionRepository定义了创建、报错、删除及检索
session的方法,将Session实例真正保存到数据库存储的逻辑就是这个接口的实现中编码完成的(典型实现类:RedisOperationSessionRepository)
-
-
对于传入的请求该如何确定用哪个
session实例,归根结底,关键问题在于sessionId如何传递?Spring Session定义了一个接口两个默认实现类HttpSessionStrategy接口CookieHttpSessionStrategy实现类(使用cookie将请求与session id关联)HeaderHttpSessionStrategy实现类(使用header将请求与session id关联)
4.相关包装类(对http的支持)
SessionRepositoryRequestWrapperSessionRepositoryResponseWrapper
Spring-session对HTTP的支持是通过标准的servlet filter来实现的,这个filter必须要配置为拦截所有的web应用请求,并且它应该是filter链中的第一个filter。Spring Session filter会确保随后调用javax.servlet.http.HttpServletRequest的getSession()方法时,都会返回Spring Session的HttpSession实例,而不是应用服务器默认的HttpSession
5.基础原理
官方原话是这样的:
我们没有使用
Tomcat的HttpSession,而是将值持久化到Redis中。
Spring会话将HttpSession替换为Redis支持的实现。当
springsecurity的SecurityContextPersistenceFilter将SecurityContext保存到HttpSession时,它就会持久化到Redis中。创建新的
HttpSession时,Spring Session会在浏览器中创建一个名为Session的cookie。
该cookie包含会话的ID。您可以查看cookies(使用Chrome或Firefox)。
也就是说,我们是需要借助spring-security的过滤器和上下文协助我们完成对session在redis存储
6.核心代码
一、启动项目
1.SpringHttpSessionConfiguration注册过滤器,注册session处理过滤器
@Bean
public <S extends Session> SessionRepositoryFilter<? extends Session> springSessionRepositoryFilter(
		SessionRepository<S> sessionRepository) {
	SessionRepositoryFilter<S> sessionRepositoryFilter = new SessionRepositoryFilter<>(sessionRepository);
	sessionRepositoryFilter.setHttpSessionIdResolver(this.httpSessionIdResolver);
	return sessionRepositoryFilter;
}
2.引入RedisHttpSessionConfiguration
注册RedisIndexedSessionRepository,设置session的存储配置、机制和模式
@Bean
public RedisIndexedSessionRepository sessionRepository() {
	RedisTemplate<Object, Object> redisTemplate = createRedisTemplate();
	RedisIndexedSessionRepository sessionRepository = new RedisIndexedSessionRepository(redisTemplate);
	sessionRepository.setApplicationEventPublisher(this.applicationEventPublisher);
	if (this.indexResolver != null) {
		sessionRepository.setIndexResolver(this.indexResolver);
	}
	if (this.defaultRedisSerializer != null) {
		sessionRepository.setDefaultSerializer(this.defaultRedisSerializer);
	}
	sessionRepository.setDefaultMaxInactiveInterval(this.maxInactiveIntervalInSeconds);
	if (StringUtils.hasText(this.redisNamespace)) {
		sessionRepository.setRedisKeyNamespace(this.redisNamespace);
	}
	sessionRepository.setFlushMode(this.flushMode);
	sessionRepository.setSaveMode(this.saveMode);
	int database = resolveDatabase();
	sessionRepository.setDatabase(database);
	this.sessionRepositoryCustomizers
			.forEach((sessionRepositoryCustomizer) -> sessionRepositoryCustomizer.customize(sessionRepository));
	return sessionRepository;
}
二、启动成功后,接受处理URL请求
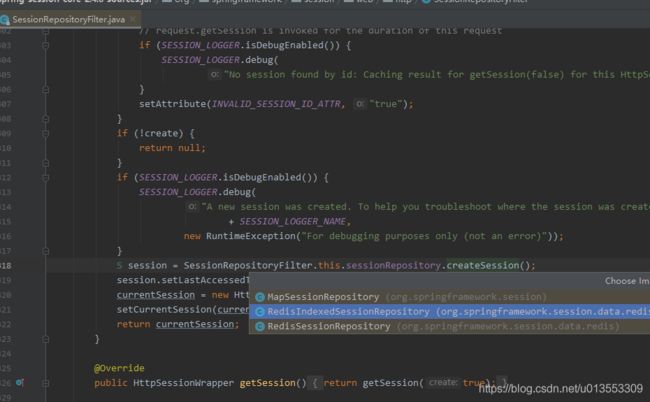
SessionRepositoryFilter重写HttpServletRequestWrapper的getSession()方法
RedisIndexedSessionRepository初始化session
@Override
public RedisSession createSession() {
	MapSession cached = new MapSession();
	if (this.defaultMaxInactiveInterval != null) {
		cached.setMaxInactiveInterval(Duration.ofSeconds(this.defaultMaxInactiveInterval));
	}
	RedisSession session = new RedisSession(cached, true);
	session.flushImmediateIfNecessary();
	return session;
}
public final class MapSession implements Session, Serializable {

	/**
	 * Default {@link #setMaxInactiveInterval(Duration)} (30 minutes).
	 */
	public static final int DEFAULT_MAX_INACTIVE_INTERVAL_SECONDS = 1800;

	private String id;

	private final String originalId;

	private Map<String, Object> sessionAttrs = new HashMap<>();

	private Instant creationTime = Instant.now();

	private Instant lastAccessedTime = this.creationTime;

	/**
	 * Defaults to 30 minutes.
	 */
	private Duration maxInactiveInterval = Duration.ofSeconds(DEFAULT_MAX_INACTIVE_INTERVAL_SECONDS);

	/**
	 * Creates a new instance with a secure randomly generated identifier.
	 */
	public MapSession() {
		this(generateId());
	}

	private static String generateId() {
		return UUID.randomUUID().toString();
	}
}
至此,大致可以知道sessionId其实就是UUID的值,有兴趣的可以debug验证
问题:如果session已经创建,那么分布式服务器如何知道用户已经登录了呢?
再回到SessionRepositoryFilter的getSession()方法
关注S requestedSession = getRequestedSession();方法
逻辑一:requestedSession为null
直接走创建createSession()方法,即生成一个uuid的主键的MapSession对象
逻辑二:requestedSession不为null
@Override
public HttpSessionWrapper getSession(boolean create) {
	HttpSessionWrapper currentSession = getCurrentSession();
	if (currentSession != null) {
		return currentSession;
	}
	S requestedSession = getRequestedSession();
	......省略部分代码.....
	S session = SessionRepositoryFilter.this.sessionRepository.createSession();
	session.setLastAccessedTime(Instant.now());
	currentSession = new HttpSessionWrapper(session, getServletContext());
	setCurrentSession(currentSession);
	return currentSession;
}
我们从S requestedSession = getRequestedSession();方法开始,一直追踪进去,会发现,实际生效的方法是在DefaultCookieSerializer里面,也就是说,request请求所在的客户端,是存在用户登录的sessionId信息的,请求过来的时候,浏览器会去请求携带的cookie中获取,然后进行Base64的解析!
private S getRequestedSession() {
			if (!this.requestedSessionCached) {
                ##########注意啦,这里是服务器解析请求中的cookie信息,解析session啦#############
				List<String> sessionIds = SessionRepositoryFilter.this.httpSessionIdResolver.resolveSessionIds(this);
                #####拿到请求sessionId之后,利用sessionRepository[redis]来对比对,匹配中一个,说明在线#######
				for (String sessionId : sessionIds) {
					if (this.requestedSessionId == null) {
						this.requestedSessionId = sessionId;
					}
					S session = SessionRepositoryFilter.this.sessionRepository.findById(sessionId);
					if (session != null) {
						this.requestedSession = session;
						this.requestedSessionId = sessionId;
						break;
					}
				}
				this.requestedSessionCached = true;
			}
			return this.requestedSession;
		}
DefaultCookieSerializer解析request的Session信息
@Override
public List<String> readCookieValues(HttpServletRequest request) {
	Cookie[] cookies = request.getCookies();
	List<String> matchingCookieValues = new ArrayList<>();
	if (cookies != null) {
		for (Cookie cookie : cookies) {
			if (this.cookieName.equals(cookie.getName())) {
				String sessionId = (this.useBase64Encoding ? base64Decode(cookie.getValue()) : cookie.getValue());
				if (sessionId == null) {
					continue;
				}
				if (this.jvmRoute != null && sessionId.endsWith(this.jvmRoute)) {
					sessionId = sessionId.substring(0, sessionId.length() - this.jvmRoute.length());
				}
				matchingCookieValues.add(sessionId);
			}
		}
	}
	return matchingCookieValues;
}
解析出request的但是这还不够,这只能判断,客户端存有用户登录的信息key,不能保证在服务器端也是登录的状态,那么这就需要做一个对比:request携带的session信息----> 分布式服务redis中存储的session集合做比对,肯定这个项目,不仅仅只有你一个人登录,对吧,别人也可以登录,这样,redis里面存在很多的用户登录信息,但是,我们只需要找出其中一个,能够与request匹配的session就可以证明,这个请求的request客户端,已经登录!比对逻辑,也是在源码中,我们继续看上面代码的注释,可以找到逻辑证明!
RedisIndexedSessionRepository中有对SessionRepositoryFilter.this.sessionRepository.findById(sessionId)做具体的实现,关注类中的以下2个方法:
private RedisSession getSession(String id, boolean allowExpired) {
	Map<Object, Object> entries = getSessionBoundHashOperations(id).entries();
	if (entries.isEmpty()) {
		return null;
	}
	MapSession loaded = loadSession(id, entries);
	if (!allowExpired && loaded.isExpired()) {
		return null;
	}
	RedisSession result = new RedisSession(loaded, false);
	result.originalLastAccessTime = loaded.getLastAccessedTime();
	return result;
}
private MapSession loadSession(String id, Map<Object, Object> entries) {
	MapSession loaded = new MapSession(id);
	for (Map.Entry<Object, Object> entry : entries.entrySet()) {
		String key = (String) entry.getKey();
		if (RedisSessionMapper.CREATION_TIME_KEY.equals(key)) {
			loaded.setCreationTime(Instant.ofEpochMilli((long) entry.getValue()));
		}
		else if (RedisSessionMapper.MAX_INACTIVE_INTERVAL_KEY.equals(key)) {
			loaded.setMaxInactiveInterval(Duration.ofSeconds((int) entry.getValue()));
		}
		else if (RedisSessionMapper.LAST_ACCESSED_TIME_KEY.equals(key)) {
			loaded.setLastAccessedTime(Instant.ofEpochMilli((long) entry.getValue()));
		}
		else if (key.startsWith(RedisSessionMapper.ATTRIBUTE_PREFIX)) {
			loaded.setAttribute(key.substring(RedisSessionMapper.ATTRIBUTE_PREFIX.length()), entry.getValue());
		}
	}
	return loaded;
}
3.Session生命周期
1.创建session
RedisSession在创建时设置3个变量createTime、maxInactiveInterval、lastAccessedTime
2.获取Session
应该通过getSession(boolean create)方法来获取session数据【create标识session不存在时是否创建session】,具体步骤如下:
getSession方法首先请求的.CURRENT_SESSION属性来获取currentSession- 获取不到,则从
request取出sessionId【该步骤依赖具体HttpSessionStrategy】 - 然后读取
spring:session:sessions:[sessionId]的值,同时根据lastAccessedTime和MaxInactiveIntervalInSeconds来判断这个session是否过期 - 如果
request中没有sessionId,说明用户是第一次访问,会根据不同的实现来创建一个新的session
3.删除session
spring session在访问有效期内,每次访问都会更新lastAccessedTime的值,过期时间为lastAccessedTime+maxInactiveInterval,也就是在有效期内每访问一次,有效期就向后延长maxInactiveInterval,对于过期数据,一般有如下三种删除策略
- 定时删除,设置键的过期时间的同时,创建定时器删除建
- 惰性删除,访问键的时候,判断键是否过期,过期则删除,否则返回该键值
- 定期删除,每隔一段时间,程序对数据库进行一次检查,删除里面的过期键
4. session的数据结构
spring-session在redis的数据结构
-
Set类型spring:session:expireations:表示经过的分钟数Set集合的member为expires:[sessionId],表示members会在min分钟后延期 -
String类型的spring:session:sessions:expires:[sessionId]:该数据的
ttl标识剩余的过期时间,即maxInactiveInterval -
Hash类型的spring:session:sessions:[sessionId]session保存的数据,记录了createTime,maxInactiveInterval,lastAccessedTime,attribute前面两个数据是用于
session过期管理的辅助数据结构
5.注意事项
spring-session要求redis版本在2.8以上- 默认情况下,
session存储在redis的key是spring:session:,但如果多个系统使用一个redis,会有冲突,此时需要配置redisNamespace的值 - 如果想在
session中保存一个对象,必须实现Serializable接口 session的域不同会生成新的session的,需进行网关代理、负载均衡、或者自定义HttpSessionStrategy策略并进行跨域处理
6.项目实战
1.核心包配置
<dependency>
    <groupId>org.springframework.bootgroupId>
    <artifactId>spring-boot-starter-data-redisartifactId>
dependency>
<dependency>
    <groupId>org.springframework.securitygroupId>
    <artifactId>spring-security-webartifactId>
    <version>5.3.6.RELEASEversion>
dependency>
<dependency>
    <groupId>org.springframework.sessiongroupId>
    <artifactId>spring-session-data-redisartifactId>
    <version>2.4.0version>
dependency>
<dependency>
    <groupId>org.springframework.sessiongroupId>
    <artifactId>spring-session-coreartifactId>
    <version>2.4.0version>
dependency>
2.启动配置
@Slf4j
// redisNamespace不同服务设置不同的namcespace
//maxInactiveIntervalInSeconds-默认失效时间1800->30分钟,cleanupCron->定期清理会话cron表达式
@EnableRedisHttpSession(redisNamespace = "spring:session:client", maxInactiveIntervalInSeconds = 1800)
@Configuration
public class RedisHttpSessionConfig {

    /**
     * 更换序列化器
     */
    @Bean("springSessionDefaultRedisSerializer")
    public RedisSerializer setSerializer(){
        return new GenericJackson2JsonRedisSerializer();
    }

    @Bean
    public CookieSerializer cookieSerializer() {
        DefaultCookieSerializer serializer = new DefaultCookieSerializer();
        //serializer.setCookieName("SESSIONID");
        serializer.setCookiePath("/");
        //serializer.setDomainNamePattern("^.+?\\.(\\w+\\.[a-z]+)$");
        return serializer;
    }

    @Bean
    public SpringHttpSessionConfiguration springHttpSessionConfiguration() {
        SpringHttpSessionConfiguration ss = new SpringHttpSessionConfiguration();
        ss.setCookieSerializer(cookieSerializer());
        log.info("加载自定义SpringHttpSessionConfiguration");
        return ss;
    }
}
3.yaml配置文件
spring:
  session:
    store-type=redis: redis
  redis:
    host: 47.105.158.78
    port: 6399
    timeout: 20s
    # 数据库索引
    database: 0
    jedis:
      pool:
        #连接池最大连接数(使用负值表示没有限制)
        max-active: 300
        #连接池最大阻塞等待时间(使用负值表示没有限制)
        max-wait: -1s
        #连接池中的最大空闲连接
        max-idle: 100
        #连接池中的最小空闲连接
        min-idle: 20
4.核心测试代码
//创建session
@GetMapping("createSession")
public JsonResult<Object> createSession(HttpSession session, String key, String value) {
    log.info("创建session:key:value:{}:{}", key, value);
    session.setAttribute(key, value);
    return JsonResult.ok(true);
}
// 获取session
@GetMapping("getSession")
public JsonResult<Object> getSession(HttpServletRequest request, String key) {
    HttpSession session = request.getSession();
    Object attribute = session.getAttribute(key);
    Map<String, Object> resultMap = Maps.newHashMapWithExpectedSize(3);
    resultMap.put("sessionId", session.getId());
    resultMap.put("maxInactiveInterval", session.getMaxInactiveInterval());
    String lastAccessedTime = LocalDateUtils.dateConvertToString(new Date(session.getLastAccessedTime()), LocalDateUtils.DATE_TIME_FORMAT);
    resultMap.put("lastAccessedTime", lastAccessedTime);
    String createTime = LocalDateUtils.dateConvertToString(new Date(session.getCreationTime()), LocalDateUtils.DATE_TIME_FORMAT);
    resultMap.put("createdTime", createTime);
    //这个key的过期时间为 Session 的最大过期时间 +5 分钟。
    resultMap.put("attribute", attribute);
    return JsonResult.ok(resultMap);
}
