在Springboot环境下,使用Docx4J + Freemarker 完成word docx文件生成与Pdf文件转换(附带兼容linux字体问题处理办法)
在Springboot环境下,使用Docx4J + Freemarker 完成word docx文件生成与Pdf文件转换(附带兼容linux字体问题处理办法)
- 前言
- 效果展示
- 正文
-
- docx文件模板创建
- Freemarker改造模板
- 由创建好的docx文件模板与Freemarker XML模板创建Docx文件
- 打包Windows下的ttf字体文件生成ttc字体文件包
- 将docx文件转换为Pdf
前言
首先介绍一下当前文档产生的原因:由于工作中需要 Docx文档的生成,以及word转Pdf的转换,但在网上所查到的文章中,都或多或少的缺少部分实际使用中可能会使用的部分,从而造成完全按照文档错误满天飞
如:
- Freemarker模板创建时,通过Docx文件中找到的模板直接使用Freemarker报错
- Docx文件转Pdf时,文档中所使用的windows字体在linux下无法使用,但字体如何获得
以及一些个人在使用中,欲动态生成数据,但样式不完全满足个人预想时的一些小花招
以下出现的代码可能有些会与其他大佬的博客高度重复,本文档就是由他们的解决各部分问题的文章为基础,最终整合出的文档
效果展示
展示部分将使用Linux上所运行的后端,在浏览器上做的下载,通过下载下的文件,来证明当前方式是可以由后端动态生成文件,以及兼容linux
初版模板为: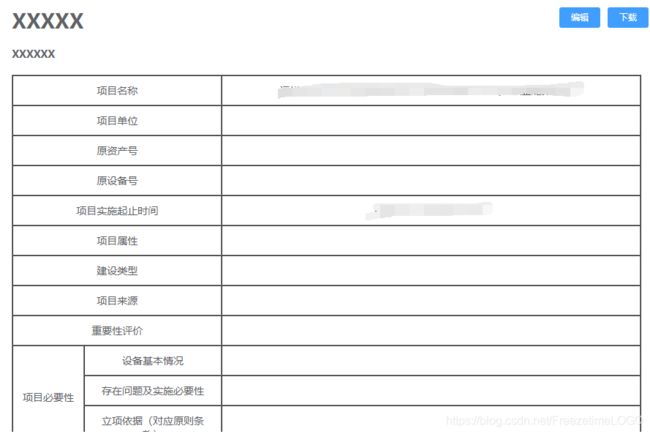
下载后:
我们对模板中的文本稍作修改:

我们再次下载,查看新生成的文件:

好的,基本展示结束,下面开始各部分拆解,进行介绍
正文
docx文件模板创建
首先,我们在桌面正常创建一个docx文件
然后打开这个docx文件,将你需要的基础模板填入这个文档

保存文件,并退出word,将刚才的docx文件后缀修改为zip

打开这个压缩包,找到下面word文件夹下的document.xml,并将它复制出来

打开这个文件,强烈推荐使用Notepad打开,因为后面有大用
刚复制出来的xml因为不是给人看的,是给电脑看的,所以节约空间,给你压成一坨坨,这时Notepad的插件就要派上用场了
![]()
我们选择上方的插件->插件管理 搜索 XML Tools,找到并下载双击安装,安装后会在已安装插件的列表内看到这个东西

而后我们就可以选中 插件->XML Tools->Pretty print 将当前文档进行XML格式化
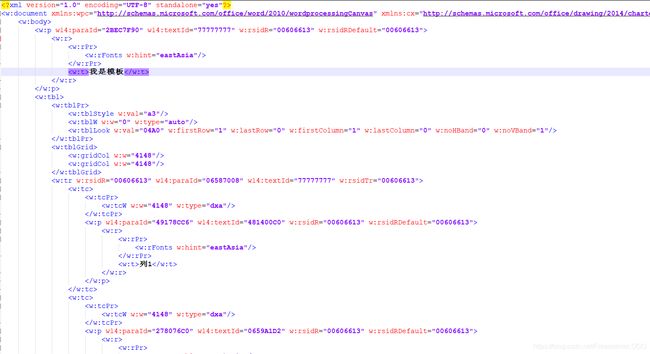
现在我们需要做的就是要学着读懂DocML了(应该没有DocML这个东西,我跟着HTML编的,还有这个东西也许微软开发者联盟之类的地方有文档吧,反正目前我是没有找到标签文档,全靠猜),比如将原来的w:tr标签进行复制,创建一个新的行,把他的第一个列改成行2,然后我们把这个xml丢回到原来的模板zip中,再把它改回docx用word打开,看一下(同样推荐一下解压工具使用winrar,免费除了有广告火绒能拦截外,都能解压,为什么推荐用winrar呢?因为出现过同事电脑上的杂牌子解压软件不能把这个xml丢回去替换的问题,我就只能推荐一个我用着能成功的软件了)
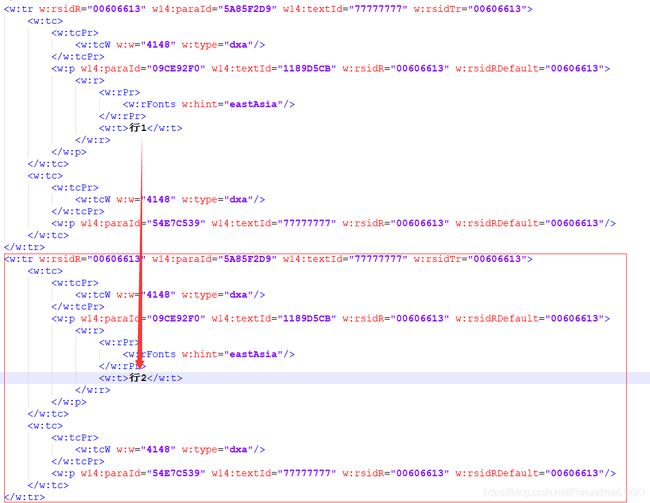

看,这时他就愣生生的多出来了一行,同时我们也验证了,通过这种方式我们只需要利用Freemarker修改这个XML,并替换zip中xml修改后缀为docx,就能得到自己想要的Word文件了
Freemarker改造模板
改造模板时颇有一种写JSP的既视感,首先我先贴上Freemarker的文档连接,先初步了解一下Freemarker如何编辑模板,当然,这里也会先提供最简单的,也是我在做模板时最常用的Freemarker标签:
- 普通插值:使用
${xxxxxx} - 循环插值:使用标签
<#list xxxxList as xxxx>${xxxx}其中xxxxList为List或Array对象 - 空值判断:
${xxxxx!""}其表示的意思就是如果xxxxx为空,则使用”“,从我使用的经验而言,做Word的模板最好所有的变量都带上这个空值默认填充空,否则会报错的
其他更详尽的Freemarker玩法,就要去看官网的介绍了Freemarker文档
最终改造好后,我们将得到一下两个文件:
前者为Freemarker模板,后者为docx源文件更改了文件后缀
这面分享一些经验,虽然我们也可以在word中将所有的${}提前预制在文档编辑页面,从而减少在编辑XML时替换变量时的工作量,但是从我是用的经验角度讲,就算这样填充好了模板,也不要直接把XML拿出来就用,因为word在一些情况下会将我们的${}标签分成多个Xml标签,从而在Freemarker处理文档时,找不到你想要的那个变量,也就无法正常替换如:

由创建好的docx文件模板与Freemarker XML模板创建Docx文件
好的,各位通过前面的小节,已经可以了解到基本的原理了,从这开始,就要开始有代码层面的东西了,首先,我们要为项目引入Freemarker的maven,我个人使用的是这个Maven版本
<dependency>
    <groupId>org.freemarkergroupId>
    <artifactId>freemarkerartifactId>
    <version>2.3.31version>
dependency>
然后,需要创建一个获取Freemarker文件输入流的工具类,把我们的xml文件填充上我们的数据:
import cn.hutool.core.io.resource.ClassPathResource;
import freemarker.template.Configuration;
import freemarker.template.Template;
import freemarker.template.TemplateException;

import java.io.*;

public class FreemarkUtils {

    /**
     * 根据指定xml生成文件(默认将文档放在resource/static下)
     * @param orgData 模板所需数据
     * @param buildXml 创建的模板名
     * @param outFilePath 模板输出文件目录与
     * @param outFileName 模板输出文件文件名
     * @throws IOException
     * @throws TemplateException
     */
    public static void createFreemarkFile(Object orgData,String buildXml,String outFilePath,String outFileName) throws IOException, TemplateException {
        Configuration configuration = new Configuration();
        configuration.setDefaultEncoding("utf-8");
        configuration.setDirectoryForTemplateLoading(new ClassPathResource("static/").getFile());
        //以utf-8的编码读取ftl文件
        Template template =  configuration.getTemplate(buildXml,"utf-8");
        Writer out = new BufferedWriter(new OutputStreamWriter(new FileOutputStream(outFilePath + outFileName), "utf-8"),10240);
        template.process(orgData, out);
        out.close();
    }

    /**
     * 获取模板输入流
     * @param dataMap   参数
     * @param templateName  模板名称
     * @param tempPath  模板路径 classes下的路径 如果是classes/static下的模板  传入 /static即可
     * @return
     */
    public static ByteArrayInputStream getFreemarkerContentInputStream(Object dataMap, String templateName, String tempPath) {
        ByteArrayInputStream in = null;

        try {
            //创建配置实例
            Configuration configuration = new Configuration();

            //设置编码
            configuration.setDefaultEncoding("UTF-8");

            //ftl模板文件统一放至 com.lun.template 包下面
            configuration.setClassForTemplateLoading(FreemarkUtils.class, tempPath);
            //获取模板
            Template template = configuration.getTemplate(templateName);

            StringWriter swriter = new StringWriter();
            //生成文件
            template.process(dataMap, swriter);
//            String result = swriter.toString();
            in = new ByteArrayInputStream(swriter.toString().getBytes());

        } catch (Exception e) {
            e.printStackTrace();
        }
        return in;
    }

}
这个类中还附带了一个createFreemarkFile方法,这个方法就是直接生成一个普通的转换过的xml文档,可以在测试过程中使用这个方法先看一下模板是否制作正常
我们将模板放在项目的resources下的/static中,这两个文件就是我们所需要的模板(不要慌张,我只是在这改个名,用了个已经做好的更复杂的模板而已)
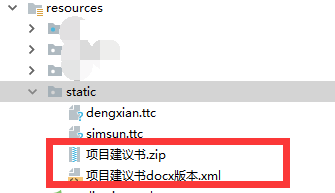
这个方法就是使用调用上面工具类中根据Freemarker模板生成好的数据,并将其替换到zip文件中,文件输出名是可根据后期个人需要进行修改
/**
     * freemark生成word----docx格式(数据源默认放在resources/static)
     * @param data 数据源
     * @param documentXmlName  document.xml模板的文件名(生成的文本数据)
     * @param docxTempName   docx模板的文件名(docx zip文件)
     * @return 生成的文件路径
     */
    public static File createApplyDocx(Object data,
                                        String documentXmlName,
                                        String docxTempName,
                                        String outFilePath) {
        ZipOutputStream zipout = null;//word输出流
        File tempPath = null;//docx格式的word文件路径
        try {
            //freemark根据模板生成内容xml
            //================================获取 document.xml 输入流================================
            ByteArrayInputStream documentInput = FreemarkUtils.getFreemarkerContentInputStream(data, documentXmlName, File.separator + "static" + File.separator);
            //================================获取 document.xml 输入流================================
            //获取主模板docx
            ClassPathResource resource = new ClassPathResource("static" + File.separator + docxTempName);
            File docxFile = resource.getFile();

            ZipFile zipFile = new ZipFile(docxFile);
            Enumeration<? extends ZipEntry> zipEntrys = zipFile.entries();

            //输出word文件路径和名称
            String fileName = "applyWord_" + System.currentTimeMillis() + ".docx";
            String outPutWordPath = outFilePath + fileName;

            tempPath = new File(outPutWordPath);
            //如果输出目标文件夹不存在,则创建
            if (!tempPath.getParentFile().exists()) {
                tempPath.mkdirs();
            }
            //docx文件输出流
            zipout = new ZipOutputStream(new FileOutputStream(tempPath));

            //循环遍历主模板docx文件,替换掉主内容区,也就是上面获取的document.xml的内容
            //------------------覆盖文档------------------
            int len = -1;
            byte[] buffer = new byte[1024];
            while (zipEntrys.hasMoreElements()) {
                ZipEntry next = zipEntrys.nextElement();
                InputStream is = zipFile.getInputStream(next);
                if (next.toString().indexOf("media") < 0) {
                    zipout.putNextEntry(new ZipEntry(next.getName()));
                    if ("word/document.xml".equals(next.getName())) {
                        //写入填充数据后的主数据信息
                        if (documentInput != null) {
                            while ((len = documentInput.read(buffer)) != -1) {
                                zipout.write(buffer, 0, len);
                            }
                            documentInput.close();
                        }
                    }else {//不是主数据区的都用主模板的
                        while ((len = is.read(buffer)) != -1) {
                            zipout.write(buffer, 0, len);
                        }
                        is.close();
                    }
                }
            }
            //------------------覆盖文档------------------
            zipout.close();//关闭

        } catch (Exception e) {
            e.printStackTrace();
            try {
                if(zipout!=null){
                    zipout.close();
                }
            }catch (Exception ex){
                ex.printStackTrace();
            }
        }
        return tempPath;
    }
File docxFile = DOC2PDFUtils.createApplyDocx(vo,
                    "项目建议书docx版本.xml",
                    "项目建议书.zip",
                    "D:/");
当调用这个方法时,我们的docx文件就被生成了
打包Windows下的ttf字体文件生成ttc字体文件包
在正式贴入docx转pdf的功能前,首先我要先介绍一下字体包的打包,在我们使用工具类,将进行文件操作的时候,最担心的就是Linux的兼容问题,以前了解过一些类似的工具类,但是很多都是使用office的dll文件做的中间件,到了Linux上。。。。一言难尽。
这个小节就是为下面docx转pdf时的最后一关,字体,打下基础。
我已将打包工具上传到CSDN的文件共享中,审核过后,将会附带链接,不用担心,我设置的是0币下载。
fontforge工具下载
打开工具目录后,我们将看到这样的目录结构
我们选择打开fontforge.bat这个文件,将会看到这样的视窗
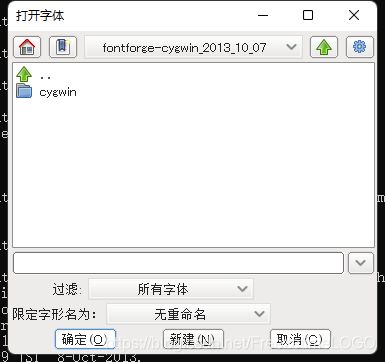
当然,这个东西我们先不要管他,主要的是要先找到我们所需要的字体文件,进入这个目录
C:\Windows\Fonts
我们将看到当前系统下所有的字体文件,这里我们使用等线字体作为范例
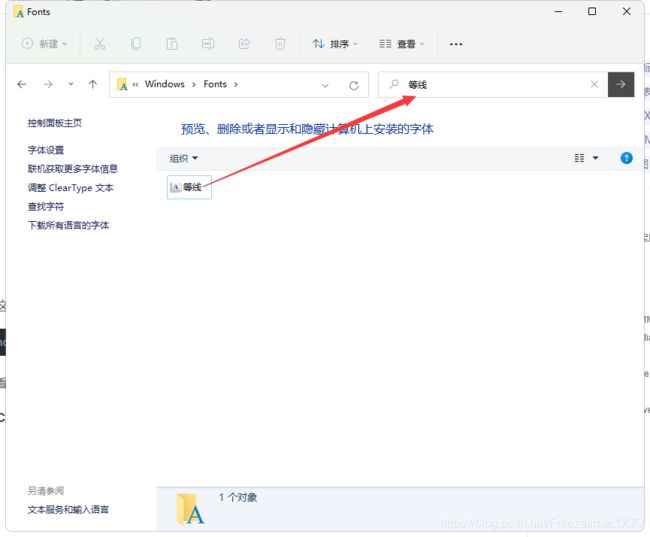
搜索后,找到所需的字体,选中后CTRL+C进行复制,在fontforge工具文件夹同级目录进行粘贴
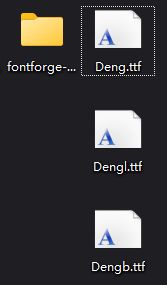
这时我们发现,虽然只复制了一个等线字体,但是实际上却复制出了多个文件,不过没问题,我们把他们进行合并生成所需要的ttc字体集合即可,回到刚才打开的窗口中,选择上面的..返回上一层,我们就可以看到工具已经识别到了这三个小家伙了,CTRL多选他们后,点击左下角的打开

简单等待后,我们可以看到这三个字体文件就被解析打开了

这时我们随便在一个窗口的 文件->生成ttc
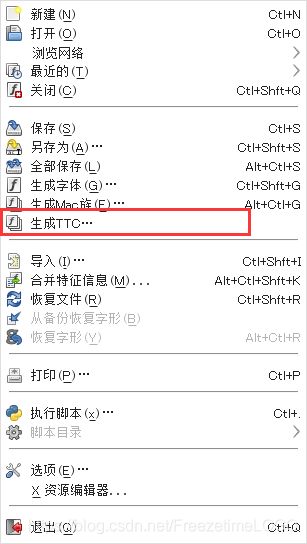
为他起一个名字,然后点击Generate静静开始等待
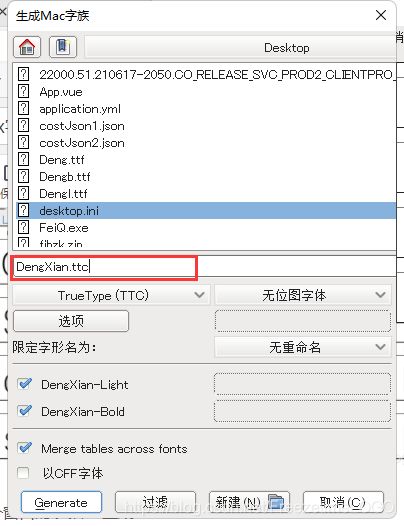
当窗口消失,即可找到刚刚生成的ttc文件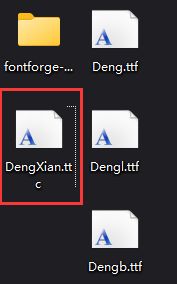
从属性文件的大小以及双击打开ttc文件的描述上,我们可以知道,所需要的字体已经被整合到一起了,上面有细心的小伙伴应该能看到,在我项目中与模板同级的位置,就放着等线(dengxian.ttc)宋体(simsun.ttc)这两个字体的ttc整合包了
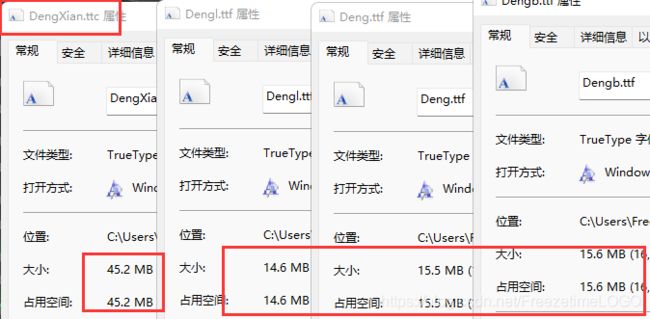
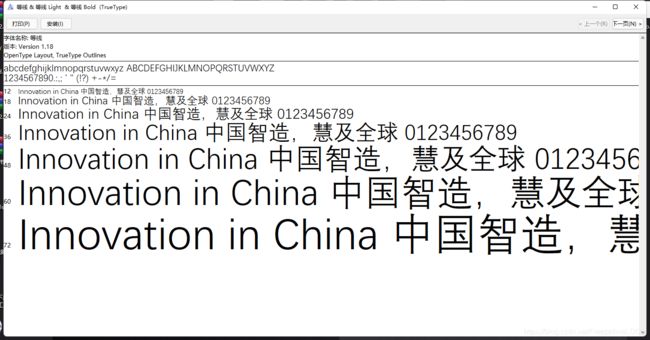
将docx文件转换为Pdf
经过前面的铺垫,我们最终来到了docx文件转pdf文件的环节,首先我们先引入Maven配置
<dependency>
   <groupId>com.itextpdfgroupId>
    <artifactId>itextpdfartifactId>
    <version>5.4.3version>
dependency>

<dependency>
    <groupId>org.docx4jgroupId>
    <artifactId>docx4jartifactId>
    <version>6.0.1version>
    <exclusions>
        <exclusion>
            <groupId>org.slf4jgroupId>
            <artifactId>slf4j-log4j12artifactId>
        exclusion>
        <exclusion>
            <groupId>com.fasterxml.jackson.coregroupId>
            <artifactId>jackson-databindartifactId>
        exclusion>
    exclusions>
dependency>
<dependency>
    <groupId>org.docx4jgroupId>
    <artifactId>docx4j-export-foartifactId>
    <version>8.1.6version>
dependency>
<dependency>
    <groupId>org.docx4jgroupId>
    <artifactId>docx4j-coreartifactId>
    <version>8.1.6version>
dependency>
<dependency>
    <groupId>org.docx4jgroupId>
    <artifactId>docx4j-JAXB-ReferenceImplartifactId>
    <version>8.1.6version>
dependency>
下面是实现代码,通过PhysicalFonts.addPhysicalFonts引入我们所导好的字体文件,并使用fontMapper.put创建Word中使用的字体类型与字体文件之间的对照关系
/**
     * word(docx)转pdf
     * @param wordPath  docx文件路径
     * @return  生成的带水印的pdf路径
     */
    public static File convertDocx2Pdf(String wordPath,String pdfOutPath) {
        String regex=".*(Courier New|Arial|Times New Roman|Comic Sans|Georgia|Impact|Lucida Console|Lucida Sans Unicode|Palatino Linotype|Tahoma|Trebuchet|Verdana|Symbol|Webdings|Wingdings|Wingdings 2|MS Sans Serif|MS Serif).*";
        Date startDate = new Date();
        PhysicalFonts.setRegex(regex);
        String pdfNoMarkPath = null;

        OutputStream os = null;
        InputStream is = null;
        try {
            is = new FileInputStream(new File(wordPath));
            WordprocessingMLPackage mlPackage = WordprocessingMLPackage.load(is);
            Mapper fontMapper = new IdentityPlusMapper();

            PhysicalFonts.addPhysicalFonts("SimSun", FreemarkUtils.class.getResource("/static/simsun.ttc"));
            PhysicalFonts.addPhysicalFonts("DengXian", FreemarkUtils.class.getResource("/static/dengxian.ttc"));
            // fontMapper.put("Helvetica", PhysicalFonts.get("SimSun"));
            fontMapper.put("宋体", PhysicalFonts.get("SimSun"));
            fontMapper.put("宋体 (中文正文)", PhysicalFonts.get("SimSun"));
            fontMapper.put("等线", PhysicalFonts.get("DengXian"));
            mlPackage.setFontMapper(fontMapper);
            //输出pdf文件路径和名称
            String fileName = "pdfNoMark_" + System.currentTimeMillis() + ".pdf";
            // String pdfNoMarkPath = System.getProperty("java.io.tmpdir").replaceAll(separator + "$", "") + separator + fileName;
            pdfNoMarkPath = pdfOutPath + fileName;

            os = new java.io.FileOutputStream(pdfNoMarkPath);
            //docx4j  docx转pdf
            FOSettings foSettings = Docx4J.createFOSettings();

            foSettings.setWmlPackage(mlPackage);
            Docx4J.toFO(foSettings, os, Docx4J.FLAG_EXPORT_PREFER_XSL);

            is.close();//关闭输入流
            os.close();//关闭输出流

            return new File(pdfNoMarkPath);
        } catch (Exception e) {
            e.printStackTrace();
            try {
                if(is != null){
                    is.close();
                }
                if(os != null){
                    os.close();
                }
            }catch (Exception ex){
                ex.printStackTrace();
            }
        }finally {
        // 这里原本是将word文件进行删除,由于我的业务上不需要对这个文件进行删除,所以就移除了这段代码
//            File file = new File(wordPath);
//            if(file!=null&&file.isFile()&&file.exists()){
//                file.delete();
//            }
        }
        return null;
    }
最后调用这个方法即可
// docxFile为上面生成的Docx文件
File pdfFile = DOC2PDFUtils.convertDocx2Pdf(docxFile.getAbsolutePath(),"D:/");
这里字体要根据个人使用情况进行适当调整,所使用的字体可以在XML模板中看到,如:
![]()
当这个方法运行时,可以根据控制台报错进行字体文件的调整