Vue2.0+AntvX6—边 Edge
创建边
方式一:构造函数
X6 的 Shape 命名空间中内置 Edge、DoubleEdge、ShadowEdge 三种边,可以使用这些边的构造函数来创建边。
import { Shape } from '@antv/x6'

// 创建边
const edge = new Shape.Edge({
  source: rect1,
  target: rect2,
})

// 添加到画布
graph.addEdge(edge)
也可以先创建边,然后调用边提供的方法来设置边的源节点、目标节点、样式等。
const edge = new Shape.Edge()

edge
  .setSource(rect1)
  .setTarget(rect2)

graph.addEdge(edge)
方式二:graph.addEdge
还可以使用 graph.addEdge 方法来创建边并添加边到画布,推荐大家使用这个便利的方法。
const rect = graph.addEdge({
  shape: 'edge', // 指定使用何种图形,默认值为 'edge'
  source: rect1,
  target: rect2,
})
选项
| 属性名 | 类型 | 默认值 | 描述 |
|---|---|---|---|
| source | TerminalData | undefined | 源节点或起始点 |
| target | TerminalData | undefined | 目标节点或目标点 |
| vertices | Point.PointLike[] | undefined | 路径点 |
| router | RouterData | undefined | 路由 |
| connector | ConnectorData | undefined | 连线 |
| labels | Label[] | undefined | 标签 |
| defaultLabel | Label | 默认标签 | 默认标签 |
source/target
graph.addEdge({
  source: rect1, // 源节点
  target: rect2, // 目标节点
})

graph.addEdge({
  source: 'rect1', // 源节点 ID
  target: 'rect2', // 目标节点 ID
})

graph.addEdge({
  source: { cell: rect1, port: 'out-port-1' },  // 源节点和链接桩 ID
  target: { cell: 'rect2', port: 'in-port-1' }, // 目标节点 ID 和链接桩 ID
})

graph.addEdge({
  source: 'rect1',            // 源节点 ID
  target: { x: 100, y: 120 }, // 目标点
})
需要注意的是,当源/目标是画布上的点时,需要开启 allowBlank 选项(默认已经开启)才能生效。
const graph = new Graph({
  connecting: {
    allowBlank: true,
  },
})
vertices
路径点。边从起始点开始,按顺序经过路径点,最后到达终止点。
graph.addEdge({
  source: rect1,
  target: rect2,
  vertices: [
    { x: 100, y: 200 },
    { x: 300, y: 120 },
  ],
})
router
路由 router 将对 vertices 进一步处理,并在必要时添加额外的点,然后返回处理后的点。例如,经过 orth 路由处理后,边的每一条链接线段都是水平或垂直的。
graph.addEdge({
  source: rect1,
  target: rect2,
  vertices: [
    { x: 100, y: 200 },
    { x: 300, y: 120 },
  ],
  router: 'orth',
  // 或
  // router: {
  //   name: 'orth',
  // },
})

路由都是通过注册的方式注册到 X6 中,使用时只需要提供路由名称 name 和 参数 args 即可,不需要参数 args 时可以使用省略写法。
X6 默认提供了以下几种路由,点击下面的链接查看每种路由的使用方式。
normal
orth
oneSide
manhattan
metro
er
connector
链接器 connector 将路由 router 返回的点加工成渲染边需要的 pathData。例如,rounded 连接器将连线之间的倒角处理为圆弧倒角。
graph.addEdge({
  source: rect1,
  target: rect2,
  vertices: [
    { x: 100, y: 200 },
    { x: 300, y: 120 },
  ],
  router: 'orth',
 connector: 'rounded',
  // 或
  // connector: {
  //   name: 'rounded',
  // },
})
X6 默认提供了以下几种连接器,点击下面的链接查看每种连接器的使用方式。
normal
rounded
smooth
jumpover
labels
标签。
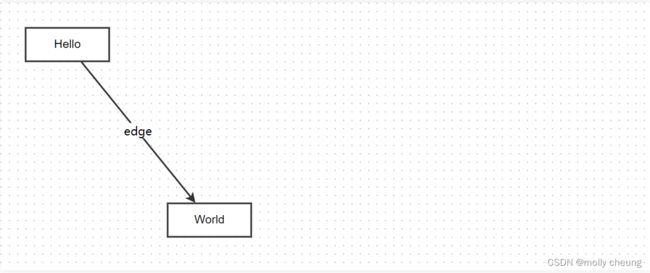
用于设置标签文本、位置、样式等。通过数组形式支持多标签,labels 指定的每一项都将于 defaultLabel 进行 merge 后使用。
const edge = graph.addEdge({
  source: rect1,
  target: rect2,
  labels: [
    {
      attrs: { label: { text: 'edge' } },
    },
  ],
})
// 或
const edge = graph.addEdge({
  source: rect1,
  target: rect2,
  labels: ['edge'], // 通过 labels 可以设置多个标签,当只设置标签文本是可以简化为此写法
})
// 或
const edge = graph.addEdge({
  source: rect1,
  target: rect2,
  label: 'edge', // 通过 label 设置单个标签,当只设置标签文本是可以简化为此写法
})
也可以调用 edge.setLabels() 和 edge.appendLabel() 来设置和添加标签。
// 设置标签
edge.setLabels([{
  attrs: { label: { text: 'edge' } },
}])
// 或
edge.setLabels(['edge'])

// 添加单个标签
edge.appendLabel({
  attrs: { label: { text: 'edge' } },
})
// 或
edge.appendLabel('edge')
defaultLabel
默认标签。通默认标签可以简化标签配置项,labels 指定的每一项都将于 defaultLabel 进行 merge 后使用。
定制样式 Attrs
例如,Shape.Edge 边定义了 ‘line’(代表 元素)和 ‘wrap’(代表透明的 元素,用于响应交互)两个选择器。我们在创建边时可以像下面这样定义边的样式。
graph.addEdge({
  source: { x: 100, y: 40 },
  target: { x: 400, y: 40 },
  attrs: {
    line: {
      stroke: "#7c68fc", // 指定 path 元素的填充色
    },
  },
})
使用箭头 Marker
定义了 sourceMarker 和 targetMarker 两个特殊属性来为边定制起始和终止箭头。例如,对 Shape.Edge 我们可以通过 ‘line’ 选择器来指定起始和终止箭头。
内置箭头
X6 提供了以下几种内置箭头,使用时只需要指定箭头名和参数(可省略)即可。
block
classic
diamond
cross
async
path
circle
circlePlus
ellipse
edge.attr({
  line: {
    sourceMarker: 'block', // 实心箭头
    targetMarker: {
      name: 'ellipse', // 椭圆
      rx: 10, // 椭圆箭头的 x 半径
      ry: 6,  // 椭圆箭头的 y 半径
    },
  },
})
自定义箭头
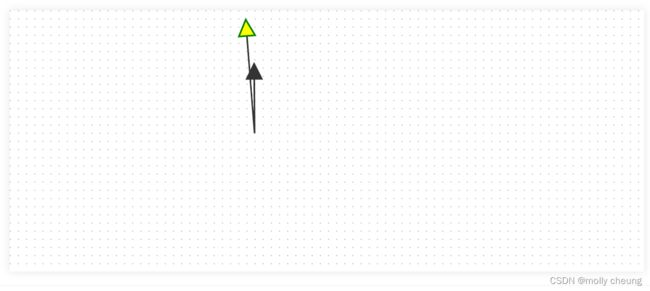
可以通过 tagName 指定的 SVG 元素来渲染箭头,例如下面我们使用 元素来渲染箭头,箭头默认继承边的填充色 fill 和边框色 stroke。
edge.attr({
  line: {
    sourceMarker: {
      tagName: 'path',
      d: 'M 20 -10 0 0 20 10 Z',
    },
    targetMarker: {
      tagName: 'path',
      fill: 'yellow',  // 使用自定义填充色
      stroke: 'green', // 使用自定义边框色
      strokeWidth: 2,
      d: 'M 20 -10 0 0 20 10 Z',
    },
  },
})
起始箭头和终止箭头使用了相同的 ‘d’ 属性,这是因为我们会自动计算箭头方向,简单来说,我们在定义箭头时,只需要定义一个向左指向坐标原点的箭头即可。


