记录vue的一些踩坑日记
记录vue的一些踩坑日记
安装Jq
npm install jquery --save
vue列表跳转到详情页,再返回列表的时候不刷新页面并且保持原位置不变;
解决:使用keepAlive
- 在需要被缓存的页面的路由中添加:keepAlive: true,
 {
        path: '/viewExamine',
        name: 'viewExamine',
        component: () => import('@/views/viewExamine'),
        meta: {
          keepAlive: true,
        },
      },
- 记录位置
const router = new VueRouter({
  // mode: 'history',
  mode: 'hash', //刷新之后找不到页面用这个
  base: process.env.BASE_URL,
  routes,
  //记录位置
  scrollBehavior: (to, from, savedPosition) => {
    if (savedPosition) {
      return savedPosition
    } else {
      return { x: 0, y: 0 }
    }
  }
})
- 在app.vue中:
<template>
  <div id="app" v-cloak>

    <keep-alive>
      <router-view v-if="$route.meta.keepAlive">router-view>
    keep-alive>

    <router-view v-if="!$route.meta.keepAlive">router-view>
  div>
template>
然后,就可以啦,问题就解决了(返回列表页不会触发created)
vue退出登录后,如何清空keep-alive缓存
问题描述:在项目中,有个页面用到了keep-alive。但是,当我点击退出登录,切换了其他账号登录后,保留的还是上一个账号的数据信息,最终采取了以下方法解决的。
原文:https://blog.csdn.net/weixin_50446072/article/details/125541134
代码如下:(app.vue)
<template>
  <div id="app">
    <keep-alive v-if="isLoggedIn">
      <router-view v-if="$route.meta.keepAlive">router-view>
    keep-alive>
    <router-view v-if="!$route.meta.keepAlive||!isLoggedIn">router-view>
  div>
template>

<script>
export default {
  data() {
    return {
      isLoggedIn: false,
    };
  },
  watch: {
    $route(to, from) {
      // if the route changes...
      let token = localStorage.getItem("court-token") || "";
      if (token) {
        // firebase returns null if user logged out
        this.isLoggedIn = true;
      } else {
        this.isLoggedIn = false;
      }
    },
  },
};
script>
转化时间戳
- 过滤器
Vue.filter('dateFormat_sfm', time => {
  //年月日时分秒
  var now = new Date(time);
  var nian = now.getFullYear();
  var yue = (now.getMonth() + 1).toString().padStart(2, "0");
  var ri = now.getDate().toString().padStart(2, "0");
  var shi = now.getHours().toString().padStart(2, "0");
  var fen = now.getMinutes().toString().padStart(2, "0");
  var miao = now.getSeconds().toString().padStart(2, "0");
  if (time === undefined) {
    return ``;
  } else {
    return `${nian}-${yue}-${ri} ${shi}:${fen}:${miao}`; //
  }
})
- mixin
- npm install moment --save(如果想使用moment)
- 在src下创建一个mixin文件夹 里面创建一个index.js
//import moment from 'moment'

const mixin = {
    methods: {
        getTimeSFM(time) {
            // if (time !== undefined) {
            //     return moment(time).format('YYYY-MM-DD HH:mm:ss')
            // } else {
            //     return ''
            // }
            //年月日时分秒
            var now = new Date(time);
            var nian = now.getFullYear();
            var yue = (now.getMonth() + 1).toString().padStart(2, "0");
            var ri = now.getDate().toString().padStart(2, "0");
            var shi = now.getHours().toString().padStart(2, "0");
            var fen = now.getMinutes().toString().padStart(2, "0");
            var miao = now.getSeconds().toString().padStart(2, "0");
            if (time === undefined) {
                return ``;
            } else {
                return `${nian}-${yue}-${ri} ${shi}:${fen}:${miao}`; //
            }
        },
        getTime(time) {

            // if (time !== undefined) {
            //     return moment(time).format('YYYY-MM-DD')
            // } else {
            //     return ''
            // }

            //年月日时分秒
            var now = new Date(time);
            var nian = now.getFullYear();
            var yue = (now.getMonth() + 1).toString().padStart(2, "0");
            var ri = now.getDate().toString().padStart(2, "0");
            var shi = now.getHours().toString().padStart(2, "0");
            var fen = now.getMinutes().toString().padStart(2, "0");
            var miao = now.getSeconds().toString().padStart(2, "0");
            if (time === undefined) {
                return ``;
            } else {
                return `${nian}-${yue}-${ri}`; //
            }
        }
    }
}
export default mixin
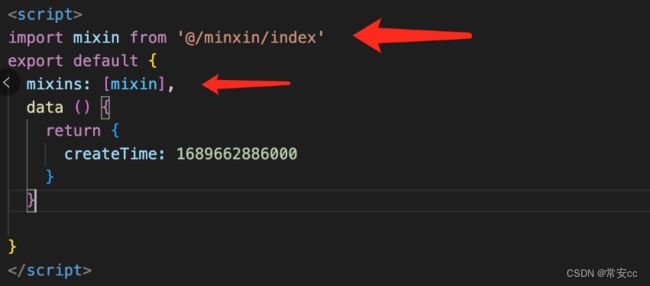
局部引入:(在需要用到的页面)
- import mixin from “@/mixin/index”;
- mixins: [mixin],
- import MiXin from ‘@/mixin/index’
- Vue.mixin(MiXin)
- 可以直接使用在div里面:
解决编程式路由往同一地址跳转时会报错的情况
//解决编程式路由往同一地址跳转时会报错的情况
const originalPush = VueRouter.prototype.push;
const originalReplace = VueRouter.prototype.replace;
//push
VueRouter.prototype.push = function push(location, onResolve, onReject) {
  if (onResolve || onReject)
    return originalPush.call(this, location, onResolve, onReject);
  return originalPush.call(this, location).catch(err => err);
};
//replace
VueRouter.prototype.replace = function push(location, onResolve, onReject) {
  if (onResolve || onReject)
    return originalReplace.call(this, location, onResolve, onReject);
  return originalReplace.call(this, location).catch(err => err);
};
多次打包之后:浏览器会有缓存
在 html 文件中加入 meta 标签,content 属性设置为no-cache;
public/index.html
  <meta http-equiv="pragram" content="no-cache">
  <meta http-equiv="cache-control" content="no-cache, no-store, must-revalidate">
  <meta http-equiv="expires" content="0">
项目打包的时候给每个打包文件加上 hash 值,一般是在文件后面加上时间戳;
vue.config.js
const { defineConfig } = require('@vue/cli-service');
const Timestamp = new Date().getTime();
module.exports = defineConfig({
  //  在打包时取消生成.map文件
  //在开发模式为true,有报错信息可以查看精确到行列(因为打包之后所有代码都打入一个js文件)
  productionSourceMap: process.env.NODE_ENV === 'production' ? false : true,
  transpileDependencies: true,
  lintOnSave: true, //eslint,默认是true
  publicPath: './',//因为webpack不认识@。
  // 设置出口:解决打包缓存
  // 修改输出js目录名及文件名
  configureWebpack: {
    output: {
    //js表示在dist生成一个js文件夹
    //[name]自动根据生成名字
    //[hash:6]打包之后会生成一个hash值. :6表示取hash前6位
    //[chunkhash]打包会生成一个chunkhash值,只有每次修改配置chunkhash才会变化
      filename: `js/[name].[chunkhash].${Timestamp}.js`,
      chunkFilename: `js/[name].[chunkhash].${Timestamp}.js`
    }
  },
  // 修改输出css目录名及文件名
  css: {
    extract: {
      filename: `css/[name].[chunkhash].${Timestamp}.css`,
      chunkFilename: `css/[name].[chunkhash].${Timestamp}.css`
    }
  },
打包之后的文件:每次生成的文件名称都是不一样的
vue配置环境:开发环境、测试环境、正式环境
项目根目录下新建文件:
.env.development、.env.production、.env.test
NODE_ENV = 'development'。//是node的语言 process.env.NODE_ENV就可以访问到值
VUE_APP_MODE = 'development'// 在vue中 要写成VUE_APP开头并大些
VUE_APP_BASE_API =  window.apiURL;//这里:'http://xxx:8080'(你的开发环境)
NODE_ENV = 'production'
VUE_APP_MODE = 'production'
VUE_APP_BASE_API = window.apiURL;//这里:'http://xxx:8080'(你的开发环境)
NODE_ENV = 'test'
VUE_APP_MODE = 'test'
VUE_APP_BASE_API = window.apiURL;//这里:'http://xxx:8080'(你的开发环境)
package.json中配置:
  "scripts": {
    "serve": "vue-cli-service serve",
    "test": "vue-cli-service serve --mode test",
    "prod": "vue-cli-service serve --mode production",
    "build": "vue-cli-service build",
    "build:test": "vue-cli-service build --mode test",
    "build:prod": "vue-cli-service build --mode production",
    "lint": "vue-cli-service lint"
  },
启动命令:
npm run serve;//开发环境
npm run test;//测试环境
npm run prod;//正式环境
打包命令:
npm run build;//开发环境
npm run build:test;//测试环境
npm run build:prod;//正式环境
window.apiURL:是获取当前项目启动的服务器的路径+端口(场景:没有固定的地址)
const apiURL = window.location.origin
- index.html中:
  <script type="text/javascript" src="<%= BASE_URL %>index.js">script>
  <script>
    // 然后使用window对象
    window.apiURL = apiURL
  script>
- utils/request.js
// 1.创建一个新的axios实例,设置基地址
const request = axios.create({
  // baseURL:process.env.VUE_APP_BASE_API + "/xxx",
  baseURL: window.apiURL + "/xxx", // 正式
  timeout: 10000
});
这样的话,不管你的项目部署在那个地址下,都不用再改路径和端口了。
Eslint:常见打包报错
- 注释://后面应该有空格;
- Operator ‘===’ must be spaced 使用’= = =’ 而不是’= =’
- Import in body of module; reorder to top import/first:将所有的import挡在最前面;
- 使用 let/const 而不是var;
vue中使用params传参,刷新页面后params参数丢失解决方案
解决方案:
1. 配合sessionStorage实现刷新页面后数据不丢失
(网上很多都是使用localStorage配合使用,但是有个问题是将当前页面直接关闭了,重新进来后localStorage还是存在的。而使用sessionStorage,页面关闭后会自动删除)
export default {
	created(){
		   let paramsData = sessionStorage.getItem("paramsData");
		   let params;
	       if(paramsData){
	            params = JSON.parse(sessionStorage.getItem("paramsData"));
	        }else{
             	params = this.$route.params;
	            sessionStorage.setItem("paramsData", JSON.stringify(params));
	        }
	        this.params = params;
		},
	// 页面销毁之前
    beforeDestroy() {
        sessionStorage.removeItem('paramsData')
   	},
	}
2. 使用动态路由
使用动态路由,访问路由地址为:/vuew1/username/6110(感觉和query访问差不多,如果参数多点路由地址会显得很长,不大美观。)
在router.js中设置路由
const routes = [
  {
    path: '/view1/:name/:idno',
    name: 'view1',
    component: () => import( '../admin/view1.vue')
  },
]

const router = new VueRouter({
  mode: 'history',
  base: process.env.BASE_URL,
  routes
})
页面中使用
this.$router.push({name:'view1', params:{name:'张三', idno:'123123'}});
<router-link :to="{name:'view1', params: {name:'张三', idno:'123123'}}">跳转</router-link>


