前后端分离开发模式介绍
1.1 什么是前后端分离
前后端分离是目前一种非常流行的开发模式,它使项目的分工更加明确:
- 后端:负责处理、存储数据
- 前端:负责显示数据
1.2 为什么要进行前后端分离
- 前后端可以身心愉快地专注于各自擅长的领域
- 避免后端写前端代码(基本上1天时间,20%写后端代码,80%写页面…)
- 前端配置后端代码运行环境(简直是要疯… 装一堆环境,而且有些开发环境是windows,前端是macos,装环境就要装好几天)
- 避免前后端打架,推诿,甩锅…
- 提高开发效率
- 分离有助于前端大放异彩,后端专注于三高(高并发、高性能、高可用)
- 太多了…
1.3 前后端分离存在的问题
- 当接口改变的时候,非常麻烦–
- 需要前后端人员联调–联调开发的时间(开发+测试+联调)占项目的 15%–60%
1.4 如何分离
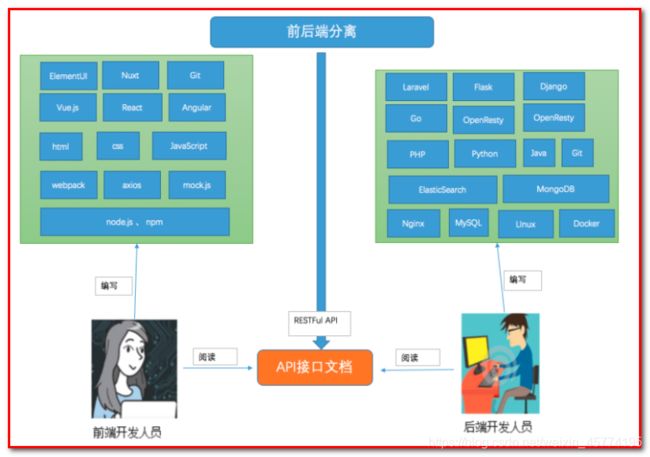
1.4.1 职责分离
1.4.2 开发流程
- 后端编写和维护接口文档,在 API 变化时更新接口文档
- 后端根据接口文档进行接口开发
- 前端根据接口文档进行开发 + Mock平台
- 开发完成后联调和提交测试
推荐几个接口规范工具:postman、eolinker
1.4.3 规范原则
- 接口返回数据即显示:前端仅做渲染逻辑处理;
- 渲染逻辑禁止跨多个接口调用;
- 前端关注交互、渲染逻辑,尽量避免业务逻辑处理的出现;
- 请求响应传输数据格式:JSON,JSON数据尽量简单轻量,避免多级JSON的出现;
1.5 数据格式
1.5.1 请求格式–统一的数据请求格式
| get请求 | http://localhost:8080/user/1 http://localhost:8080/user?id=1 |
|---|---|
| post请求 | http://localhost:8080/user |
| put请求 | http://localhost:8080/user |
| delete请求 | http://localhost:8080/user/1 |
1.5.2 响应格式–统一的返回结果
- 基本格式
{
    "code": 20000,
    "msg": "success"
}
code : 请求处理状态(可以根据业务自行添加)
- 20000 成功
- 20001 失败
msg:请求处理消息(可以根据业务自行添加)
响应实体格式
{
    "code": 20000,
    "msg": "success",
    "data": [
        "entity": {
            "id": 1,
            "name": "XXX",
            "phone": "XXX"
        }
    ]
}
响应列表格式
{
    "code": 20000,
    "msg": "success",
    "data": {
        "list":[
            {
                "id": 1,
                "name": "XXX",
                "code": "XXX"
            },
             {
                "id": 2,
                "name": "XXX",
                "code": "XXX"
            },
             {
                "id": 3,
                "name": "XXX",
                "code": "XXX"
            }
        ]
    }
}
响应分页格式
{
    "code": 200,
    "msg":"success",
    "data": {
        "totalCount": 2,
        "totalPage": 1
        "pageNo": 1,
        "pageSize": 10,
        "list": [
            {
                "id": 1,
                "name": "XXX",
                "code": "H001"
            },
            {
                "id": 1,
                "name": "XXX",
                "code": "H001"
            },
            {
                "id": 1,
                "name": "XXX",
                "code": "H001"
            }
 		],
    }
}
- data.totalCount: 总记录数
- data.pageNo: 当前页码
- data.pageSize: 每页大小
- data.totalPage: 总页数
1.5.3 JAVA定义统一返回结果
Result
@Data
//@ApiModel(value = "全局统一返回结果")
public class Result {
//@ApiModelProperty(value = "是否成功")
private boolean success;
//@ApiModelProperty(value = "返回码")
private Integer code;
//@ApiModelProperty(value = "返回消息")
private String message;
//@ApiModelProperty(value = "返回数据")
private Map data = new HashMap();
private Result(){}
public static Result ok(){
Result r = new Result();
r.setSuccess(true);
r.setCode(ResultCode.OK);
r.setMessage("成功");
return r;
}
public static Result error(){
Result r = new Result();
r.setSuccess(false);
r.setCode(ResultCode.ERROR);
r.setMessage("失败");
return r;
}
public Result message(String message){
this.setMessage(message);
return this;
}
public Result code(Integer code){
this.setCode(code);
return this;
}
public Result data(String key, Object value){
this.data.put(key, value);
return this;
}
public Result data(Map map) {
this.setData(map);
return this;
}
}
2 商品管理系统
2.1 案例需求
完成商品的查询、新增、修改、删除等操作
后端(服务器端):spring boot+spring mvc+mybatis
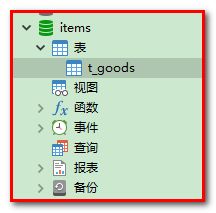
2.2 数据库设计与表结构
CREATE TABLE `t_goods` (
  `id` int(11) NOT NULL AUTO_INCREMENT,
  `name` varchar(255) DEFAULT NULL,
  `image` varchar(255) DEFAULT NULL,
  `price` double(20,0) DEFAULT NULL,
  PRIMARY KEY (`id`)
)
导入数据:
INSERT INTO `t_goods` VALUES ('1', '华为 G9 青春版 白色 移动联通电信4G手机 双卡双待', 'https://img12.360buyimg.com/n1/jfs/t17050/106/1124838205/250590/7e63050a/5abb6be2N853106d9.jpg', '84900');
INSERT INTO `t_goods` VALUES ('2', '华为 G9 青春版 金色 移动联通电信4G手机 双卡双待', 'https://img12.360buyimg.com/n1/jfs/t17050/106/1124838205/250590/7e63050a/5abb6be2N853106d9.jpg', '84900');
INSERT INTO `t_goods` VALUES ('3', '三星 Galaxy C5(SM-C5000)4GB+32GB 枫叶金 移动联通电信4G手机 双卡双待', 'https://img12.360buyimg.com/n1/jfs/t17050/106/1124838205/250590/7e63050a/5abb6be2N853106d9.jpg', '119900');
INSERT INTO `t_goods` VALUES ('4', '三星 Galaxy C5(SM-C5000)4GB+32GB 蔷薇粉 移动联通电信4G手机 双卡双待', 'https://img12.360buyimg.com/n1/jfs/t17050/106/1124838205/250590/7e63050a/5abb6be2N853106d9.jpg', '119900');
INSERT INTO `t_goods` VALUES ('5', '三星 Galaxy C5(SM-C5000)4GB+32GB 烟雨灰 移动联通电信4G手机 双卡双待', 'https://img12.360buyimg.com/n1/jfs/t17050/106/1124838205/250590/7e63050a/5abb6be2N853106d9.jpg', '119900');
INSERT INTO `t_goods` VALUES ('6', '三星 Galaxy C5(SM-C5000)4GB+32GB 皎洁银 移动联通电信4G手机 双卡双待', 'https://img12.360buyimg.com/n1/jfs/t17050/106/1124838205/250590/7e63050a/5abb6be2N853106d9.jpg', '119900');
INSERT INTO `t_goods` VALUES ('7', '华为 G9 Plus 32GB 月光银 移动联通4G手机 双卡双待', 'https://img12.360buyimg.com/n1/jfs/t17050/106/1124838205/250590/7e63050a/5abb6be2N853106d9.jpg', '119900');
INSERT INTO `t_goods` VALUES ('8', '华为 麦芒5 全网通 4GB+64GB版 香槟金 移动联通电信4G手机 双卡双待', 'https://img12.360buyimg.com/n1/jfs/t17050/106/1124838205/250590/7e63050a/5abb6be2N853106d9.jpg', '139900');
INSERT INTO `t_goods` VALUES ('9', '努比亚(nubia)Z11 百合金 4GB+64GB 全网通 移动联通电信4G手机双卡双待', 'https://img12.360buyimg.com/n1/jfs/t17050/106/1124838205/250590/7e63050a/5abb6be2N853106d9.jpg', '159900');
INSERT INTO `t_goods` VALUES ('10', '华为 HUAWEI nova 4GB+64GB版 香槟金(白)移动联通电信4G手机 双卡双待', 'https://img12.360buyimg.com/n1/jfs/t17050/106/1124838205/250590/7e63050a/5abb6be2N853106d9.jpg', '139900');
2.3 服务器端
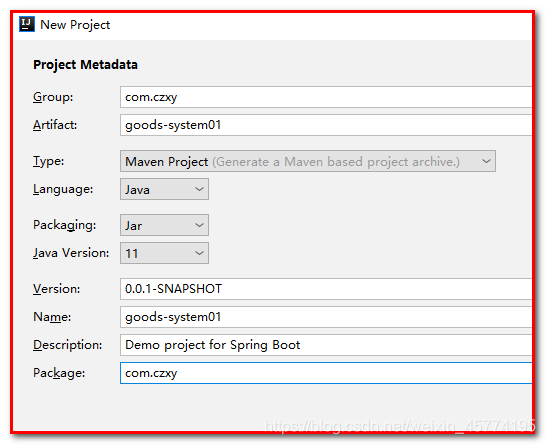
2.3.1 创建SpringBoot项目
2.3.2 导入jar包
pom.xml
UTF-8
UTF-8
1.8
1.3.2
2.0.2
5.1.32
1.2.5
1.1.10
org.springframework.boot
spring-boot-starter-web
org.springframework.boot
spring-boot-starter-jdbc
org.mybatis.spring.boot
mybatis-spring-boot-starter
$ {mybatis.starter.version}
tk.mybatis
mapper-spring-boot-starter
$ {mapper.starter.version}
com.github.pagehelper
pagehelper-spring-boot-starter
$ {pageHelper.starter.version}
mysql
mysql-connector-java
$ {mysql.version}
com.alibaba
druid-spring-boot-starter
$ {durid.starter.version}
org.projectlombok
lombok
1.18.10
2.3.3 配置文件(application.properties)
application.properties文件
#Tomcat
server.port=8090
#DB configuration
spring.datasource.driverClassName=com.mysql.jdbc.Driver
spring.datasource.url=jdbc:mysql://127.0.0.1:3306/vue01?useUnicode=true&characterEncoding=utf8
spring.datasource.username=root
spring.datasource.password=123456
#druid
spring.datasource.driver-class-name=com.mysql.jdbc.Driver
spring.datasource.druid.initial-size=1
spring.datasource.druid.min-idle=1
spring.datasource.druid.max-active=20
spring.datasource.druid.test-on-borrow=true
spring.datasource.druid.stat-view-servlet.allow=true
2.3.4 **创建springboot引导类
@SpringBootApplication
public class UserManagementApplication {

    public static void main(String[] args) {
        SpringApplication.run(UserManagementApplication.class, args);
    }
}
2.3.5 创建实体

创建包com.czxy.pojo,创建类User.java
@Table(name="t_goods")
@Data
public class Goods {

    @Id
    @GeneratedValue(strategy = GenerationType.IDENTITY)
    public Integer id;
    private String name;
    private String image;
    private Double price;
}
2.3.6 创建Dao
创建包com.czxy.dao,创建接口GoodsMapper.java
@org.apache.ibatis.annotations.Mapper
public interface GoodsMapper extends Mapper2.3.7 创建Service
创建包com.czxy.service,创建接口GoodsService.java
@Service
@Transactional
public class GoodsService {

    @Autowired
    private GoodsMapper goodsMapper;

}
2.3.8 创建Controller
创建包com.czxy.controller,创建类GoodsController.java
@RestController
@RequestMapping("/goods")
public class GoodsController {
    @Autowired
    private GoodsService goodsService;
}


