springBoot+sharding-jdbc+mybatis整合demo
Demo实现的功能
使用springBoot集成sharding-jdbc做水平分库分表,实现从数据库添加和查询数据功能。
关于sharding-jdbc基础知识, 可参考本人知识梳理:https://blog.csdn.net/mikewuhao/article/details/106838733
github源码地址
https://github.com/mikewuhao/springBoot-shardingJDBC-demo
搭建详细步骤
准备工作
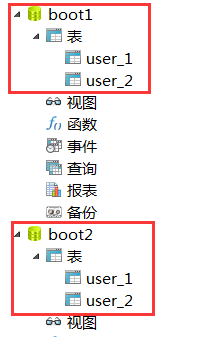
建立好2个数据库: boot1和boot2, 每个库建2张相同结构的表: 命名user1和user2, 如下所示 :
user表的建表语句
/*
Navicat MySQL Data Transfer

Source Server         : localhost
Source Server Version : 50712
Source Host           : localhost:3306
Source Database       : boot1

Target Server Type    : MYSQL
Target Server Version : 50712
File Encoding         : 65001

Date: 2020-06-17 22:48:49
*/

SET FOREIGN_KEY_CHECKS=0;

-- ----------------------------
-- Table structure for `user_1`
-- ----------------------------
DROP TABLE IF EXISTS `user_1`;
CREATE TABLE `user_1` (
  `user_id` bigint(20) NOT NULL AUTO_INCREMENT,
  `user_name` varchar(60) DEFAULT NULL COMMENT '姓名',
  `age` int(20) DEFAULT NULL COMMENT '年龄',
  `birthday` varchar(20) DEFAULT NULL COMMENT '生日',
  `address` varchar(20) DEFAULT NULL COMMENT '地址',
  `sex` int(10) DEFAULT NULL COMMENT '身份证号码',
  PRIMARY KEY (`user_id`)
) ENGINE=InnoDB AUTO_INCREMENT=480144140672172033 DEFAULT CHARSET=utf8mb4;

-- ----------------------------
-- Records of user_1
-- ----------------------------
项目结构

在idea开发工具里面新建maven类型的project, 命名为springBoot-shardingJDBC-demo按上图目录结构建包
pom.xml, 引入sharding-jdbc-spring-boot-starter的jar包
<?xml version="1.0" encoding="UTF-8"?>
<project xmlns="http://maven.apache.org/POM/4.0.0"
         xmlns:xsi="http://www.w3.org/2001/XMLSchema-instance"
         xsi:schemaLocation="http://maven.apache.org/POM/4.0.0 http://maven.apache.org/xsd/maven-4.0.0.xsd">
    <modelVersion>4.0.0</modelVersion>

    <groupId>com.wuhao.demo</groupId>
    <artifactId>speingBoot-shardingJDBC-demo</artifactId>
    <version>1.0-SNAPSHOT</version>

    <parent>
        <groupId>org.springframework.boot</groupId>
        <artifactId>spring-boot-starter-parent</artifactId>
        <version>2.1.7.RELEASE</version>
    </parent>

    <dependencies>
        <dependency>
            <groupId>org.springframework.boot</groupId>
            <artifactId>spring-boot-starter-web</artifactId>
        </dependency>

        <dependency>
            <groupId>org.springframework.boot</groupId>
            <artifactId>spring-boot-starter-test</artifactId>
            <scope>test</scope>
        </dependency>

        <!-- spring-boot整合mybatis -->
        <dependency>
            <groupId>org.mybatis.spring.boot</groupId>
            <artifactId>mybatis-spring-boot-starter</artifactId>
            <version>1.1.1</version>
        </dependency>

        <!-- mysql驱动 -->
        <dependency>
            <groupId>mysql</groupId>
            <artifactId>mysql-connector-java</artifactId>
            <version>5.1.6</version>
        </dependency>

        <!--druid连接池-->
        <dependency>
            <groupId>com.alibaba</groupId>
            <artifactId>druid-spring-boot-starter</artifactId>
            <version>1.1.16</version>
        </dependency>

        <!--sharding-jdbc-->
        <dependency>
            <groupId>org.apache.shardingsphere</groupId>
            <artifactId>sharding-jdbc-spring-boot-starter</artifactId>
            <version>4.0.0-RC1</version>
        </dependency>

        <dependency>
            <groupId>org.springframework.boot</groupId>
            <artifactId>spring-boot-starter-data-jpa</artifactId>
        </dependency>

        <dependency>
            <groupId>org.springframework</groupId>
            <artifactId>spring-context-support</artifactId>
        </dependency>

        <!--lombok-->
        <dependency>
            <groupId>org.projectlombok</groupId>
            <artifactId>lombok</artifactId>
            <version>1.18.0</version>
            <scope>provided</scope>
        </dependency>
    </dependencies>
</project>
配置文件application.properties, 配置好分库分表策略: 按用户性别分库, 用户id奇偶数分表的策略
server.port=8080

spring.main.allow-bean-definition-overriding = true

mybatis.configuration.map-underscore-to-camel-case = true

#数据源
spring.shardingsphere.datasource.names = m1,m2

#数据源1
spring.shardingsphere.datasource.m1.type = com.alibaba.druid.pool.DruidDataSource
spring.shardingsphere.datasource.m1.driver-class-name = com.mysql.jdbc.Driver
spring.shardingsphere.datasource.m1.url = jdbc:mysql://localhost:3306/boot1?useUnicode=true
spring.shardingsphere.datasource.m1.username = root
spring.shardingsphere.datasource.m1.password = root

#数据源2
spring.shardingsphere.datasource.m2.type = com.alibaba.druid.pool.DruidDataSource
spring.shardingsphere.datasource.m2.driver-class-name = com.mysql.jdbc.Driver
spring.shardingsphere.datasource.m2.url = jdbc:mysql://localhost:3306/boot2?useUnicode=true
spring.shardingsphere.datasource.m2.username = root
spring.shardingsphere.datasource.m2.password = root

# 分库策略,以sex为分片键,分片策略为sex % 2 + 1,sex为偶数操作m1数据源,否则操作m2。
spring.shardingsphere.sharding.tables.user.database-strategy.inline.sharding-column = sex
spring.shardingsphere.sharding.tables.user.database-strategy.inline.algorithm-expression = m$->{sex % 2 + 1}

# 指定user表的数据分布情况
spring.shardingsphere.sharding.tables.user.actual-data-nodes = m$->{1..2}.user_$->{1..2}

# 指定user表的主键生成策略为SNOWFLAKE
spring.shardingsphere.sharding.tables.user.key-generator.column=user_id
spring.shardingsphere.sharding.tables.user.key-generator.type=SNOWFLAKE

# 指定user表的分片策略,分片策略包括分片键和分片算法
spring.shardingsphere.sharding.tables.user.table-strategy.inline.sharding-column = user_id
spring.shardingsphere.sharding.tables.user.table-strategy.inline.algorithm-expression = user_$->{user_id % 2 + 1}

# 打开sql输出日志
spring.shardingsphere.props.sql.show = true

logging.level.root = info
logging.level.org.springframework.web = info
logging.level.com.itheima.dbsharding  = debug
logging.level.druid.sql = debug

#mybatis
mybatis.type-aliases-package=com.wuhao.domain
mybatis.mapper-locations=classpath:mapper/*.xml
启动类, ShardingJdbcApplication
package com.wuhao;

import org.springframework.boot.SpringApplication;
import org.springframework.boot.autoconfigure.SpringBootApplication;

/**
 * @description: 启动类
 * @author: wuhao
 * @create: 2020-06-17 22:10
 **/
@SpringBootApplication
public class ShardingJdbcApplication {
    public static void main(String[] args) {
        SpringApplication.run(ShardingJdbcApplication.class, args);
    }

}
控制层, UserController
package com.wuhao.controller;

import com.wuhao.configuration.IDUtil;
import com.wuhao.dao.UserMapper;
import com.wuhao.domain.User;
import lombok.extern.slf4j.Slf4j;
import org.springframework.beans.factory.annotation.Autowired;
import org.springframework.web.bind.annotation.RequestMapping;
import org.springframework.web.bind.annotation.RestController;

import java.util.List;

/**
 * @description: userController
 * @author: wuhao
 * @create: 2020-06-17 22:21
 **/
@RestController
@Slf4j
public class UserController {

    @Autowired
    UserMapper userDao;

    /***
    * @Description: 添加用戶数据
    * @Author: wuhao
    * @Date: 2020/6/17 22:31
    */
    @RequestMapping("/testInsertUser")
    public void testInsertUser(){
        for(int i=0; i<20 ;i++){
            User user = new User();
            user.setUserId(IDUtil.getRandomId());
            user.setAddress("北京市通州区");
            user.setAge(10+i);
            user.setBirthday("1992-01-01");
            user.setUserName("小吴"+i);
            user.setSex(i%2+1);
            userDao.addUser(user);
        }
    }


    /***
    * @Description: 查询所有数据
    * @return: java.lang.String
    * @Author: wuhao
    * @Date: 2020/6/17 22:30
    */
    @RequestMapping("/testQueryUser")
    public String testQueryUser(){
        List<User> userList = userDao.queryAllUser();
        return userList.toString();
    }


}
Dao层, UserMapper
package com.wuhao.dao;

import com.wuhao.domain.User;
import org.apache.ibatis.annotations.Mapper;
import org.springframework.stereotype.Component;

import java.util.List;

/**
 * @description: dao接口类
 * @author: wuhao
 * @create: 2020-06-17 22:38
 **/
@Mapper
@Component
public interface UserMapper {

    void addUser(User user);

    List<User> queryAllUser();
}
实体类, User
package com.wuhao.domain;

import lombok.AllArgsConstructor;
import lombok.Data;
import lombok.NoArgsConstructor;

/**
 * @description: User实体类
 * @author: wuhao
 * @create: 2020-06-17 22:38
 **/
@Data
@NoArgsConstructor
@AllArgsConstructor
public class User {

    private Long userId;

    private String userName;

    private Integer age;

    private Integer sex;

    private String birthday;

    private String address;


}
用户接口UserService
package com.wuhao.service;

import com.wuhao.domain.User;

import java.util.List;

/**
 * @description: 用户接口
 * @author: wuhao
 * @create: 2020-06-17 22:38
 **/
public interface UserService {

     void addUser(User user);

     List<User> queryAllUser();

}
用户接口实现类, UserServiceImpl
package com.wuhao.service.impl;

import com.wuhao.dao.UserMapper;
import com.wuhao.domain.User;
import com.wuhao.service.UserService;
import org.springframework.beans.factory.annotation.Autowired;

import java.util.List;

/**
 * @description: 用户接口
 * @author: wuhao
 * @create: 2020-06-17 22:38
 **/
public class UserServiceImpl implements UserService {

    @Autowired
    private UserMapper userMapper;

    public void addUser(User user) {
        userMapper.addUser(user);
    }

    public List<User> queryAllUser() {
        return userMapper.queryAllUser();
    }

}
雪花算法, id生成器
package com.wuhao.configuration;

/**
 * Twitter_Snowflake<br>
 * SnowFlake的结构如下(每部分用-分开):<br>
 * 0 - 0000000000 0000000000 0000000000 0000000000 0 - 00000 - 00000 - 000000000000 <br>
 * 1位标识,由于long基本类型在Java中是带符号的,最高位是符号位,正数是0,负数是1,所以id一般是正数,最高位是0<br>
 * 41位时间截(毫秒级),注意,41位时间截不是存储当前时间的时间截,而是存储时间截的差值(当前时间截 - 开始时间截)
 * 得到的值),这里的的开始时间截,一般是我们的id生成器开始使用的时间,由我们程序来指定的(如下下面程序IdWorker类的startTime属性)。41位的时间截,可以使用69年,年T = (1L << 41) / (1000L * 60 * 60 * 24 * 365) = 69<br>
 * 10位的数据机器位,可以部署在1024个节点,包括5位datacenterId和5位workerId<br>
 * 12位序列,毫秒内的计数,12位的计数顺序号支持每个节点每毫秒(同一机器,同一时间截)产生4096个ID序号<br>
 * 加起来刚好64位,为一个Long型。<br>
 * SnowFlake的优点是,整体上按照时间自增排序,并且整个分布式系统内不会产生ID碰撞(由数据中心ID和机器ID作区分),并且效率较高,经测试,SnowFlake每秒能够产生26万ID左右。
 */
public class SnowflakeIdWorker {

    // ==============================Fields===========================================
    /** 开始时间截 (2015-01-01) */
    private final long twepoch = 1420041600000L;

    /** 机器id所占的位数 */
    private final long workerIdBits = 5L;

    /** 数据标识id所占的位数 */
    private final long datacenterIdBits = 5L;

    /** 支持的最大机器id,结果是31 (这个移位算法可以很快的计算出几位二进制数所能表示的最大十进制数) */
    private final long maxWorkerId = -1L ^ (-1L << workerIdBits);

    /** 支持的最大数据标识id,结果是31 */
    private final long maxDatacenterId = -1L ^ (-1L << datacenterIdBits);

    /** 序列在id中占的位数 */
    private final long sequenceBits = 12L;

    /** 机器ID向左移12位 */
    private final long workerIdShift = sequenceBits;

    /** 数据标识id向左移17位(12+5) */
    private final long datacenterIdShift = sequenceBits + workerIdBits;

    /** 时间截向左移22位(5+5+12) */
    private final long timestampLeftShift = sequenceBits + workerIdBits + datacenterIdBits;

    /** 生成序列的掩码,这里为4095 (0b111111111111=0xfff=4095) */
    private final long sequenceMask = -1L ^ (-1L << sequenceBits);

    /** 工作机器ID(0~31) */
    private long workerId;

    /** 数据中心ID(0~31) */
    private long datacenterId;

    /** 毫秒内序列(0~4095) */
    private long sequence = 0L;

    /** 上次生成ID的时间截 */
    private long lastTimestamp = -1L;

    //==============================Constructors=====================================
    /**
     * 构造函数
     * @param workerId 工作ID (0~31)
     * @param datacenterId 数据中心ID (0~31)
     */
    public SnowflakeIdWorker() {
        this.workerId = 0L;
        this.datacenterId = 0L;
    }

    /**
     * 构造函数
     * @param workerId 工作ID (0~31)
     * @param datacenterId 数据中心ID (0~31)
     */
    public SnowflakeIdWorker(long workerId, long datacenterId) {
        if (workerId > maxWorkerId || workerId < 0) {
            throw new IllegalArgumentException(String.format("worker Id can't be greater than %d or less than 0", maxWorkerId));
        }
        if (datacenterId > maxDatacenterId || datacenterId < 0) {
            throw new IllegalArgumentException(String.format("datacenter Id can't be greater than %d or less than 0", maxDatacenterId));
        }
        this.workerId = workerId;
        this.datacenterId = datacenterId;
    }

    // ==============================Methods==========================================
    /**
     * 获得下一个ID (该方法是线程安全的)
     * @return SnowflakeId
     */
    public synchronized long nextId() {
        long timestamp = timeGen();

        //如果当前时间小于上一次ID生成的时间戳,说明系统时钟回退过这个时候应当抛出异常
        if (timestamp < lastTimestamp) {
            throw new RuntimeException(
                    String.format("Clock moved backwards.  Refusing to generate id for %d milliseconds", lastTimestamp - timestamp));
        }

        //如果是同一时间生成的,则进行毫秒内序列
        if (lastTimestamp == timestamp) {
            sequence = (sequence + 1) & sequenceMask;
            //毫秒内序列溢出
            if (sequence == 0) {
                //阻塞到下一个毫秒,获得新的时间戳
                timestamp = tilNextMillis(lastTimestamp);
            }
        }
        //时间戳改变,毫秒内序列重置
        else {
            sequence = 0L;
        }

        //上次生成ID的时间截
        lastTimestamp = timestamp;

        //移位并通过或运算拼到一起组成64位的ID
        return ((timestamp - twepoch) << timestampLeftShift) //
                | (datacenterId << datacenterIdShift) //
                | (workerId << workerIdShift) //
                | sequence;
    }

    /**
     * 阻塞到下一个毫秒,直到获得新的时间戳
     * @param lastTimestamp 上次生成ID的时间截
     * @return 当前时间戳
     */
    protected long tilNextMillis(long lastTimestamp) {
        long timestamp = timeGen();
        while (timestamp <= lastTimestamp) {
            timestamp = timeGen();
        }
        return timestamp;
    }

    /**
     * 返回以毫秒为单位的当前时间
     * @return 当前时间(毫秒)
     */
    protected long timeGen() {
        return System.currentTimeMillis();
    }

    //==============================Test=============================================
    /** 测试 */
    public static void main(String[] args) {
        SnowflakeIdWorker idWorker = new SnowflakeIdWorker(0, 0);
        for (int i = 0; i < 1000; i++) {
            long id = idWorker.nextId();
//            System.out.println(Long.toBinaryString(id));
            System.out.println(id);
        }
    }
}
全局id生成工具类
package com.wuhao.configuration;

/**
 * @description: id工具类
 * @author: wuhao
 * @create: 2020-06-17 22:38
 **/
public class IDUtil {
    /**
     * 随机id生成,使用雪花算法
     */
    public static long getRandomId() {
        SnowflakeIdWorker sf = new SnowflakeIdWorker();
        long id = sf.nextId();
        return id;
    }
}
userMapper执行sql
<?xml version="1.0" encoding="UTF-8"?>
<!DOCTYPE mapper PUBLIC "-//mybatis.org//DTD Mapper 3.0//EN"
        "http://mybatis.org/dtd/mybatis-3-mapper.dtd">
    <mapper namespace="com.wuhao.dao.UserMapper">
    <resultMap id="BaseResultMap" type="com.wuhao.domain.User">
        <id column="user_id" property="userId" jdbcType="BIGINT"/>
        <result column="user_name" property="userName" jdbcType="VARCHAR"/>
        <result column="age" property="age" jdbcType="INTEGER"/>
        <result column="birthday" property="birthday" jdbcType="VARCHAR"/>
        <result column="address" property="address" jdbcType="VARCHAR"/>
        <result column="sex" property="sex" jdbcType="INTEGER"/>
    </resultMap>

    <!--用户添加-->
    <insert id="addUser" parameterType="com.wuhao.domain.User">
        insert into `user` (user_name, age, birthday, address, sex)
             values(#{userName}, #{age}, #{birthday}, #{address}, #{sex})
    </insert>

    <!--用户查询-->
    <select id="queryAllUser" resultMap="BaseResultMap" >
        select * from `user` where 1=1
    </select>


</mapper>
演示效果
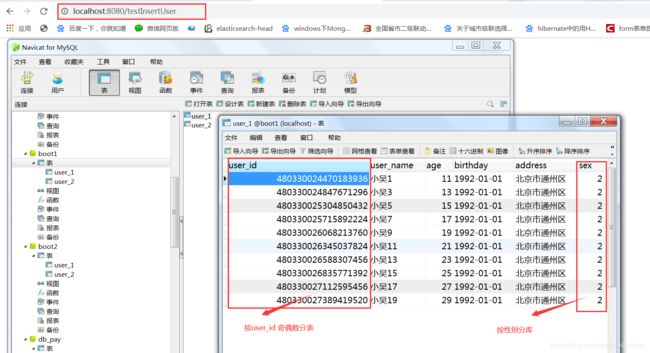
启动项目, 执行插入用户数据的测试方法浏览器输入: http://localhost:8080/testInsertUser
然后查看用户数据是否已经按用户性别分库, 用户id奇偶数分表写入到数据库boot1和boot2里的user_1和user_2表下:
执行查询用户数据的测试方法浏览器输入:
http://localhost:8080/testQueryUser 查看全部用户数据查询结果 :

遇到的问题
在做用户查询时, 起初只配置从一个数据源查数据, 导致查出来的数据缺失, 后来指定user表的全部数据分布情况后, 正常查询全部的用户数据

后续优化点
可以用sharding-jdbc结合mysql实现主从同步, 读写分离, 这里时间原因就不再叙述了