Linux系统安装Mysql二进制文件
前言
为了简化安装和配置过程,许多Linux发行版提供了预编译的二进制MySQL安装包,这些安装包已经经过测试和验证,可以在大多数Linux系统上正常工作。通过安装这些二进制MySQL安装包,可以省去从源代码编译和安装的繁琐过程,提高安装和配置的效率。
此外,二进制MySQL安装包也包含了一些预配置的参数和选项,这些参数和选项已经经过优化和调整,可以满足大多数用户的需求。如果需要更高级的配置或定制化的选项,可以使用源代码进行编译和安装。
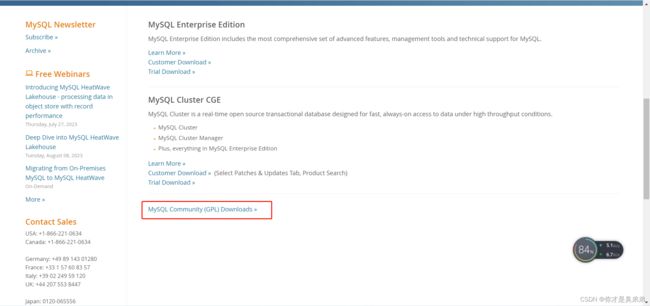
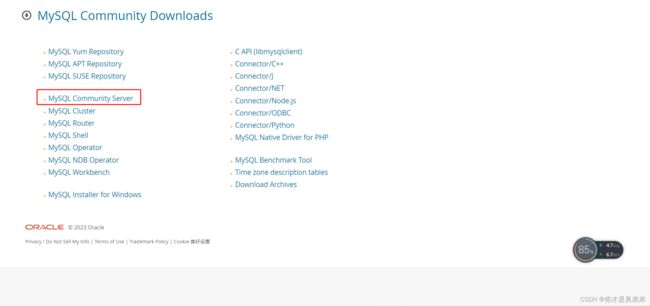
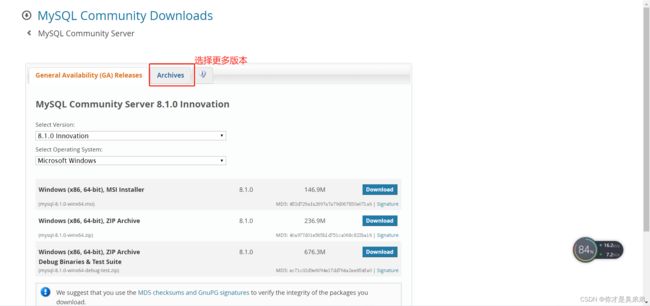
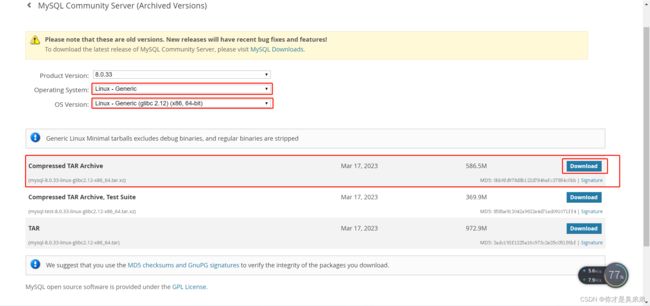
下载Linux版Mysql
官方地址:https://www.mysql.com/
下载步骤:
通过Xftp上传到Linux:
解压
1.我的Linux是桥接,通过Xshell连接我的另一台电脑。
2.执行压缩命令
tar -xvf mysql-8.0.33-linux-glibc2.12-x86_64.tar -C /usr/local该命令用于解压缩名为mysql-8.0.33-linux-glibc2.12-x86_64.tar的压缩文件,并将其解压缩到/usr/local目录下。-x选项表示解压缩,-v选项表示在解压缩时显示详细信息,-f选项指定要解压缩的文件名,-C选项指定解压缩后的目标目录。
3.重命名
进入解压目录对mysql-8.0.33-linux-glibc2.12-x86_64重命名为 mysql
[root@xiaojian ~]# cd /usr/local
[root@xiaojian local]# ll
total 0
drwxr-xr-x. 2 root root   6 Apr 11  2018 bin
drwxr-xr-x. 2 root root   6 Jul 25 15:29 etc
drwxr-xr-x. 2 root root   6 Apr 11  2018 games
drwxr-xr-x. 2 root root   6 Apr 11  2018 include
drwxr-xr-x. 8   10  143 255 Mar 29  2018 jdk1.8.0_171
drwxr-xr-x. 2 root root   6 Apr 11  2018 lib
drwxr-xr-x. 2 root root   6 Apr 11  2018 lib64
drwxr-xr-x. 2 root root   6 Apr 11  2018 libexec
drwxr-xr-x  9 root root 129 Jul 26 10:53 mysql-8.0.33-linux-glibc2.12-x86_64
drwxr-xr-x. 2 root root   6 Apr 11  2018 sbin
drwxr-xr-x. 5 root root  49 Jul 11 09:19 share
drwxr-xr-x. 2 root root   6 Apr 11  2018 src
drwxr-xr-x. 9 root root 220 Jul 25 14:54 tomcat-8.5.91
[root@xiaojian local]# mv mysql-8.0.33-linux-glibc2.12-x86_64 mysql
[root@xiaojian local]# ll
total 0
drwxr-xr-x. 2 root root   6 Apr 11  2018 bin
drwxr-xr-x. 2 root root   6 Jul 25 15:29 etc
drwxr-xr-x. 2 root root   6 Apr 11  2018 games
drwxr-xr-x. 2 root root   6 Apr 11  2018 include
drwxr-xr-x. 8   10  143 255 Mar 29  2018 jdk1.8.0_171
drwxr-xr-x. 2 root root   6 Apr 11  2018 lib
drwxr-xr-x. 2 root root   6 Apr 11  2018 lib64
drwxr-xr-x. 2 root root   6 Apr 11  2018 libexec
drwxr-xr-x  9 root root 129 Jul 26 10:53 mysql
drwxr-xr-x. 2 root root   6 Apr 11  2018 sbin
drwxr-xr-x. 5 root root  49 Jul 11 09:19 share
drwxr-xr-x. 2 root root   6 Apr 11  2018 src
drwxr-xr-x. 9 root root 220 Jul 25 14:54 tomcat-8.5.91
[root@xiaojian local]#
添加用户/组
#进入到安装目录
[root@xiaojian local]# cd /usr/local/mysql/

#创建组
[root@xiaojian mysql]# groupadd mysql

#创建用户
[root@xiaojian mysql]# useradd -r -g mysql mysql

#设置/usr/local/mysql/文件夹的拥有者
[root@xiaojian mysql]# chown -R mysql:mysql ./
初始化Mysql生成默认随机密码
#创建数据库文件存放的文件夹。这个文件夹将来存放每个数据库的库文件
[root@xiaojian mysql]# mkdir data

#执行命令,
[root@xiaojian mysql]# bin/mysqld --initialize --user=mysql --lower_case_table_names=1 --basedir=/usr/local/mysql --datadir=/usr/local/mysql/data/

#参数说明
     #--initialize:初始化MySQL服务器,包括创建数据目录和初始化系统数据库等操作。
     #--user=mysql:指定运行MySQL服务器的用户,这里为mysql用户。
     #--lower_case_table_names=1:将数据库和表名转换为小写,方便在不同操作系统间迁移。
     #--basedir=/usr/local/mysql:指定MySQL服务器的安装路径。
     #--datadir=/usr/local/mysql/data:指定MySQL服务器的数据目录。
#注意:有些centos版本缺少libaio.so.1文件,就会执行不成功,使用yum install -y libaio安装

#设置数据库存储文件夹拥有者
[root@xiaojian mysql]# chown -R root:root ./
[root@xiaojian mysql]# chown -R mysql:mysql data
记住这个随机生成的密码(登录Mysql必须)
修改配置
修改Mysql配置文件
[root@xiaojian mysql]# vi /etc/my.cnf将里面的命令都删除掉,添加以下命令,保存并退出
[mysql]
# 设置mysql客户端默认字符集
default-character-set=utf8

[mysqld]
# 设置3306端口
port=3306
# 设置mysql的安装目录
basedir=/usr/local/mysql
# 设置mysql数据库的数据的存放目录
datadir=/usr/local/mysql/data
# 允许最大连接数
max_connections=1500
# 服务端使用的字符集默认为8比特编码的latin1字符集
character-set-server=utf8
# 创建新表时将使用的默认存储引擎
default-storage-engine=INNODB
# 默认使用"mysql_native_password"插件认证
default_authentication_plugin=mysql_native_password
# 区分大小写,0区分,1不区分,填写这个配置前提是在initialize初始化数据库的时候加参数--lower_case_table_names=1,否则报错
lower_case_table_names=1

[client]
# 设置mysql客户端连接服务端时默认使用的端口
default-character-set=utf8
启动Mysql服务
[root@xiaojian mysql]# cd /usr/local/mysql/support-files
[root@xiaojian support-files]# ./mysql.server start
#如果执行有问题
[root@xiaojian support-files]# chmod -R 777 /usr/local/mysql
#注意
1.该命令会将/usr/local/mysql目录及其所有子目录和文件的权限设置为777,即所有用户都可以读取、写入和执行这些目录和文件。
2.chmod命令用于修改文件或目录的访问权限。其中,-R选项表示递归修改,即连同子目录和文件一起修改。权限数字777表示所有用户都有读、写和执行权限。
3.需要注意的是,给文件或目录设置777权限可能会存在安全风险,因为这允许所有用户对文件或目录进行操作。因此,应该根据实际需要设置适当的权限。
启动服务
[root@xiaojian mysql]# cd /usr/local/mysql/support-files
[root@xiaojian support-files]# ./mysql.server start
Starting MySQL SUCCESS!
[root@xiaojian support-files]#
停止服务
[root@xiaojian support-files]# ./mysql.server stop
Shutting down MySQL.. SUCCESS!
[root@xiaojian support-files]#
如果安装包支持systemd,按下方式启动服务器。
1.systemctl {start|stop|restart|status} mysqld
systemctl start mysqld:启动MySQL服务器。
systemctl stop mysqld:停止MySQL服务器。
systemctl restart mysqld:重新启动MySQL服务器。
systemctl status mysqld:查看MySQL服务器的状态,包括是否正在运行、已经运行的进程等。

2.service mysqld {start|stop|restart|status}
service mysqld start:启动MySQL服务器。
service mysqld stop:停止MySQL服务器。
service mysqld restart:重新启动MySQL服务器。
service mysqld status:查看MySQL服务器的状态,包括是否正在运行、已经运行的进程等。
service mysqld reload:重载配置
修改Mysql登录密码
1.重新启动Mysql后查看进程
#查看 Mysql 进程
ps -ef|grep mysql

#查看 3306 端口
netstat -ano |grep "3306"
2.登录Mysql输入初始化随机生成的密码
[root@xiaojian mysql]# mysql -u root -p
Enter password:
Welcome to the MySQL monitor.  Commands end with ; or \g.
Your MySQL connection id is 9
Server version: 8.0.33

Copyright (c) 2000, 2023, Oracle and/or its affiliates.

Oracle is a registered trademark of Oracle Corporation and/or its
affiliates. Other names may be trademarks of their respective
owners.

Type 'help;' or '\h' for help. Type '\c' to clear the current input statement.

mysql>
#设置Mysql新密码为 'root'
mysql> alter user 'root'@'localhost' IDENTIFIED WITH mysql_native_password BY 'root';
Query OK, 0 rows affected (0.00 sec)
#设置允许远程登录
mysql> use mysql;
Reading table information for completion of table and column names
You can turn off this feature to get a quicker startup with -A
Database changed
#允许root用户从任何主机连接到MySQL服务器。
mysql> update user set user.Host='%'where user.User='root';
Query OK, 1 row affected (0.00 sec)
Rows matched: 1 Changed: 1 Warnings: 0
#刷新权限
mysql> flush privileges;
Query OK, 0 rows affected (0.01 sec)
#退出
mysql> exit;
3.设置Mysql 开机自启
#将Mysql添加到系统进程中
[root@xiaojian mysql]# cp /usr/local/mysql/support-files/mysql.server /etc/init.d/mysqld
[root@xiaojian mysql]# chown 777 /etc/my.cnf
[root@xiaojian mysql]# chmod +x /etc/init.d/mysqld
[root@xiaojian mysql]# systemctl enable mysqld

#重新启动后(可测试Linux开机自启Mysql)
[root@xiaojian mysql]# reboot
查看防火墙开放端口
#使用 firewall-cmd --list-all 命令可以列出当前防火墙的所有规则和状态。这将显示公共区域、信任区域和排除区域的规则,以及每个区域中已打开的端口和接受连接的端口。
[root@xiaojian mysql]# firewall-cmd --list-all

#在防火墙中将3306端口开放 使用 firewall-cmd --zone=public --add-port=3306/tcp --permanent 命令想要在防火墙公共区域上永久添加3306/tcp端口。 注意:--permanent为永久生效,没有此参数 服务器重启后配置失效
[root@xiaojian  mysql]# firewall-cmd --zone=public --add-port=3306/tcp --permanent

#使用 firewall-cmd --reload 命令来重新加载防火墙配置。这个命令会重新读取防火墙配置文件,并将任何已更改或新添加的规则应用于防火墙。
[root@xiaojian  mysql]# firewall-cmd --reload
#查看当前所有tcp端口
netstat -lptn

#查看所有3306端口使用情况
netstat -lptn |grep 3306
附属
生产环境必须开启防火墙保证服务器的数据安全,所以需要开启防火墙并且开启对应的服务端口。
使用iptables工具配置Linux防火墙的简单步骤:
1.确认已安装iptables防火墙工具。
yum install iptables2.配置防火墙规则,例如允许或拒绝特定IP地址、端口或协议的流量。以下是一个允许IP地址为192.168.0.100的TCP流量通过端口22的示例:
iptables -A INPUT -s 192.168.0.100 -p tcp --dport 22 -j ACCEPT3.保存防火墙规则,以便在系统重启后也生效。可以使用以下命令保存:
iptables-save > /etc/sysconfig/iptables4.确保防火墙规则在系统启动时自动加载,可以使用以下命令:
systemctl enable iptables
systemctl start iptables
以上是配置Linux防火墙的基本步骤,可以根据您的需求和配置文件来配置更复杂的规则。同时,也可以使用其他工具,如firewalld来配置和管理防火墙,它提供了更简单的界面和更快的速度。
防火墙配置(摘录)
1.firewall 防火墙

基本使用

# 启动
systemctl start firewalld.service

# 停止
systemctl stop firewalld.service

# 重启
systemctl restart firewalld.service

# 查看状态
systemctl status firewalld.service

# 启用, 开机自启服务
systemctl enable firewalld.service

# 禁用, 开机自启服务
systemctl disable firewalld.service

# 查看是否开机启动
systemctl is-enabled firewalld.service

# 查看已启动的服务列表
systemctl list-unit-files | grep enabled

# 查看启动失败的服务列表
systemctl --failed
命令后 .service 不加也可以


基本配置 firewalld-cmd

# 查看版本
firewall-cmd --version

# 查看帮助
firewall-cmd --help

# 显示状态
firewall-cmd --state

# 开发一个端口
firewall-cmd --zone=public --permanent --add-port=端口/tcp

参数:--permanent永久生效,没有此参数重启后失效   --add-port 端口


# 更新防火墙规则
firewall-cmd --reload

# 删除端口
firewall-cmd --zone=public --permanent --remove-port=端口/tcp

# 查看端口是否开放
firewall-cmd --zone=public --query-port=端口/tcp

# 查看所有打开的端口
firewall-cmd --zone=public --list-ports

# 查看防火墙规则
firewall-cmd --list-all

# 查看区域信息
firewall-cmd --get-active-zones

# 查看指定接口所属区域
firewall-cmd --get-zone-of-interface=eth0

# 拒绝所有包
firewall-cmd --panic-on

# 取消拒绝状态
firewall-cmd --panic-off

# 查看是否拒绝
firewall-cmd --query-panic


2.iptables 防火墙

安装 iptables

# 检查状态
systemctl status iptables.service

# 停止firewall
systemctl stop firewalld.service

# 禁用开机启动firewall
systemctl disable firewalld.service

# 安装 iptables
yum install -y iptables iptables-services

# 启动 iptables
systemctl start iptables.service

# 启用开机启动 iptables
systemctl enable iptables.service


设置规则

参数:
-t<表>:指定要操纵的表
-A:向规则链中添加条目
-D:从规则链中删除条目
-i:向规则链中插入条目
-R:替换规则链中的条目
-L:显示规则链中已有的条目
-F:清除规则链中已有的条目
-Z:清空规则链中的数据包计算器和字节计数器
-N:创建新的用户自定义规则链
-P:定义规则链中的默认目标
-h:显示帮助信息
-p:指定要匹配的数据包协议类型
-s:指定要匹配的数据包源ip地址
-j<目标>:指定要跳转的目标
-i<网络接口>:指定数据包进入本机的网络接口
-o<网络接口>:指定数据包要离开本机所使用的网络接口
# 查看iptables现有规则
iptables -L -n

# 先允许所有,不然有可能会杯具
iptables -P INPUT ACCEPT

# 清空所有默认规则
iptables -F

# 清空所有自定义规则
iptables -X

# 所有计数器归0
iptables -Z

# 允许来自于lo接口的数据包(本地访问)
iptables -A INPUT -i lo -j ACCEPT

开放端口
iptables -A INPUT -p tcp -s IP地址 --dport 端口 -j ACCEPT

# 保存规则
service iptables save

# 允许ping
iptables -A INPUT -p icmp --icmp-type 8 -j ACCEPT

# 允许接受本机请求之后的返回数据 RELATED,是为FTP设置的
iptables -A INPUT -m state --state  RELATED,ESTABLISHED -j ACCEPT

# 其他入站一律丢弃
iptables -P INPUT DROP

# 所有出站一律绿灯
iptables -P OUTPUT ACCEPT

# 所有转发一律丢弃
iptables -P FORWARD DROP

# 如果要添加内网ip信任
iptables -A INPUT -p tcp -s 45.96.174.68 -j ACCEPT

# 过滤所有非以上规则的请求
iptables -P INPUT DROP

# 要封停一个IP,使用下面这条命令:
iptables -I INPUT -s IP地址 -j DROP

# 要解封一个IP,使用下面这条命令:
iptables -D INPUT -s IP地址 -j DROP


常用端口

# http 80
# https 443
# mysql 3306
# mongodb 27017
# postgre 5432
# elasticsearch 9200
# redis 6379
# rabbitmq 15672, 5672
# consul 8500
# nacos 8848
# ftp 21
# ssh 22
# telnet 23
# smtp 25


firewall 实例

# 开放 mysql 端口
firewall-cmd --zone=public --permanent --add-port=3306/tcp

# 重新载入规则
firewall-cmd --reload

# 删除 mysql 端口
firewall-cmd --zone=public --permanent --remove-port=3306/tcp


iptables 实列

开放端口
iptables -A INPUT -p tcp --dport 3306 -j ACCEPT

# 保存规则
service iptables save

删除端口
iptables -D INPUT -p tcp --dport 3306 -j ACCEPT


