rtmp和http-flv推流及rtsp-server 区别及搭建提示
rtmp和http-flv推流及rtsp-server 区别及搭建提示
- 区别
-
- 推流和拉流,和rtsp-server
- rtmp
- http-flv
- rtsp-server
- rtmp和http-flv联系
- rtmp推流和http-flv拉流的安装和配置
- ffmpeg在nx上的安装 同nano应该也可
区别
推流和拉流,和rtsp-server
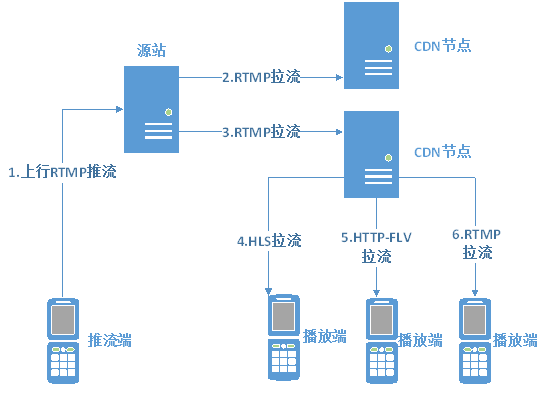
推流:将直播内容推送至服务器的过程,一般rtmp推流
拉流:为服务器已有直播内容,用指定地址进行拉取的过程,可以hls、http-flv、rtmp拉流

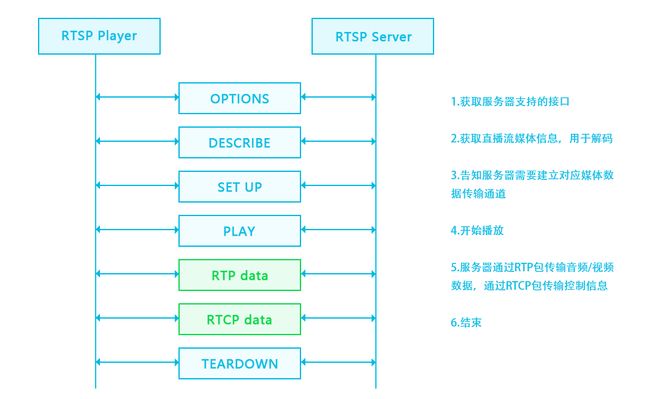
rtsp-server没有推流拉流的概率,RTSP(Real-Time Stream Protocol )是一种基于文本的应用层协议,直白的讲客户端与服务器建立连接并从服务器上接收流,服务器上的流可以是采集的,文件,等等。
rtmp
可以理解为Flash 播放器 开发的
http-flv
HTTP-FLV 和 RTMPT 类似,都是针对于 FLV 视频格式做的直播分发流。
但,两者有着很大的区别:
相同点:
- 两者都是针对 FLV 格式
- .两者延时都很低
- 两者都走的 HTTP 通道
不同点:
-
HTTP-FLv
直接发起长连接,下载对应的 FLV 文件
头部信息简单 -
RTMPT
握手协议过于复杂
分包,组包过程耗费精力大
因为 RTMP 发的包很容易处理,通常 RTMP 协议会作为视频上传端来处理,然后经由服务器转换为 FLV 文件,通过 HTTP-FLV 下发给用户。
rtsp-server
可以理解为我们常常调监控摄像头的哪个,监控摄像头正是建立了rtsp-server,我们才能随时拉取rtsp
rtsp-server的好处吧,感觉就是可以你调用时才启用推流,不想前面两者你得有个一直推流的,不然这边无法拉取。或许可以将rtmp、httplflv通过定义一些逻辑和接口,达到拉取时才启动推流来等价于这个rstp-server服务吧。
但rtsp-server常用的是以gstramer来建立,这个在windows上面对c++支持可以,python只能用linux系统的了,不然没支持。
一般来说不会这样整,所以就不具体展开了。
以下都是基于python开发的rtsp-server,资料较少,参考链接:
jetson板卡上用gstramer建立rtsp-server,python
可能的一些库
python开发rtsp-server的example
jetson开发opecncv输出rtsp流,即rtsp-server
rtmp和http-flv联系
由于浏览器对 flash 对禁用,Web 播放 RTMP 于是成为了一个难题,目前主流的 Web 直播流(客户端拉取时)都为 http-flv 格式,但推流时实际上还是常用rtmp去推流的。
rtmp推流和http-flv拉流的安装和配置
安装nginx-http-flv-module以及配置ffmpeg,nginx-http-flv-module是基于nginx-rtmp-module开发的,所以nginx-rtmp-module有的,nginx-http-flv-module都有,nginx-http-flv-module主要加了http-flv的拉流服务,即nginx服务器接收到rtmp的推流将其转换为http-flv进行分发,供用户拉取。
配置rtmp参考,在配置http-flv时,实际上配置文件里主要改的是server里的部分,相对于原始的rtmp配置加了个location /live 部分,配置和安装参考http-flv的官方教程很容易理解,安装只用安装nginx-http-flv-module即可,毕竟包含了nginx-http-flv-module。
管教里会让装nginx,编译安装的时候,configure的时候可能差各种环境,转就是,成功编译安装完成之后,设置systemctl 的自启动服务
关于如何使用systemctl服务
综合自己写了个nginx.service文件,注意最后安装的nginx路径,启动路径很关键啊:
[Unit] Description=The NGINX HTTP and reverse proxy server After=syslog.target network-online.target remote-fs.target nss-lookup.target Wants=network-online.target [Service] Type=forking ExecStartPre=/usr/local/nginx/sbin/nginx -t ExecStart=/usr/local/nginx/sbin/nginx ExecReload=/usr/local/nginx/sbin/nginx -s reload ExecStop=/usr/local/nginx/sbin/nginx -s stop PrivateTmp=true [Install] WantedBy=multi-user.target
详细的可以根据关键词搜索资料。
附上自己的配置文件部分:
rtmp {
    server {
        listen 1935;
        chunk_size 4096;

    application mylive{
        live on;
        }
    }
}

server {
        listen       8080;
        server_name  localhost;
        location / {
                root   html;
                index  index.html index.htm;
        }

        location /live{
                flv_live on;
                chunked_transfer_encoding on;
                add_header 'Access-Control-Allow-Origin' '*';
                add_header 'Access-Control-Allow-Credentials' 'true';
  }

        location /pop/video {
                alias /var/video;
        }

        location /info {
               rtmp_stat all;
               rtmp_stat_stylesheet stat.xsl;
        }
        location /stat.xsl {
                root   /home/tangbo/nginx/nginx-http-flv-module/;
        }
        }
附上简单的实现opencv拉取rtsp流后处理后,在用rtmp推流的代码:
import cv2
import subprocess

rtsp = "rtsp://admin:[email protected]:554/h264/ch1/main/av_stream"
rtmp = 'rtmp://192.168.1.67:1935/mylive/test02'

# 读取视频并获取属性
cap = cv2.VideoCapture(rtsp)
size = (int(cap.get(cv2.CAP_PROP_FRAME_WIDTH)), int(cap.get(cv2.CAP_PROP_FRAME_HEIGHT)))
sizeStr = str(int(size[0]*0.5)) + 'x' + str(int(size[1]*0.5))

command = [r'D:\ffmpeg-4.4-essentials_build\bin/ffmpeg.exe',
           '-y', '-an',
           '-f', 'rawvideo',
           '-vcodec', 'rawvideo',
           '-pix_fmt', 'bgr24',
           '-s', sizeStr,
           '-r', '25',
           '-i', '-',
           '-c:v', 'libx264',
           '-pix_fmt', 'yuv420p',
           '-preset', 'ultrafast',
           '-f', 'flv',
           rtmp]

pipe = subprocess.Popen(command
                        , shell=False
                        , stdin=subprocess.PIPE
                        )

while cap.isOpened():
    success, frame = cap.read()
    frame = cv2.resize(frame,(0,0,),fx=0.5,fy=0.5)

    if success:
        '''
      对frame进行识别处理
      '''
        # if cv2.waitKey(1) & 0xFF == ord('q'):
        #     break
        pipe.stdin.write(frame.tobytes())

cap.release()
pipe.terminate()
最后拉取的链接的组成参考上面的http-flv里官方教程部分。
ffmpeg在nx上的安装 同nano应该也可
参考ffmpeg安装依赖后
具体推流遇到报错问题:
- Unknown input format: ‘rawvideo’:
决定将yasm 和nasm也编译安装。解决并可以实现python版本的推流rtmp.
记录一下我的安装步骤:
基于jieson nx NVIDIA JetPack 4.6安装包的系统安装
1.安装yasm,1.3已经是最新的了
wget http://www.tortall.net/projects/yasm/releases/yasm-1.3.0.tar.gz #下载yasm
tar zxvf yasm-1.3.0.tar.gz  #解压
cd yasm-1.3.0  #跳转到yasm目录下
./configure
make
sudo make install  #编译安装
2.安装nasm 安装的2.15,访问https://www.nasm.us/pub/nasm/releasebuilds/ 点击到2.15下,通过wget下载nasm-2.15.tar.gz
./configure
make
sudo make install
3.安装x264
#安装FFmpeg x264支持到时候遇到了  “libx264 not found”
#于是开始搜索,原来到编译libx264时的姿势不对,于是调整了一下姿势如下:
#The latest x264 source code:
git clone https://code.videolan.org/videolan/x264.git

cd ~/x264
#make uninstall
#make distclean
# –disable-static生产静态库,默认生成静态库 –enable-shared 生成动态库,默认不生成动态库
#
./configure --enable-shared --disable-opencl
make
sudo make install
4.安装x265
git clone https://github.com/videolan/x265.git
 cd x265-master/build/linux
 ./make-Makefiles.bash
 make
sudo make install
5.支持cuda
下载nvenc的头文件。
git clone https://github.com/FFmpeg/nv-codec-headers
make
sudo make install
#完成后,在/usr/local/include/路径包含文件ffnvcodec
6.安装ffmpeg
访问https://launchpad.net/ubuntu/+source/ffmpeg/7:4.3.2-0+deb11u2ubuntu1
通过wget下载ffmpeg_4.3.2.orig.tar.xz,解压
cd ffmpegxxxx

./configure --enable-shared --enable-cuda --enable-cuvid --enable-nvenc --enable-nonfree  --enable-shared   --enable-libx264  --enable-libx265  --enable-gpl  --prefix=/usr/local/ffmpeg
make
sudo make install
配置环境ffmpeg变量
sudo gedit ~/.bashrc
#添加以下
export FFMPEG_HOME=/usr/local/ffmpeg
export PATH=$FFMPEG_HOME/bin:$PATH
#刷新
source ~/.bashrc
ffmpeg -version
# 如果报错libavdevice.so.58: cannot open shared object file: No such file or directory
# 或者 ffmpeg: symbol lookup error: ffmpeg: undefined symbol: avio_protocol_get_class, version LIBAVFORMAT_58
# 执行下面操作
sudo gedit /etc/ld.so.conf.d/ffmpeg.conf
# 在ffmpeg.conf内添加下面内容(注意根据自己ffmpeg路径来填写)
/usr/local/ffmpeg/lib
# 最后执行下面即可
sudo ldconfig
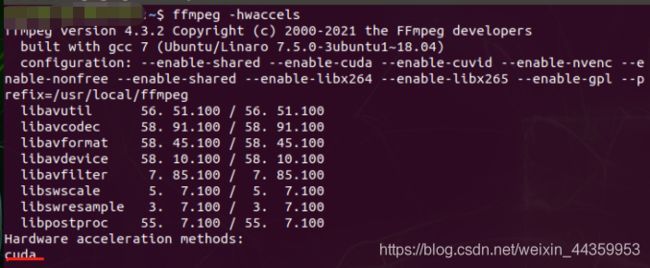
查看是否支持cuda等
ffmpeg -hwaccels
