SpringBoot项目中的web安全防护
最近这个月公司对项目进行了几次安全性扫描,然后扫描出来了一些安全漏洞,所以最近也一直在修复各种安全漏洞,还有就是最近在备考软考高级系统架构设计师,也刚好复习到了网络安全这一个章节,顺便将最近修复的安全漏洞总结一下。
由于公司的项目多是使用的spring security做的安全鉴权,所以本文在安全防护措施上主要是从spring security的安全配置,结合Nginx的安全配置以及springboot的一些安全配置入手,解决各种系统安全风险。
首先,先介绍一下常见的web安全漏洞和攻击,常见的安全风险包括用户弱口令,资源未授权访问,敏感数据泄露或窃取等,常见的攻击包括CSRF攻击,XSS攻击,SQL注入等。
下边针对这几次扫描出来的安全漏洞进行说明和以及如何解决。
其中一次扫描出现的
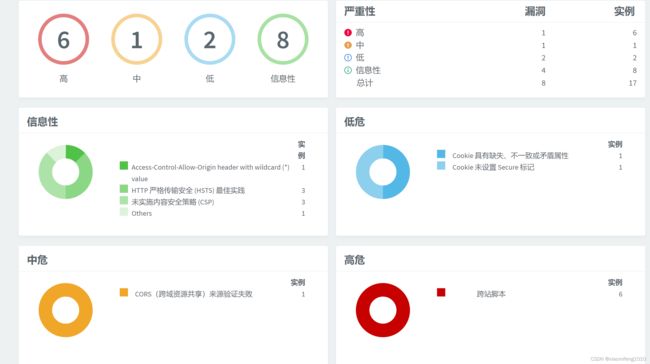
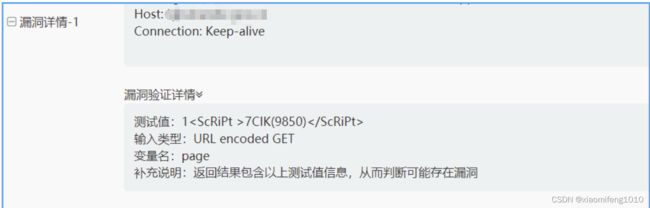
高危漏洞显示的是XSS(跨站脚本攻击) ,为啥有这个漏洞呢,因为我们的门户网站有些页面是不需要登录的,所以有一些接口是没有做授权的,所以会允许扫描工具直接调用到这个接口,进行传参的时候,这个安全测试工具给分页查询的参数传递了一些script标签内容
比如在分页中的page或者size参数测试值是这样的:
由于项目中分页参数用的Long类型,所以传参如果不是数值,spring框架会提示这样的
{
"code":400,
"data":"",
"message":"Failed to convert property value of type 'java.lang.String' to required type 'java.lang.Integer' for property 'page'; nested exception is java.lang.NumberFormatException: For input string: \"1\"",
"success":false
}由于异常提示信息中又返回了输入的非法参数值,所以被认定有XSS风险,所以在项目中将分页参数Long类型改为String类型,并且对分页参数进行合法性验证
@ApiModel(value = "分页参数")
@Data
public class PageParams extends SortParams {

    @ApiModelProperty(value = "当前页面码")
    private String page = 1L;
    @ApiModelProperty(value = "页面容量")
    private String size = 20L;


}
在controller层加上下边这个验证判断,返回给前端异常信息自定义为“非法参数值”即可解决这个漏洞
  if (!NumberUtil.isInteger(page) || !NumberUtil.isInteger(size)) {
            throw new IllegalArgumentException("非法参数值");
        }
这里是说cookie没有设置安全标志,这个是在一个验证码验证的功能中出现的。
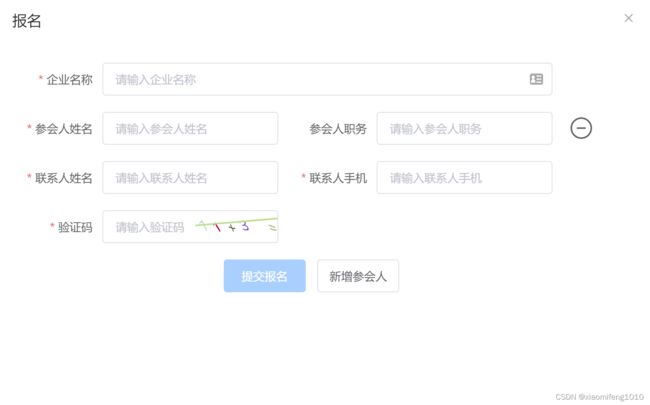
这个活动报名的功能中的验证输入的算数运算后的验证码值是否正确的过程中需要用到cookie中的sessionId信息。不过当时没有设置安全的cookie
    @ApiOperation(value = "生成验证码")
    @GetMapping(value = "/web/getCaptcha")
    @ResponseBody
    public void getCaptcha(HttpServletRequest request, HttpServletResponse response) {
        String sessionId = request.getSession().getId();
        log.info("sessionId:{}", sessionId);
        ShearCaptcha captcha = CaptchaUtil.createShearCaptcha(200, 45, 4, 4);
// 自定义验证码内容为四则运算方式
        captcha.setGenerator(new MathGenerator());
// 重新生成code
        captcha.createCode();
        try (OutputStream out = response.getOutputStream()) {
            String code = captcha.getCode();
            log.info("验证码内容:" + code);
            code = StringUtils.substringBefore(code, "=");
            Object eval = ScriptUtil.eval(code);
            String result = Convert.toStr(eval);
            log.info("验证码计算结果:" + result);
            response.setContentType("image/png");
            captcha.write(out);
//            将计算结果存入到redis中
            redisService.set("captcha:user:" + sessionId, result, 1000L);
//            验证码有效期1分钟
        } catch (IOException e) {
            log.error("生成验证码错误", e.getMessage());
        }

    }


   @ApiOperation(value = "验证图片验证码的计算结果")
    @GetMapping(value = "/web/captchaVerify")
    @ResponseBody
    public ApiResult captchaVerify(HttpServletRequest request, Integer result) {
        String sessionId = request.getSession().getId();
        log.info("sessionId:{}", sessionId);
        Object calculateResult = redisService.get("captcha:user:" + sessionId);
        if (Objects.isNull(calculateResult)) {
            log.info("验证码已失效");
            return ApiResult.error("验证码已失效");
        } else {
            Integer codeResult = Convert.toInt(calculateResult);
            if (Objects.equals(codeResult, result)) {
                log.info("验证码计算结果匹配成功");
                return ApiResult.success(true);
            } else {
                log.info("验证码计算结果匹配失败");
                return ApiResult.error("验证码结果匹配错误");
            }
        }


    }
解决也很简单,在yml配置文件中加上配置即可:
server:
  port: 8300
  servlet:
    context-path: /contextPath
# 设置安全cookie
    session:
      cookie:
        secure: true
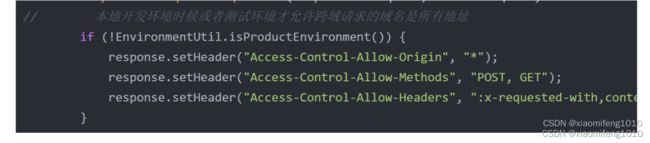
跨域安全风险,由于项目中之前跨域的配置是允许所有域名来源。所以针对不同的环境,做一定的限制,比如在本地开发环境由于没有把前端项目每次放在Nginx中,因为本地联调,直接是前后端在自己的机器上启动项目,进行的联调,所以需要允许在本地开发环境设置所有请求可以跨域,方便联调,所以在spring security的安全配置类中,
首先加上一个拦截器:
package com.dcboot.module.common.interceptor;

/**
 * @author xiaomifeng1010
 * @version 1.0
 * @date: 2023/7/25 11:19
 * @Description
 */

import com.dcboot.base.config.security.support.MyAccessDecisionManager;
import com.dcboot.base.config.security.support.MyFilterInvocationSecurityMetadataSource;
import com.dcboot.module.common.util.EnvironmentUtil;
import lombok.extern.slf4j.Slf4j;
import org.springframework.beans.factory.annotation.Autowired;
import org.springframework.security.access.SecurityMetadataSource;
import org.springframework.security.access.intercept.AbstractSecurityInterceptor;
import org.springframework.security.access.intercept.InterceptorStatusToken;
import org.springframework.security.authentication.AuthenticationManager;
import org.springframework.security.web.FilterInvocation;

import javax.servlet.*;
import javax.servlet.http.HttpServletRequest;
import javax.servlet.http.HttpServletResponse;
import java.io.IOException;
import java.util.regex.Matcher;
import java.util.regex.Pattern;

@Slf4j
public class MySecurityInterCeptor extends AbstractSecurityInterceptor implements Filter {
    private MyFilterInvocationSecurityMetadataSource securityMetadataSource;


    @Override
    public void init(FilterConfig filterConfig) throws ServletException {
        if (log.isInfoEnabled()) {
            log.info("MyFilterSecurityInterceptor init");
        }

    }

    @Autowired
    public void setMyAccessDecisionManager(MyAccessDecisionManager myAccessDecisionManager) {
        super.setAccessDecisionManager(myAccessDecisionManager);
    }

    @Override
    public void doFilter(ServletRequest servletRequest, ServletResponse servletResponse, FilterChain filterChain) throws IOException, ServletException {
        FilterInvocation fi = new FilterInvocation(servletRequest, servletResponse, filterChain);
        HttpServletResponse response = (HttpServletResponse) servletResponse;
        HttpServletRequest request = (HttpServletRequest) servletRequest;
//        本地开发环境时候或者测试环境才允许跨域请求的域名是所有地址
        if (!EnvironmentUtil.isProductEnvironment()) {
            response.setHeader("Access-Control-Allow-Origin", "*");
            response.setHeader("Access-Control-Allow-Methods", "POST, GET");
            response.setHeader("Access-Control-Allow-Headers", ":x-requested-with,content-type");
        }
        String uri = request.getRequestURI();
        String ignoreList = "(\\/druid//*)|(/login)";
        Pattern p = Pattern.compile(ignoreList);
        Matcher m = p.matcher(uri);
        if (!uri.equals("/oauth/token") && !ignoreList.contains(uri) && !m.find()) {
            this.invoke(fi);
        } else {
            filterChain.doFilter(servletRequest, servletResponse);
        }

    }

    public void invoke(FilterInvocation filterInvocation) throws IOException, ServletException {
        InterceptorStatusToken token = super.beforeInvocation(filterInvocation);

        try {
            filterInvocation.getChain().doFilter(filterInvocation.getRequest(), filterInvocation.getResponse());
        } catch (Exception var7) {
            log.error("授权拦截错误", var7);
        } finally {
            super.afterInvocation(token, (Object) null);
        }

    }

    @Override
    public void destroy() {
    }

    @Override
    public Class getSecureObjectClass() {
        return FilterInvocation.class;
    }

    @Override
    public SecurityMetadataSource obtainSecurityMetadataSource() {
        return this.securityMetadataSource;
    }

    public void setOauth2AccessDecisionManager(MyAccessDecisionManager accessDecisionManager) {
        super.setAccessDecisionManager(accessDecisionManager);
    }

    @Override
    public void setAuthenticationManager(AuthenticationManager authenticationManager) {
        super.setAuthenticationManager(authenticationManager);
    }

    public void setSecurityMetadataSource(MyFilterInvocationSecurityMetadataSource securityMetadataSource) {
        this.securityMetadataSource = securityMetadataSource;
    }
}
这一部分是判断如果不是生产环境,则使用代码中的来配置跨域,如果是生产环境,则在Nginx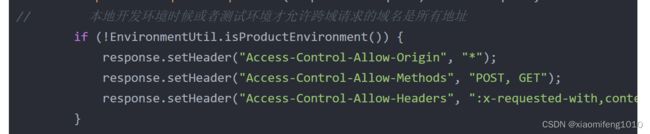
中配置跨域参数
判断环境的工具类:
package com.dcboot.module.common.util;

import cn.hutool.extra.spring.SpringUtil;
import cn.hutool.system.OsInfo;
import cn.hutool.system.SystemUtil;
import lombok.experimental.UtilityClass;
import lombok.extern.slf4j.Slf4j;
import org.apache.commons.lang3.StringUtils;
import org.springframework.core.env.ConfigurableEnvironment;

import java.util.ArrayList;
import java.util.List;

/**
 * @author xiaomifeng1010
 * @version 1.0
 * @date: 2023/6/5 17:26
 * @Description 获取项目部署环境
 */
@UtilityClass
@Slf4j
public class EnvironmentUtil {

    private static List ENVIRONMENT_LIST = new ArrayList<>();

    static {
        ENVIRONMENT_LIST.add("dev");
        ENVIRONMENT_LIST.add("test");
    }

    /**
     * @param
     * @description: 判断当前是否为本地环境
     * @author: xiaomifeng1010
     * @date: 2023/6/5
     * @return: Boolean
     **/
    public Boolean isLocalEnvironment() {
//        log.info("判断当前是否本地环境");
        ConfigurableEnvironment configurableEnvironment = SpringUtil.getBean(ConfigurableEnvironment.class);
        String propertyActive = configurableEnvironment.getProperty("spring.profiles.active", "dev");
        OsInfo osInfo = SystemUtil.getOsInfo();
//        本系统判断是否为本地环境,判断服务器是否为Windows系统或者mac系统,以及active是dev
        if ((osInfo.isWindows() || osInfo.isMac()) && StringUtils.equalsIgnoreCase(propertyActive, "dev")) {
//            log.info("当前为本地环境");
            return true;
        }
        return false;

    }

    /**
     * @param
     * @description: 判断当前是否为生产环境
     * @author: xiaomifeng1010
     * @date: 2023/6/6
     * @return: Boolean
     **/
    public Boolean isProductEnvironment() {
        ConfigurableEnvironment configurableEnvironment = SpringUtil.getBean(ConfigurableEnvironment.class);
//        由于本项目在部署到生产环境时,使用的配置文件也是直接替换的dev的配置内容
        String propertyActive = configurableEnvironment.getProperty("spring.profiles.active", "dev");
        OsInfo osInfo = SystemUtil.getOsInfo();
//        本系统判断是否为本地环境,判断服务器是否为Linux系统,以及active是dev
        if (osInfo.isLinux() && StringUtils.equalsIgnoreCase(propertyActive, "dev")) {
            return true;
        }
        return false;

    }

    /**
     * @param
     * @description: 正常情况下,使用profile为product的配置文件时候,使用这个方法
     * @author: xiaomifeng1010
     * @date: 2023/6/6
     * @return: boolean
     **/
    public boolean isProdEnvironment() {
        ConfigurableEnvironment configurableEnvironment = SpringUtil.getBean(ConfigurableEnvironment.class);
        String propertyActive = configurableEnvironment.getProperty("spring.profiles.active", "product");
        return !ENVIRONMENT_LIST.stream().filter(each -> propertyActive.contains(each)).findFirst().isPresent();
    }

}
最后在spring security的资源授权配置类中加入这个拦截器:
package com.dcboot.module.common.configuration;

/**
 * @author xiaomifeng1010
 * @version 1.0
 * @date: 2023/7/25 14:56
 * @Description
 */

import com.dcboot.base.config.security.support.MyAccessDecisionManager;
import com.dcboot.base.config.security.support.MyFilterInvocationSecurityMetadataSource;
import com.dcboot.module.common.interceptor.MySecurityInterCeptor;
import lombok.NoArgsConstructor;
import org.springframework.beans.factory.annotation.Autowired;
import org.springframework.context.annotation.Configuration;
import org.springframework.core.annotation.Order;
import org.springframework.security.authentication.AuthenticationManager;
import org.springframework.security.config.annotation.web.builders.HttpSecurity;
import org.springframework.security.oauth2.config.annotation.web.configuration.EnableResourceServer;
import org.springframework.security.oauth2.config.annotation.web.configuration.ResourceServerConfigurerAdapter;
import org.springframework.security.web.access.intercept.FilterSecurityInterceptor;

@Configuration
@Order(8)
@EnableResourceServer
@NoArgsConstructor
public class MyResourceServerConfig extends ResourceServerConfigurerAdapter {
    @Autowired
    AuthenticationManager manager;
    @Autowired
    MyAccessDecisionManager accessDecisionManager;
    @Autowired
    MyFilterInvocationSecurityMetadataSource securityMetadataSource;


    @Override
    public void configure(HttpSecurity http) throws Exception {
        String[] permitList = new String[]{"/oauth/*", "/demo/**", "/swagger-resources/**", "/swagger-ui.html", "/webjars/**", "/v2/api-docs", "/druid/**", "/swagger/**", "/getAllSystemResources", "/kaptcha/**", "/getUserToResource"};
        String[] authentiCatList = new String[]{"/*/admin/**"};
        http.requestMatchers().anyRequest().and().anonymous().and().authorizeRequests().antMatchers(authentiCatList).authenticated().and().authorizeRequests().antMatchers(permitList).permitAll();
        http.addFilterAfter(this.createApiAuthenticationFilter(), FilterSecurityInterceptor.class);
    }

    private MySecurityInterCeptor createApiAuthenticationFilter() {
        MySecurityInterCeptor interceptor = new MySecurityInterCeptor();
        interceptor.setAuthenticationManager(this.manager);
        interceptor.setAccessDecisionManager(this.accessDecisionManager);
        interceptor.setSecurityMetadataSource(this.securityMetadataSource);
        return interceptor;
    }
}
生产环境中检验出这个漏洞风险就是因为之前代码中的这部分的设置没有区分环境
所以导致在生产环境中就出现了接口响应头的Access-Control-Allow-Origin参数值为*
加上判断后,在生产环境中就不会有这些响应头参数了,所以直接在Nginx中再单独配置这些参数就可以了,之前没有加这个判断的时候,还有一个问题,就是跨域相关的响应头参数,都出现了重复,即相同的响应头出现了两个,就是Nginx中配置了一个,代码中配置了一个的原因
生产环境的Nginx配置:
在nginx配置文件的server模块配置上即可解决跨域安全风险问题,只允许特定的请求来源跨域
   add_header X-Xss-Protection "1;mode=block";
    add_header X-Download-Options value;
    #add_header Referrer-Policy value;
    add_header X-Permitted-Cross-Domain-Policies value;
    #add_header X-Content-Type-Options nosniff;
    add_header X-Content-Type-Options none;
    add_header X-Frame-Options "SAMEORIGIN";
    add_header Strict-Transport-Security "max-age=2592000; includeSubdomains; preload";
    proxy_cookie_path / "/; Path=/; HttpOnly";
    add_header Access-Control-Allow-Origin 19.202.145.27:8181 always;
    add_header Access-Control-Allow-Methods "GET, POST, OPTIONS" always;
    add_header Access-Control-Allow-Headers "Origin, X-Requested-With, Content-Type,Accept" always;
如果项目中没有使用spring security,那么配置跨域可以参考我的另一篇博客:
springboot项目解决跨域的几种方式
补充内容:(如果在项目中使用了spring security,同时也是按照 springboot项目解决跨域的几种方式这篇博客去配置的跨域,要让跨域生效,还需要在spring security的WebSecurityConfigurerAdapter中的configure(HttpSecurity http)配置方法,加上http.cors()配置)
public class SpringSecurityConfig extends WebSecurityConfigurerAdapter {
    @Override
    protected void configure(HttpSecurity http) throws Exception {
        http.cors().and()
        ...
    }
}
另外Spring Security为我们提供了一种新的CORS规则的配置方法:CorsConfigurationSource 。使用这种方法实现的效果等同于注入一个CorsFilter过滤器;所以还可以这样配置
@Bean
CorsConfigurationSource corsConfigurationSource() {
    CorsConfiguration configuration = new CorsConfiguration();
    configuration.setAllowedOrigins(Lists.newArrayList("http://localhost:9002"));
    configuration.setAllowedMethods(Lists.newArrayList("GET","POST"));
    configuration.applyPermitDefaultValues();
    UrlBasedCorsConfigurationSource source = new UrlBasedCorsConfigurationSource();
    source.registerCorsConfiguration("/**", configuration);
    return source;
}
还有一些就是缺少了一些安全响应头的设置


这些通过spring security的安全配置类配置即可解决问题:
package com.dcboot.module.common.configuration;

import com.dcboot.base.config.security.filter.KaptchaAuthenticationFilter;
import com.dcboot.base.config.security.support.MyAccessDecisionManager;
import com.dcboot.base.config.security.support.MyFilterInvocationSecurityMetadataSource;
import com.dcboot.base.config.security.support.Oauth2AuthenticationProvider;
import lombok.NoArgsConstructor;
import lombok.extern.slf4j.Slf4j;
import org.springframework.beans.factory.annotation.Autowired;
import org.springframework.context.annotation.Bean;
import org.springframework.context.annotation.Configuration;
import org.springframework.core.annotation.Order;
import org.springframework.security.authentication.AuthenticationManager;
import org.springframework.security.config.annotation.authentication.builders.AuthenticationManagerBuilder;
import org.springframework.security.config.annotation.web.builders.HttpSecurity;
import org.springframework.security.config.annotation.web.builders.WebSecurity;
import org.springframework.security.config.annotation.web.configuration.EnableWebSecurity;
import org.springframework.security.config.annotation.web.configuration.WebSecurityConfigurerAdapter;
import org.springframework.security.crypto.bcrypt.BCryptPasswordEncoder;
import org.springframework.security.crypto.password.PasswordEncoder;

/**
 * @author xiaomifeng1010
 * @version 1.0
 * @date: 2023/7/14 15:14
 * @Description
 */
@Order(9)
@Configuration
@EnableWebSecurity
@NoArgsConstructor
@Slf4j
public class SpringSecurityConfig extends WebSecurityConfigurerAdapter {

    @Autowired
    AuthenticationManager manager;
    @Autowired
    MyAccessDecisionManager accessDecisionManager;
    @Autowired
    MyFilterInvocationSecurityMetadataSource securityMetadataSource;

    @Override
    public void configure(WebSecurity web) {
        String[] ignoreMatchers = new String[]{"*.json", "*.html", "/static/**", "/uploadfile/**", "/templates/**", "/druid/**", "/getAllSystemResources", "/swagger/**"};
        web.ignoring().antMatchers(ignoreMatchers);
    }

    @Override
    protected void configure(AuthenticationManagerBuilder auth) {
        auth.authenticationProvider(this.oauth2AuthenticationProvider());
    }

    @Override
    protected void configure(HttpSecurity http) throws Exception {
        http.addFilter(this.kaptchaAuthenticationFilter());
//        增加httpStrictTransportSecurity(HSTS)配置
        http.headers().httpStrictTransportSecurity().includeSubDomains(true).maxAgeInSeconds(31536000L);
//                        增加contentSecurityPolicy(CSP)配置 default-src 'self'指定默认源为当前域名,script-src 'self' 'unsafe-inline'指定允许当前域名和内联脚本,style-src 'self' 'unsafe-inline'指定允许当前域名和内联样式
        http.headers().contentSecurityPolicy("default-src 'self'; script-src 'self' 'unsafe-inline'; style-src 'self' 'unsafe-inline'");
        http.headers().xssProtection().block(false);
        http.headers().frameOptions().sameOrigin();
    }

    @Override
    @Bean
    public AuthenticationManager authenticationManagerBean() throws Exception {
        return super.authenticationManager();
    }

    @Bean(
            name = {"oauth2AuthenticationProvider"}
    )
    public Oauth2AuthenticationProvider oauth2AuthenticationProvider() {
        return new Oauth2AuthenticationProvider();
    }

    @Bean
    KaptchaAuthenticationFilter kaptchaAuthenticationFilter() throws Exception {
        KaptchaAuthenticationFilter kaptchaAuthenticationFilter = new KaptchaAuthenticationFilter();
        kaptchaAuthenticationFilter.setAuthenticationManager(this.authenticationManagerBean());
        kaptchaAuthenticationFilter.setFilterProcessesUrl("/oauth/token");
        return kaptchaAuthenticationFilter;
    }

    @Bean({"passwordEncoder"})
    public PasswordEncoder passwordEncoder() {
        return new BCryptPasswordEncoder();
    }


}
对于csrf攻击,spring security框架的默认配置就是开启了,所以保持默认即可,如果要关闭csrf保护,则在这个方法中

修改即可
http
    .csrf()
    .disable();
而资源授权问题,我们用的事spring security整合的Oauth2做认证和授权,认证模式是用户密码模式。token也替换的JWT集成方式,token缓存在redis
至于敏感信息泄露风险问题,则是对敏感信息进行了脱敏,以及配置文件中的身份信息的密码进行加密。
敏感信息加密,可以参考我们的另外两篇博客:
Springboot项目结合druid加密配置数据源连接的用户密码
使用Jasypt加密spring boot应用配置文件的敏感信息
下边这个是生产环境中没有关闭swagger文档访问和actuator的访问
导致可以直接访问到系统中的接口文档,有信息泄露风险,针对这个问题,只需要在生产环境的文件中配置关闭swagger文档即可:
在swagger配置文件中配置:
yml文件中设为false
#swagger 是否启用配置
swagger:
  enable: false
配置类中:
package com.dcboot.config;

import io.swagger.annotations.ApiOperation;
import org.springframework.beans.factory.annotation.Value;
import org.springframework.context.annotation.Bean;
import org.springframework.context.annotation.Configuration;
import org.springframework.context.annotation.Primary;
import org.springframework.web.util.UriComponentsBuilder;
import springfox.documentation.PathProvider;
import springfox.documentation.builders.ApiInfoBuilder;
import springfox.documentation.builders.PathSelectors;
import springfox.documentation.builders.RequestHandlerSelectors;
import springfox.documentation.service.ApiInfo;
import springfox.documentation.service.ApiKey;
import springfox.documentation.service.AuthorizationScope;
import springfox.documentation.service.SecurityReference;
import springfox.documentation.spi.DocumentationType;
import springfox.documentation.spi.service.contexts.SecurityContext;
import springfox.documentation.spring.web.paths.DefaultPathProvider;
import springfox.documentation.spring.web.paths.Paths;
import springfox.documentation.spring.web.plugins.Docket;
import springfox.documentation.swagger2.annotations.EnableSwagger2WebMvc;

import java.util.List;

import static cn.hutool.core.collection.CollUtil.newArrayList;

/**
 * @description: SwaggerConfig
 * @date: 2022/5/11 11:22
 * @author:
 * @version: 1.0
 */
@Configuration("SwaggerConfig")
@Primary
@EnableSwagger2WebMvc
public class SwaggerConfig {

    @Value("${swagger.enable}")
    private Boolean enable;

    @Value("${server.servlet.context-path}")
    private String context;

    /**
     * 解决context-path重复问题
     *
     * @return
     */
    @Bean
    @Primary
    public PathProvider pathProvider2() {
        return new DefaultPathProvider() {
            @Override
            public String getOperationPath(String operationPath) {
                operationPath = operationPath.replaceFirst(context, "/");
                UriComponentsBuilder uriComponentsBuilder = UriComponentsBuilder.fromPath("/");
                return Paths.removeAdjacentForwardSlashes(uriComponentsBuilder.path(operationPath).build().toString());
            }

            @Override
            public String getResourceListingPath(String groupName, String apiDeclaration) {
                apiDeclaration = super.getResourceListingPath(groupName, apiDeclaration);
                return apiDeclaration;
            }
        };
    }

    @Bean
    public Docket createRestApi() {

        return new Docket(DocumentationType.SWAGGER_2)
                .enable(enable)
//                不想使用dcboot中的配置,但是需要添加一个分组,不然会提示重复的Docket对象,
//                 加上分组与dcboot脚手架中的Docket对象进行区分
                .groupName("xxx服务平台-门户端")
                .apiInfo(apiInfo())
                .select()
                //加了ApiOperation注解的类,才生成接口文档
                .apis(RequestHandlerSelectors.withMethodAnnotation(ApiOperation.class))
                //包下的类,才生成接口文档
                .apis(RequestHandlerSelectors.basePackage("com.dcboot.module"))
                .paths(PathSelectors.any())
                .build()
                .securitySchemes(securitySchemes())
                .securityContexts(securityContexts());
    }

    private List securitySchemes() {
        return newArrayList(
                new ApiKey("token", "token", "header"));
    }

    private List securityContexts() {
        return newArrayList(
                SecurityContext.builder()
                        .securityReferences(defaultAuth())
                        .forPaths(PathSelectors.regex("^(?!auth).*$"))
                        .build()
        );
    }

    List defaultAuth() {
        AuthorizationScope authorizationScope = new AuthorizationScope("global", "accessEverything");
        AuthorizationScope[] authorizationScopes = new AuthorizationScope[1];
        authorizationScopes[0] = authorizationScope;
        return newArrayList(
                new SecurityReference("token", authorizationScopes));
    }

    private ApiInfo apiInfo() {
        return new ApiInfoBuilder()
                .title("xxx服务平台-门户端")
                .description("xx金融服务平台Api文档")
                .version("1.0.0")
                .build();
    }
}
禁用actuator则配置如下:
在yml文件中配置:
management:
  endpoints:
    web:
      exposure:
        include:
        exclude: health,info
    enabled-by-default: false
  endpoint:
    health:
      show-details: never
这将禁用Actuator的默认端点,包括健康检查(health)和应用信息(info)端点;重新启动应用程序,Actuator的端点将会被禁用。
其他的还有一些表单上的一些安全风险,前端同事去处理了。
此外spring security允许在项目中自定义安全控制策略,粒度在方法级别;
在一些安全控制场景中,一些在接口或者方法的调用之前一些预处理以及后处理,可以有效防止一些不安全的操作;具体有方法调用预授权,方法调用预过滤以及后处理。
方法调用预授权例子:
要开启预授权,预过滤以及后处理功能,需要在配置类或者启动类上加上这个@EnableGlobalMethodSecurity(prePostEnabled = true)注解使得预授权和预过滤及后处理生效。默认情况下这些机制是不生效的。
比如我们需要在删除方法上做一个授权,授权那些有删除权限的才能调用删除接口,则可以在controller层或者servicer层加上限制:
 @PostMapping("/admin/delete")
    @ApiOperation("删除风险投资")
    @PreAuthorize("hasAnyAuthority(DELETE)")
    public ApiResult delete(@RequestParam(value = "ids",required = false) @NotEmpty(message = "id不能为空") List ids){
        boolean b = gzkfqFinancingOrgStockrightService.removeByIds(ids);
        return ApiResult.success(b);
    }
则拥有权限的人员账号才可以调用执行这个删除接口的方法。注意@PreAuthorize注解中是属性参数值在idea中是有提示的
在比如获取通过用户名获取用户信息方法:
    /**
     * @param
     * @description: 获取当前用户账号
     * @author: xiaomifeng1010
     * @date: 2022/3/5
     * @return: String
     **/
    public String getUserAccount() {
        MyUserDetails userDetails = (MyUserDetails) SecurityContextHolder.getContext().getAuthentication().getPrincipal();
        String userAccount = userDetails.getUsername();
        return userAccount;
    }

    /**
     * @param
     * @description: 获取userId
     * @author: xiaomifeng1010
     * @date: 2022/4/11
     * @return: Long
     **/
    public Long getUserId() {
        String userAccount = getUserAccount();
        return userService.getObj(Wrappers.lambdaQuery()
                .select(User::getId).eq(User::getUserAccount, userAccount), a -> Long.valueOf(String.valueOf(a)));
    }


    /**
     * @param userAccount
     * @description: 根据用户账号获取用户id
     * @author: xiaomifeng1010
     * @date: 2022/7/11
     * @return: Long
     **/

    @PreAuthorize("#userAccount== authentication.principal.username")
    public Long getUserId(String userAccount) {
        return userService.getObj(Wrappers.lambdaQuery()
                .select(User::getId).eq(User::getUserAccount, userAccount), a -> Long.valueOf(String.valueOf(a)));
    }
项目中的用户表的user_account对应的就是spring security用户管理类中的username,所以预验证需要匹配才可以。这里我们通过将输入的“userAccount”参数与通过 SpEL 表达式从安全上下文中所获取的“authentication.principal.username”进行比对,如果相同则执行正确的方法逻辑,反之则会直接抛出异常.
方法调用预过滤
spring security还提供了两个用于过滤的注解,方便在方法级别进行过滤,其中@PreFilter 注解是对方法进行预过滤
预过滤的源码类:
/*
 * Copyright 2002-2016 the original author or authors.
 *
 * Licensed under the Apache License, Version 2.0 (the "License");
 * you may not use this file except in compliance with the License.
 * You may obtain a copy of the License at
 *
 *      https://www.apache.org/licenses/LICENSE-2.0
 *
 * Unless required by applicable law or agreed to in writing, software
 * distributed under the License is distributed on an "AS IS" BASIS,
 * WITHOUT WARRANTIES OR CONDITIONS OF ANY KIND, either express or implied.
 * See the License for the specific language governing permissions and
 * limitations under the License.
 */
package org.springframework.security.access.prepost;

import java.lang.annotation.Documented;
import java.lang.annotation.ElementType;
import java.lang.annotation.Inherited;
import java.lang.annotation.Retention;
import java.lang.annotation.RetentionPolicy;
import java.lang.annotation.Target;

/**
 * Annotation for specifying a method filtering expression which will be evaluated before
 * a method has been invoked. The name of the argument to be filtered is specified using
 * the filterTarget attribute. This must be a Java Collection implementation
 * which supports the {@link java.util.Collection#remove(Object) remove} method.
 * Pre-filtering isn't supported on array types and will fail if the value of named filter
 * target argument is null at runtime.
 *
 * For methods which have a single argument which is a collection type, this argument will
 * be used as the filter target.
 *
 * The annotation value contains the expression which will be evaluated for each element
 * in the collection. If the expression evaluates to false, the element will be removed.
 * The reserved name "filterObject" can be used within the expression to refer to the
 * current object which is being evaluated.
 *
 * @author Luke Taylor
 * @since 3.0
 */
@Target({ ElementType.METHOD, ElementType.TYPE })
@Retention(RetentionPolicy.RUNTIME)
@Inherited
@Documented
public @interface PreFilter {
	/**
	 * @return the Spring-EL expression to be evaluated before invoking the protected
	 * method
	 */
	String value();

	/**
	 * @return the name of the parameter which should be filtered (must be a non-null
	 * collection instance) If the method contains a single collection argument, then this
	 * attribute can be omitted.
	 */
	String filterTarget() default "";
}
注释中说明这个预过滤只对集合类及子类生效,并且可以直接使用filterObject这个名称指代要过滤验证的集合中的对象。
具体使用示例:
    /**
    * 批量新增标签id
    * @param labelIds ID集合
    * @return
    */
    @ApiOperation("批量新增标签id")
    @ApiImplicitParam(name="ids",value="ids[]",required=true)
    @RequestMapping(value = "/admin/addIntelligentmatchings",method = {RequestMethod.POST})
    @ResponseBody
    @PreFilter("filterObject!=null && filterObject!=''")
    public ApiResult addIntelligentmatchings(@RequestParam(value = "ids[]",required = true) List labelIds) {


        int num=0;
        for(int i=0;i
用于验证集合中的元素不为null,并且不为空白
如果集合中是一个对象类,例如:
@Data
@AllArgsConstructor
public class Enterprise{

   private string enterpriseName;

   private string ceoName;

}
@RestController
public class EnterPriseController {
@Autowired
private EnterPriseService enterpriseService;
@GetMapping("/listEnterpriseInfo")
public List listEnterpriseInfo() {
List enterprises= new ArrayList<>();
enterprises.add(new Enterprise("阿里巴巴", "马云"));
enterprises.add(new Enterprise("腾讯", "马化腾"));
enterprises.add(new Enterprise("百度", "李彦宏"));
return enterpriseService.listEnterpriseInfo(enterprises);
}
} 在service类中:
@Service
public class EnterpriseService {

    @PreFilter("filterObject.ceoName== authentication.name")
    public List listEnterpriseInfo(List enterprises) {
       List collect = enterprises.stream().map(Enterprise::getCeoName).collect(Collectors.toList());
        return baseMapper.queryList(collect);
    }
}
公司的ceo名字必须是经过认证的用户才会作为查询条件,不符合的会直接从List集合中过滤掉,相当于是执行了List的remove方法。collet中只会保留满足过滤条件的元素
方法调用后处理
@PostAuthorize 注解,对返回的用户对象信息进行验证
创建测试对象 Custormer类:
public class Customer{
    private String userName;
    private List products;
}
创建几条测试数据:
 Map productsMap = ImmutableMap.of("马云", new Customer("马云",Lists.newArrayList("阿里云", "淘宝", "天猫", "钉钉")),
                "马化腾", new Customer("马化腾",Lists.newArrayList("微信", "QQ", "QQ音乐", "腾讯视频")));
现在有一个查询方法,根据名字获取阿里云产品的客户信息
@PostAuthorize("returnObject.products.contains('阿里云')")
public Customer getCustomerByUsername(String userName) {
    return productMap.get(userName);
}
如果我们使用产品包含“阿里云”的“马云”这个用户来执行方法调用就能正常返回数据。而一旦使用其他用户来访问这个方法就会触发授权拦截机制并返回授权异常信息
如果上边的那个service层查询企业信息的需求,我只想查询出ceoName中包含马字的企业信息
那么在在这个方法上再加上@PostFilter,对方法的返回结果进一步过滤
@Service
public class EnterpriseService {

    @PreFilter("filterObject.ceoName== authentication.name")
    @PostFilter("filterObject.ceoName.contains('马')")
    public List listEnterpriseInfo(List enterprises) {
       List collect = enterprises.stream().map(Enterprise::getCeoName).collect(Collectors.toList());
        return baseMapper.queryList(collect);
    }
}
综上:@PreFilter是对方法的参数进行过滤,@PostFilter是对方法的返回值进行过滤;
@PreAuthorize 是对接口的用户权限及身份进行预校验;@PostAuthorize是对接口返回的信息进行验证,不满足验证的条件的用户调用这个接口就会提示未授权。