android中aidl学习(1)
AIDL(Android Interface Definition Language),Android接口定义语言。他是一种描述语言,用来生成IPC代码。在使用aidl写完文件之后,需要通过编译生成对应的Interface实例代码,在编程中实际使用的是生成的Interface实例。AIDL的作用是让你可以在自己的APP里绑定一个其他APP的service,这样你的APP可以和其他APP交互。
AIDL支持的数据类型分为如下几种:
八种基本数据类型:byte、char、short、int、long、float、double、boolean
String,CharSequence
实现了Parcelable接口的数据类型
List 类型。List承载的数据必须是AIDL支持的类型,或者是其它声明的AIDL对象
Map类型。Map承载的数据必须是AIDL支持的类型,或者是其它声明的AIDL对象
Aidl使用步骤如下:
1、服务端创建一个AIDL文件,将暴露给客户端的接口在里面声明
2、在service中实现这些接口
3、客户端绑定服务端,并将onServiceConnected()得到的IBinder转为AIDL生成的Interface实例
4、通过得到的实例调用其暴露的方法
本文将首先介绍最基本的aidl使用方法,会创建2个工程,一个作为服务端,一个作为客户端
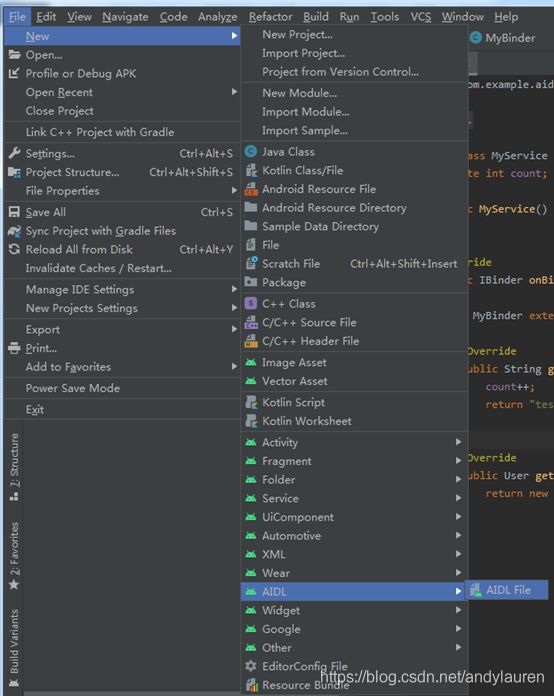
我们首先创建一个空的工程,然后在工程中添加aidl文件
创建出来的文件默认为下:
// IMyAidlInterface.aidl
package com.example.myapplication;

// Declare any non-default types here with import statements

interface IMyAidlInterface {
    /**
     * Demonstrates some basic types that you can use as parameters
     * and return values in AIDL.
     */
    void basicTypes(int anInt, long aLong, boolean aBoolean, float aFloat,
            double aDouble, String aString);
}
其中包含一个方法,这个方法是给用户展示支持的类型。
下面我们写出我们自己的测试程序
// IMyAidlInterface.aidl
package com.example.myapplication;

// Declare any non-default types here with import statements

interface IMyAidlInterface {
    String getName();
}
然后我们编译一下,让他生成对应的接口文件。
然后新建一个服务,并且这个服务需要其他应用能够拉起,所以修改AndroidManifest.xml
下面我们在服务中编写MyBinder类,并继承aidl接口
package com.example.myapplication;

import android.app.Service;
import android.content.Intent;
import android.os.IBinder;

public class MyService extends Service {
    private int count;

    public MyService() {
    }

    @Override
    public IBinder onBind(Intent intent) {
        return new MyBinder();
    }

    class MyBinder extends IMyAidlInterface.Stub {

        @Override
        public String getName() {
            count++;
            return "test" + count;
        }
    }
}
如此我们一个简单的aidl就写完了,这个接口getName返回test后面追加一个count,每被调用一次就增加一次。
然后我们就可以编译并安装。
现在我们需要一个客户端,用来调用这个接口的客户端。
还是新建一个工程
然后。将我们的AIDL文件拷贝到第二个项目,包括整个目录。添加完成后需要编译一下,让工程生成对应的接口文件。
之后我们先在xml中添加一下测试使用的按钮。
Activity_main.xml
之后在Activity中绑定服务,在onServiceConnected方法中通过IMyAidlInterface.Stub.asInterface(service)获取iMyAidlInterface对象,然后在onClick中调用iMyAidlInterface.getName()。
package com.example.myapplication1;

import androidx.appcompat.app.AppCompatActivity;

import android.content.ComponentName;
import android.content.Intent;
import android.content.ServiceConnection;
import android.os.Bundle;
import android.os.IBinder;
import android.os.RemoteException;
import android.widget.Button;
import android.widget.TextView;

import com.example.myapplication.IMyAidlInterface;

public class MainActivity extends AppCompatActivity {
    private IMyAidlInterface iMyAidlInterface;

    @Override
    protected void onCreate(Bundle savedInstanceState) {
        super.onCreate(savedInstanceState);
        setContentView(R.layout.activity_main);

        Intent intent = new Intent();
        intent.setPackage("com.example.myapplication");
        intent.setAction("com.example.aidlservice.action");
        bindService(intent, new ServiceConnection() {

            @Override
            public void onServiceConnected(ComponentName name, IBinder service) {

                iMyAidlInterface = IMyAidlInterface.Stub.asInterface(service);
            }

            @Override
            public void onServiceDisconnected(ComponentName name) {

            }
        }, BIND_AUTO_CREATE);

        TextView tv = findViewById(R.id.textview);
        Button bt = findViewById(R.id.button);
        bt.setOnClickListener(v -> {
            try {
                tv.setText("" + iMyAidlInterface.getName());
            } catch (RemoteException e) {
                e.printStackTrace();
            }
        });
    }
}
这样,最简单的aidl例子就写完了,我们编译安装,就可以使用了。

