hive整合iceberg
1.6 Hive与Iceberg整合
Iceberg就是一种表格式,支持使用Hive对Iceberg进行读写操作,但是对Hive的版本有要求,如下:
| 操作 | Hive 2.x | Hive 3.1.2 |
|---|---|---|
| CREATE EXTERNAL TABLE | √ | √ |
| CREATE TABLE | √ | √ |
| DROP TABLE | √ | √ |
| SELECT | √ | √ |
| INSERT INTO | √ | √ |
这里基于Hive3.1.2版本进行Hive操作Iceberg表讲解。
1.6.1 开启Hive支持Iceberg
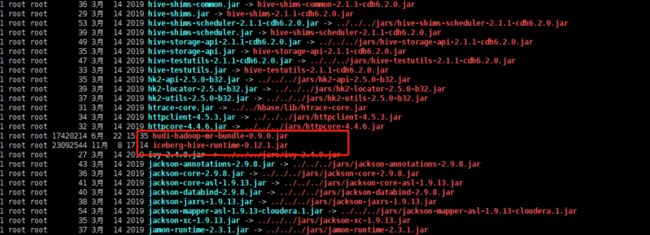
- 下载iceberg-hive-runtime.jar
想要使用Hive支持查询Iceberg表,首先需要下载“iceberg-hive-runtime.jar”,Hive通过该Jar可以加载Hive或者更新Iceberg表元数据信息。下载地址:https://iceberg.apache.org/#releases/:

将以上jar包下载后,上传到Hive服务端和客户端对应的lib目录下。另外在向Hive中Iceberg格式表插入数据时需要到“libfb303-0.9.3.jar”包,将此包也上传到Hive服务端和客户端对应的lib目录下。

- 配置hive-site.xml
在Hive客户端$HIVE_HOME/conf/hive-site.xml中添加如下配置:
    iceberg.engine.hive.enabled
    true
1.6.2 Hive中操作Iceberg格式表
从Hive引擎的角度来看,在运行环境中有Catalog概念(catalog主要描述了数据集的位置信息,就是元数据),Hive与Iceberg整合时,Iceberg支持多种不同的Catalog类型,例如:Hive、Hadoop、第三方厂商的AWS Glue和自定义Catalog。在实际应用场景中,Hive可能使用上述任意Catalog,甚至跨不同Catalog类型join数据,为此Hive提供了org.apache.iceberg.mr.hive.HiveIcebergStorageHandler(位于包iceberg-hive-runtime.jar)来支持读写Iceberg表,并通过在Hive中设置“iceberg.catalog.
在Hive中创建Iceberg格式表时,根据创建Iceberg格式表时是否指定iceberg.catalog属性值,有以下三种方式决定Iceberg格式表如何加载(数据存储在什么位置)。
- 如果没有设置iceberg.catalog属性,默认使用HiveCatalog来加载
这种方式就是说如果在Hive中创建Iceberg格式表时,不指定iceberg.catalog属性,那么数据存储在对应的hive warehouse路径下。
在Hive客户端node3节点进入Hive,操作如下:
create table test_iceberg_1(
id int ,
name string,
age int
)
partitioned by (dt string)
stored by 'org.apache.iceberg.mr.hive.HiveIcebergStorageHandler';


#在Hive中加载如下两个包,在向Hive中插入数据时执行MR程序时需要使用到   /opt/cloudera/parcels/CDH/lib/hive/lib
#每次重新登录到客户端都需要重新加载这两个jar包
hive> add jar /opt/cloudera/parcels/CDH/lib/hive/lib/iceberg-hive-runtime-0.12.1.jar;
hive> add jar /opt/cloudera/parcels/CDH/lib/hive/lib/libfb303-0.9.3.jar;

#向表中插入数据
hive> insert into test_iceberg_1 values (1,"安徽",18,"20221108");
#查看是否能存储中文格式的数据
insert into test_iceberg_1 values (2,"百诚慧通",18,"20221108");  #查看结果后,表示可以存储中文格式并不会出现乱码情况

#查询表中的数据
select * from test_iceberg_1;
查看表:
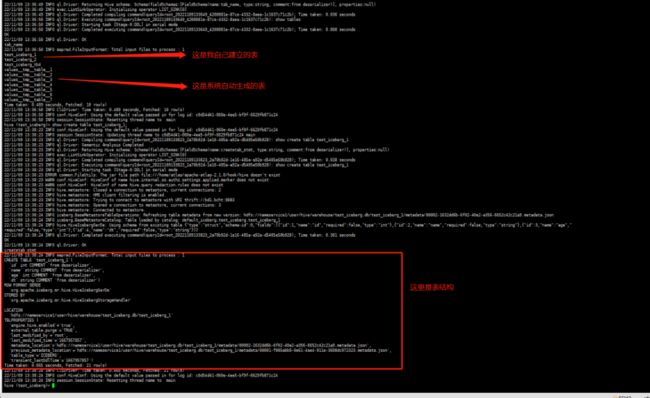
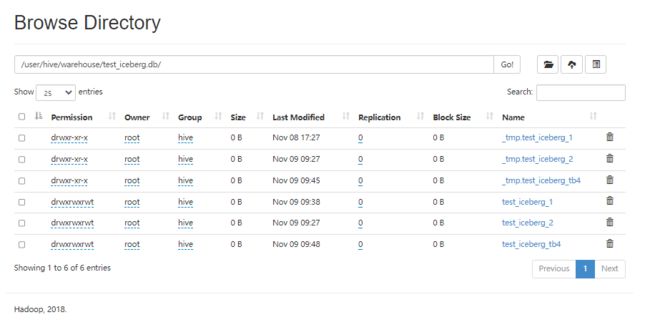
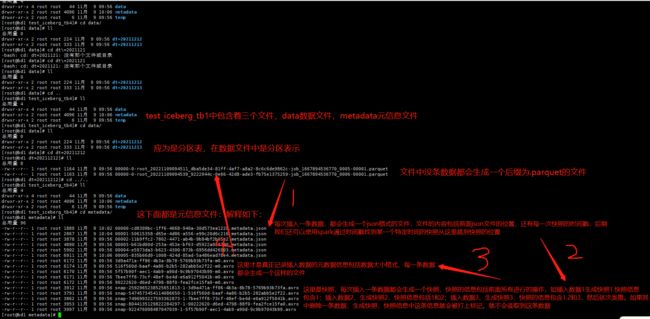
在Hive默认的warehouse目录下可以看到创建的表目录:
点进去 test_iceberg_1:
data文件是数据文件
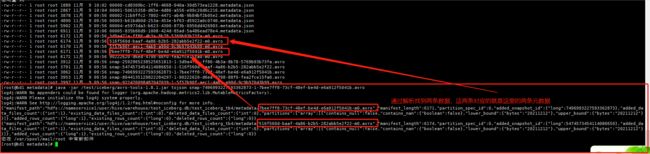
metadata是源文件:其中包含了有 JSON文件和AVRO后缀的文件。后面详细讲解、
temp是临时文件

- 如果设置了iceberg.catalog对应的catalog名字,就用对应类型的catalog加载
这种情况就是说在Hive中创建Iceberg格式表时,如果指定了iceberg.catalog属性值,那么数据存储在指定的catalog名称对应配置的目录下。
在Hive客户端node3节点进入Hive,操作如下:
#注册一个HiveCatalog叫another_hive
hive> set iceberg.catalog.another_hive.type=hive;

#在Hive中创建iceberg格式表
create table test_iceberg_2(
id int,
name string,
age int
)
partitioned by (dt string)
stored by 'org.apache.iceberg.mr.hive.HiveIcebergStorageHandler'
tblproperties ('iceberg.catalog'='another_hive');

# 注意如果重新启动了hive的客户端必须将 iceberg-hive-runtime-0.12.1.jar libfb303-0.9.3.jar两个jar包重新
#加载一下否则会报一下错误
=============================================== 错 误 ===============================================================================
22/11/09 09:21:57 ERROR metadata.Hive: Table test_iceberg_tbl2 not found: test_iceberg.test_iceberg_tbl2 table not found
FAILED: SemanticException org.apache.hadoop.hive.ql.metadata.InvalidTableException: Table not found test_iceberg_tbl2
22/11/09 09:21:57 ERROR ql.Driver: FAILED: SemanticException org.apache.hadoop.hive.ql.metadata.InvalidTableException: Table not found test_iceberg_tbl2
org.apache.hadoop.hive.ql.parse.SemanticException: org.apache.hadoop.hive.ql.metadata.InvalidTableException: Table not found test_iceberg_tbl2

#在Hive中加载如下两个包,在向Hive中插入数据时执行MR程序时需要使用到
hive> add jar /opt/cloudera/parcels/CDH/lib/hive/lib/iceberg-hive-runtime-0.12.1.jar;
hive> add jar /opt/cloudera/parcels/CDH/lib/hive/lib/libfb303-0.9.3.jar;

#插入数据,并查询
hive> insert into test_iceberg_tbl2 values (2,"wb",19,"20221109");
hive> select * from test_iceberg_tbl2;以上方式指定“iceberg.catalog.another_hive .type=hive”后,实际上就是使用的hive的catalog,这种方式与第一种方式不设置效果一样,创建后的表存储在hive默认的warehouse目录下。也可以在建表时指定location 写上路径,将数据存储在自定义对应路径上。

除了可以将catalog类型指定成hive之外,还可以指定成hadoop,在Hive中创建对应的iceberg格式表时需要指定location来指定iceberg数据存储的具体位置,这个位置是具有一定格式规范 的自定义路径。在Hive客户端node3节点进入Hive,操作如下,没有测试:
#注册一个HadoopCatalog叫hadoop
hive> set iceberg.catalog.hadoop.type=hadoop;

#使用HadoopCatalog时,必须设置“iceberg.catalog..warehouse”指定warehouse路径
hive> set iceberg.catalog.hadoop.warehouse=hdfs://mycluster/iceberg_data;

#在Hive中创建iceberg格式表,这里创建成外表
create external table test_iceberg_tbl3(
id int,
name string,
age int
)
partitioned by (dt string)
stored by 'org.apache.iceberg.mr.hive.HiveIcebergStorageHandler'
location 'hdfs://mycluster/iceberg_data/default/test_iceberg_tbl3'
tblproperties ('iceberg.catalog'='hadoop');

注意:以上location指定的路径必须是“iceberg.catalog.hadoop.warehouse”指定路径的子路径,格式必须是${iceberg.catalog.hadoop.warehouse}/${当前建表使用的hive库}/${创建的当前iceberg表名}

#在Hive中加载如下两个包,在向Hive中插入数据时执行MR程序时需要使用到
hive> add jar /software/hive-3.1.2/lib/iceberg-hive-runtime-0.12.1.jar;
hive> add jar /software/hive-3.1.2/lib/libfb303-0.9.3.jar;

#插入数据,并查询
hive> insert into test_iceberg_tbl3 values (3,"ww",20,"20211213");
hive> select * from test_iceberg_tbl3;
OK
3 ww 20 20211213 在指定的“iceberg.catalog.hadoop .warehouse”路径下可以看到创建的表目录:

- 如果iceberg.catalog属性设置为“location_based_table”,可以从指定的根路径下加载Iceberg 表 (结合spark和flink使用)
这种情况就是说如果HDFS中已经存在iceberg格式表,我们可以通过在Hive中创建Icerberg格式表指定对应的location路径映射数据。,在Hive客户端中操作如下:
CREATE TABLE test_iceberg_tbl4  (
  id int,
  name string,
  age int
)
PARTITIONED BY (
   dt string
) STORED BY 'org.apache.iceberg.mr.hive.HiveIcebergStorageHandler'
LOCATION 'hdfs://mycluster/spark/person'
TBLPROPERTIES ('iceberg.catalog'='location_based_table');

注意:指定的location路径下必须是iceberg格式表数据,并且需要有元数据目录才可以。不能将其他数据映射到Hive iceberg格式表。
注意:由于Hive建表语句分区语法“Partitioned by”的限制,如果使用Hive创建Iceberg格式表,目前只能按照Hive语法来写,底层转换成Iceberg标识分区,这种情况下不能使用Iceberge的分区转换,例如:days(timestamp),如果想要使用Iceberg格式表的分区转换标识分区,需要使用Spark或者Flink引擎创建表。
1.7 Iceberg表数据组织与查询
1.7.1 下载avro-tools jar包
由于后期需要查看avro文件内容,我们可以通过avro-tool.jar来查看avro数据内容。可以在以下网站中下载avro-tools对应的jar包,下载之后上传到node5节点上:
“https://mvnrepository.com/artifact/org.apache.avro/avro-tools”。
查看avro文件信息可以直接执行如下命令,可以将avro中的数据转换成对应的json数据。
java -jar /test/iceberg/avro-tools-1.8.1.jar tojson snap-5474573454114086650-1-516f560d-baaf-4a86-b2b5-282abb5e2f22.avro
1.7.2 在Hive中创建Iceberg表并插入数据
在Hive中创建Iceberg格式表,并插入如下数据:
#在Hive中创建iceberg格式表
create table test_iceberg_tb4(
id int ,
name string,
age int)
partitioned by (dt string)
stored by 'org.apache.iceberg.mr.hive.HiveIcebergStorageHandler';

# 测试修改表名
ALTER TABLE test_iceberg_tb4 RENAME  test_iceberg_4;  #测试不成功
#插入如下数据
insert into test_iceberg_tb4 values (1,"张三",21,"20211212");
insert into test_iceberg_tb4 values (2,"李四",22,"20211212");
insert into test_iceberg_tb4 values (3,"王五",23,"20211213");
insert into test_iceberg_tb4 values (4,"赵六",24,"20211213");
insert into test_iceberg_tb4 values (5,"孙七",25,"20211213");
1.7.3 查看Iceberg底层数据存储
下图为Iceberg表“test_iceberg_tbl1”在HDFS中存储的数据组织图:
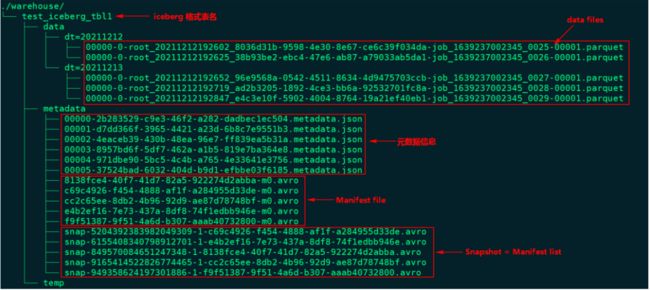
通过上图我们可以看到有5个Snapshot快照,以上5个Snapshot实际上就是对应了5个Manifest list清单列表。
- 查询最新快照数据
为了了解Iceberg如何查询最新数据,可以参照下面这张图来详细了解底层实现。

查询Iceberg表数据时,首先获取最新的metadata信息,这里先获取到“00000-ec504.metadata.json”元数据信息,解析当前元数据文件可以拿到当前表的快照id:“949358624197301886”以及这张表的所有快照信息,也就是json信息中snapshots数组对应的值。根据当前表的快照id值可以获取对应的snapshot对应的avro文件信息:“snap--32800.avro”,我们可以找到当前快照对应的路径,看到其包含的Manifest 清单文件有5个:"32800-m0.avro"、"2abba-m0.avro"、"d33de-m0.avro"、"748bf-m0.avro"、"*b946e-m0.avro",读取该Iceberg格式表最新数据就是读取这几个文件中描述对应的parquet数据文件即可。
我们可以看到“snap-*-32800.avro”快照文件中不仅有包含的manifest路径信息,还有“added_data_files_count”、“existing_data_files_count”、“deleted_data_files_count”三个属性,Iceberg 根据 deleted_data_files_count 大于 0 来判断对应的manifest清单文件里面是不是被删除的数据,如果一个manifest清单文件该值大于0代表数据删除,读数据时就无需读这个manifest清单文件对应的数据文件。
根据Manifest list找到了各个对应的manifest 清单文件,每个文件中描述了对应parquet文件存储的位置信息,可以看到在对应的avro文件中有“status”属性,该属性为1代表对应的parquet文件为新增文件,需要读取,为2代表parquet文件被删除。
- 查询某个快照的数据
Apache Iceberg支持查询历史上任何时刻的快照,在查询时需要指定snapshot-id属性即可,这个只能通过Spark/Flink来查询实现,例如在Spark中查询某个快照数据如下:
spark.read.option("snapshot-id",6155408340798912701L).format("iceberg").load("path")查询某个快照数据的原理如下图所示(以查询快照id为“6155408340798912701”的数据为例):

通过上图可以看出,实际上读取历史快照数据和读取最新数据不同之处就是找到的snapshot-id不同而已,原理都是一样。
- 根据时间戳查看某个快照的数据
Apache iceberg还支持通过as-of-timestamp参数执行时间戳来读取某个快照的数据,同样也是通过Spark/Flink来读取,Spark读取代码如下:
spark.read.option("as-of-timestamp","时间戳").format("iceberg").load("path")实际上通过时间戳找到对应数据文件的原理与通过snapshot-id找到数据文件原理一样,在*.metadata.json文件中,除了有“current-snapshot-id”、“snapshots”属性外还有“snapshot-log”属性,该属性对应的值如下:

我们可以看到其中有个 timestamp-ms 属性和 snapshot-id 属性,并且是按照 timestamp-ms 升序的。在 Iceberg 内部实现中,它会将 as-of-timestamp 指定的时间和 snapshot-log 数组里面每个元素的 timestamp-ms 进行比较,找出最后一个满足 timestamp-ms <= as-of-timestamp 对应的 snapshot-id,原理同上,通过snapshot-id再找到要读取的数据文件。
1.7.4自己测试理解:
现在我们以插入最后一条数据为例
- 先将存储在hdfs上的test_iceberg_tb4文件全部拉下来(重点)
-
首先我们查看json格式的文件
====================================================第二次插入数据的json文件============================================================ { "format-version" : 1, "table-uuid" : "132d9e89-ba03-4bec-9b5b-146896a5b595", "location" : "hdfs://nameservice1/user/hive/warehouse/test_iceberg.db/test_iceberg_tb4", "last-updated-ms" : 1667958364508, "last-column-id" : 4, "schema" : { "type" : "struct", "schema-id" : 0, "fields" : [ { "id" : 1, "name" : "id", "required" : false, "type" : "int" }, { "id" : 2, "name" : "name", "required" : false, "type" : "string" }, { "id" : 3, "name" : "age", "required" : false, "type" : "int" }, { "id" : 4, "name" : "dt", "required" : false, "type" : "string" } ] }, "current-schema-id" : 0, "schemas" : [ { "type" : "struct", "schema-id" : 0, "fields" : [ { "id" : 1, "name" : "id", "required" : false, "type" : "int" }, { "id" : 2, "name" : "name", "required" : false, "type" : "string" }, { "id" : 3, "name" : "age", "required" : false, "type" : "int" }, { "id" : 4, "name" : "dt", "required" : false, "type" : "string" } ] } ], "partition-spec" : [ { "name" : "dt", "transform" : "identity", "source-id" : 4, "field-id" : 1000 } ], "default-spec-id" : 0, "partition-specs" : [ { "spec-id" : 0, "fields" : [ { "name" : "dt", "transform" : "identity", "source-id" : 4, "field-id" : 1000 } ] } ], "last-partition-id" : 1000, "default-sort-order-id" : 0, "sort-orders" : [ { "order-id" : 0, "fields" : [ ] } ], "properties" : { "engine.hive.enabled" : "true", "storage_handler" : "org.apache.iceberg.mr.hive.HiveIcebergStorageHandler" }, "current-snapshot-id" : 7496993227593362873, --通过current-snapshot-id找到第三次插入数据的快照 "snapshots" : [ { "snapshot-id" : 5474573454114086650, "timestamp-ms" : 1667958335813, "summary" : { "operation" : "append", "added-data-files" : "1", "added-records" : "1", "added-files-size" : "1164", "changed-partition-count" : "1", "total-records" : "1", "total-files-size" : "1164", "total-data-files" : "1", "total-delete-files" : "0", "total-position-deletes" : "0", "total-equality-deletes" : "0" }, "manifest-list" : "hdfs://nameservice1/user/hive/warehouse/test_iceberg.db/test_iceberg_tb4/metadata/snap-5474573454114086650-1-516f560d-baaf-4a86-b2b5-282abb5e2f22.avro", "schema-id" : 0 }, { "snapshot-id" : 7496993227593362873, "parent-snapshot-id" : 5474573454114086650, "timestamp-ms" : 1667958364508, "summary" : { "operation" : "append", "added-data-files" : "1", "added-records" : "1", "added-files-size" : "1163", "changed-partition-count" : "1", "total-records" : "2", "total-files-size" : "2327", "total-data-files" : "2", "total-delete-files" : "0", "total-position-deletes" : "0", "total-equality-deletes" : "0" }, "manifest-list" : "hdfs://nameservice1/user/hive/warehouse/test_iceberg.db/test_iceberg_tb4/metadata/snap-7496993227593362873-1-7bee7ff8-73cf-48ef-be4d-e6a912f5041b.avro", -- 当然这里也有第三次快照的坐标 "schema-id" : 0 } ], "snapshot-log" : [ { "timestamp-ms" : 1667958335813, "snapshot-id" : 5474573454114086650 }, { "timestamp-ms" : 1667958364508, "snapshot-id" : 7496993227593362873 } ], "metadata-log" : [ { -- 下面这两个是上两次插入数据时的json格式时间戳和json格式。 "timestamp-ms" : 1667958025965, "metadata-file" : "hdfs://nameservice1/user/hive/warehouse/test_iceberg.db/test_iceberg_tb4/metadata/00000-cd8309bc-1ff6-4668-940a-30d573ea1228.metadata.json" }, { "timestamp-ms" : 1667958335813, "metadata-file" : "hdfs://nameservice1/user/hive/warehouse/test_iceberg.db/test_iceberg_tb4/metadata/00001-50615358-d65e-4d86-a556-e99c20d6c216.metadata.json" } ] } -
通过上面的json格式的内容可以找到对应的.avro格式的快照,然后解析
{
    "manifest_path": "hdfs://nameservice1/user/hive/warehouse/test_iceberg.db/test_iceberg_tb4/metadata/516f560d-baaf-4a86-b2b5-282abb5e2f22-m0.avro",
    "manifest_length": 6174,
    "partition_spec_id": 0,
    "added_snapshot_id": {
        "long": 5474573454114086650
    },
    "added_data_files_count": {
        "int": 1
    },
    "existing_data_files_count": {
        "int": 0
    },
    "deleted_data_files_count": {
        "int": 0
    },
    "partitions": {
        "array": [
            {
                "contains_null": false,
                "contains_nan": {
                    "boolean": false
                },
                "lower_bound": {
                    "bytes": "20211212"
                },
                "upper_bound": {
                    "bytes": "20211212"
                }
            }
        ]
    },
    "added_rows_count": {
        "long": 1
    },
    "existing_rows_count": {
        "long": 0
    },
    "deleted_rows_count": {
        "long": 0
    }
}

{
    "manifest_path": "hdfs://nameservice1/user/hive/warehouse/test_iceberg.db/test_iceberg_tb4/metadata/7bee7ff8-73cf-48ef-be4d-e6a912f5041b-m0.avro",
    "manifest_length": 6171,
    "partition_spec_id": 0,
    "added_snapshot_id": {
        "long": 7496993227593362873
    },
    "added_data_files_count": {
        "int": 1
    },
    "existing_data_files_count": {
        "int": 0
    },
    "deleted_data_files_count": {
        "int": 0
    },
    "partitions": {
        "array": [
            {
                "contains_null": false,
                "contains_nan": {
                    "boolean": false
                },
                "lower_bound": {
                    "bytes": "20211212"
                },
                "upper_bound": {
                    "bytes": "20211212"
                }
            }
        ]
    },
    "added_rows_count": {
        "long": 1
    },
    "existing_rows_count": {
        "long": 0
    },
    "deleted_rows_count": {
        "long": 0
    }
}